These are tutorials for the Document Library in an Alfresco Share site.
Adding new actions
Extension Point: Document Library
Description:
In many extension projects you want to customize the Document Library in Alfresco Share. And quite often this involves adding new actions that can be applied to the content in the library. These actions are referred to as “DocLib” actions, and unlike a lot of other functionality in Content Services, they do not use web scripts to implement their business logic, at least not directly, instead they hook into custom, or out-of-the-box, client-side JavaScript code.
Each action has a 16x16 icon, one or more text labels, and configuration to hook them into the Share application. Most actions by their nature do something, and it’s likely that they will make a call back to the repository to perform their work, which may require a custom repository Action or a custom repository web script.
This tutorial will demonstrate how to add a DocLib action that can be used to send documents as attachments in an email. The “Send-as-Email” action will be available for documents in Browse view and Details view. The implementation of this action will make use of a form to collect the email data, such as where to send the email, subject, etc. The email will be sent by a custom repository Action that is invoked by an out-of-the-box JavaScript function.
The tutorial will also show how a web script can be called from a DocLib action in a an easy way. And finally we will look at how to create an action that displays an external Web page.
Implementation Steps:
Adding a new DocLib action to the Document Library involves the following steps:
- Configure the action so it is known to Share (typically in a Surf Extension Module)
- Configure where the action should be visible (typically in a Surf Extension Module)
- (Optionally) Configure a form for the action if it requires input from the end-user, such as asking for email address, email subject, etc (typically in a Surf Extension Module)
- Add a custom icon
- (Optionally) Add an evaluator if the action should be visible based on a condition, such as previously executed or not
- (Optionally) Add a status indicator, can for example be used to show if an action has been applied to a content item
- Implement custom client side JavaScript code that should be called when action is invoked, or use one of the out-of-the-box JavaScript functions (e.g.
onActionFormDialog- displays a form and then calls a Repo Action,onActionSimpleRepoAction- calls a Repo Action) - (Optionally) Implement any repository Action or repository web script that should be invoked by the action
As we can see, implementing a DocLib action can involve quite a few steps and take some time. However, it can also be very simple as we will see with our DocLib action example that navigates to the Google search home page.
Related Information:
This tutorial assumes that you are familiar with the Document Library in Share. If you are new to it read up on it here before starting this tutorial. Also, familiar yourself with how Surf Extension Modules work as we will be creating one of those.
Source Code: Go to code
This tutorial assumes you have created a new SDK All-In-One project. To try out the Send-As-Email DocLib action in this tutorial you will need to install a local SMTP server such as Fake SMTP.
This tutorial will demonstrate the following:
- How to create a DocLib action that uses the out-of-the-box
onActionFormDialogJavaScript function to collect data from the user via a form and then call a repository action with this data (Send-As-Email). - How to create a DocLib action that invokes a custom JavaScript function and displays a message (Show-Custom-Message)
- How to create a DocLib action that invokes a custom repository web script (Call-Web-Script)
- How to create a DocLib action that navigates to an external web page (Go-To-Google)
Tutorial implementation steps:
Preparations for the Send-As-Email DocLib action
-
Add a project with a repository Action that can send emails with attachments.
This tutorial assumes that we have a repository Action available that can send emails with attachments. Currently the out-the-box
mailrepository action cannot send emails with attachments. So we need to include another custom Repo action that can do this. The SDK sample code has a repository JAR project with such an action that we can use. See sample action.Copy the whole
add-action-repoJAR project into your All-In-One project. Then include it in the repository WAR project by updating theaio/pom.xmlfile as follows:<plugin> <groupId>org.alfresco.maven.plugin</groupId> <artifactId>alfresco-maven-plugin</artifactId> <version>${alfresco.sdk.version}</version> ... <platformModules> <!-- Share Services will be ignored if you are on Platform earlier than 5.1 --> <moduleDependency> <groupId>${alfresco.groupId}</groupId> <artifactId>alfresco-share-services</artifactId> <version>${alfresco.share.version}</version> <type>amp</type> </moduleDependency> <!-- Bring in custom Modules --> <moduleDependency> <groupId>${project.groupId}</groupId> <artifactId>aio-platform-jar</artifactId> <version>${project.version}</version> </moduleDependency> <moduleDependency> <groupId>${project.groupId}</groupId> <artifactId>add-action-repo</artifactId> <version>${project.version}</version> </moduleDependency> <!-- Bring in the integration tests --> <moduleDependency> <groupId>${project.groupId}</groupId> <artifactId>integration-tests</artifactId> <version>${project.version}</version> <classifier>tests</classifier> </moduleDependency> </platformModules>A repository action with the
send-as-emailID is now available and we can call it from a DocLib action. It takes three parameters as can be seen in the implementation:public class SendAsEmailActionExecuter extends ActionExecuterAbstractBase { private static Log logger = LogFactory.getLog(SendAsEmailActionExecuter.class); public static final String PARAM_EMAIL_TO_NAME = "to"; public static final String PARAM_EMAIL_SUBJECT_NAME = "subject"; public static final String PARAM_EMAIL_BODY_NAME = "body_text"; ... @Override protected void addParameterDefinitions(List<ParameterDefinition> paramList) { for (String s : new String[]{PARAM_EMAIL_TO_NAME, PARAM_EMAIL_SUBJECT_NAME, PARAM_EMAIL_BODY_NAME}) { paramList.add(new ParameterDefinitionImpl(s, DataTypeDefinition.TEXT, true, getParamDisplayLabel(s))); } }Our Send-As-Email DocLib action will collect the values for these three parameters via a form.
-
Start up the SMTP Server
After downloading the FakeSMTP server, see link in the beginning of this tutorial, unpack and then start it with the following command:
martin@gravitonian:~/apps/fakeSMTP$ java -jar fakeSMTP-1.13.jar -s -p 2525It should start up immediately and listen on port 2525, you should see a UI that will display any incoming emails.
Implementing the Send-As-Email DocLIb Action
-
Add a new Surf Extension Module file and define the Send-As-Email action
Call the file
add-doclib-actions-extension-modules.xmland save it in theaio/aio-share-jar/src/main/resources/alfresco/web-extension/site-data/extensionsdirectory (note. it is important to give this file a unique name when several Share JARs are installed, otherwise the last one wins).Then define the Send-As-Email DocLib action as follows:
<extension> <modules> <module> <id>Add Document Library Actions (Send-as-Email, Call WS, Show Msg, Go to Google)</id> <version>1.0</version> <auto-deploy>true</auto-deploy> <configurations> <config evaluator="string-compare" condition="DocLibActions"> <actions> <action id="alfresco.tutorials.doclib.action.sendAsEmail" icon="email" type="javascript" label="alfresco.tutorials.doclib.action.sendAsEmail.label"> <param name="function">onActionFormDialog</param> <param name="itemKind">action</param> <param name="itemId">send-as-email</param> <!-- Repository action id = Spring Bean id --> <param name="mode">create</param> <param name="destination">{node.nodeRef}</param> <param name="successMessage">alfresco.tutorials.doclib.action.sendAsEmail.msg.success</param> <param name="failureMessage">alfresco.tutorials.doclib.action.sendAsEmail.msg.failure</param> <evaluator negate="true">alfresco.tutorials.evaluator.isEmailed</evaluator> </action> </actions> </config> </configurations> </module> </modules> </extension>The different attributes and sub-elements for the
actionelement have the following meaning:Name Description idThe global identifier for this action. It’s used when you refer to this action in other parts of the configuration, such as when defining where it should be visible. iconShare looks for an icon that starts with this name and ends with -16.png. So it will look foremail-16.pngin our case. Content Services expects the image file to be located in the/components/documentlibrary/actionsdirectory. If not set, theidis used.typeSets the type of action; this can be either javascript(as in our example) if you want the action to execute some Java Script code,linkif you want to invoke some external URL, orpagelinkif you want to invoke a URL within the Share web application. More details around the different types:link- accepts ahrefparameter that will be passed anodeReftoken for substitution, used for external links.pagelink- accepts apageparameter that will be passed anodeReftoken for substitution, used for Share links.javascript- accepts afunctionparameter with a JavaScript function that will get the current folder item as first argument.labelPoints to a property name in a resource file. The value of this property will be displayed in the UI as the action’s label. In our case the resource file is aio/aio-share-jar/src/main/resources/alfresco/web-extension/messages/aio-share-jar.propertiesparamThere can be one or more parameters set for an action. In case of a javascriptaction they will be passed into the Java Script code, there is one special parameter with the namefunctionthat sets the Java Script function that should be called when the action is executed. In case of alinkaction the parameters would typically be used to specifyhrefandtarget. In case of apagelinkaction apageparameter is used to specify a relative URL within the Share web application.evaluatorSpring Bean id for an evaluator that is called by the system to find out if the action should be visible or not in the UI. An evaluator extends the org.alfresco.web.evaluator.BaseEvaluatorclass. You can negate the result of calling the evaluator by setting thenegateattribute totrue. In our case we do not want to show the Send-As-Email action if it has already been invoked on a content file.When the Send-As-Email action is invoked we want it to do the following:
- Display a form where the end-user can type in the values for the email address, email subject, and email body text.
- When the form is submitted it should automatically call a custom repository action with the information collected via the form.
We achieve this by using the out-of-the-box JavaScript function called
onActionFormDialog. The following table explains the parameters used with this function:Name Description itemKindThe “kind” of item that the form is for, and that should be invoked when the form is submitted. For example, node,task,type,action(that is, repository action),mbean. In our case we are going to show a form that collects values for parameters used when invoking a repository action, so we specifyitemKindasaction.
If you need multiple forms for the sameitemKindanditemIdthen you can also add an extra parameter calledformId. It is the form configuration to lookup, refers to theidattribute of theformelement. If omitted thedefaultform is used, that is, the form element without anidattribute.itemIdThe identifier for the item the form is for, this will be different for each “kind” of item, for an actionit would be the Spring bean ID for the repository action definition, for anodeit would be a NodeRef etc. In our case it is set tosend-as-email, which matches a Spring Bean ID in theaio/aio-platform-jar/src/main/resources/alfresco/module/aio-platform-jar/context/service-context.xmlcontext file.modeMode the current form is in, can be view,editorcreate, defaults toedit. In our case we are using thecreatemode as we want the form to be empty so we can collect new email information.destinationProvides a destination for any new items created by the form. When present a hidden field is generated with a name of alf_destination. Note. This parameter is necessary even if the action is not creating any new items/nodes.successMessageA message to display when the DocLib action is executed successfully. It actually points to a property name in a resource file. In our case the resource file is aio/aio-share-jar/src/main/resources/alfresco/web-extension/messages/aio-share-jar.propertiesfailureMessageA message to display when the DocLib action execution failed. It actually points to a property name in a resource file. In our case the resource file is aio/aio-share-jar/src/main/resources/alfresco/web-extension/messages/aio-share-jar.properties -
Add an i18n resource file that will contain all the labels and messages for the Send-As-Email action.
We can use the existing
aio/aio-share-jar/src/main/resources/alfresco/web-extension/messages/aio-share-jar.propertiesfile for this. Add the following properties to it:alfresco.tutorials.doclib.action.sendAsEmail.label=Send as Email alfresco.tutorials.doclib.action.sendAsEmail.msg.success='{0}' successfully sent in email to {1}. alfresco.tutorials.doclib.action.sendAsEmail.msg.failure=Couldn't send '{0}' in email to {1}. -
Define where in the user interface the Send-As-Email action should be displayed.
This is also done in the
add-doclib-actions-extension-modules.xmlfile in a new section calledactionGroups::<extension> <modules> <module> <id>Add Document Library Actions (Send-as-Email, Call WS, Show Msg, Go to Google)</id> <version>1.0</version> <auto-deploy>true</auto-deploy> <configurations> <config evaluator="string-compare" condition="DocLibActions"> <actions> ... </actions> <actionGroups> <actionGroup id="document-browse"> <action index="400" id="alfresco.tutorials.doclib.action.sendAsEmail" /> </actionGroup> <actionGroup id="document-details"> <action index="400" id="alfresco.tutorials.doclib.action.sendAsEmail" /> </actionGroup> </actionGroups> </config> </configurations> </module> </modules> </extension>In this sub-section we configure in what document library views the action should be visible and where in the list of actions it should be displayed (ordering). To refer to the action we use the
idthat was specified when theactionwas defined. The following table shows availableactionGroups:Action Group Id Default usage document-browseAction is visible for documents on the Browse page document-detailsAction is visible for document on the Document Details page folder-browseAction is visible for folders on the Browse page folder-detailsAction is visible for folder on the Folder Details page document-link-browseAction is visible for links to documents on the Browse page document-link-detailsAction is visible for link to document on the Document Details page folder-link-browseAction is visible for links to folders on the Browse page folder-link-detailsAction is visible for link to folder on the Folder Details page The
indexargument is specifying the order of this action in the list of actions. The higher the number the lower it will be displayed in the action list. By having a look in theshare-documentlibrary-config.xmlconfiguration file located in thealfresco/tomcat/webapps/share/WEB-INF/classes/alfrescodirectory of your Content Services 6.0.1 installation, you can find out that the highest index fordocument-browseactions is 360 and fordocument-detailsactions 390. So if we set ourindexfor the Send-As-Email action to 400 it should end up last in both of these action lists.If you want more examples of how Document Library actions can be defined and configured, have a look in the
share-documentlibrary-config.xmlfile and theDocLibActionssection. -
Add a custom icon for the Send-As-Email action.
The icons for all the Document Library actions are stored in the
tomcat/webapps/share/components/documentlibrary/actionsdirectory in your Content Services installation. The system will try and load any custom Document Library action icons from this directory. Icons are loaded via the resource Servlet and action icons related to the Document Library are loaded with thehttp://localhost:8080/share/res/components/documentlibrary/actions/<icon>-16-pngURL. This article is not about how to create a 16x16 icon in PNG format so copy one from the SDK sample source. In fact, copy all the icons that we need for all actions in this tutorial from this folder and put them in theaio/aio-share-jar/src/main/resources/META-INF/resources/aio-share-jar/components/documentlibrary/actionsdirectory of your project (you might have to create this directory path). -
Add an Evaluator for the Send-As-Email action.
For demonstration purpose the
send-as-emailrepository action is implemented so it sets thecm:emailedaspect on the document after it has been sent in an email. This will then be checked by this evaluator, which will disable the Send-As-Email DocLib action if the document has thecm:emailedaspect already applied.There are three parts to setting up an evaluator for a Document Library action:
- Configure it with the
element in the action configuration (We have already done this) - Create a Java class that extends the
org.alfresco.web.evaluator.BaseEvaluatorclass - Define a spring bean with an id matching the
configuration element’s value and then set the class for the Spring bean to the one implemented in step 2
Create a new Java class called
CheckIfDocIsEmailedEvaluatorin theaio/aio-share-jar/src/main/java/org/alfresco/tutorial/doclibaction/evaluatorpackage (you will have to create the package path). Then implement the Java class like this:package org.alfresco.tutorial.doclibaction.evaluator; import org.alfresco.web.evaluator.BaseEvaluator; import org.json.simple.JSONArray; import org.json.simple.JSONObject; public class CheckIfDocIsEmailedEvaluator extends BaseEvaluator { private static final String ASPECT_EMAILED = "cm:emailed"; @Override public boolean evaluate(JSONObject jsonObject) { try { JSONArray nodeAspects = getNodeAspects(jsonObject); if (nodeAspects == null) { return false; } else { if (nodeAspects.contains(ASPECT_EMAILED)) { return true; } else { return false; } } } catch (Exception err) { throw new RuntimeException("JSONException whilst running action evaluator: " + err.getMessage()); } } }The
evaluatemethod gets a JSON object passed in from which you can get all the information you need about the node that the action is being applied to. Here we use thegetNodeAspectsmethod to get all the aspects that have been applied to the node (for more methods look in theBaseEvaluatorclass). Then we just check if thecm:emailedaspect has been applied to the node (that is, file).Next thing we need to do is define a Spring Bean for this evaluator, this is done in the
aio-share-jar-slingshot-application-context.xmlfile located in theaio/aio-share-jar/src/main/resources/alfresco/web-extension. directory. Define the bean as follows:<bean id="alfresco.tutorials.evaluator.isEmailed" class="org.alfresco.tutorial.doclibaction.evaluator.CheckIfDocIsEmailedEvaluator" />Note here that the
idhas to match what was specified for the<evaluator>element in theactiondefinition.It is not always necessary to create evaluators from scratch. There are a number of predefined evaluators (that is, out of the box evaluators ready to use):
- Has aspect
- Is mimetype
- Property not Null
- Site preset
- Site / No Site
- Container Type
- Node Type
- Always false
- Value-based
- Metadata value
- Is Browser (type)
- Is Portlet mode
See the
slingshot-documentlibrary-context.xmlfile located in thealfresco/tomcat/webapps/share/WEB-INF/classes/alfrescodirectory of your Content Services 6.0.1 installation for more information about out-of-the-box evaluators. - Configure it with the
-
Add a Status Indicator for the Send-As-Email action.
Sometimes you might want to know if a document has been emailed without going in and checking if the
cm:emailedaspects has been applied. This can be achieved by adding a so called status indicator. An indicator is displayed in the Document Library browse view and builds on the work we have already done with the evaluator.There are four parts to setting up an indicator for a Document Library action:
- Make sure you got an
<evaluator>element in theactionconfiguration (We have already done this) and that this evaluator has been implemented (We have already done this) - Add an
indicatorconfiguration to theDocumentLibrarysection configuration - Add i18n label to the resource property file
- Add an image to be used as indicator to the
components/documentlibrary/indicatorsdirectory
The
indicatorconfiguration is also done in theadd-doclib-actions-extension-modules.xmlfile and points to the evaluator previously implemented. It looks like this in the newDocumentLibrarysection:<extension> <modules> <module> <id>Add Document Library Actions (Send-as-Email, Call WS, Show Msg, Go to Google)</id> <version>1.0</version> <auto-deploy>true</auto-deploy> <configurations> <config evaluator="string-compare" condition="DocumentLibrary"> <indicators> <indicator id="alfresco.tutorials.indicator.isEmailed" icon="email-16.png" index="100" label="alfresco.tutorials.indicator.isEmailed.label"> <evaluator>alfresco.tutorials.evaluator.isEmailed</evaluator> </indicator> </indicators> </config> <config evaluator="string-compare" condition="DocLibActions"> ... </config> </configurations> </module> </modules> </extension>The different attributes and sub-elements for the
indicatorelement have the following meaning:Name Description idThe global identifier for this indicator. iconThe name of the icon to display as the status indicator. Content Services expects the image file to be located in the /components/documentlibrary/indicatorsdirectory. If not specified, “id” is used. Note. In this case Content Services does not assume*-16.pngformat but you have to specify the complete file name.indexIs used to order the indicator in the UI when there are several indicators displayed for a document. If we look in the share-documentlibrary-config.xml(in thetomcat/webapps/share/WEB-INF/classes/alfrescodirectory) configuration file we can see that the largest index for out-of-the-box indicators is 90, so by using 100 the emailed indicator will always be displayed last in the list.labelPoints to a property name in a resource file. The value of this property will be displayed in the UI as the indicators tool-tip. In our case the resource file is aio/aio-share-jar/src/main/resources/alfresco/web-extension/messages/aio-share-jar.propertiesevaluatorSpring Bean id for an evaluator that is called by the system to find out if the indicator should be visible or not in the UI. An evaluator extends the org.alfresco.web.evaluator.BaseEvaluatorclass. You can negate the result of calling the evaluator by setting thenegateattribute totrue. In our case we do want to show the indicator if the Send-As-Email action has been invoked on a content file, so we don’t negate.Now update the resource properties file with the value for the label, open the
aio-share-jar.propertiesfile and add the following property to it:alfresco.tutorials.indicator.isEmailed.label=This document has been emailedAs an indicator image we will use the same one as is used for the action. Copy the
email-16.pngicon from theaio/aio-share-jar/src/main/resources/META-INF/resources/aio-share-jar/components/documentlibrary/actionsdirectory to theaio/aio-share-jar/src/main/resources/META-INF/resources/aio-share-jar/components/documentlibrary/indicatorsdirectory (you might have to create the indicators directory). - Make sure you got an
-
Add the form for the Send-As-Email action.
The Send-As-Email action invokes the out-of-the-box
onActionFormDialogJavaScript function, which expects there to be a form registered for the repository action that is invoked.The repository action that sends emails with attachments is registered with the id
send-as-email(seeaio/add-action-repo/src/main/resources/alfresco/module/add-action-repo/context/service-context.xml). We define a form for it as follows in theadd-doclib-actions-extension-modules.xmlfile:<extension> <modules> <module> <id>Add Document Library Actions (Send-as-Email, Call WS, Show Msg, Go to Google)</id> <version>1.0</version> <auto-deploy>true</auto-deploy> <configurations> <config evaluator="string-compare" condition="DocumentLibrary"> ... </config> <config evaluator="string-compare" condition="DocLibActions"> ... </config> <config evaluator="string-compare" condition="send-as-email"> <!-- ID for the Repository Action that this form is associated with --> <forms> <form> <field-visibility> <show id="to"/> <show id="subject"/> <show id="body_text"/> </field-visibility> <appearance> <field id="to" label-id="alfresco.tutorials.doclib.action.sendAsEmail.form.field.to"/> <field id="subject" label-id="alfresco.tutorials.doclib.action.sendAsEmail.form.field.subject"/> <field id="body_text" label-id="alfresco.tutorials.doclib.action.sendAsEmail.form.field.body_text"> <control template="/org/alfresco/components/form/controls/textarea.ftl" /> </field> </appearance> </form> </forms> </config> </configurations> </module> </modules> </extension>Note here that the field identifiers (that is, the
idattribute) need to match the parameters sent into the send-as-email repository action. Seeaio/aio-platform-jar/src/main/java/org/alfresco/tutorial/repoaction/SendAsEmailActionExecuter.java.Update the resource properties file with the field labels as follows, the property names must match what we defined in the form definition above (that is, the
label-idvalues). In theaio-share-jar.propertiesfile add the following properties:alfresco.tutorials.doclib.action.sendAsEmail.form.field.to=To alfresco.tutorials.doclib.action.sendAsEmail.form.field.subject=Subject alfresco.tutorials.doclib.action.sendAsEmail.form.field.body_text=Body Text -
Build and start the application server as follows:
/all-in-one$ ./run.sh build_start -
Now, log in to Share (
http://localhost:8080/share) and upload a document to some folder. You will see the new Send-As-Email action in the Browse view when hovering over the document and clicking More… in the pop-up menu:
Clicking on the file name displays the Document Details view, where the Send-As-Email action should also be visible:

Clicking on the Send-As-Email action will display the form for collecting email information:
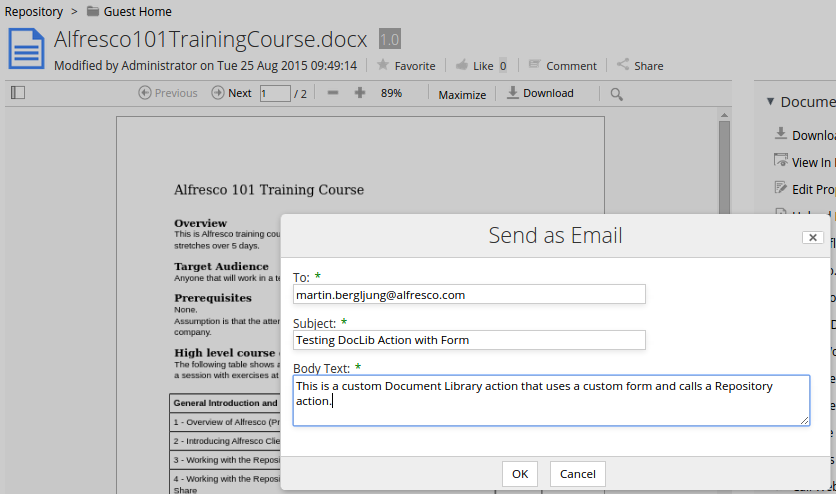
Filling in the form and clicking OK will call the
send-as-emailrepository action, which will send the email with the file as attachment. The Repo action will also apply thecm:emailedaspect to the document. So we should be able to see the indicator on the file telling us the Send-As-Email action has been applied to it: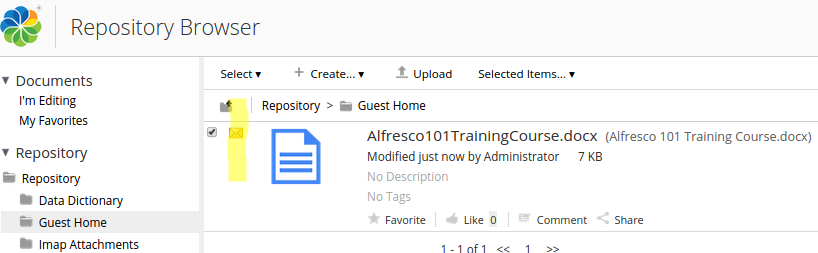
If the FakeSMTP server is running we should see a new email picked up:

Implementing the Call-Web-Script DocLib Action
-
Define and configure the Call-Web-Script action
Open the
add-doclib-actions-extension-modules.xmlSurf Extension module file that we have used so far in the tutorial, it is located in theaio/aio-share-jar/src/main/resources/alfresco/web-extension/site-data/extensionsdirectory.Then define the Call-Web-Script DocLib action as follows:
<extension> <modules> <module> <id>Add Document Library Actions (Send-as-Email, Call WS, Show Msg, Go to Google)</id> <version>1.0</version> <auto-deploy>true</auto-deploy> <configurations> <config evaluator="string-compare" condition="DocLibActions"> <actions> ... <action id="alfresco.tutorials.doclib.action.callWebScript" icon="callws" type="javascript" label="alfresco.tutorials.doclib.action.callWebScript.label"> <param name="function">onActionCallWebScript</param> <param name="successMessage">alfresco.tutorials.doclib.action.callWebScript.msg.success</param> <param name="failureMessage">alfresco.tutorials.doclib.action.callWebScript.msg.failure</param> </action> </actions> </config> </configurations> </module> </modules> </extension>This action is also of type
javascriptin the same way the Send-As-Email action was. However, this action will call a custom JavaScript function calledonActionCallWebScript. Thecallws-16.pngicon for this action should already be available if you implemented the Send-As-Email action above. -
Add labels and messages for the Call-Web-Script to the i18n resource file .
Open up the
aio-share-jar.propertiesfile locate din theaio/aio-share-jar/src/main/resources/alfresco/web-extension/messagesdirectory. Then add the following properties to it:alfresco.tutorials.doclib.action.callWebScript.label=Call Web Script alfresco.tutorials.doclib.action.callWebScript.msg.success=Successfully called Web Script alfresco.tutorials.doclib.action.callWebScript.msg.failure=Failed to invoke Web Script -
Define where in the user interface the Call-Web-Script action should be displayed.
This is done in the
add-doclib-actions-extension-modules.xmlfile in the section calledactionGroups::<extension> <modules> <module> <id>Add Document Library Actions (Send-as-Email, Call WS, Show Msg, Go to Google)</id> <version>1.0</version> <auto-deploy>true</auto-deploy> <configurations> <config evaluator="string-compare" condition="DocLibActions"> <actions> ... </actions> <actionGroups> <actionGroup id="document-browse"> ... <action index="401" id="alfresco.tutorials.doclib.action.callWebScript" /> </actionGroup> <actionGroup id="document-details"> ... <action index="401" id="alfresco.tutorials.doclib.action.callWebScript" /> </actionGroup> </actionGroups> </config> </configurations> </module> </modules> </extension>The Call-Web-Script action will be displayed in the same views as the Send-As-Email action. We give it an
indexof401so it is displayed just after the Send-As-Email action. -
Implement the custom JavaScript function that is invoked by the Call-Web-Script action.
This is the first custom JavaScript function that we implement so we need a new file for it, call it
custom-doclib-actions.jsand put it in theaio/aio-share-jar/src/main/resources/META-INF/resources/aio-share-jar/components/documentlibrarydirectory.The implementation of the
onActionCallWebScriptfunction looks like this:(function () { YAHOO.Bubbling.fire("registerAction", { actionName: "onActionCallWebScript", fn: function org_alfresco_training_onActionCallWebScript(file) { this.modules.actions.genericAction( { success: { callback: { fn: function org_alfresco_training_onActionCallWebScriptSuccess(response) { Alfresco.util.PopupManager.displayPrompt( { title: this.msg("alfresco.tutorials.doclib.action.callWebScript.msg.success"), text: JSON.stringify(response.json), buttons: [ { text: this.msg("button.ok"), handler: function org_alfresco_training_onActionCallWebScriptSuccess_success_ok() { this.destroy(); }, isDefault: true }, { text: this.msg("button.cancel"), handler: function org_alfresco_training_onActionCallWebScriptSuccess_cancel() { this.destroy(); } }] }); }, scope: this } }, failure: { message: this.msg("alfresco.tutorials.doclib.action.callWebScript.msg.failure", file.displayName, Alfresco.constants.USERNAME) }, webscript: { name: "sample/fileinfo?nodeRef={nodeRef}", stem: Alfresco.constants.PROXY_URI, method: Alfresco.util.Ajax.GET, params: { nodeRef: file.nodeRef } }, config: {} }); } }); })();The way we plug-in custom JavaScript action handlers is to call the
YAHOO.Bubbling.fire(“registerAction”…)method. This will tell the system about the new action JavaScript code, and it will be plugged in after the out- of-the-box code to allow for customization and extensions.In the
org_alfresco_training_onActionCallWebScriptfunction we use thethis.modules.actions.genericActionfunction to call a specific custom web script (or an out-of-the-box web script if we wanted to). ThegenericActionfunction is defined in thedoclib-actions.jsfile located in thealfresco/tomcat/webapps/share/modules/documentlibrarydirectory of an Content Services installation. This function sets up the web script call based on the passed in parameters (that is,success.callback.fn,failure.message,webscript.name, and so on). There are a lot more parameters that we can use if we wanted to more stuff when calling the web script, such as firing an event after successful invocation.Here is a list from the documentation:
/** * ACTION: Generic action. * Generic DocLib action based on passed-in parameters * * @method genericAction * @param action.success.event.name {string} Bubbling event to fire on success * @param action.success.event.obj {object} Bubbling event success parameter object * @param action.success.message {string} Timed message to display on success * @param action.success.callback.fn {object} Callback function to call on success. * <pre>function(data, obj) where data is an object literal containing config, json, serverResponse</pre> * @param action.success.callback.scope {object} Success callback function scope * @param action.success.callback.obj {object} Success callback function object passed to callback * @param action.success.activity.siteId {string} Site associated with activity * @param action.success.activity.activityType {string} Activity type to post * @param action.success.activity.page {string} Page to generate activity link to * @param action.success.activity.activityData {object} Metadata for activity type * @param action.failure.event.name {string} Bubbling event to fire on failure * @param action.failure.event.obj {object} Bubbling event failure parameter object * @param action.failure.message {string} Timed message to display on failure * @param action.failure.callback.fn {object} Callback function to call on failure. * <pre>function(data, obj) where data is an object literal containing config, json, serverResponse</pre> * @param action.failure.callback.scope {object} Failure callback function scope * @param action.failure.callback.obj {object} Failure callback function object passed to callback * @param action.webscript.stem {string} optional webscript URL stem * <pre>default: Alfresco.constants.PROXY_URI + "slingshot/doclib/action/"</pre> * @param action.webscript.name {string} data webscript URL name * @param action.webscript.method {string} HTTP method to call the data webscript on * @param action.webscript.queryString {string} Optional queryString to append to the webscript URL * @param action.webscript.params.siteId {string} current site * @param action.webscript.params.containerId {string} component container * @param action.webscript.params.path {string} path where file is located * @param action.webscript.params.file {string} file to be deleted * @param action.webscript.params.nodeRef {string} noderef instead of site, container, path, file * @param action.wait.message {string} if set, show a Please wait-style message during the operation * @param action.config {object} optional additional request configuration overrides * @return {boolean} false: module not ready */The web script we are going to call is registered on the
sample/fileinfo?nodeRef={nodeRef}URL. This is a new custom web script that just takes a node reference as a parameter and then fetches some properties for this node in the controller. The web script template will send back a JSON response with the data for these properties. We will implement it in the next step. The full web script URL that is invoked when the action is executed looks something like this:http://localhost:8080/share/proxy/alfresco/sample/fileinfo?nodeRef=workspace://SpacesStore/cbb63e68-9884-4d24-abb3-28aaf8677169The call to the repository web script is proxied via Share so authentication credentials etc are managed automatically for us. There will be no Login dialog popping up.
If the web script is invoked successfully we call the
Alfresco.util.PopupManager.displayPrompt(function from the success callback to display the response from the web script. The success callback is implemented with theorg_alfresco_training_onActionCallWebScriptSuccessfunction. -
Implement the File Info web script that is indirectly invoked by the Call-Web-Script action.
We will add this web script to the repository JAR project that comes with the All-In-One project when it is generated.
Add a web script descriptor file called
file-info.get.desc.xmlto theaio/aio-platform-jar/src/main/resources/alfresco/extension/templates/webscriptsdirectory. Define it as follows:<webscript> <shortname>Sample Webscript that returns Audit data</shortname> <description>Returns the audit data for file with passed in node reference</description> <url>/sample/fileinfo?nodeRef={nodeRef}</url> <authentication>user</authentication> <format default="json"></format> </webscript>Then add the controller file called
file-info.get.js:var nodeRef = args["nodeRef"]; var fileNode = search.findNode(nodeRef); model["name"] = fileNode.name; model["creator"] = fileNode.properties.creator; model["createdDate"] = fileNode.properties.created; model["modifier"] = fileNode.properties.modifier; model["modifiedDate"] = fileNode.properties.modified;Finally add the template file called
file-info.get.json.ftl:<#assign datetimeformat="EEE, dd MMM yyyy HH:mm:ss zzz"> { "name" : "${name}", "creator" : "${creator}", "createdDate" : "${createdDate?string(datetimeformat)}", "modifier" : "${modifier}", "modifiedDate" : "${modifiedDate?string(datetimeformat)}" } -
The implementation of the Call-Web-Script DocLib action is now complete, build and start the application server as follows:
/all-in-one$ ./run.sh build_start -
Now, log in to Share (http://localhost:8080/share) and upload a file to some folder. You will see the new Call-Web-Script action in the Browse view when hovering over the file and clicking More… in the pop-up menu:

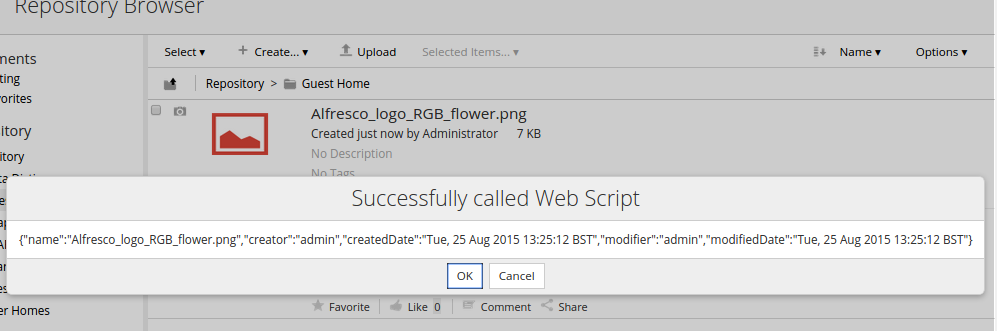
Note that the Send-As-Email action might not be displayed in the pop-up menu if it has already been invoked. Invoking the “Call Web Script” action will display the following dialog with the web script JSON response (if the invocation was successful):
Implementing the Show-Custom-Message DocLib Action
-
Define and configure the Show-Custom-Message action
This action is just executing some JavaScript code that shows a message, it will not call a repository action or a repository web script. It just demonstrates how to invoke some JavaScript code on the client side without involving the repository and the server side.
Open the
add-doclib-actions-extension-modules.xmlSurf Extension module file that we have used so far in this tutorial, it is located in theaio/aio-share-jar/src/main/resources/alfresco/web-extension/site-data/extensionsdirectory.Then define the Show-Custom-Message DocLib action as follows:
<extension> <modules> <module> <id>Add Document Library Actions (Send-as-Email, Call WS, Show Msg, Go to Google)</id> <version>1.0</version> <auto-deploy>true</auto-deploy> <configurations> <config evaluator="string-compare" condition="DocLibActions"> <actions> ... <action id="alfresco.tutorials.doclib.action.showCustomMessage" icon="showmsg" type="javascript" label="alfresco.tutorials.doclib.action.showCustomMessage.label"> <param name="function">onShowCustomMessage</param> </action> </actions> </config> </configurations> </module> </modules> </extension>This action is also of type
javascriptin the same way the previous actions have been.This action will call a custom JavaScript function calledonShowCustomMessage. Theshowmsg-16.pngicon for this action should already be available if you implemented the Send-As-Email action above. -
Add labels and messages for the Show-Custom-Message to the i18n resource file .
Open up the
aio-share-jar.propertiesfile locate din theaio/aio-share-jar/src/main/resources/alfresco/web-extension/messagesdirectory. Then add the following properties to it:alfresco.tutorials.doclib.action.showCustomMessage.text=Showing custom message for {0} and {1} alfresco.tutorials.doclib.action.showCustomMessage.label=Show Message -
Define where in the user interface the Show-Custom-Message action should be displayed.
This is done in the
add-doclib-actions-extension-modules.xmlfile in the section calledactionGroups::<extension> <modules> <module> <id>Add Document Library Actions (Send-as-Email, Call WS, Show Msg, Go to Google)</id> <version>1.0</version> <auto-deploy>true</auto-deploy> <configurations> <config evaluator="string-compare" condition="DocLibActions"> <actions> ... </actions> <actionGroups> <actionGroup id="document-browse"> ... <action index="402" id="alfresco.tutorials.doclib.action.showCustomMessage" /> </actionGroup> <actionGroup id="document-details"> ... <action index="402" id="alfresco.tutorials.doclib.action.showCustomMessage" /> </actionGroup> </actionGroups> </config> </configurations> </module> </modules> </extension>The Show-Custom-Message action will be displayed in the same views as the other actions that we have implemented. We give it an
indexof402so it is displayed just after the Call-Web-Script action. -
Implement the custom JavaScript function that is invoked by the Show-Custom-Message action.
This JavaScript function can go into the same file as the Call-Web-Script function, open the
custom-doclib-actions.jsfile located in theaio/aio-share-jar/src/main/resources/META-INF/resources/aio-share-jar/components/documentlibrarydirectory and add the code as follows:(function () { YAHOO.Bubbling.fire("registerAction", { actionName: "onShowCustomMessage", fn: function org_alfresco_training_onShowCustomMessage(file) { Alfresco.util.PopupManager.displayMessage( { text: this.msg("alfresco.tutorials.doclib.action.showCustomMessage.text", file.displayName, Alfresco.constants.USERNAME) }); } }); YAHOO.Bubbling.fire("registerAction", { actionName: "onActionCallWebScript", ... }); })();The only thing we do in this action code is to display a message with the help of the
Alfresco.util.PopupManager.displayMessagefunction. -
The implementation of the Show-Custom-Message DocLib action is now complete. This is probably the smallest DocLib action backed by JavaScript code that you might come across. To try it out build and start the application server as follows:
/all-in-one$ ./run.sh build_start -
Now, log in to Share (http://localhost:8080/share). You will see the new Show-Custom-Message action in the Browse view when hovering over a file and clicking More… in the pop-up menu:

Note that the Send-As-Email action is not displayed in the pop-up menu as it has already been invoked, see the indicator. Invoking the “Show Message” action will display the following message temporary:

Implementing the Go-to-Google DocLib Action
-
Define and configure the Go-to-Google action.
This action is different from all the others that we have implemented in that it is not backed by a specific JavaScript function. Instead it is of type
linkand just takes you to the Google search home page when clicked.Open the
add-doclib-actions-extension-modules.xmlSurf Extension module file that we have used so far in this tutorial, it is located in theaio/aio-share-jar/src/main/resources/alfresco/web-extension/site-data/extensionsdirectory.Then define the Go-to-Google DocLib action as follows:
<extension> <modules> <module> <id>Add Document Library Actions (Send-as-Email, Call WS, Show Msg, Go to Google)</id> <version>1.0</version> <auto-deploy>true</auto-deploy> <configurations> <config evaluator="string-compare" condition="DocLibActions"> <actions> ... <action id="alfresco.tutorials.doclib.action.goToGoogle" icon="google" type="link" label="alfresco.tutorials.doclib.action.goToGoogle.label"> <param name="href">http://www.google.com</param> <param name="target">_blank</param> </action> </actions> </config> </configurations> </module> </modules> </extension>The
google-16.pngicon for this action should already be available if you implemented the Send-As-Email action above. -
Add the label for the Go-to-Google action to the i18n resource file .
Open up the
aio-share-jar.propertiesfile locate din theaio/aio-share-jar/src/main/resources/alfresco/web-extension/messagesdirectory. Then add the following property to it:alfresco.tutorials.doclib.action.goToGoogle.label=Go to Google -
Define where in the user interface the Go-to-Google action should be displayed.
This is done in the
add-doclib-actions-extension-modules.xmlfile in the section calledactionGroups::<extension> <modules> <module> <id>Add Document Library Actions (Send-as-Email, Call WS, Show Msg, Go to Google)</id> <version>1.0</version> <auto-deploy>true</auto-deploy> <configurations> <config evaluator="string-compare" condition="DocLibActions"> <actions> ... </actions> <actionGroups> <actionGroup id="document-browse"> ... <action index="403" id="alfresco.tutorials.doclib.action.goToGoogle" /> </actionGroup> <actionGroup id="document-details"> ... <action index="403" id="alfresco.tutorials.doclib.action.goToGoogle" /> </actionGroup> <actionGroup id="folder-browse"> <action index="403" id="alfresco.tutorials.doclib.action.goToGoogle" /> </actionGroup> </actionGroups> </config> </configurations> </module> </modules> </extension>The Go-to-Google action will be displayed in the same views as the other actions that we have implemented, plus for folders when in Browse view. We give it an
indexof403so it is displayed after all the other custom DocLib actions that we have implemented. -
The implementation of the Go-to-Google DocLib action is now complete, not much to it really, it’s very easy to add a DocLib action for navigating to an external page. To try it out build and start the application server as follows:
/all-in-one$ ./run.sh build_start -
Now, log in to Share (
http://localhost:8080/share). You will see the new Go-to-Googleaction in the Browse view when hovering over for example a folder and clicking More… in the pop-up menu: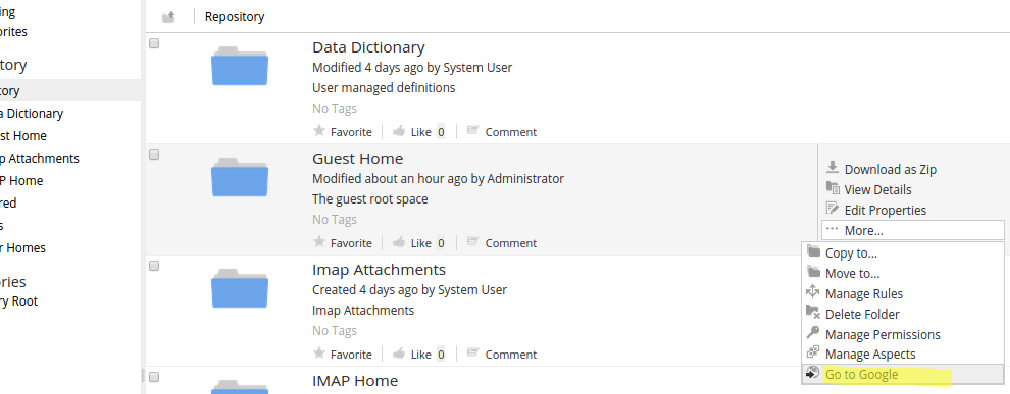
Note that the other DocLib actions are not visible when you look at the Folder actions. This is because they have not been configured to be visible for this view type. Invoking the “Go to Google” action will open up
www.google.comin a different tab in the Browser.
Adding new metadata templates
Extension Point: Document Library
Description:
When custom content models are deployed to the repository it is sometimes a requirement to display properties from these in the Document Library Browse view. This can be done with so called Metadata Templates, which are tied to an evaluator that decides if the template is applicable or not to the content item in question, such as a folder or a file.
If there is no specific Metadata Template defined for a content item type then it falls back on a default Metadata
template that looks like this (all out-of-the-box Metadata Templates can be found in
alfresco/tomcat/webapps/share/WEB-INF/classes/alfresco/share-documentlibrary-config.xml):
<template id="default">
<banner index="10" id="lockBanner" evaluator="evaluator.doclib.metadata.hasLockBanner">{lockBanner}</banner>
<banner index="20" id="syncTransientError" evaluator="evaluator.doclib.metadata.hasSyncTransientErrorBanner">{syncTransientError}</banner>
<banner index="30" id="syncFailed" evaluator="evaluator.doclib.metadata.hasSyncFailedBanner">{syncFailed}</banner>
<line index="10" id="date">{date}{size}</line>
<line index="20" id="description" view="detailed">{description}</line>
<line index="30" id="tags" view="detailed">{tags}</line>
<line index="40" id="categories" view="detailed" evaluator="evaluator.doclib.metadata.hasCategories">{categories}</line>
<line index="50" id="social" view="detailed">{social}</line>
</template>
This template gives you the basic information for the node, such is in the following example for a file:

This tutorial will demonstrate how to add a custom DocLib Metadata Template for a custom type from a content model that
comes with the SDK Samples. This content model has a type called acme:document that contains a property called
acme:documentId (for more info see aio/aio-platform-jar/src/main/resources/alfresco/module/aio-platform-jar/model/content-model.xml).
We will create a new template that displays this custom property. The template will be based on the default template
that you can see above and the property will use the default presentation rendering.
The tutorial will also show how you can render a property in a custom way in your Metadata template.
Implementation Steps:
Adding a new Metadata Template to the Document Library involves the following steps:
- Configure the template so it is known to Share (typically in a Surf Extension Module)
- Add an evaluator that controls for what content nodes (i.e. file, folder, etc.) the template is applicable
- Add property labels to the i18n resource file(s)
- (Optionally) Implement custom client side JavaScript code that renders the property in a custom way
Related Information:
This tutorial assumes that you are familiar with the Document Library in Share. If you are new to it read up on it here before starting this tutorial. Also, familiar yourself with how Surf Extension Modules work as we will be creating one of those.
Source Code: Go to code
This tutorial assumes you have created a new SDK All-In-One project.
This tutorial will demonstrate the following:
- How to create a custom DocLib Metadata Template for the
acme:documenttype, which is part of the SDK AIO project by default. The template will be based on thedefaultone but will also display theacme:documentIdproperty. - How to define an evaluator for a custom content type
- How to add another field to the custom template that displays the
acme:documentIdproperty in a custom way (i.e. custom rendering)
Tutorial implementation steps:
Implementing the custom Metadata Template for the acme:document type.
-
Add a new Surf Extension Module file and define the Metadata Template
Call the file
add-metadata-template-doclib-extension-modules.xmland save it in theaio/aio-share-jar/src/main/resources/alfresco/web-extension/site-data/extensionsdirectory (note. it is important to give this file a unique name when several Share JARs are installed, otherwise the last one wins).Then define the custom Metadata Template as follows:
<extension> <modules> <module> <id>Add Acme Document Metadata Template</id> <version>1.0</version> <auto-deploy>true</auto-deploy> <configurations> <config evaluator="string-compare" condition="DocumentLibrary"> <metadata-templates> <template id="acmeDocMetadataTemplate"> <evaluator>alfresco.tutorials.evaluator.isAcmeDocument</evaluator> <banner index="10" id="lockBanner" evaluator="evaluator.doclib.metadata.hasLockBanner">{lockBanner}</banner> <banner index="20" id="syncTransientError" evaluator="evaluator.doclib.metadata.hasSyncTransientErrorBanner">{syncTransientError}</banner> <banner index="30" id="syncFailed" evaluator="evaluator.doclib.metadata.hasSyncFailedBanner">{syncFailed}</banner> <line index="10" id="date">{date}{size}</line> <line index="20" id="description" view="detailed">{description}</line> <line index="30" id="tags" view="detailed">{tags}</line> <line index="40" id="categories" view="detailed" evaluator="evaluator.doclib.metadata.hasCategories">{categories}</line> <line index="50" id="acmeDocId" view="detailed">{acme_documentId org.alfresco.tutorial.label.acme_documentId}</line> <line index="60" id="social" view="detailed">{social}</line> </template> </metadata-templates> </config> </configurations> </module> </modules> </extension>What we have done here is basically copied the metadata template with the identifier
<template id="default">from the/alfresco/tomcat/webapps/share/WEB-INF/classes/alfresco/share-documentlibrary-config.xmlconfiguration file. Then added thelinewithid="acmeDocId"just before the social properties. We have also added a customevaluatorto the template that will only returntrueif the node in question has the typeacme:documentapplied.The different attributes and sub-elements for the
templateelement have the following meaning:Name Description template idThe global identifier for this template. Make sure to change it after copying from out-of-the-box templates, otherwise you will override those. So change it from defaulttoacmeDocMetadataTemplate.bannerMessage banner that will display above the node name. A common message that you might see is the one about a node being locked by another user for editing. banner idUnique identifier for this banneritem.lineOne line in the template displaying label and value for a property. The text content of the lineelement consist of the property value and optionally the label to use, such as{lockBanner}and{acme_documentId org.alfresco.tutorial.label.acme_documentId}. The Acme Doc Id line specifies the content model property we want to display (i.e.acme:documentId, note that we use underscore instead of colon when specifying the type in the template) and the label we want to use (i.e.org.alfresco.tutorial.label.acme_documentId).line idUnique identifier for this lineitem.indexFor banneritems: determines the order the banner messages are displayed in. The lower the index the higher up it is displayed.
Forlineitems: determines the order the properties are displayed in. The lower the index the higher up it is displayed.evaluatorDetermines the overall applicability of this template for a content node (e.g. file, folder etc.), if it evaluates to falsethen the template will not be used and it falls back on thedefaultone. Abannerorlineitem can also have a boolean evaluator associated with it that will determine if the item should be displayed or not.viewDetermines in what Browse view the lineitem should be displayed. Can besimpleordetailed. If not specified the property will be displayed in both views (e.g.datein above template). So ouracmeDocIdline item will only be displayed in thedetailedview. -
Add an i18n resource file that will contain the property labels and messages for the Metadata Template.
We can use the existing
aio/aio-share-jar/src/main/resources/alfresco/web-extension/messages/aio-share-jar.propertiesfile for this. Add the following property to it:org.alfresco.tutorial.label.acme_documentId=Acme Doc ID -
Define a custom evaluator for the custom Metadata Template.
This evaluator should return
trueif the node is of typeacme:document. This is done in theaio/aio-share-jar/src/main/resources/alfresco/web-extension/aio-share-jar-slingshot-application-context.xmlSpring context file:... <bean id="alfresco.tutorials.evaluator.isAcmeDocument" parent="evaluator.doclib.action.nodeType"> <property name="types"> <list> <value>acme:document</value> </list> </property> </bean> </beans>Here we are using a built in evaluator called
evaluator.doclib.action.nodeType. It can be used to evaluate if a node is of a specific type. We set the beanidso it matches what we specified above as<metadata-template><evaluator>. We add only the content type QName for the Acme Document type (i.e.acme:document) in the list.There are a number of predefined evaluators (i.e. out of the box evaluators ready to use):
- Has aspect
- Is mimetype
- Property not Null
- Site preset
- Site / No Site
- Container Type
- Node Type
- Always false
- Value-based
- Metadata value
- Is Browser (type)
- Is Portlet mode
See the
slingshot-documentlibrary-context.xmlfile located in thealfresco/tomcat/webapps/share/WEB-INF/classes/alfrescodirectory of your Content Services installation for more information about out-of-the-box evaluators. -
The implementation of the custom Metadata Template is now complete. However, before we start the server up we need to make sure we have the Share JAR installed that provides the Create Acme Document feature. This will make it easy to create a new text document with the specific
acme:documenttype so we can test our new Metadata Template. Download the source and include the JAR in your AIO project. -
Build and start the application server as follows:
/all-in-one$ ./run.sh build_start -
Now, login to Share (
http://localhost:8080/share) and you will see the new Create… > Create an Acme Text Document menu item as follows:
Clicking the new menu item brings up a form that looks like this:

Note the custom field for the document identifier at the bottom of the form. Fill in some values for the
Name,Title, andDescriptorfields. Give the Document Identifier a value ofDOC001and then click the Create button. -
The Acme Document file should now display in the Browse view with the custom metadata template:

Implementing custom rendering for the Document Identifier field.
-
Add an extra field representing the Acme Doc Id custom rendered
Open the
add-metadata-template-doclib-extension-modules.xmlSurf Extension module file again, it is located in theaio/aio-share-jar/src/main/resources/alfresco/web-extension/site-data/extensionsdirectory.Then update the Metadata Template definition so it has the extra Acme Document Id field at the end:
<extension> <modules> <module> <id>Add Acme Document Metadata Template</id> <version>1.0</version> <auto-deploy>true</auto-deploy> <configurations> <config evaluator="string-compare" condition="DocumentLibrary"> <metadata-templates> <template id="acmeDocMetadataTemplate"> <evaluator>alfresco.tutorials.evaluator.isAcmeDocument</evaluator> <banner index="10" id="lockBanner" evaluator="evaluator.doclib.metadata.hasLockBanner">{lockBanner}</banner> <banner index="20" id="syncTransientError" evaluator="evaluator.doclib.metadata.hasSyncTransientErrorBanner">{syncTransientError}</banner> <banner index="30" id="syncFailed" evaluator="evaluator.doclib.metadata.hasSyncFailedBanner">{syncFailed}</banner> <line index="10" id="date">{date}{size}</line> <line index="20" id="description" view="detailed">{description}</line> <line index="30" id="tags" view="detailed">{tags}</line> <line index="40" id="categories" view="detailed" evaluator="evaluator.doclib.metadata.hasCategories">{categories}</line> <line index="50" id="acmeDocId" view="detailed">{acme_documentId org.alfresco.tutorial.label.acme_documentId}</line> <line index="60" id="social" view="detailed">{social}</line> <line index="70" id="acmeDocIdCustom" view="detailed">{acmeDocumentIdCustomRendition org.alfresco.tutorial.label.acme_documentId}</line> </template> </metadata-templates> </config> <config evaluator="string-compare" condition="DocLibCustom"> <dependencies> <js src="components/documentlibrary/custom-metadata-template-renderer.js"/> </dependencies> </config> </configurations> </module> </modules> </extension>Here we have added an extra
lineidentified with theid="acmeDocIdCustom"that will represent the custom rendered document identifier. The custom rendering will be done via some client side JavaScript code that is going to be associated with thelinevia the property nameacmeDocumentIdCustomRendition. The custom JavaScript code will be loaded via the aboveDocLibCustomdefinition that loads a new JavaScript file calledcustom-metadata-template-renderer.js. This file needs to be created next. -
Add custom JavaScript file with the rendering code
Add a JavaScript file called
custom-metadata-template-renderer.jsto theaio/aio-share-jar/src/main/resources/META-INF/resources/aio-share-jar/components/documentlibrarydirectory. Then add the following function:(function () { YAHOO.Bubbling.fire("registerRenderer", { propertyName: "acmeDocumentIdCustomRendition", renderer: function acmeDocumentId_renderer(record, label) { var jsNode = record.jsNode, properties = jsNode.properties, html = ""; var acmeDocId = properties["acme:documentId"] || ""; html = '<span>' + label + '<h2>' + acmeDocId + '</h2></span>'; return html; } }); })();The important thing here is that the
propertyNamematches what we got in thelineelement text content in the metadata template, which isacmeDocumentIdCustomRendition. There is not much of a fancy rendering going on here, we just change the presentation of the property value so it is displayed as header<h2>. -
The implementation of the custom rendering of the property is now complete, build and start the application server as follows:
/all-in-one$ ./run.sh build_start -
Now, log in to Share (
http://localhost:8080/share) and look at the file previously created, you should see the extra Acme Doc Id field with the value inh2style: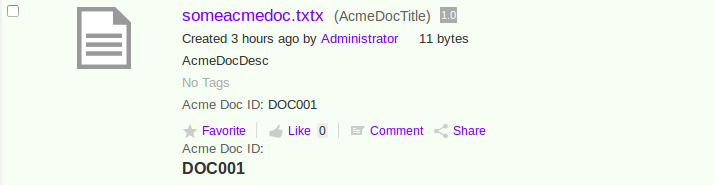
Adding a menu item to the “Create…” menu
Extension Point: Surf Extension Modules
Description:
This tutorial demonstrates how to add a new menu item called Create an Acme Text Document to the Create… menu
that is available in the browse view in the Document Library. When the new menu item is selected it will prompt the user
for document name, title, description, and text content. When the user clicks Create to create the document it will
be created with a custom type set. Because the document is created with a custom type we also need to configure a
“create” form for this type, which this tutorial shows how to do. The general take away from this tutorial is that most
of the configuration that is normally done in the share-config-custom.xml file can also be done with
Surf Extension Modules, which makes it possible to enable and disable the configuration at runtime.
Implementation Steps:
Adding a new content create item in the Document Library usually involves the following steps:
- Create a custom content model, with the type that should be set on content when using the new create content action.
- Generate/Use a Repo JAR project to contain the custom model
- Create a Surf Extension Module containing the create action definition and the form definition.
- Generate/Use a new Share JAR project to contain the Surf Extension Module
Related Information:
This tutorial assumes that you are familiar with the Document Library in Share. If you are new to it read up on it here before starting this tutorial. Also, familiar yourself with how you can create a text document via the Create… > Plain Text… menu item as it is similar to what we are going to do in this tutorial.
Source Code: Go to code
This tutorial assumes you have created a new SDK All-In-One project.
Sometimes when you have a custom content model it is useful to be able to create new documents with a custom type set automatically, and at the same time also collect values for the type’s custom properties. All directly from the Share user interface. This can be done by adding menu items to the Create… menu in the Document Library.
Tutorial implementation steps:
-
Add a custom content model and type.
This tutorial assumes that we have a custom type to work with. So we are going to create one in a new custom content model and include it in the Repo JAR that comes with the All-In-One project.
The Repo JAR already got a file where we can start adding our custom content model. Open up the
aio/aio-platform-jar/src/main/resources/alfresco/module/aio-platform-jar/model/content-model.xmlfile and update it so it looks like this:<?xml version="1.0" encoding="UTF-8"?> <model name="acme:contentModel" xmlns="http://www.alfresco.org/model/dictionary/1.0"> <!-- Optional meta-data about the model --> <description>Document Model for the fictional company Acme</description> <author>James Alfresco</author> <version>1.0</version> <imports> <!-- Import Alfresco Dictionary Definitions --> <import uri="http://www.alfresco.org/model/dictionary/1.0" prefix="d"/> <!-- Import Alfresco Content Domain Model Definitions --> <import uri="http://www.alfresco.org/model/content/1.0" prefix="cm"/> <!-- Import Alfresco System Model Definitions --> <import uri="http://www.alfresco.org/model/system/1.0" prefix="sys"/> </imports> <!-- Custom namespace for your domain --> <namespaces> <namespace uri="http://www.acme.org/model/content/1.0" prefix="acme"/> </namespaces> <!-- =============================================================================================================== Constraints, Types, and Aspects go here... --> <types> <!-- Enterprise-wide Document root type --> <type name="acme:document"> <title>Base document type</title> <parent>cm:content</parent> <properties> <property name="acme:documentId"> <title>Document Identification Number</title> <type>d:text</type> </property> </properties> </type> </types> ... </model>Here we have defined a new name space for the model called
acme, and then added a new type to it calleddocument. The type has one custom property calleddocumentIdthat can be used to keep an identifier for the document for easier lookup. We will use this type when creating the text document from the Share UI. -
Add a new Surf Extension Modules file called
add-create-menuitem-doclib-extension-modules.xmlto theaio/aio-share-jar/src/main/resources/alfresco/web-extension/site-data/extensionsdirectory (note. it is important to give this file a unique name when several Share JARs are installed, otherwise the last one wins):<extension> <modules> <!-- This module is dependent on the custom content model setup in the repo-amp module --> <module> <id>Add a new menu item to Create... menu in DocLib</id> <version>1.0</version> <auto-deploy>true</auto-deploy> <configurations> <config evaluator="string-compare" condition="DocumentLibrary"> <create-content> <content id="acme-plain-text" label="create.acmedoc.menu.item.label" icon="text" type="pagelink"> <param name="page">create-content?destination={nodeRef}&itemId=acme:document&mimeType=text/plain</param> </content> </create-content> </config> <config evaluator="model-type" condition="acme:document"> <forms> <form> <field-visibility> <show id="cm:name"/> <show id="cm:content" force="true"/> <show id="cm:title" force="true"/> <show id="cm:description" force="true"/> <show id="acme:documentId" force="true"/> <show id="mimetype"/> <show id="app:editInline" force="true"/> </field-visibility> <appearance> <field id="cm:name"> <control> <control-param name="maxLength">255</control-param> </control> </field> <field id="cm:title"> <control template="/org/alfresco/components/form/controls/textfield.ftl"/> </field> <field id="cm:content" label-id=""> <control> <control-param name="editorAppearance">explorer</control-param> </control> </field> <field id="acme:documentId"> <control template="/org/alfresco/components/form/controls/textfield.ftl"/> </field> <field id="mimetype"> <control template="/org/alfresco/components/form/controls/hidden.ftl"> <control-param name="contextProperty">mimeType</control-param> </control> </field> <field id="app:editInline"> <control template="/org/alfresco/components/form/controls/hidden.ftl"> <control-param name="contextProperty">editInline</control-param> </control> </field> </appearance> </form> </forms> </config> </configurations> </module> </modules> </extension>This extension module first configures the new menu item for the Create… menu. These
create-contentmenu items can be of three different types (matching the usual DocLib action configuration):- link - accepts a
hrefparam that will be passed anodeReftoken for substitution, used for external links. - pagelink - accepts a
pageparam that will be passed anodeReftoken for substitution, used for Share links. - javascript - accepts a
functionparam of an action that will get the current folder item as first argument. This new menu item should create a new text document with a custom type applied so thepageparameter is set to point to the create form page in Share (that is,/create-content?destination={nodeRef}...). And theitemId=acme:documentparameter specifies what custom type that should be applied to the new text document. Thecreate-contentpage has a form manager that will look for a create form matching theacme:documenttype, so we need to define one.
To create a new form for the
create-contentpage we define a configuration section matching the<config evaluator="model-type" condition="{content model type}">pattern. The easiest way to get going with these types of forms is to lookup the form for the type that the new custom type is extending, in our case thecm:contenttype. All the out-of-the-box form definitions can be found in thetomcat/webapps/share/WEB-INF/classes/alfresco/share-form-config.xmlfile. Search for<config evaluator="model-type" condition="cm:content">to get the form. Then just change theconditionand add any custom properties such asacme:documentId. - link - accepts a
-
Add an i18n resource file with the create content action label.
We can use the existing
aio/aio-share-jar/src/main/resources/alfresco/web-extension/messages/aio-share-jar.propertiesfile for this. Add the following property to it:create.acmedoc.menu.item.label=Create an Acme Text DocumentIt is also possible to skip these resource label properties all together, and just type in the label directly in the create action definition, if for example the system should only support English:
<content id="acme-plain-text" label="Create an Acme Text Document" icon="text" type="pagelink"> -
The implementation of this sample is now done, build and start the application server as follows:
/all-in-one$ ./run.sh build_start -
Now, log in to Share (http://localhost:8080/share) and you will see the new Create… > Create an Acme Text Document menu item as follows:
Clicking the new menu item brings up a form that looks like this:
Note the custom field for the document identifier at the bottom of the form.
If you wanted to hide all other file and folder create actions, and just display your custom one. Then use
replace="true"in the configuration so it looks like this:<config evaluator="string-compare" condition="DocumentLibrary" replace="true"> <create-content>...Further on, if you wanted to for example display the other create actions only for users and groups with certain permissions you could use the following type of configuration:
<config evaluator="string-compare" condition="DocumentLibrary" replace="true"> ... <content id="folder" label="create-content.folder" icon="folder" index="5" type="javascript"> <param name="function">onNewFolder</param> <permissions> <permission allow="true">CustomCreateContentPermission</permission> </permissions> </content>...See here for more information about how to create custom permissions.
Note: A Surf Extension module like this can be deployed and undeployed during runtime. And this means that an Administrator can control when different customizations should be visible or hidden. This is managed via the Module deployment page that can be found at:
http://localhost:8080/share/service/modules/deploy.
Customizing a Surf JavaScript Widget
Extension Points: Surf Widgets and Surf Extension Modules
Description:
This tutorial demonstrates how to customize an existing Surf JavaScript Widget by extending the out-of-the-box Documentlist widget so it shows a message every time a filter is changed. In previous versions of Content Services it was only possible to customize JavaScript widgets by copying existing code, modifying it, and then copying it onto the web extensions path. This was not efficient as it created a maintenance burden as the code needed to be managed through changes to the original widget.
Now logic and metadata about widget instantiation has been moved from the FreeMarker templates and moved into the JavaScript controller as this is easier to customize. The metadata is stored as a standardized object structure in the model, which is then processed by a new custom directive in the FreeMarker template to output the JavaScript code necessary to instantiate the specified widgets.
Existing JavaScript controller extension capabilities can be used so that Surf Extension Modules can modify the default metadata object(s) to change the following:
- The name of the JavaScript widget to be instantiated
- The arguments passed when instantiating the widget
- The variable that the instantiated widget is assigned to
- Whether or not i18n messages are set for the widget
- Whether or not additional options are applied to the widget
- The additional options that should be applied to the widget
FreeMarker templates use a common “boiler-plate” structure to ensure consistency across web script rendered components.
Updated resource handling features in Surf are used to move all the CSS and JavaScript dependency requests into the
template and remove the associated *.head.ftl file. A consistent pattern of <@markup> directives is used throughout
the template to further enhance customization options.
The general take away from this tutorial is that most JavaScript Widget customizations that was previously done by changing out-of-the-box JavaScript code, can now be done via Surf Extension Modules and JavaScript object extensions.
Implementation Steps:
Customizing the Documentlist Widget in the Document Library involves the following steps:
- Generate/Use a Share JAR project (either stand-alone or as part of an All-in-One project)
- Create a Surf Extension Module containing the mapping between out-of-the-box widget and custom widget.
- Implement the custom Widget
- Override the
documentlist-v2web script to swap in the custom Widget - Deploy the Surf Extension Module manually if it is not auto-deployed
Related Information:
This tutorial assumes that you are familiar with the Document Library in Share. If you are new to it, see Share Document Library before starting this tutorial. Also, familiar yourself with how you can switch between different filters in the Document Library (that is, the navigation menu to the left in the DocLib).
This tutorial assumes you have created a new SDK All-In-One project.
Tutorial implementation steps:
-
In the AIO project open up the file
aio/aio-share-jar/src/main/resources/alfresco/web-extension/site-data/extensions/aio-share-jar-example-widgets.xml. This Surf Extension Module file is automatically generated when the AIO project is created. -
Add the following module configuration (there is already a module defined, add this one after it):
<module> <id>Custom DocumentList Widget</id> <description>Instantiate a custom DocumentList widget</description> <customizations> <customization> <targetPackageRoot>org.alfresco.components.documentlibrary</targetPackageRoot> <sourcePackageRoot>org.alfresco.tutorials.customization</sourcePackageRoot> </customization> </customizations> </module> -
Create the following directory:
aio/aio-share-jar/src/main/resources/META-INF/resources/aio-share-jar/doclib/extension. -
In the doclib/extension directory create the custom Document list JavaScript Widget in the file
custom-documentlist.js:// Declare namespace if (typeof Tutorials == undefined || !Tutorials) { var Tutorials = {}; } if (!Tutorials.custom) { Tutorials.custom = {}; } (function() { // Define constructor Tutorials.custom.DocumentList = function CustomDocumentList_constructor(htmlId) { Tutorials.custom.DocumentList.superclass.constructor.call(this, htmlId); return this; }; // Extend default DocumentList YAHOO.extend(Tutorials.custom.DocumentList, Alfresco.DocumentList, { onFilterChanged: function CustomDL_onFilterChanged(layer, args) { // Call super class method Tutorials.custom.DocumentList.superclass.onFilterChanged.call(this, layer,args); // Pop-up a message Alfresco.util.PopupManager.displayMessage({ text: "Filter Changed!" }); } }); })(); -
Create the following directory:
aio/aio-share-jar/src/main/resources/alfresco/web-extension/site-webscripts/org/alfresco/tutorials/customization. -
In the
tutorials/customizationdirectory create the filedocumentlist-v2.get.html.ftlwith the following contents:<@markup id="custom-documentlist-dependencies" target="js" action="after" scope="global"> <@script src="${url.context}/res/doclib/extension/custom-documentlist.js" group="documentlibrary"/> </@markup>This loads our custom JavaScript widget class after the out-of-the-box JavaScript files used by the Document List widget.
-
In the same
tutorials/customizationdirectory create the filedocumentlist-v2.get.jswith the following contents:// Find the default DocumentList widget and replace it with the custom widget for (var i=0; i<model.widgets.length; i++) { if (model.widgets[i].id == "DocumentList") { model.widgets[i].name = "Tutorials.custom.DocumentList"; } }This code changes the widget that is instantiated.
-
Run
/aio$ ./run.sh build_startto build and start up the customization. -
In Share, (
http://localhost:8080/share/page/modules/deploy) deploy the new module. -
In Share, navigate to a Document Library within a Site. Changing the Document Filter (for example changing the view) will result in a pop up displaying the “Filter Changed!” message.