Use this information to quickly start up Content Services using Docker Compose. Due to the limited capabilities of Docker Compose, this deployment method is recommended for development and test environments only.
To deploy Content Services using Docker Compose, download and install Docker, then follow the steps below. Make sure that you’ve reviewed the prerequisites before continuing.
-
Clone the repository locally or download one of the
docker-compose.ymlfiles (e.g.6.1.N-docker-compose.yml), and then change directory to the project folder:git clone https://github.com/Alfresco/acs-deployment.git cd acs-deploymentNote: Make sure that the following ports are free on your computer: 5432, 8080, 8083. These ports are set in the
docker-compose.ymlfile - refer to thehost:containerport definitions.See the
Alfresco/acs-deploymentproject README for more information. -
Change directory to the location of your
docker-compose.ymlfile. -
Log in to Quay.io using your credentials:
docker login quay.ioAlfresco customers can request Quay.io credentials by logging a ticket with Alfresco Support. These credentials are required to pull private (Enterprise-only) Docker images from Quay.io.
-
Deploy Content Services, including the repository, Share, Postgres database, Search Services, etc.:
docker-compose -f 6.1.N-docker-compose.yml upThis downloads the images, fetches all the dependencies, creates each container, and then starts the system:
 ...
 Creating docker-compose_postgres_1              ... done
 Creating docker-compose_share_1 ...
 Creating docker-compose_digital-workspace_1 ...
 Creating docker-compose_sync-service_1      ...
 Creating docker-compose_solr6_1             ...
 Creating docker-compose_alfresco_1          ...
 Creating docker-compose_activemq_1          ...
 Creating docker-compose_shared-file-store_1 ...
 Creating docker-compose_proxy_1             ...
 Creating docker-compose_imagemagick_1       ...
 Creating docker-compose_alfresco-pdf-renderer_1 ...
 Creating docker-compose_libreoffice_1           ...
 Creating docker-compose_transform-router_1      ...
 Creating docker-compose_tika_1                  ...
 Attaching to docker-compose_postgres_1, docker-compose_tika_1, docker-compose_alfresco_1, docker-compose_digital-workspace_1, ...
As an alternative, you can also start the containers in the background by running
docker-compose up -d. -
Wait for the logs to complete, showing messages:
 ...
 alfresco_1 | 2019-02-21 11:50:46,000  WARN ... The Alfresco Content Services license will expire in 2 days.
 alfresco_1 | 2019-02-21 11:50:50,341  INFO ... Starting 'Transformers' subsystem, ID: [Transformers, default]
 alfresco_1 | 2019-02-21 11:50:50,600  INFO ... Startup of 'Transformers' subsystem, ID: [Transformers, default] complete
 ...
See Troubleshooting if you encounter errors whilst the system is starting up.
-
Open your browser and check everything starts up correctly:
Service Endpoint Administration and REST APIs http://localhost:8080/alfrescoShare http://localhost:8080/shareDigital Workspace http://localhost:8080/workspaceSearch Services administration http://localhost:8083/solrIf Docker is running on your local machine, the IP address will be just
localhost.If you’re using the Docker Toolbox, run the following command to find the IP address:
docker-machine ip -
Log in as the
adminuser. Enter the default administrator passwordadmin.
Check system start up
Use this information to verify that the system started correctly, and to clean up the deployment.
-
Open a new terminal window.
-
Change directory to the
docker-composefolder that you created in the deployment steps. -
Verify that all the services started correctly.
-
List the images and additional details:
docker-compose imagesYou should see a list of the services defined in your
docker-compose.yamlfile:Container Repository ... Size -------------------------------------------------------------------------------------------------- docker-compose_activemq_1 alfresco/alfresco-activemq ... 545.9 MB docker-compose_alfresco_1 alfresco/alfresco-content-repository ... 1.52 GB docker-compose_digital-workspace_1 quay.io/alfresco/alfresco-digital-workspace ... 33.3 MB docker-compose_postgres_1 postgres ... 312.5 MB docker-compose_proxy_1 alfresco/alfresco-acs-nginx ... 20.42 MB docker-compose_share_1 alfresco/alfresco-share ... 785.5 MB docker-compose_shared-file-store_1 alfresco/alfresco-shared-file-store ... 651.1 MB docker-compose_solr6_1 alfresco/alfresco-search-services ... 1.07 GB docker-compose_sync-service_1 quay.io/alfresco/service-sync ... 773.4 MB docker-compose_transform-router_1 quay.io/alfresco/alfresco-transform-router ... 600.5 MB ... -
List the running containers:
docker-compose psYou should see a list of the services defined in the
docker-compose.yamlfile. -
View the log files for each service
<service-name>, or container<container-name>:docker-compose logs <service-name> docker container logs <container-name>For example, to check the logs for Share, run any of the following commands:
 docker-compose logs share
 docker container logs docker-compose_share_1
You can add an optional parameter
--tail=25before<container-name>to display the last 25 lines of the logs for the selected container.docker-compose logs --tail=25 share docker container logs --tail=25 docker-compose_share_1Check for a success message:
Successfully retrieved license information from Alfresco.
Once you’ve tested the services, you can clean up the deployment by stopping the running services.
-
-
Stop the session by using
CONTROL+Cin the same window as the running services:^CGracefully stopping... (press Ctrl+C again to force) Stopping docker-compose_transform-router_1 ... done Stopping docker-compose_proxy_1 ... done Stopping docker-compose_sync-service_1 ... done Stopping docker-compose_activemq_1 ... done Stopping docker-compose_share_1 ... done Stopping docker-compose_alfresco_1 ... done Stopping docker-compose_digital-workspace_1 ... done Stopping docker-compose_postgres_1 ... done Stopping docker-compose_shared-file-store_1 ... done Stopping docker-compose_solr6_1 ... done Stopping docker-compose_alfresco-pdf-renderer_1 ... done Stopping docker-compose_libreoffice_1 ... done Stopping docker-compose_tika_1 ... done Stopping docker-compose_imagemagick_1 ... done -
Alternatively, you can open a new terminal window, change directory to the
docker-composefolder, and run:docker-compose downThis stops the running services, as shown in the previous example, and removes them from memory:
Stopping docker-compose_transform-router_1 ... done ... Removing docker-compose_transform-router_1 ... done Removing docker-compose_proxy_1 ... done Removing docker-compose_sync-service_1 ... done Removing docker-compose_alfresco-pdf-renderer_1 ... done Removing docker-compose_shared-file-store_1 ... done Removing docker-compose_postgres_1 ... done Removing docker-compose_activemq_1 ... done Removing docker-compose_share_1 ... done Removing docker-compose_solr6_1 ... done Removing docker-compose_imagemagick_1 ... done Removing docker-compose_libreoffice_1 ... done Removing docker-compose_tika_1 ... done Removing docker-compose_alfresco_1 ... done Removing docker-compose_digital-workspace_1 ... done Removing network docker-compose_default -
You can use a few more commands to explore the services when they’re running. Change directory to
docker-composebefore running these:-
Stop all the running containers:
docker-compose stop -
Restart the containers (after using the
stopcommand):docker-compose restart -
Starts the containers that were started with
docker-compose up:docker-compose start -
Stop all running containers, and remove them and the network:
docker-compose down [--rmi all]The
--rmi alloption also removes the images created bydocker-compose up, and the images used by any service. You can use this, for example, if any containers fail and you need to remove them:Stopping docker-compose_transform-router_1 ... done ... Removing docker-compose_transform-router_1 ... done ... Removing network docker-compose_default Removing image alfresco/alfresco-content-repository:6.1.1 Removing image ...
-
See the Docker documentation for more on using Docker.
Deployment project in GitHub
See the Alfresco/acs-deployment GitHub project for more details.
- In this project, you’ll find several Docker Compose files. The default
docker-compose.ymlfile contains the latest work-in-progress deployment scripts, and installs the latest development version of Content Services. - To deploy a specific released version of Content Services, several major.minor Docker Compose files are provided in the
docker-composefolder of the project. - To modify your development environment, for example to change or mount files in the existing images, you’ll have to create new custom Docker images (recommended approach). The same approach applies if you want to install AMP files into the repository and Share images. See the Customization guidelines for more.
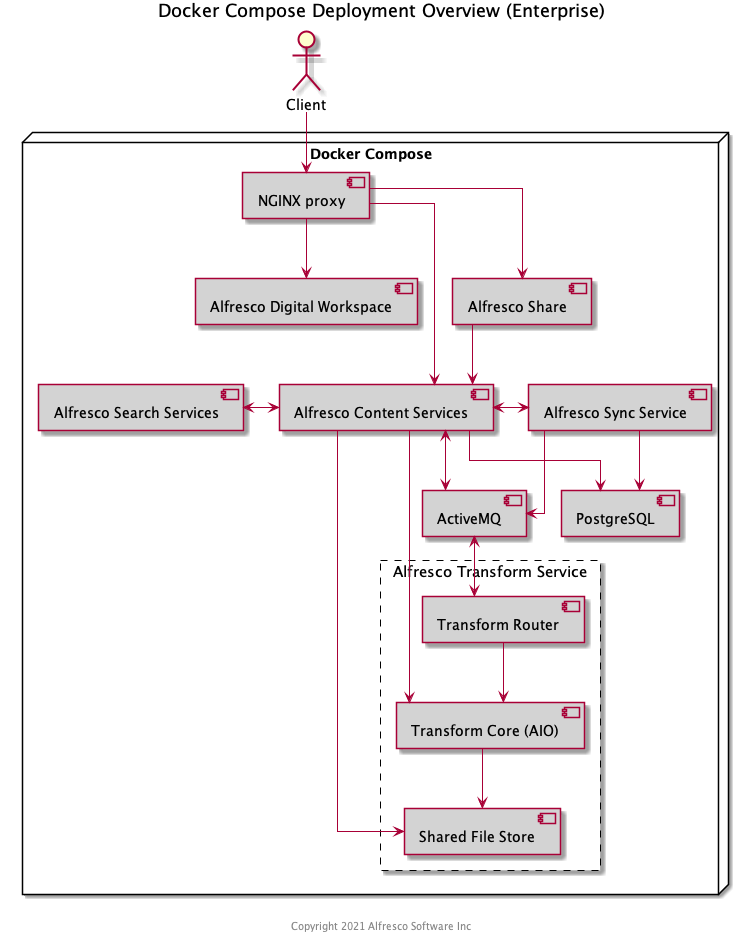
Using one of the Enterprise Compose files in this project deploys the following system:
Configure
The Docker Compose file provides some default configuration. This section lists the full set of environment variables exposed by each of the containers in the deployment.
Alfresco Content Repository (alfresco)
| Property | Description |
|---|---|
| JAVA_TOOL_OPTIONS | Adding this environment variable, allows to set sensitive values (like passwords) that are not passed as arguments to the Java Process. |
| JAVA_OPTS | A set of properties that are picked up by the JVM inside the container. Any Content Services property can be passed to the container using the format -Dproperty=value (e.g. -Ddb.driver=org.postgresql.Driver). |
Alfresco Share (share)
| Property | Description |
|---|---|
| JAVA_OPTS | A set of properties that are picked up by the JVM inside the container |
| REPO_HOST | Share needs to know how to register itself with Alfresco. The default value is localhost |
| REPO_PORT | Share needs to know how to register itself with Alfresco. The default value is 8080 |
| CSRF_FILTER_REFERER | CSRF Referrer |
| CSRF_FILTER_ORIGIN | CSRF Origin |
Alfresco Digital Workspace (digital-workspace)
| Property | Description |
|---|---|
| BASE_PATH | The default value is ./ |
| APP_CONFIG_OAUTH2_HOST | The address of the Identity Service including the realm name configured |
| APP_CONFIG_AUTH_TYPE | The authentication type. To use Single Sign-on mode you must change this property to OAUTH. The default value is BASIC |
| APP_CONFIG_OAUTH2_CLIENTID | The name of the client configured for Digital Workspace |
| APP_CONFIG_OAUTH2_REDIRECT_SILENT_IFRAME_URI | The address that Digital Workspace uses to refresh authorization tokens |
| APP_CONFIG_OAUTH2_REDIRECT_LOGIN | The URL to redirect to after a user is successfully authenticated |
| APP_CONFIG_OAUTH2_REDIRECT_LOGOUT | The URL to redirect to after a user successfully signs out |
| APP_BASE_SHARE_URL | Base Share URL. For example {protocol}//{hostname}{:port}/workspace/#/preview/s |
| AUTH_TYPE | The authentication type. To use Single Sign-on mode you must change this property to OAUTH. The default value is BASIC |
| PROVIDER | The default value is ALL |
| ENVIRONMENT_SUFFIX | Only for Process Cloud instance. The default value is _CLOUD |
| API_HOST | |
| API_CONTENT_HOST | |
| API_CONTENT_HOST_LOCAL | The default value is http://localhost:8080 |
| API_PROCESS_HOST | |
| OAUTH_HOST | |
| IDENTITY_HOST | The address of the Identity Service including the realm name configured. |
| E2E_HOST | The default value is http://localhost |
| E2E_PORT | The default value is 80 |
| API_HOST_CLOUD | |
| API_CONTENT_HOST_CLOUD | |
| API_PROCESS_HOST_CLOUD | |
| OAUTH_HOST_CLOUD | |
| IDENTITY_HOST_CLOUD | |
| E2E_HOST_CLOUD | The default value is http://localhost |
| E2E_PORT_CLOUD | The default value is 4200 |
| APP_CONFIG_APPS_DEPLOYED | The name of the deployed application (e.g. "[{"name": "<the name of the deployed application>"}]") |
Alfresco Search Services (solr6)
| Property | Description |
|---|---|
| SOLR_ALFRESCO_HOST | Solr needs to know how to register itself with Alfresco. The default value is alfresco |
| SOLR_ALFRESCO_PORT | Solr needs to know how to register itself with Alfresco. The default value is 8080 |
| SOLR_SOLR_HOST | Alfresco needs to know how to call solr. The default value is solr6 |
| SOLR_SOLR_PORT | Alfresco needs to know how to call solr. The default value is 8983 |
| SOLR_CREATE_ALFRESCO_DEFAULTS | Create the default alfresco and archive cores. The default value is alfresco,archive |
| SOLR_OPTS | Options to pass when starting the Java process |
| SOLR_HEAP | The Java heap assigned to Solr. The default value is 2g |
| SOLR_JAVA_MEM | The exact memory settings for Solr. Note that SOLR_HEAP takes precedence over this. The default value is -Xms2g -Xmx2g |
| MAX_SOLR_RAM_PERCENTAGE | The percentage of available memory (an integer value) to assign to Solr. Note that SOLR_HEAP and SOLR_JAVA_MEM take precedence over this. The default value is 2 |
| SEARCH_LOG_LEVEL | The root logger level (ERROR, WARN, INFO, DEBUG or TRACE). The default value is INFO |
| ENABLE_SPELLCHECK | Whether spellchecking is enabled or not (true or false) |
| DISABLE_CASCADE_TRACKING | Whether cascade tracking is enabled or not (true or false). Disabling cascade tracking will improve performance, but result in some feature loss (e.g. path queries) |
| ALFRESCO_SECURE_COMMS | Whether communication with the repository is secured (https or none). See Alfresco Search Services implementation for more details. The default value is none |
| SOLR_SSL_KEY_STORE | Path to SSL key store. See Alfresco Search Services Docker Compose steps for more details |
| SOLR_SSL_KEY_STORE_PASSWORD | Password for key store. See Alfresco Search Services Docker Compose steps for more details |
| SOLR_SSL_KEY_STORE_TYPE | Key store type. See Alfresco Search Services Docker Compose steps for more details. The default value is JCEKS |
| SOLR_SSL_TRUST_STORE | Path to SSL trust store. See Alfresco Search Services Docker Compose steps for more details |
| SOLR_SSL_TRUST_STORE_PASSWORD | Password for trust store. See Alfresco Search Services Docker Compose steps for more details |
| SOLR_SSL_TRUST_STORE_TYPE | Trust store type. See Alfresco Search Services Docker Compose steps for more details. The default value is JCEKS |
| SOLR_SSL_NEED_CLIENT_AUTH | This variable is used to configure SSL (true or false). See Alfresco Search Services Docker Compose steps for more details |
| SOLR_SSL_WANT_CLIENT_AUTH | This variable is used to configure SSL (true or false). See Alfresco Search Services Docker Compose steps for more details |
Alfresco Transform Router (transform-router)
| Property | Description |
|---|---|
| JAVA_OPTS | A set of properties that are picked up by the JVM inside the container |
| ACTIVEMQ_URL | ActiveMQ URL (in this case, the name of the container is used). The default value is nio://activemq:61616 |
| ACTIVEMQ_USER | ActiveMQ user. The default value is admin |
| ACTIVEMQ_PASSWORD | ActiveMQ password. The default value is admin |
| TRANSFORM_REQUEST_QUEUE | The default value is org.alfresco.transform.t-request.acs |
| TRANSFORM_REPLY_QUEUE | The default value is org.alfresco.transform.t-reply.acs |
| TRANSFORM_ENGINE_REPLY_QUEUE | The default value is org.alfresco.transform.engine.t-reply.acs |
| JMS_LISTENER_CONCURRENCY | The default value is 1-10 |
| IMAGEMAGICK_URL | URL for the ImageMagick T-Engine |
| PDF_RENDERER_URL | URL for the PDF Renderer T-Engine |
| LIBREOFFICE_URL | URL for the LibreOffice T-Engine |
| TIKA_URL | URL for the Tika T-Engine |
| MISC_URL | URL for the Miscellaneous T-Engine |
| CORE_AIO_URL | URL for the All-In-One T-Engine |
| FILE_STORE_URL | URL for the Shared File Store |
| IMAGEMAGICK_QUEUE | Name of the queue used by the ImageMagick T-Engine. The default value is org.alfresco.transform.engine.imagemagick.acs |
| PDF_RENDERER_QUEUE | Name of the queue used by the PDF Renderer T-Engine. The default value is org.alfresco.transform.engine.alfresco-pdf-renderer.acs |
| LIBREOFFICE_QUEUE | Name of the queue used by the LibreOffice T-Engine. The default value is org.alfresco.transform.engine.libreoffice.acs |
| TIKA_QUEUE | Name of the queue used by the Tika T-Engine. The default value is org.alfresco.transform.engine.tika.acs |
| MISC_QUEUE | Name of the queue used by the Miscellaneous T-Engine. The default value is org.alfresco.transform.engine.misc.acs |
| CORE_AIO_QUEUE | Name of the queue used by the All-In-One Core T-Engine. The default value is org.alfresco.transform.engine.aio.acs |
| TRANSFORMER_ENGINE_PROTOCOL | This value can be one of the following (http, jms). The default value is jms |
| TRANSFORMER_ROUTES_FILE_LOCATION | The default value is transformer-pipelines.json |
| MAX_TRANSFORM_RETRIES | The default value is 3 |
| INITIAL_RETRY_TIMEOUT | The default value is 10000 |
| INCREASE_RETRY_TIMEOUT | The default value is 10000 |
| MAX_IN_MEMORY_SIZE | Double default limit to 512KiB. The default value is 524288 |
| HOSTNAME | The default value is t-router |
Alfresco Transform Core AIO (transform-core-aio)
| Property | Description |
|---|---|
| JAVA_OPTS | A set of properties that are picked up by the JVM inside the container |
| ACTIVEMQ_URL | ActiveMQ URL (in this case, the name of the container is used) |
| FILE_STORE_URL | Shared file store URL (in this case, the name of the container is used) |
| TRANSFORM_ENGINE_REQUEST_QUEUE | Name of the queue. The default value is org.alfresco.transform.engine.aio.acs |
| PDFRENDERER_EXE | Location of the PDF Renderer binary. The default value is /usr/bin/alfresco-pdf-renderer |
| LIBREOFFICE_HOME | Location of the LibreOffice installation. The default value is /opt/libreoffice5.4 |
| IMAGEMAGICK_ROOT | Location of the ImageMagick installation. The default value is /usr/lib64/ImageMagick-7.0.10 |
| IMAGEMAGICK_DYN | Location of the ImageMagick dynamic libraries. The default value is /usr/lib64/ImageMagick-7.0.10/lib |
| IMAGEMAGICK_EXE | Location of the ImageMagick binary. The default value is /usr/bin/convert |
| IMAGEMAGICK_CODERS | Location of the ImageMagick coders folder |
| IMAGEMAGICK_CONFIG | Location of the ImageMagick configuration folder |
Alfresco Shared File Store (shared-file-store)
| Property | Description |
|---|---|
| JAVA_OPTS | A set of properties that are picked up by the JVM inside the container |
| fileStorePath | Shared File Store content storing path. The default value is /tmp/Alfresco |
| scheduler.contract.path | Cleanup Scheduler contract path. The default value is /tmp/scheduler.json |
| scheduler.content.age.millis | Content retention period. The default value is 86400000 |
| scheduler.cleanup.interval | Cleanup Scheduler interval. The default value is 86400000 |
Alfresco Sync Service (sync-service)
| Property | Description |
|---|---|
| JAVA_OPTS | A set of properties that are picked up by the JVM inside the container. Any Sync Service property can be passed to the container using the following format -Dproperty=value (e.g. -Dsql.db.username=alfresco). For a complete list of properties that can be passed through JAVA_OPTS environment variable, check Alfresco Sync Service configuration |
Alfresco Proxy (proxy)
| Property | Description |
|---|---|
| ADW_URL | Digital Workspace URL inside network. The default value is http://digital-workspace |
| REPO_URL | Repository URL inside network. The default value is http://alfresco:8080 |
| SHARE_URL | Share URL inside network. The default value is http://share:8080 |
| SYNCSERVICE_URL | Sync service URL inside network. The default value is http://sync-service:9090 |
| ACCESS_LOG | Sets the access_log value. Set to off to switch off logging |
Customize
To customize the Docker Compose deployment, for example applying AMPs, we recommend following the best practice of creating your own custom Docker image(s). The Customization guidelines walks you through this process.
Cleanup
To bring the system down and cleanup the containers run the following command:
docker-compose down
Troubleshooting
-
If you have issues running
docker-compose upafter deleting a previous Docker Compose cluster, try replacing step 4 in the initial Docker Compose instructions with:docker-compose down && docker-compose build --no-cache && docker-compose up -
Stop the session by using
CONTROL+C. -
Remove the containers (using the
--rmi alloption):docker-compose down --rmi all -
Try allocating more memory resources, as advised in
docker-compose.yml.For example, in Docker, change the memory setting in Preferences (or Settings) Resources > Advanced > Memory to at least 8GB. Make sure you restart Docker and wait for the process to finish before continuing.
Go back to step 4 in the initial Docker Compose instructions to start the deployment again.
Note: You’ll need a machine with at least 13GB of memory to distribute among the Docker containers.
Reference
The table below shows the location of the Dockerfile for each container used in this deployment.
| Container | Dockerfile location |
|---|---|
| alfresco | https://github.com/Alfresco/acs-packaging/blob/master/docker-alfresco/Dockerfile |
| share | https://github.com/Alfresco/share/blob/master/packaging/docker/Dockerfile |
| solr6 | https://github.com/Alfresco/InsightEngine/blob/master/search-services/packaging/src/docker/Dockerfile |
| https://github.com/Alfresco/alfresco-digital-workspace-app/blob/develop/Dockerfile | |
| activemq | https://github.com/Alfresco/alfresco-docker-activemq/blob/master/Dockerfile |
| https://github.com/Alfresco/dsync-services/blob/master/service-sync/packaging/docker/Dockerfile | |
| https://github.com/Alfresco/alfresco-transform-service/blob/master/alfresco-transform-router/src/main/docker/Dockerfile | |
| https://github.com/Alfresco/alfresco-transform-core/blob/master/alfresco-transform-core-aio/alfresco-transform-core-aio-boot/Dockerfile | |
| https://github.com/Alfresco/alfresco-shared-file-store/blob/master/controller/Dockerfile | |
| proxy | https://github.com/Alfresco/acs-ingress/blob/master/Dockerfile |