Installing Alfresco Office Services allows Microsoft Office Suite applications (for example, Word, PowerPoint, and Excel) to interact with Alfresco similar to SharePoint. This feature allows you to edit Office documents in Alfresco Share and to modify Office files without checking them in and out. Alfresco locks the file while it is being modified and releases the lock when the file is saved and closed.
Prerequisites for using Alfresco Office Services
There are a number of software requirements for using AOS.
Alfresco Office Services is part of the standard Alfresco installation, and software and hardware requirements are the same as those for Alfresco. See Supported platforms for more information.
- Microsoft Office 2010 (32 or 64-bit)
- Microsoft Office 2013 (32 or 64-bit)
- Microsoft Office for Mac 2011
Note: Microsoft Office 2016 is supported with AOS 1.1.2 and Alfresco 5.1 or later. If you use Office 2016, you must upgrade to Alfresco 5.1 or later.
Note: You must activate SSL when using Alfresco Office Services. For more information, see Configuring SSL.
Installing manually using the AMP file
If you install Alfresco using the setup wizard, AOS is installed as a component at the same time.
A fully-compatible SharePoint repository is also installed, that allows Microsoft Office Suite applications (for example, Word, PowerPoint, and Excel) to interact with Alfresco as if it was SharePoint. This feature allows you to edit Office documents in Alfresco Share and to modify Office files without checking them in and out. Alfresco locks the file while it is being modified and releases the lock when the file is saved and closed.
-
If you are installing using the setup wizard, choose the installation wizard that you require (for your platform) and follow the instructions for installing Alfresco using setup wizards.
If you use the Easy install option, Alfresco Office Services is installed by default. If you use the Advanced option, ensure that in the Select Components window, you check the Alfresco Office Services box.
-
If you are installing the repository manually, or are installing into an existing Alfresco instance:
-
Install the AMP file,
alfresco-aos-module-1.1.x.amp. See Installing an AMP for more information. -
Deploy the
_vti_bin.warfile.
For Tomcat, copy the file to the
tomcat/webappsfolder. When the server starts up, it deploys the WAR file automatically.Note: If the
_vti_binfolder already exists undertomcat/webapps(for example, in the case of an upgrade), then remove the folder first, otherwise the new WAR file won’t be deployed. -
Install into an existing web application
If you install Alfresco manually, you must deploy the ROOT.war application to the server root. If you already have an application running in the server root, you can merge the Alfresco function into your existing web application.
The ROOT.war application is required to enable Alfresco Office Services (AOS). If you have a custom application that is running in the server root directory, it is important that you modify this application to enable AOS.
There are two types of requests that are sent to the server root directly by Microsoft Office and Windows:
- A request for the
_vti_inf.htmlfile that contains configuration information OPTIONSandPROPFINDrequests
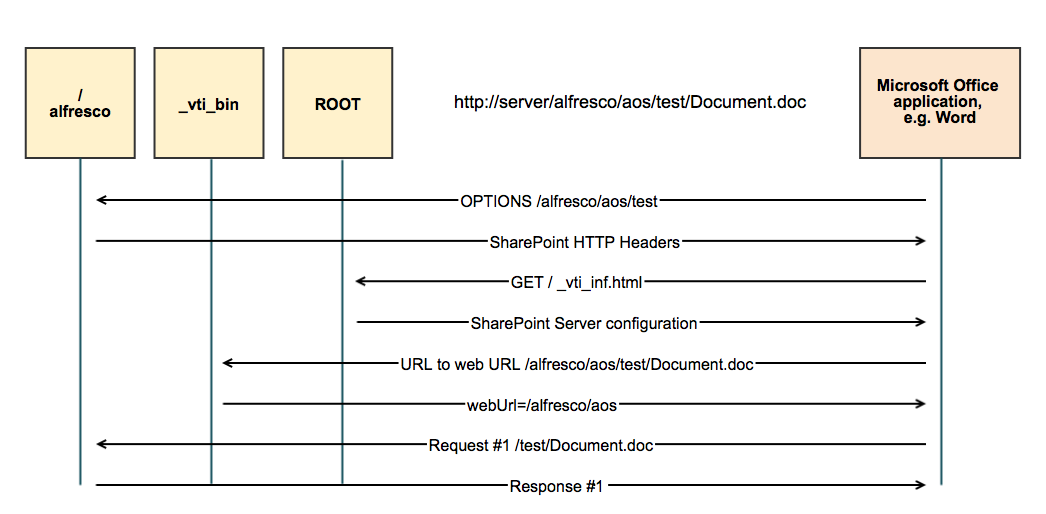
The following diagram shows the information flow between Microsoft Office and Alfresco, including interactions with the /alfresco, _vti_bin and ROOT applications:
-
Extract the
_vti_inf.htmlfile from the<TOMCAT_HOME>webapps/ROOT.wararchive file and add it to your web application. -
In your web application, modify the service that responds to requests to the server root, so that it sends
PROPFINDandOPTIONSrequests to the /alfresco application.If you have a
.jsppage responding to the server root, you can add this code example to that page:<% if(request.getMethod().equals("PROPFIND") || request.getMethod().equals("OPTIONS")) { ServletContext alfrescoContext = application.getContext("/alfresco"); if( (alfrescoContext != null) && !alfrescoContext.equals(getServletContext()) ) { RequestDispatcher rd = alfrescoContext.getRequestDispatcher("/AosResponder_ServerRoot"); if(rd != null) { rd.forward(request, response); return; } } } %>and add this import statement to the top of the
.jsppage:<%@page session="true" import="javax.servlet.ServletContext, javax.servlet.RequestDispatcher” %>If you have deployed alfresco to a different context path (something other than
/alfresco), make sure that you edit theapplication.getContextvalue to represent this.If you have a servlet responding to these requests, integrate the Java code from these JSP code examples into your application.
-
Depending on your application server, ensure that requests are dispatched by default between different application servers.
For Tomcat, add a file called
context.xmlto the META-INF directory of your web application. Here is an example of thecontext.xmlfile:<?xml version="1.0" encoding="UTF-8"?> <Context path="/" debug="100" privileged="true" reloadable="true" crossContext="true"> </Context>