Bulk Upload
Bulk Upload allows a user to select multiples files to upload, edit common properties for all documents, edit individual document properties and upload all documents. Additionally, Bulk Upload has support for scanning and MSG file parsing.
Configuration
The features currently available is Bulk Upload are as follows:
- Set doc as new version of existing document - must be enabled in the admin
- Scanning - must be enabled in the admin
- Create Document from Template - must be enabled in the admin
- Parsing MSG files for attachments (and recursively parsing attached MSG files)
- Gmail Inbox ingestion - must be enabled in the admin
- Inheriting Folder Attributes
Inherit Folder Attributes
(Only available when bulk upload is configured as a folder action). Enable this configuration option to automatically inherit attribute values from the parent folder (these can be removed individual for each document or modified as a whole from the Bulk Property Editing Page).
Extension Whitelist
By default, any file type is allowed and will be uploaded to the repository. However, for some systems that want to prevent some file types from being allowed, the White List Document Types box allows an administrator to specify which types to allow. Simply comma separate any allowed extensions. All other file types will be rejected by Bulk Upload.
Example whitelist:
pdf,jpeg,jpg,png,gif,doc,docx,docm,msg,potm,potx,ppsm,ppsx,ppt,pptx,pub,xls,xlsx,xlsb,xlsm,xltm,xltx,xltx,xps,html,mp3,mp4,txt,xml,json,eml
Set as new version
Enable this configuration to allow users to set an uploaded doc as a new minor version of an existing document in the folder instead of creating a new document in the folder.
Scanning
The Bulk Upload scanning functionality allows a user to scan multiple documents and upload them. To enable, change the Allow Documents from Scanner slider to Yes in the Bulk Upload Action Advanced Properties section of the admin config.
Setting up Scanning
Follow the steps to setup Scanning paper documents into ACA. Currently, this functionality is set using Dynamic Web TWAIN (DWT) Version 18.5.
Install Scanner Drivers
You must have a TWAIN-compliant scanner plugged into your machine with the proper drivers installed in order to scan documents.
Install Dynamic Web TWAIN
There are two ways to install Dynamic Web TWAIN:
- Download and run the
Dynamsoft-Service-Setupinstallation file from Dynamsoft Downloads (Download the installer according to your OS). - Download the installer on the Bulk Upload window. Right-click the Download icon, copy the link, paste it in a new browser tab, and hit Enter.

Configuration Options for Scanning
License Key: The License key from Dynamsoft - this must be configured properly for the functionality to work as expected.

Create Document from Template
The Bulk Upload create document from template functionality allows a user to upload a new document by using content that already exists in the repository.
Parsing MSG Files
The Bulk Upload action provides support for parsing MSG files.
Configuration Options for MSG Files
Email Relation Type: In order for parsed attachments to be properly associated with the parent email repository object, the email relation type must be set to (hpi:emailed).
Ingest from Gmail
The Bulk Upload action provides support for pulling in emails/threads and their attachments directly from a user’s gmail inbox. This assumes the user’s repo email is their gmail account email.
Enabling Gmail API
- Go to https://console.developers.google.com/.
- Click the Create Project button.
- Give it whatever name you want and click the Create button.
- Once it has been created, you should be taken to the Project Overview page. In the lefthand column, click on Credentials, and then click the OAuth consent screen tab.
- Fill out Product name. This will be shown to the user when they authenticate when importing docs from their gmail. You can fill out the other sections if you want, but it is not necessary.
- Save your changes.
- Go to the Library by clicking the menu item on the left.
- Under Google Apps APIs, click on Gmail API.
- Click the Enable button at the top.
- Once the API has been enabled, an option will appear to create a new Client ID.
-
When creating the client ID:
- Make sure Web application is selected
- In the Authorized JavaScript origins section, put in the url for that is hosting ACA. For example, if ACA was accessed by
http://www.mysite.com/hpi, you would usehttp://www.mysite.com. Note that multiple domains can be entered here if you have multiple HPIs that you would like to access the Gmail API.
- Click Create Client ID.
- Copy the Client ID.
- In the bulk upload config, paste the Client ID into the ‘Gmail Client Id’ textbox.
Note: You can always get back to your Client ID by going to the Credentials section.
Configuration Options for Ingest from Gmail
Gmail Client Id: The client id from registering the application with Google. See above for instructions
Enabling Upload From Box
Box Application
- Create an application in Box or use an existing one.
-
Go to https://app.box.com/developers/console to view existing apps or create a new one.
- When asked what type of app you are building, choose
Partner Integration. - Within an application, under the configuration tab, we can see the Client ID that we will need to use in the bulk upload admin (picture below).
-
Below the client ID will also be the redirect URI that will need to redirect back to ACA (for example,
https://localhost:8080/hpi/dummy/path):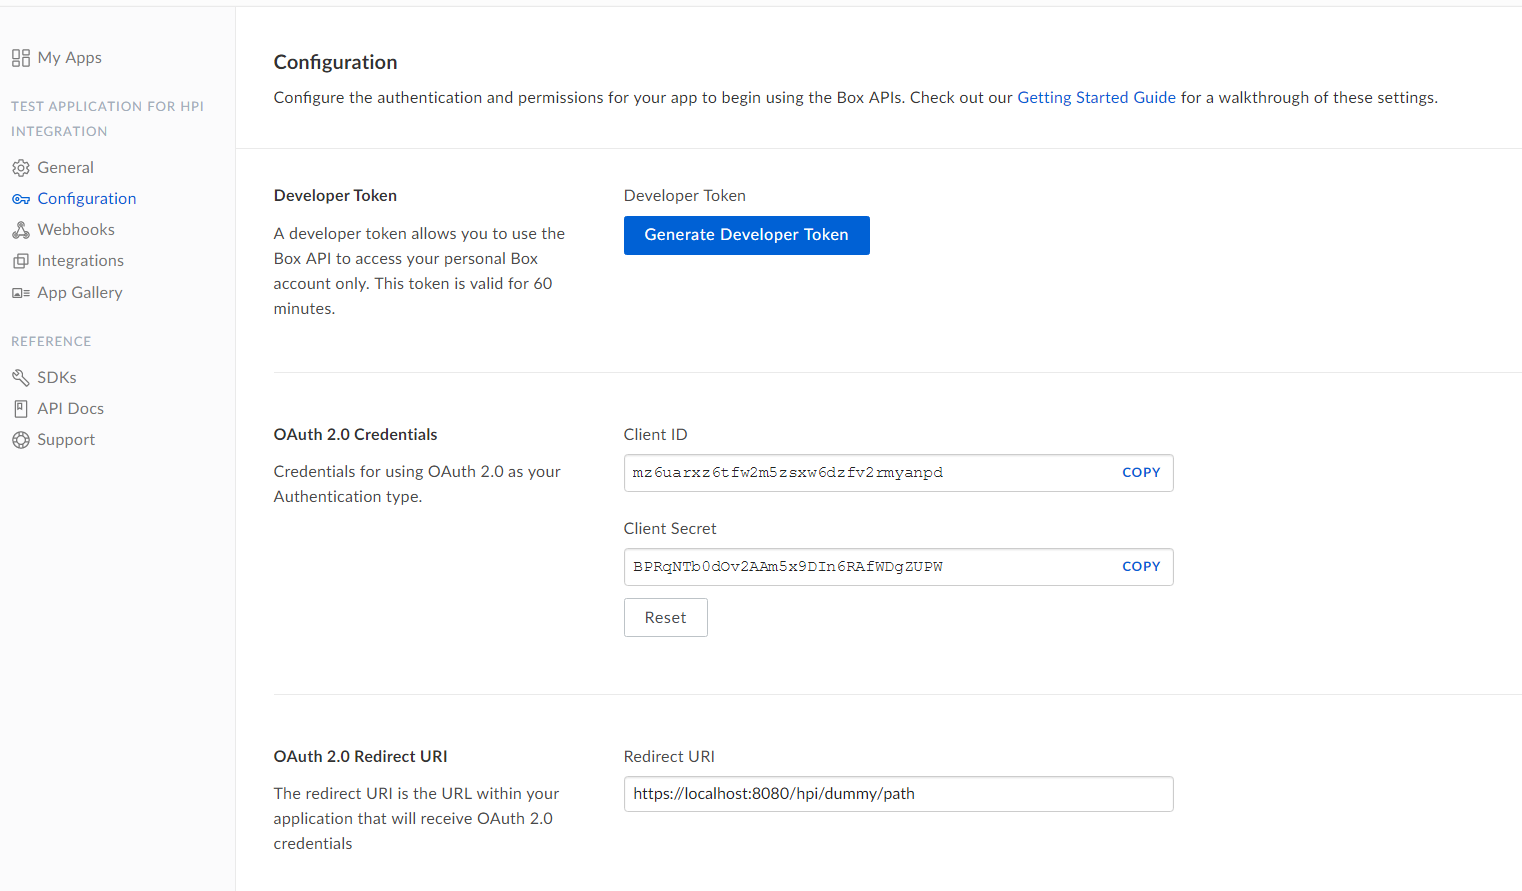
Bulk Upload Config for Box
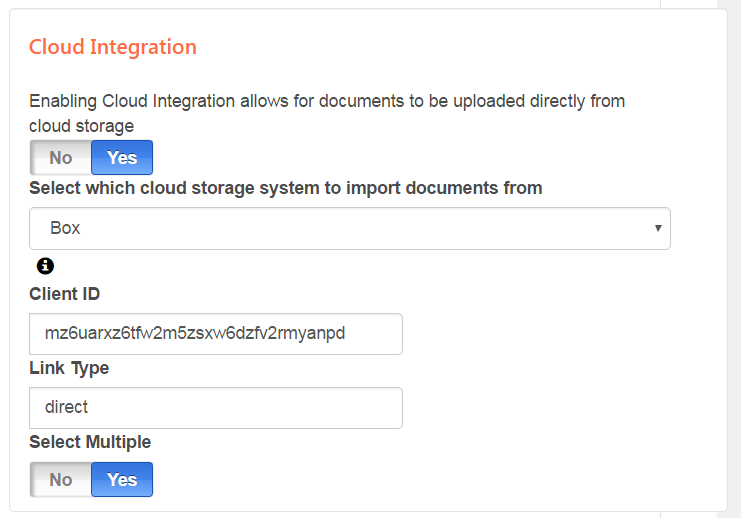
- Select Bulk Upload Action.
- Set ‘Enable Cloud Integration’ slider to Yes.
- Choose ‘Box’ from dropdown selecting which application to integrate with (Box is the only one at the moment).
- Set Client ID (Explained above).
- Set Link Type to ‘direct’.
-
Choose whether to allow a user to select multiple documents to upload:
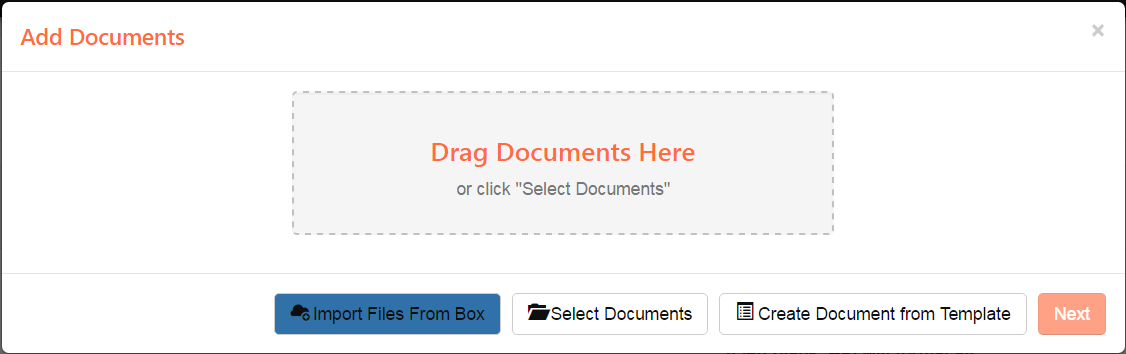
Separate Bulk Upload View for Box
When configured, Box upload will be a button next to the other upload buttons:
Saved Sessions
Bulk Upload Saved Sessions allows for the upload session to be saved at a recurring interval or manually by the user. This will also save a users Bulk Upload session whenever they navigate away from Bulk Upload.
Download Document
The Download Document (sometimes also referred to as the Export Native Content) action allows a user to download the native content or a PDF rendition of the current document being viewed in the stage.
Configuration Options for Download Document
Downloaded File Name
The action can be configured to use a pattern for the downloaded file name based on object type. Each document object type may have its own pattern of its attribute and constant characters to use for the downloaded file name.
Configuration Options for Download Document
In the Download Type section, the following settings are available: Allow End User to specify Rendition/Native Content on Download If you enable this setting using the toggle switch, you can specify the download type every time you download a document.
Available Rendition Type default
You can configure the default rendition type to download files in the set rendition by default. You can set the default rendition type to any of the rendition types available in the drop-down, including PDF rendition and native client.
Allow End User to specify whether to include annotations on Download of a pdf
If you enable this setting using the toggle switch, you are prompted to specify whether you want to include annotations every time you download a PDF document.
Download with Annotations Default
If you enable this setting using the toggle switch, annotations are included in PDF downloads by default.
Allow End User to specify whether to include overlays on Download of a pdf
If you enable this setting using the toggle switch, you are prompted to specify whether you want to include overlays every time you download a PDF document.
Download with Overlays Default
If you enable this setting using the toggle switch, overlays are included in PDF downloads by default.
Export folder
Configuration for Export Folder
Export folder must be configured as a folder action - it will throw an error if it is a document action.
The ZIP created will be the {folder name}.zip
If any child objects are subfolders or empty documents, they’ll be omitted from the ZIP.
Download With Tags
When enabled (defaults to false), a user can download a folder with folder tags enabled - creating individual folders for each tag and populating each folder with any child documents that share the same tag.
If a child document lacks a tag, or Download With Tags is disabled, all docs will be at the root of the ZIP.
Send Email
Send Email is a Folder and Stage action that sends email to recipients. When sending an email, only the email body is included in the email. The copy stored in the docbase includes any content from the To:, Cc:, Bcc:, Subject, and body fields.
An email may be sent with an optional attachment from the parent folder’s children, so long as the child is a document.
Configuration for Send Email
Max Subject Length
The maximum number of characters allowed in the subject line of an email. If left blank, the default maximum is ten (10) characters.
Email Storage Location
The subfolder of all correspondence sent from the parent folder. If left blank, all correspondence will be stored in the parent folder.
Email Object Type
This is the object type for Send Email. The default object type is HPIEmailMessage. It can be overridden with a custom object type.
Email Relationship
Is the relationship between an email and its attachments. For example, in a related objects view, it would show the attachments of an email and vice versa. This should be set to hpi:emailed (alfresco).
Folder Tags
You can optionally add a tag to the email object after it’s created, typically set to ‘Correspondence’. Usually, this is set when the folder is displayed using Folder Tags. If this is the case, you will typically want to set the Email Storage Location to empty. This way, the email will be stored in the parent folder, but displayed in a ‘Correspondence’ tag in the folder.
Note: If you have both the folder and document action configured for send email, you will want to have the same tags in both configurations.
Folder Notes Integration
Users can toggle attaching a folder note in addition to the rest of their email (default is Off). When a user turns on Folder Notes Integration, they must configure a chained action for Send Email to fire Folder Notes. Just like regular folder notes, a note requires a Note Object Type (defaults to hpi_note) and a Note Type (defaults to Correspondence). When Folder Notes Integration is enabled, a second editor will appear under the email body called Folder Note. If the note is sent without any content, the email’s subject line will be substituted. The note that is created will be linked to the email being sent.
View All Documents Refined Search
Overview
This feature allows the user to perform an additional search on a container from the View All Documents action. In some situations, such as a long-tail insurance claim, the total number of documents in a given container may exceed the repository’s search result limit. The “Refined Search” feature gives the user more control over what documents from the container are returned to View All Documents by allowing some to provide more specific search criteria. This feature can still be used when that limit has not been reached by the initial view all documents query.
Performing a Search
- Navigate to any container that belongs to the configured trac.
- Find the search icon button to the right of the search result controls.
- Click on search icon to open the Refined Search slide out pane.
- At the top of the view is a drop down to select document type you would like to search against. The form below matches what is configured for that object type. Populating form fields with the values you wish to search on.
- To search, click the search button at the top of the view.
- To empty out the current form, click the reset button located next to the search button.
Handling the Refined Search Results
After searching, the pane will off the screen. The displayed results are those of the additional search. Notice the search button is now displayed as active and text appears to the right of the search results message. All text and facet filtering, as well as pagination functionality, is still active for the user to use. Clicking on the search icon again will allow you to perform a new search independent of the previous search. Clicking on the reset search message runs the initial view all documents search before any additional searching was performed.
Configuration for Refined Search
To enable this feature, go to Admin -> Stage -> (desired trac) -> Folder Actions -> View All Documents. Scroll to Additional Configurations and turn the “Enable Additional Searching” switch to “ON”. Once active, this feature uses the View All Documents search configuration and the configured query type. This feature allows the user to select one document object type to perform the refined search on. The object types available are selected from the search config’s attribute search. The displayed form for each object type can be set in the attribute search config.
Note: Additional Searching is not supported for the getChildren query type and does not support searching on folder object types.