Integration with DocuSign
Setup a DocuSign Account
-
If needed, create a DEV sandbox with DocuSign.
-
Once you are in, setup your DocuSign account and go to Admin -> Account -> API and Keys.
-
Click Add Integrator Key button to add an integrator key.
Setup OpenContent
-
Locate the
opencontent-override-placeholders.propertiesfile. It will be located on the /alfresco classpath, for example,tomcat/shared/classes/alfresco/module/com.tsgrp.opencontent. -
Add the following properties:
docusign.username- DocuSign user name (which should be the same as the user’s email address)docusign.password- DocuSign user password, should be encrypted with the TSGEncrypter and enclosed with the encryption indicator like:@{theEncPassword}docusign.integratorKey- see setup step abovedocusign.login.url- the login URL is defaulted to the DocuSign dev sandbox URL inuniversal-defaults.properties. You will want to override this for production environmentsdocusign.hpi.dataPath- The folder where DocuSign data objects should be stored. Defaults to/hpi/docuSignData-
docusign.completed.version.policy- When a document is completed in docusign, it is versioned in the repository. This property controls whether the version is a major or minor version.Note: Versioning is not possible for TSG Controlled Documents. If a controlled document is sent out for DocuSign, the PDF rendition is replaced in the repository when DocuSign completes it’s process. The object is not versioned in the repository.
-
Update the module-context in order for the Retrieve job to run. Adding the following to the
opencontent-override-module-context.xml:<!-- Retrieve Content from DocuSign Job --> <bean id="hpi-docusign-retrieve-trigger" class="org.springframework.scheduling.quartz.CronTriggerFactoryBean"> <!-- Run every hour --> <property name="cronExpression" value="0 0 * * * ?"/> <property name="jobDetail"> <bean id="com.tsgrp.opencontent.alfresco.job.retrieveDocusignContentJob" class="org.springframework.scheduling.quartz.JobDetailFactoryBean"> <property name="jobClass" value="com.tsgrp.opencontent.alfresco.job.RetrieveDocusignContentJob"/> <property name="jobDataAsMap"> <map> <entry key="serviceRegistry" value-ref="ServiceRegistry"/> <entry key="version" value="${docusign.completed.version.policy}"/> <entry key="docuSignUsername" value="${docusign.username}"/> <entry key="docuSignPassword" value="${docusign.password}"/> <entry key="integratorKey" value="${docusign.integratorKey}"/> <entry key="docuSignLoginURL" value="${docusign.login.url}"/> <entry key="dataPath" value="${docusign.hpi.dataPath}"/> <entry key="folderNotesEnabled" value="${docusign.folderNotesEnabled}"/> </map> </property> </bean> </property> </bean> -
Ensure that the job is scheduled to run.
Ensure that the
tsgSchedulerAccessorbean has the docusign retrieve job configured in thetriggerslist. This can be overriden in theopencontent-override-module-context.xml.<bean id="tsgSchedulerAccessor" class="org.springframework.scheduling.quartz.SchedulerAccessorBean"> <property name="scheduler" ref="schedulerFactory"/> <property name="triggers"> <list> <ref bean="hpi-docusign-retrieve-trigger"/> <ref bean="index-queue-document-unlock-reset-trigger"/> <ref bean="indexer-temp-cleanup-trigger"/> </list> </property> </bean> -
After making these changes you will need to restart Alfresco.
Setup the Repository
-
Add a folder to the repository to store DocuSign data.
- Defaults to
/hpi/docuSignData
- Defaults to
-
Set the permissions on the folder to - HPI Administrators - Coordinator, EVERYONE - Contributor.
Run Job Immediately
Since the job is typically configured to run every hour, it’s sometimes necessary to force the job to run for testing. Navigate to the Alfresco Admin Console -> Scheduled Jobs. Run the com.tsgrp.opencontent.alfresco.job.retrieveDocusignContentJob.
Integrating Controlled Documents Solution with Alfresco Governance Services
Background
- When utilizing ACA Controlled Docs and Alfresco Governance Services, a common desired result is that as soon as a doc becomes effective it should become an AGS record.
- If we were just to declare that effective controlled doc a record, it could no longer be able to be checked out and checked back in since records are immutable (the controlled doc version chain would essentially be dead)
- Therefore, enabling the controlled docs with AGS solution will actually create a copy of the controlled document when it becomes effective so that that copy can be declared an AGS record and the controlled doc itself will still be able to be checked out and checked back in
The following things will happen when this add on is enabled
- When a controlled doc becomes effective
- A record copy is created of that controlled doc
- Disposition
- When the record copy is deleted, a behavior will now run and delete the associated controlled document version
- Superceded/obsolete
- When a controlled doc becomes superceded or obsoleted, the record copy status will also be updated to show the change
Configuring the solution
Prerequisites
- You will need AGS installed in Alfresco
- You will need a working controlled docs solutions such that documents are moved to the effective state
- You will need 2 separate object types - 1 for your controlled doc (for example hy:controlledDoc) and 1 type that your record should be copied to (for example hy:record)
The are 2 key pieces to configuring controlled docs with AGS
1. Enable the functionality by overriding the default values for these props
controlled.docs.with.ags=true- Set this to true to signify we are using the controlled docs with AGS solution
controlled.docs.with.ags.object.type={http://www.hyland.com/model/content/1.0}record- Set the ObjectType for the created record copy of the node
- this is the object type that we will use when we create the copy of the controlled document
- It should be a different object type than the controlled document
controlled.docs.with.ags.association={http://www.hyland.com/model/content/1.0}controlledRecordCopyAssoc- Set the Name of the Association to associate the controlled doc to its record copy
- This is what ties the controlled document to its record copy so we can later look up the associated document to update status or disposition
controlled.docs.with.ags.behaviors.to.disable={http://www.alfresco.org/model/content/1.0}content,{http://www.tsgrp.com/model/tsg/1.0}renditioned- Set the list of behaviors that should be disabled when running the controlled doc with AGS logic
- We suggest setting this to at least cm:content and tsg:Rendition since these content props will be automatically copied over and we don’t want them generated from jobs on our record copy
controlled.docs.with.ags.prefix.for.name.of.copy=REC_- Set the prefix we append to the name of the Record Copy of the controlled document to avoid collisions by copying with the exact same name
controlled.docs.with.ags.associations.to.copy.over=- list of associations we want to copy over from the controlled document to the Record copy
controlled.docs.with.ags.aspects.to.always.add={http://www.tsgrp.com/model/tsg/1.0}doNotAutoRender (http://www.tsgrp.com/model/tsg/1.0%7DdoNotAutoRender)- list of aspects to add (doesn’t need to be on controlled doc but can be)
- Since we will copy over the rendition, add the do not autorender aspect
2. Setup a folder rule to declare the created copy as an AGS record
Setup the folder Rule to declare our record copy as an AGS Record.
-
In the share site, on the folder where your record copy will get created (or moved to if autofile is configured), under folder rules -> add rule.
-
Set the rule to run:
on create or enter -
RUN WHEN -
Content Type = Content(since we don’t want this to run when folders are created in here) -
File Record -> to unfiled Records Folder
-
Check Box to Run on Subfolders
Optional: You can also then setup another rule on the unfiled records folder in the RM site to file the record to a more specific location
-
Processing Outlook MSG Files
ACA provides some out of the box components to allow the repository to process MSG files when they are added to the system. The general goals and requirements are to:
-
Parse the MSG file for any attachments and allow the user to specify an object type and individual properties for each attachment.
-
Store any attachments in the repository and relate them back to the original email. The email is the parent, any attachments are children (if a nested MSG file has an attachment, it is related to the top level email, not the nested MSG file).
-
Generate a PDF rendition for the uploaded MSG file.
When an MSG file is uploaded through Bulk Upload, the MSG file is parsed for any attachments. The attachments are displayed to the user as documents to upload; this means the user can set individual properties for each attachment, including a specific document object type. When the user is done editing properties and chooses to upload the files the attachments are created as individual repository objects with the properties specified by the user. All attachments are placed in the same folder as the email and each attachment is related to the email. A folder tag may additionally be added to each attachment (or the original email) to utilize the folder tags related objects functionality (assuming the content / object model has a folder tag property specified).
Renditioning Outlook MSG Files
The MSG file can be renditioned to a PDF by either OpenContent or Alfresco.
Using Alfresco for MSG renditions
The default renditioning behavior is to allow the repository to add a PDF rendition to the uploaded MSG file(s). It’s also possible to generate a PDF rendition using iText (not recommended). This is configured in the Bulk Import action config in the ACA admin.
Renditioning MSG to PDF is available OOTB in Alfresco if your object type has the tsg:renditioned aspect applied to it. To take advantage of Alfresco’s renditioning engine, ensure you have the below settings.
-
Bulk Upload is configured to let the repository generate the PDF rendition for MSG files.
-
The following bean is in the
module-context.xml:<bean id="transformer.complex.OcMsg2PdfTransformer" class="org.alfresco.repo.content.transform.ComplexContentTransformer" parent="baseContentTransformer"> <property name="transformers"> <list> <ref bean="transformer.OutlookMsg"/> <ref bean="transformer.PdfBox.TextToPdf"/> <ref bean="transformer.Pdf2swf"/> </list> </property> <property name="intermediateMimetypes"> <list> <value>text/plain</value> <value>application/pdf</value> </list> </property> </bean> -
The following property is set in the
alfresco-defaults.properties:
content.transformer.complex.OcMsg2PdfTransformer.pipeline=OutlookMsg|txt|*|pdf|Pdf2swf
Using OpenContent for MSG renditions
To take advantage of OpenContent’s MSG to PDF renditioning, ensure you have the below settings:
- Bulk Upload is configured to let OpenContent generate the PDF rendition for MSG files.
Note: A current limitation of the library used to parse the MSG files is that nested MSG attachments are not available as a byte array, which means the native content is not available. However, a PDF rendition is generated by OC for any nested MSG attachment.
Stage Collaboration Features
ACA allows users to collaborate within the interface by utilizing tools like Zoom and Microsoft Teams. You can configure these integrations so that users are able to start a Teams or Zoom call from within the stage view of ACA.
Stage Collaboration in Action
When viewing a claim with stage collaboration enabled, the stage info section of ACA will include user icons for each user currently viewing that claim.
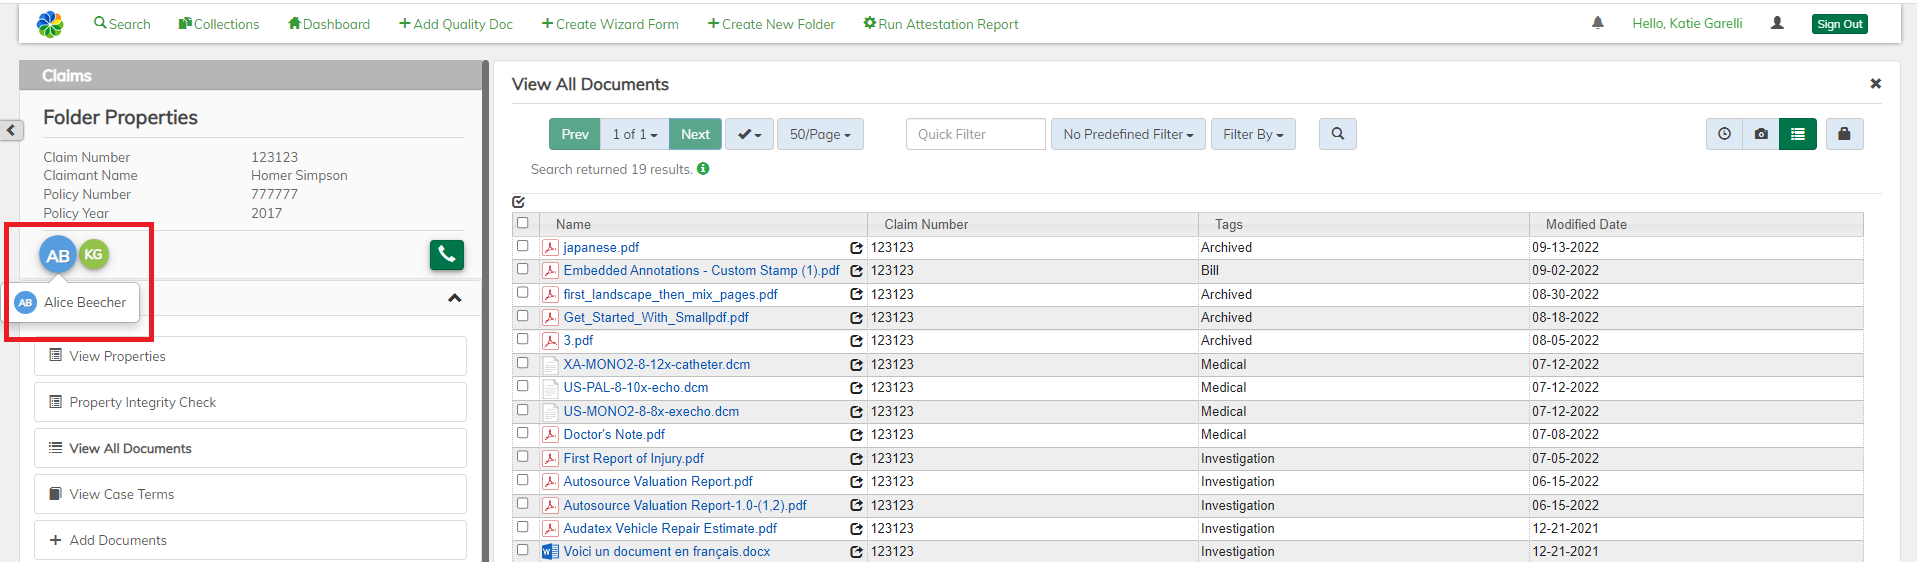
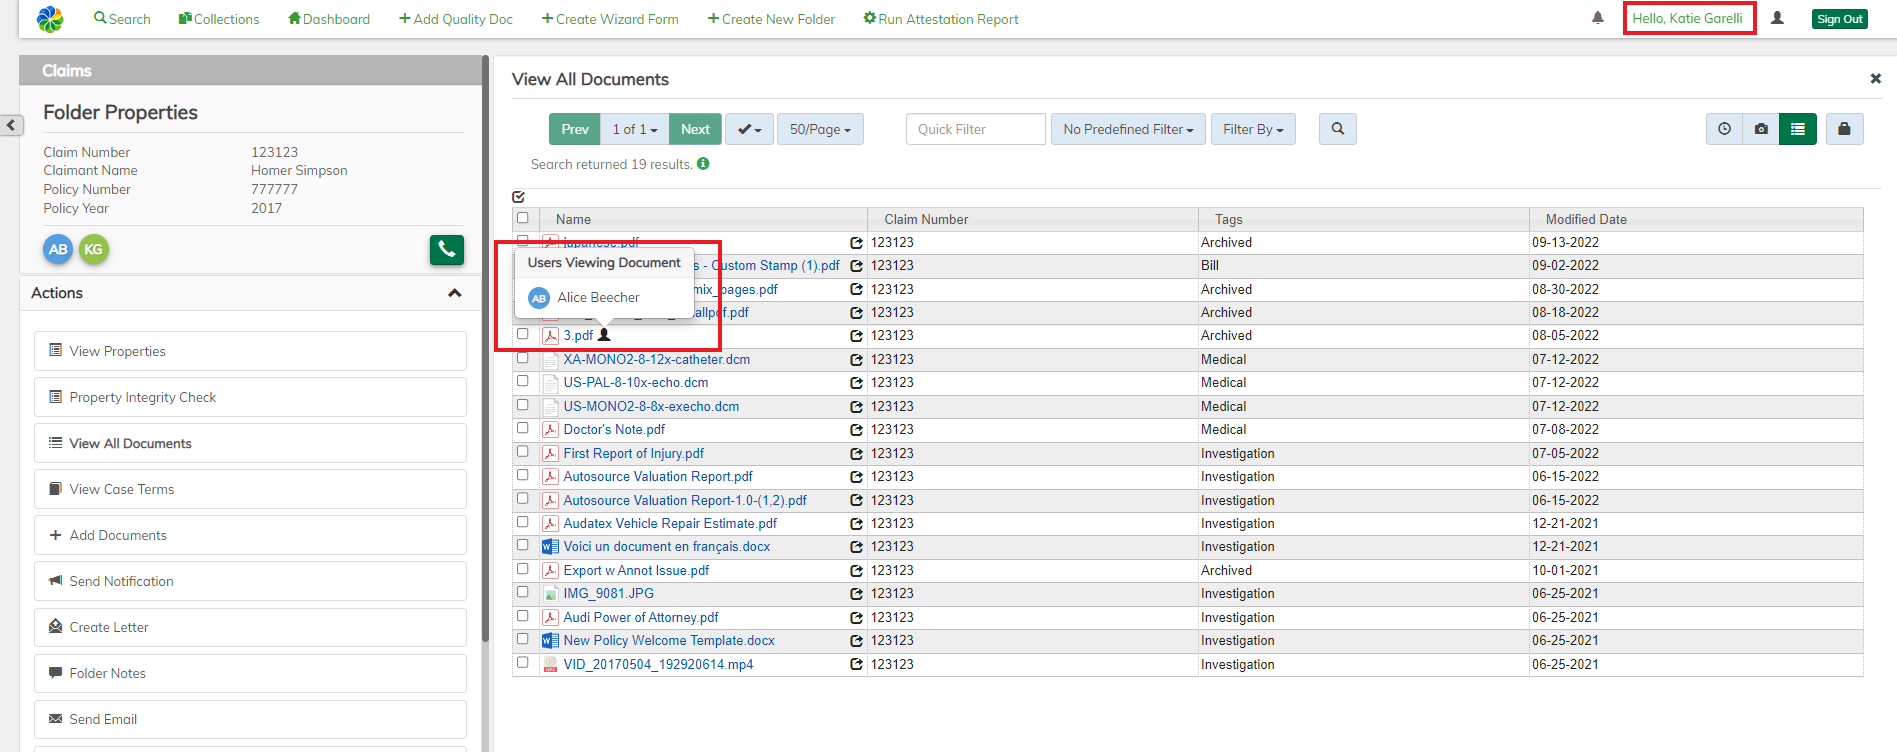
If a user, views one of the documents within the claim, then their icon will appear next to that document for all other users viewing the claim.
For example, if both Alice and Katie are viewing claim 123123 and Alice opens the 3.pdf document shown below:
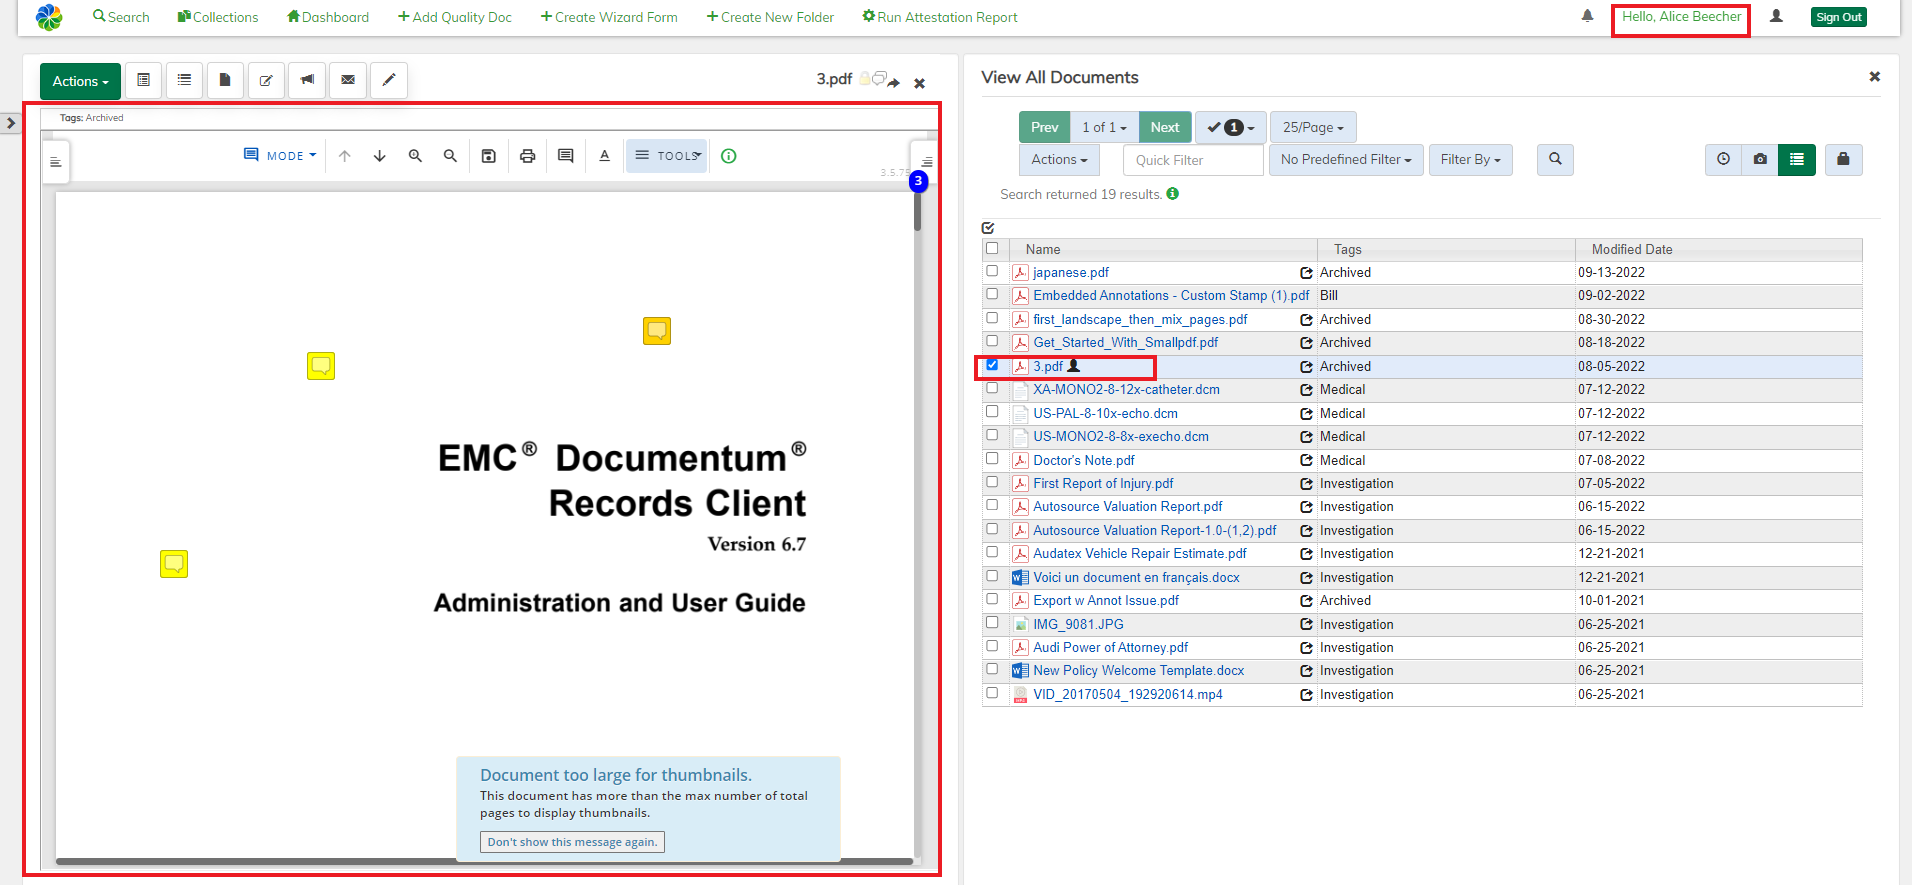
Katie will see an icon in the view all documents table showing that someone is viewing that document. If Katie hovers over that icon she can see that it is Alice who is viewing the document.
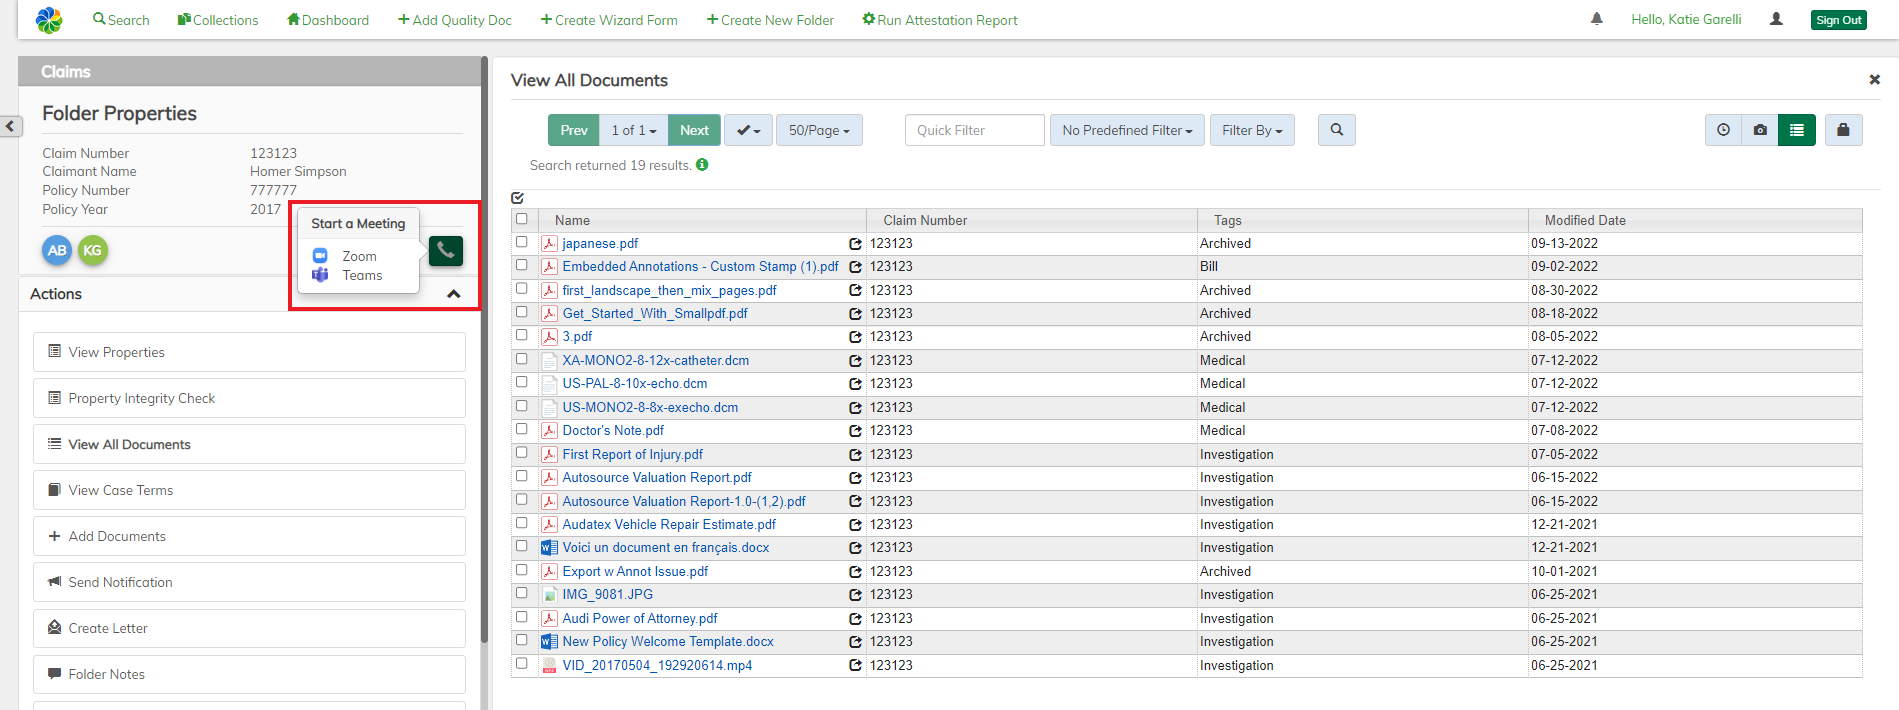
Another important feature to note: (If configured) there will be an option to start a zoom and/or teams call with the users viewing the claim.
Configuration Steps
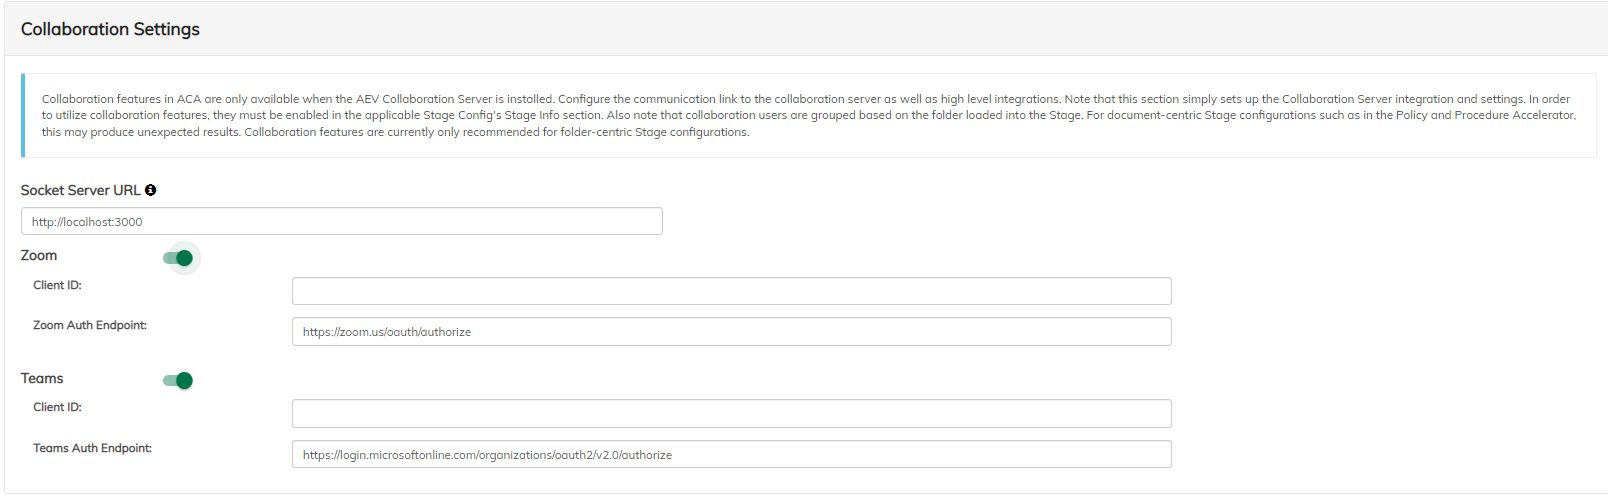
The stage collaboration features are configured in the ACA admin.
Under the Application configuration, find the Collaboration Setting section:
 Here you will have the option to turn on zoom or teams integrations, or both.
This area holds the high level configurations for these integrations.
Here you will have the option to turn on zoom or teams integrations, or both.
This area holds the high level configurations for these integrations.
Application Config
-
Set the collaboration url. These collaboration features require the AEV socket server to be installed. If you installed the defaults according to the installation guide then the socket server will be running on port 3000. Update the url to have the correct host and port (ex:
http://localhost:3000). -
Enable Zoom integration if desired by toggling the switch to on
- Once toggled on you will be prompted for a Client Id and authentication endpoint
- For the client Id, if you already have a zoom account setup with your application registered then go ahead and add the clientId and auth url from that account. If you need to set it up still, see the Zoom Setup via Zoom MarketPlace section below.
-
Enable Teams integration if desired by toggling the switch to on
-
Once toggled on you will be prompted for a Client Id and authentication endpoint
-
For the client Id, if you already have an azure account setup with your application registered then go ahead and add the clientId and auth url from that account. If you need to set it up still, see the Teams Setup via Azure section below.
-
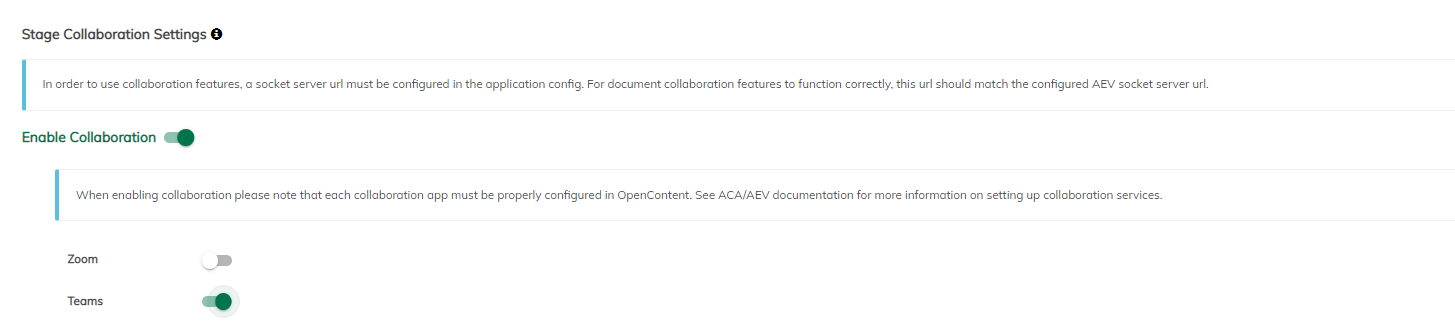
Stage Config
Now that the collaboration connection details are configured, we need to enable it for the individual stage configurations.
To do so, in the ACA admin interface, navigate to the Stage configuration you wish to enable collaboration for. Select the Stage Info section of the config in the dropdown. Then navigate to the Collaboration Settings section of this config. Flip the switch to enable overall collaboration then choose to enable zoom, teams, or both via the individual toggles.
OpenContent Config
The final piece is to configure the teams integration information that Open Content requires. To do so, add the following properties to your opencontent-override-placeholders.properties
Required by both zoom and teams collaborations
annotation.collabEndpoint= {endpoint to the collaboration server ex: http://localhost:3000}
Required by teams collaboration
-
teams.redirectURL= {opencontent endpoint to redirect teams to ex: http://localhost:8080/alfresco/OpenContent/annotation/teamsAuth} -
teams.clientId= {client id from teams marketplace} -
teams.clientSecret= {client secret from teams marketplace}
Required by zoom collaboration
-
zoom.redirectURL= {opencontent endpoint to redirect teams to ex: http://localhost:8080/alfresco/OpenContent/annotation/zoomAuth} -
zoom.clientID= {client id from zoom marketplace} -
zoom.clientKey= {client secret from zoom marketplace} -
zoom.jwtTokenExpiration= {The time in seconds until the jwtToken expires} -
zoom.recordMeetings=false -
zoom.createMeetingRecordingObject=false
Teams Setup via Azure
-
Sign in to the Azure Portal.
-
If your account gives you access to more than one tenant, select your account in the upper right hand corner. Set your portal session to the Azure AD tenant that you want.
-
Search for and select Azure Active Directory. Under Manage, select App Registrations and then click New registration.
-
When the Register an application page appears, enter your application’s registration information:
- Name: any name you want
- Supported Account Types: Select Accounts in any organizational directory
- Redirect URI: Choose Web and fill out the url of the path to your OpenContent plus the Teams endpoint name. ex:
http://localhost:8080/alfresco/OpenContent/annotation/teamsAuth
-
When finished, click Register and you will be taken to the Overview display. Copy and save the Application (client) ID so you can use it in the ACA configuration.
-
Go to Certificates & secrets and create a new client secret. Copy and save this secret because you will need it to use as an injectable in OC.
-
Go to API Permissions.
- You should already have the User.Read permission. Keep it.
- Select Add a permission.
- Navigate to Microsoft Graph -> Delegated Permissions -> OnlineMeetings -> Select and add the OnlineMeetings.ReadWrite permission
Zoom Setup via Zoom MarketPlace
The app must be made by the zoom owner that has all the users added to their zoom account.
Creating a Zoom Application
Here we are creating a zoom app that will allow us to access their APIs as well as interact with users zoom accounts.
-
Create an application in the Zoom Marketplace.
-
Pull open the dropdown that says Develop and click build app - select the OAuth for the app type.
-
Name it whatever you would like, make it an account-level app and do not publish to the Marketplace.
- Now your app has been created. A few items to note here on the first page:
- You will need the clientID and Client Secret Key to use as injectables in OC and to fill in the application config in ACA.
-
Then you will also need to fill out the redirect URL and whitelist URL with the url of the path to the your OpenContent plus the zoom endpoint name.
Ex:
http://localhost:8080/alfresco/OpenContent/annotation/zoomAuth
-
Under the scopes section of the app setup, you will want to add the following scopes:
- meeting:write:admin
- user:read:admin
Adding roles for users
Here we are adding users to a role, so they have permission to interact with the zoom application and start calls from Alfresco Enterprise Viewer.
-
Log in as the zoom owner.
-
Head to the role management section.
-
Add a role called developer.
-
Go to the Role Settings section for the developer role we created in step 3 as we will need to set a few of the roles:
- Under User and Permission Management - check view for Users(View user information)
- Under Dashboard - check view for Meetings(View detail information of real-time and past zoom meetings and relevant participants)
- Under Advanced Features - check edit for Zoom for Developers, Integration, and Marketplace
What to do if my collaboration endpoint is on https
You will need to import the SSL certificate into the truststore of the Java that is running OpenContent.
-
Get your SSL certificate.
- This is the same certificate you have pointed your Collaboration Server at in the
collaborationConfig.jsfile
- This is the same certificate you have pointed your Collaboration Server at in the
-
Find the Java home for the Java which is running OpenContent.
- Find the truststore for this Java.
- If this is a JDK the default should be at
{JAVA_HOME}/jre/lib/security/cacerts, if it is a JRE the default should be at{JAVA_HOME}/lib/security/cacerts
- If this is a JDK the default should be at
-
Import the certficate into the truststore using the java keytool command line tool.
{JAVA_HOME}/bin/keytool -import -trustcacerts -alias collaborationServerCertificate -file {THE_CERTIFICATE}.cer -keystore {TRUSTSTORE_LOCATION}- The default password for the truststore should be
changeit
Google Drive and OneDrive Integrations
ACA has the capability to edit documents online leveraging either the Google Drive or Microsoft OneDrive cloud solutions. In order to enable this functionality, you must have the checkoutToCloudService and checkinFromCloudService document actions configured in your trac’s DocViewer stage actions.
The configs for these actions will require you to specify either Google Drive or OneDrive as your cloud solution of choice.
Once your cloud solution has been chosen, the following steps must be completed in order to integrate your selected cloud solution with ACA:
Microsoft OneDrive
-
Navigate to the Azure Portal and login.
-
Search for
App registrations. -
Create a new App Registration.
-
Make sure the audience is set to
Accounts in any organizational directory and personal Microsoft accounts. -
Select the Authentication section.
- Click the +
Add Platformbutton. - Select
Web. - Set up Redirect url(s) (example:
https://{server}/ocms/dummy/path).Note: For development, a redirect URL starting with
http://localhostis acceptable. All other URLs must start withhttps://. - Under
Implicit grant and hybrid flows, ensure theAccess tokensandID tokenscheckboxes are checked.
- Click the +
-
Select the API Permissions section. Ensure the following permissions are granted:
- Microsoft Graph:
user.read, Files.ReadWrite.All, Files.ReadWrite.AppFolder, Files.ReadWrite.Selected, offline_access, openid, Sites.ReadWrite.All - Admin Consent Required - no for all
- Microsoft Graph:
-
After saving all changes, navigate back to the Overview page and copy the
Application (client) ID. This will be needed in the Configure Google Drive and OneDrive Actions in ACA section. -
Follow these steps if your version of Java runs into issues with the SSL Certificate, usually manifesting in
PKIXerrors in the log files:- Download and install OpenSSL.
- Ensure you are on the same network as the target server.
-
From a command prompt, run this command:
openssl s_client -showcerts -host graph.microsoft.com -port 443 - For the first certificate returned (there are usually 2), mark the lines starting with
-----BEGIN CERTIFICATE-----up to-----END CERTIFICATE-----and copy them into a text editor and save to a file on the Alfresco server. -
Run this command on the Alfresco server to add the certificate to the Java keystore:
<ALFRESCO_HOME>\java\bin\keytool.exe -import -trustcacerts -alias <give the certificate an alias> -file <path to file from the previous step> -keystore <ALFRESCO_HOME>\java\lib\security\cacerts - The alias can be anything as long as it’s unique.
- When prompted, enter the default keystore password.
- When prompted, type yes to trust the certificate.
- Restart Alfresco.
Google Drive
Note: Google Docs is an experimental action and may not work properly.
Reference: https://developers.google.com/identity/protocols/OAuth2UserAgent
-
Create a Google Project:
- Access the Google Developers Console.
- If not already, sign-in to your Google Drive account associated with your ACA application.
- Click on
Select a Projectand create a new project from the menu that appears.
-
Enable Drive within your newly created Google Project:
- Navigate back to the Google API Library.
- From the list of Google APIs, choose
Google Drive API. - Click
Enableon the menu screen that appears.
-
Create a Client ID:
- Click on the Credentials tab from the Google API Library home.
- Click on
Create Credentialsand selectOAuth client IDfrom the dropdown that appears. - Select
Web Applicationas the Application Type. - In the
Authorized JavaScript Originsections that appears, input the domain origin of your ACA application. - Click
Createand Google should present you with a Client ID and Client Secret. - Copy the
Application (client) ID. This will be needed in the ACA admin (see below).
Configure Google Drive and OneDrive Actions in ACA
(CheckoutToCloudService, CheckinFromCloudService, CancelCheckout)
-
Select the action.
-
In the
Edit Online Withslider, choose “Office Online” or “Google Drive” -
For Office online, Enter the Client ID and the Redirect URL from the newly registered Application.
- Set OneDrive checkout location to
Personal or Organization. The default is the user’s personal OneDrive. - Set
Give Edit AbilitySlider depending on whether you want Share Permissions in OneDrive to be automatically sent to any users with Write Permission on that Document. - If Give Edit Ability Slider is set to true, there will be another slider setting whether to send an email to all users with Write permission on the document any time it is checked out to OneDrive. If set to false, the document will simply show up in those users’ Shared Folder on OneDrive.
- Set OneDrive checkout location to
-
For Google Drive, enter the Application ID and choose “Alfresco”
-
Click Save Config.
Integration with Workshare Compare
Install Workshare Compare
-
Download and install CompareService-(version).exe
-
During installing, you will be prompted to set an HTTP and TCP port.
- If choosing the default (8080) continue to the next section.
- If choosing anything but the default, finish the installation then navigate to the installation directory and edit
/Workshare/Compare Service/bin/Workshare.CompareService.ServiceHost.exe.config. Make changes to the below lines.<serviceMetadata httpGetEnabled="true" httpGetUrl="http://localhost:8080/Comparer" />. Updatelocalhostto the server name and8080to your port chosen in the installation wizard.<endpoint address="http://localhost:8080/Comparer/Compare5" binding="basicHttpBinding" bindingConfiguration="UnsecureBindingC5" contract="Workshare.Document.Services.Compare.IComparer" bindingNamespace="http://workshare.com/compareservices/5.0/comparewebservice/" name="CompareWebServiceWCF">. Updatelocalhostto the server name and8080to your port chosen in the installation wizard.<endpoint address="net.tcp://localhost:8090/Comparer/Compare5" binding="netTcpBinding" bindingConfiguration="NetTcpBinding_IComparer" bindingNamespace="http://workshare.com/compareservices/5.0/comparewebservice/" contract="Workshare.Document.Services.Compare.IComparer" name="NetTcpBinding_IComparer">. Updatelocalhostto the server name and8090to the tcp port chosen in the installation wizard.<endpoint address="net.pipe://localhost/Comparer/Compare5" binding="netNamedPipeBinding" bindingNamespace="http://workshare.com/compareservices/5.0/comparewebservice/" bindingConfiguration="NetNamedPipeBinding_IComparer" contract="Workshare.Document.Services.Compare.IComparer" name="NetNamedPipeBinding_IComparer">. Updatelocalhostto the server name.<endpoint address="http://localhost:8080/Comparer/Chunked" binding="wsHttpBinding" bindingConfiguration="WSHttpBinding_IComparerChunked" contract="Workshare.Document.Services.Compare.IComparerChunked" bindingNamespace="http://workshare.com/compareservices/5.2/comparewebservice/" name="WSHttpBinding_IComparerChunked">. Updatelocalhostto the server name and8080to your port chosen in the installation wizard.<endpoint address="net.tcp://localhost:8090/Comparer/Chunked" binding="netTcpBinding" bindingConfiguration="NetTcpBinding_IComparerChunked" contract="Workshare.Document.Services.Compare.IComparerChunked" bindingNamespace="http://workshare.com/compareservices/5.2/comparewebservice/" name="NetTcpBinding_IComparerChunked">. Updatelocalhostto the server name and8090to the tcp port chosen in the installation wizard.<endpoint address="net.pipe://localhost/Comparer/Chunked" binding="netNamedPipeBinding" bindingConfiguration="NetNamedPipeBinding_IComparerChunked" contract="Workshare.Document.Services.Compare.IComparerChunked" bindingNamespace="http://workshare.com/compareservices/5.2/comparewebservice/" name="NetNamedPipeBinding_IComparerChunked">. Updatelocalhostto the server name.<endpoint address="http://localhost:8080/Comparer/mex" binding="mexHttpBinding" bindingNamespace="http://workshare.com/compareservices/1.1/comparewebservice/" contract="IMetadataExchange" />. Updatelocalhostto the server name and8080to your port chosen in the installation wizard.<add key="http_port" value="8080" />. Update8080to the http port chosen in the installation wizard.<add key="tcp_port" value="8090" />. Update8090to the tcp port chosen in the installation wizard.
Setup OpenContent
Override the applicable Workshare Compare properties (see below) in a project-placeholders.properties or override-placeholders.properties file in OC or a custom amp.
Workshare Compare Properties
oc.workshare.wsdl- The URL of the Workshare Compare service. The base is thehttpGetUrlfrom the previous section with?wsdappended to the end. Ex."http://server:8781/Comparer?wsd"oc.workshare.domain- The domain of the machine/server the Workshare Compare server is installed on.oc.workshare.user- Username to login to the machine/server the Workshare Compare server is installed on.oc.workshare.password- Password to login to the machine/server the Workshare Compare server is installed on.oc.workshare.setfile- Path the the “set file” (ex. WorkshareStandard.set) on the machine/server the Workshare Compare server is installed on or local machine. By default, this file is included in the classpath and can be set toWorkshareStandard.setoc.workshare.password.encrypted- Set whether the workshare password has been encrypted with the TSGEncrypter. This only needs to be set if the password is encrypted.
Configure ACA
In ACA Admin, update the View Versions document action to set “Compare Versions?” to yes.