Alfresco Control Center is being developed to allow the administration of multiple Alfresco applications from a single, modern interface. It will provide admin functions that are currently only available in Alfresco Share, and will eventually allow the full administration of Alfresco Content Services and Alfresco Governance Services without needing to use the Share application.
The initial release focusses on the basic minimum requirements to configure Content Services (Enterprise Edition) - the creation of users and groups of users. Additional functionality will be added in future releases.
Overview
The Control Center is provided as a Docker image for containerized deployment. It is recommended for evaluations only (i.e. test and development environments), and accessed using the /admin URL.
When you expand the Identity section, you’ll see the two main areas the Control Center covers:
- A Users section used to manage your users.
- A Groups section used to manage the groups to which your users may be added.
Note: This provides an alternative way of managing users and groups in Share Admin Tools.
Prerequisites
There are a number of software requirements for installing the Control Center. These are the same as for deploying Alfresco Content Services. However, the same details are provided here for easy reference.
Containerized deployment
The images downloaded directly from Docker Hub, or Quay.io are for a limited trial of the Enterprise version of Content Services that goes into read-only mode after 2 days. For a longer (30-day) trial, get the Alfresco Content Services Download Trial.
Note: A Quay.io account is needed to pull the Docker images that are needed:
quay.io/alfresco/alfresco-admin-app
Note: Alfresco customers can request Quay.io credentials by logging a support ticket via Hyland Community. These credentials are required to pull private (Enterprise-only) Docker images from Quay.io.
Software requirements (Docker)
- Docker (latest stable version)
- This allows you to run Docker images and
docker-composeon a single computer.
- This allows you to run Docker images and
- Docker Compose
- Docker Compose is included as part of some Docker installers. If it’s not part of your installation, then install it separately after you’ve installed Docker.
Note: Check the prerequisites for your operating system, both for Docker and Docker Compose.
Deployment
These steps describe how to quickly start up Content Services (including Control Center) using Docker Compose.
Note: While Docker Compose is often used for production deployments, the Docker Compose file provided is recommended for development and test environments only. Customers are expected to adapt this file to their own requirements, if they intend to use Docker Compose to deploy a production environment.
To deploy Content Services using Docker Compose, download and install Docker, then follow the steps below. Make sure that you’ve reviewed the prerequisites before continuing.
-
Download the
docker-compose.ymlfile by accessing the Content Services Download Trial page, which will give you a 30-day license.If you already have a valid license file for Content Services 7.2, you can apply it directly to the running system. See Uploading a new license for more details.
Note: Make sure that exposed ports are open on your host computer. Check the
docker-compose.ymlfile to determine the exposed ports - refer to thehost:containerport definitions. You’ll see they include 5432, 8080, 8083 and others.Note: The Download Trial is usually updated for major.minor versions of Content Services. The latest published version on our website is labelled Version 7.2 - March 2022).
-
Save the
docker-compose.ymlfile in a local folder. -
Log in to Quay.io using your credentials:
docker login quay.ioAlfresco customers can request Quay.io credentials by logging a support ticket via Hyland Community. These credentials are required to pull private (Enterprise-only) Docker images from Quay.io.
-
Deploy Content Services, including the repository, Share, Postgres database, Search Services, etc.:
docker-compose upThis downloads the images, fetches all the dependencies, creates each container, and then starts the system.
As an alternative, you can also start the containers in the background by running
docker-compose up -d. -
Wait for the logs to complete.
See Troubleshooting if you encounter errors whilst the system is starting up.
-
Open your browser and check everything starts up correctly:
Service Endpoint Control Center http://localhost:8080/adminDigital Workspace http://localhost:8080/workspaceShare http://localhost:8080/shareAdministration and REST APIs http://localhost:8080/alfrescoIf Docker is running on your local machine, the IP address will be just
localhost.If you’re still using the Docker Toolbox, you’ll need to switch to Docker Desktop as Docker Toolbox is deprecated.
-
Log in to the Control Center as the
adminuser. Enter the default administrator passwordadmin.
Manage users
The Identity section of the application is used to create and manage users, and groups. Expand the section to see the two main areas the Control Center covers: Users and Groups.
The Users section displays the current list of users in the system.
Properties
The properties for users are:
| Property | Description |
|---|---|
| Id / Username | A unique identifier (username) for the user. Note: A Username cannot be changed once a user has been created. |
| An email address associated to the user. | |
| First Name | The first name of the user. |
| Last Name | The last name of the user. |
| Password | The password for the user account. Note: Enter a minimum of eight characters otherwise you won’t be able to click the Create button. |
| Verify password | Re-enter the password for the user. Make sure that you type the same password you typed in the Password field. |
| Enabled | Select the checkbox to enable the user. |
Add a user
To add a user:
-
Sign into the application.
-
Expand the Identity section and select Users.
-
Click the Add User icon to display the Add User page.
-
Fill in the properties for a user and click Create.
All fields marked with an asterisk (*) are required.
Note: The create button isn’t available until you complete all the required fields. If you didn’t type in matching passwords, you’ll see a message to say that the password fields do not match.
Once the user has been created, click the vertical ellipsis (⋮) at end of the row to access more options, or use the search field on the toolbar to search for users:
- View the user to assign them to one or more groups.
- Edit the user details, including resetting their password.
- Search for any user and view that user’s account information. In the search box, enter the full or partial name of the user (at least 3 characters).
Manage groups
The Groups section displays the current list of groups in the system.
Groups are used to create both top level user groups and subgroups within existing groups.
Properties
The properties for groups are:
| Property | Description |
|---|---|
| Group ID | Enter a unique identifier for the group. Note: The Group ID cannot be changed once a group has been created. |
| Name | A name to identify the group. |
Add a group
To add a group:
-
Sign into the application.
-
Expand the Identity section and select Groups.
-
Click the Add Group icon to display the Add Group page.
-
Give a name to the group and click Create.
Once the group has been created, click the vertical ellipsis (⋮) at end of the row to access more options, or use the search field on the toolbar to search for groups:
- Create subgroup to create subgroups from the parent group.
- Edit group details to change the group name.
- Delete group to remove the group from your system.
- Search for a group. In the search box, enter the full or partial name (at least 3 characters).
Note: You can only modify the group
Nameonce a group has been created.
Security Controls
You can add Security Controls to files and folders so that only users with the required security level can view or access them. These security controls are created and configured using the Admin App and are applied to your files or folders from within the Digital Workspace. The Security Controls you create are made up of Controls created in the Admin App which are in turn made up of one or more Security Marks. You can create as many Security Marks that you require within the different Controls. The names of the Controls and Security Marks you create will be unique to your organization.
There are three different ways you can configure your Controls:
-
All = Users must have all Security Marks from the group that are applied to a file to see that file.
Example: A Security Group named Training contains Security Marks of Media and Data Handling. To see a file marked as both Media or Data Handling, a user must have both Media and Data Handling clearance.
-
Any = Users must have at least one of the Security Marks from the group that are applied to a file to see that file.
Example: A Security Group named Nationality contains Security Marks of UK, US, and Aus. To see a file marked as UK and US, a user must have UK and / or US clearance.
-
Hierarchical = Security Marks are ranked in the order they’re created. The mark created first in a security group has the greatest clearance, the one created last the least clearance.
Example: The predefined Classification group has marks of Top Secret, Secret, and Classified. To see a file classified as Secret, the user must have Secret or Top Secret clearance.
Security Controls in the Admin App
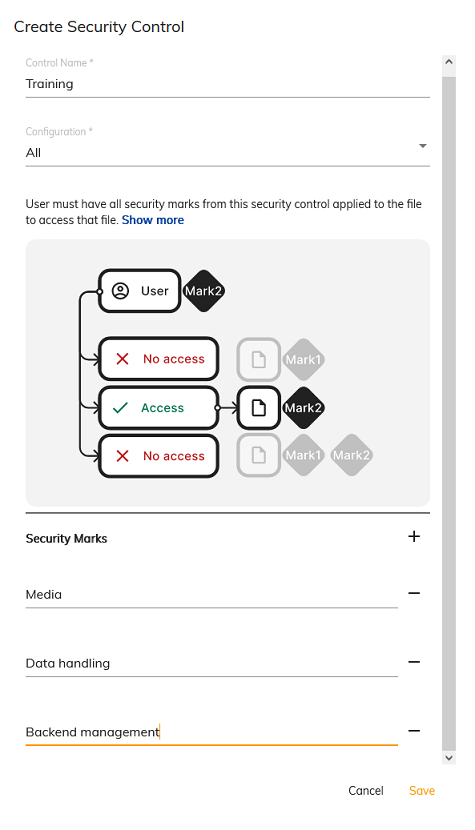
Use this example to create an All Control in the Admin App called Training that has three Security Marks, Media, Data handling, and Backend management.
Important: All Security Marks you create are visible to all users within the Digital Workspace.
Create Controls and Security Marks
Use the Admin App to create Controls.
-
Log into the Admin App as an administrator.
-
Expand the Security entry in the left pane and then click Security Controls.
You can view and edit all of your Controls from here.
-
Click Create New Control.
-
Enter
Trainingin the Control Name field. -
Select All from the Configuration drop-down list.
You can see from the example diagram the user has
Mark 2security rights. When All is selected from the Configuration drop-down list it means they can only access files or directories that only haveMark 2Security Marks assigned to them. -
Click the + symbol next to Security Marks.
-
Enter
Mediainto the new row. -
Click the + symbol again next to Security Marks.
-
Enter
Data handlinginto the new row. -
Click the + symbol again next to Security Marks.
-
Enter
Backend managementinto the new row and then click Save.
You have created a new Control called Training that has three Security Marks. The Security Marks will be visible and useable within the Digital Workspace.
You have created a new Control called Training that has three Security Marks. The Security Marks will be visible and useable within the Digital Workspace.
Troubleshooting
-
If you have issues running
docker-compose upafter deleting a previous Docker Compose cluster, try replacing step 4 in the initial Docker Compose instructions with:docker-compose down && docker-compose build --no-cache && docker-compose up -
If you’re having issues running
docker-compose upon Windows environments due to unavailable or reserved ports, and get errors such as:bind: An attempt was made to access a socket in a way forbidden by its access permissionswhich means that the Windows NAT (WinNAT) service has reserved the port range that Docker Compose is trying to use.To remedy this issue, run the following in a terminal:
net stop winnat docker-compose up net start winnat -
Stop the session by using
CONTROL+C. -
Remove the containers (using the
--rmi alloption):docker-compose down --rmi all -
Try allocating more memory resources, as advised in
docker-compose.yml.For example, in Docker, change the memory setting in Preferences (or Settings) Resources > Advanced > Memory to at least 13 GB. Make sure you restart Docker and wait for the process to finish before continuing.
Go back to step 4 in the initial Docker Compose instructions to start the deployment again.
Note: You’ll need a machine with at least 13 GB of memory to distribute among the Docker containers.