Use this information to install and configure Keycloak as an alternative to using the Identity Service. Keycloak is responsible for supporting user authentication of other Alfresco software.
The key capabilities of Keycloak include the ability to:
- Enable Single Sign On (SSO) capabilities for Alfresco Content Services and Alfresco Process Services
- Configure user authentication between Keycloak and a Lightweight Directory Access Protocol (LDAP) provider
- Configure a supported SAML provider to enable Single Sign On (SSO) with an existing identity provider
More information is available about Keycloak covering:
- An overview of Keycloak architecture is provided in the Alfresco/alfresco-identity-service GitHub project documentation.
- How to install Keycloak.
- How to configure realm and theme customizations.
Note: See the supported platforms page for compatibility between Alfresco Content Services or Alfresco Process Services and Keycloak.
Install Keycloak
You can deploy Keycloak into a new or existing Kubernetes cluster or installed manually using a standalone ZIP distribution.
There are two options for installing Keycloak:
Note: It is recommended that you familiarize yourself with the concepts of containerized deployment before working with Docker, Kubernetes, and Helm.
Install using distribution ZIP
You can install Keycloak on bare metal by using the zip distribution.
-
Download the required zip version from the Keycloak Downloads Archive.
Make sure you fetch the correct Keycloak Server version from the Downloads Archive based on the compatible version listed in the Supported platforms page.
-
Unzip the contents of the archive file.
A single folder called
keycloak-<version>is extracted. -
Follow the instructions provided in the Keycloak - Getting started page to continue.
Install Keycloak using Helm charts
To install Keycloak using Helm charts, follow the instructions provided in the codecentric README.
Install Alfresco Keycloak Theme
The Alfresco Keycloak Theme can replace the default Keycloak login theme to provide an experience that is consistent with Alfresco.
Install the theme manually
To install the Alfresco Keycloak Theme manually:
-
Download the required zip version from https://github.com/Alfresco/alfresco-keycloak-theme/releases based on the compatible version listed in the Supported platforms page.
-
Unzip the contents of the archive file.
A single folder called
alfrescois extracted. -
Move the
alfrescofolder inside thethemesfolder that’s located at the root of the Keycloak distribution.
Install the theme via Helm
Installing the Alfresco theme via Helm requires different steps. The following instructions assume that the codecentric keycloakx Helm charts are used.
Edit your values.yaml file to include a section similar to the following, making sure that the correct THEME_VERSION is set:
keycloakx:
  # [...]
  extraVolumes: |
    - name: theme
      emptyDir: {}
  extraVolumeMounts: |
    - name: theme
      mountPath: "/opt/keycloak/themes/alfresco"
      readOnly: true
  extraInitContainers: |
    - name: theme-provider
      image: busybox:1.36
      imagePullPolicy: IfNotPresent
      command:
        - sh
      args:
        - -c
        - |
          THEME_VERSION=0.3.5
          wget https://github.com/Alfresco/alfresco-keycloak-theme/releases/download/${THEME_VERSION}/alfresco-keycloak-theme-${THEME_VERSION}.zip -O /alfresco.zip
          unzip alfresco.zip
          mv alfresco/* /theme/
      volumeMounts:
        - name: theme
          mountPath: /theme
For further instructions on how to provide additional custom themes, see the official keycloakx Helm charts documentation.
Install the Alfresco Realm
The Alfresco Realm is a reference realm that you can customize and extend according to the given requirements.
Important: The Alfresco realm is not production ready and should be used as a reference only.
Install the realm manually
Prerequisites: Git and Helm are installed.
To install the Alfresco Realm manually:
-
Clone the
https://github.com/Alfresco/alfresco-identity-serviceGitHub repository:git clone https://github.com/Alfresco/alfresco-identity-service.git -
Checkout the required tag based on the Keycloak and Alfresco Keycloak Theme versions specified in the Supported platforms page.
For example:
git checkout keycloak-24.0.3_theme-0.3.5 -
(Optional) Customize the realm section of the sample
values.yamlfile by editing it locally, if needed - for example to define additional users, roles, groups, and override the allowedredirectUris. -
Move to the root of the cloned repository and run the following command.
Make sure that
KC_DISTRIBUTIONis set to the root of your Keycloak installation.You can use either Git Bash or WSL if using Windows:
helm template helm/alfresco-keycloak \
  -f helm/alfresco-keycloak/values.yaml \
  --show-only templates/realm-secret.yaml |
  grep '\"alfresco-realm.json\"' | awk '{ print $2}' |
  sed -e 's/\"$//' -e 's/^\"//' | base64 --decode | jq '.' >$KC_DISTRIBUTION/data/import/alfresco-realm.json
Install the realm via Helm
Prerequisites:
- Git, Helm, and Kubectl are installed.
- A valid
alfresco-realm.jsonfile is produced from the previous instructions.
Installing the Alfresco Realm via Helm requires additional steps.
-
Create a secret using the
alfresco-realm.jsonfile:kubectl create secret generic realm-secret \ --from-file=./alfresco-realm.json \ --namespace=$DESIREDNAMESPACE -
Edit your
values.yamlfile to include a section similar to the following, making sure to merge each section appropriately with pre-existing configuration:keycloakx: # [...] # customize this property as needed # but retain the --import-realm part command: - "/opt/keycloak/bin/kc.sh" - "start" - "--import-realm" - "--http-relative-path=/auth" extraVolumes: | - name: realm-secret secret: secretName: realm-secret extraVolumeMounts: | - name: realm-secret mountPath: "/opt/keycloak/data/import/" readOnly: true
Upgrade Keycloak
Use the following information to upgrade your Keycloak version.
Important:
- Upgrading Keycloak requires downtime and should be performed in a test environment before being attempted in a production environment.
- After the upgrade the database will no longer be compatible with the old server.
You can upgrade from an older Keycloak version to a more recent one by using the official Keycloak documentation, Upgrading Guide. Make sure you follow the instructions in each paragraph of the Migration Changes section sequentially, starting from the Keycloak version you’re currently using until you reach the target Keycloak version for the upgrade.
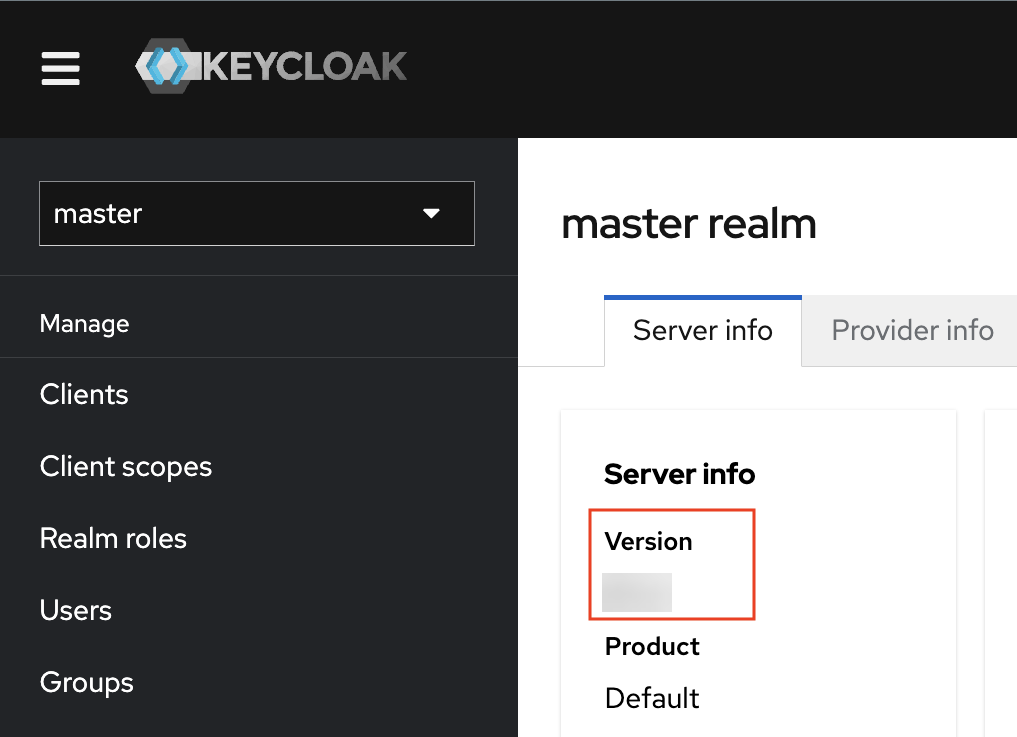
If you need to identify which Keycloak version is used in your installation, sign in to the Keycloak Admin Console and verify the Server Info for the master realm as shown below:
Configure Keycloak
There are two things that you can configure in Keycloak:
- Configure a custom realm
- Configure a custom theme
Configure a custom realm
After you’ve followed the steps in the Install section to install the default Alfresco realm and Alfresco Keycloak Theme, Keycloak is installed or deployed with a default realm applied called Alfresco. You can customize the realm manually or by using a JSON file.
Important: The default realm provided is not production ready and should be used as a reference only.
Customize a realm manually
Customizing a realm manually uses the Keycloak Administration Console to configure realm settings.
-
Sign into the master realm Keycloak Administration Console (Keycloak Admin Console) using the credentials created on your first sign in.
-
Add a new realm or edit the
Alfrescorealm. -
Create a new OIDC client or edit the existing one.
-
Configure any groups or users.
Customize a realm using a JSON file
Customizing a realm using a JSON file configures a realm outside of Keycloak and imports it into the configuration using the Keycloak Admin Console or during deployment if installing to Kubernetes cluster using Helm charts.
To import the configuration in the Admin Console:
-
Edit or use the default realm file provided in the Identity Service GitHub project as a reference to create a custom realm file.
-
Sign into the master realm for the Admin Console using the credentials created on your first sign in.
-
Navigate to the Create Realm page and use the Browse… option to import your custom realm file.
Configure a custom theme
You can apply a custom theme to the following Keycloak components:
- Login screens
- Admin Console
- Account management
The Alfresco theme includes a custom login theme only.
Developing a theme
Themes are created using a combination of CSS, HTML FreeMarker templates, theme properties and images.
Use the Alfresco theme or the default Keycloak theme as a base to extend and create custom themes from.
Importing a theme for a Kubernetes deployment
There are a number of options for importing a theme into a Kubernetes deployment, for example:
-
Create a new Docker image that contains a custom theme.
-
Use an
emptyDirthat is shared with the Keycloak container and configure aninit containerthat runs the new theme image and copies it into the theme directory.The following is an example of configuring this in the
values.yaml:keycloak: extraInitContainers: | - name: custom-theme image: <theme-image-location-and-tag> imagePullPolicy: IfNotPresent command: - sh args: - -c - | echo "copying new theme..." cp -R /<theme-image-name>/* /theme volumeMounts: - name: theme mountPath: /theme extraVolumeMounts: | - name: theme mountPath: /opt/keycloak/themes/<theme-folder-name> extraVolumes: | - name: theme emptyDir: {}
However a new theme is imported, the new theme will need to be applied by signing into the Keycloak Admin Console and selecting the new themes for each component in the Themes tab under Realm Settings.
Importing a theme for a standalone installation
-
Navigate to the themes directory of the installation.
-
Create a new directory for the custom theme.
-
Copy the custom files into directories for each custom theme component, for example
/themes/login/. -
Restart the Keycloak service.
-
In the Keycloak Admin Console select the new themes for each component in the Themes tab under Realm Settings.
Run Keycloak with Process Services
You can run Keycloak with Process Services. You must configure both applications for the logout functionality in Process Services to function correctly.
Note: If you do not configure Keycloak and Process Services correctly, you will receive an error when you try and logout using Process Services.
To run Keycloak with Process Services:
-
Deploy your Keycloak installation by adding the following command-line parameter:
--spi-login-protocol-openid-connect-legacy-logout-redirect-uri=true -
Ensure you’ve set
keycloak.token-store=cookiein theactiviti-identity-service.propertiesfile in Process Services.See
keycloak.token-storein the Process Services properties table for more details. -
Restart Process Services.
The Process Services logout functionality will now work with Keycloak.