A content store provides low-level access to stored binaries ensuring that, for every write, a new binary storage location is made available. This information gives an overview on the content stores, their types, and configuration details with examples.
Content stores overview
Background information on the content store and content binary life cycle.
A content store (ContentStore) or combinations of content stores can be used to control how and where the binary files are physically stored. Binary streams can be stored across a range of locations and can be encrypted/decrypted, as necessary. Also, fast versus slow storage options can be wired up together for efficient storage and access.
Content Services supports a number of different content stores. These are the File content store (default content store), Content store selector, S3 content store, Caching content store, Aggregating content store, and Encrypted content store. For more information on each content store, see Content store types.
Common behavior of different content stores:
- Content stores always write to a new location, so binary files are never overwritten. The content is never modified.
- Each content store can support its own URL standard.
Content binaries life cycle:
-
Stage 1 - Content writes:
When you create a file in Content Services, it becomes a content (in form of a
.binfile) and is stored in the default file content store, for example<ALFRESCO_HOME>\alf_data\contentstoredirectory. The metadata for the content is stored in the database. The database contains a reference to the.binfile. -
Stage 2 - Content reads:
When a request is made to the
ContentStorefor aContentReader, the client reads the content using methods on theContentReader. -
Stage 3 - Copying, moving and versioning files:
The content binaries are never modified by any high-level process. Moving, copying and versioning a file merely affects the content metadata. It is possible to end up with several references to the same raw binary content. Also, writes to the file system do not become visible until the metadata has been committed to the database.
-
Stage 4 - Cleaning up binary files:
When a content URL is no longer attached to any metadata in the system, it is referred to as orphaned. In order to allow adequate time for backup, the content binaries are not deleted immediately. Instead, they’re deleted on a schedule. The job runs against the following
CRONexpression:
system.content.orphanCleanup.cronExpression=0 0 4 * * ?
As an additional safety measure, the binaries are first copied to a local backup at:
dir.contentstore.deleted=${dir.root}/contentstore.deleted
This location can be cleared out by administrators, as necessary. The time to protect orphaned binaries is controlled by:
system.content.orphanProtectDays=14
In most cases, there is no need to change this and the value should be large enough to encompass a sufficient number of full content backups.
Content store types
By default, Content Services is configured to save files or content items in the File content store and orphaned files in the Deleted content store. Other content stores are also provided, which may be used in place of or in addition to the default stores. This information provides an overview on the File content store and additional content stores that you can use with Content Services.
File content store
The File content store is the default content store.
The File content store saves the files or content items on a file system under the root directory. Within the root directory, the files are stored in numeric directories based upon the creation time of the document. The reason for storing the files in a directory structure is to assist incremental backup. The metadata of your file is stored in the database.
Content Services does not modify any file that is stored in the content store. The fileContentStore is pointed to by the ${dir.contentstore} property.
Caching content store (CCS)
This information provides an overview of the Caching content store (CCS) and describes how to configure it.
CachingContentStore class overview
The CachingContentStore class adds transparent caching to any ContentStore implementation. Wrapping a slow ContentStore in a CachingContentStore improves access speed in many use cases. Example use cases include document storage using a XAM appliance or cloud-based storage, such as Amazon’s S3.
The diagram shows the architecture of the Caching content store.

The major classes and interfaces that form the Caching Content Store are:
-
CachingContentStore:This is the main class that implements the ContentStore interface, and can therefore, be used anywhere that a
ContentStorecould be used. TheCachingContentStorehandles all the high level logic of interaction between the cache and the backing store, while the caching itself is provided by a collaboratingContentCacheobject. -
ContentCache:This class is responsible for putting items into and getting items from the cache. The single supplied implementation (
ContentCacheImpl) for this class uses a lookup table to keep track of the files that are being managed by the cache, and a directory on the local file system to store the cached content files. The lookup table itself is aSimpleCacheimplementation instance (for example,DefaultSimpleCacheorHazelcastSimpleCachewhen running a clustered environment). -
QuotaManagerStrategy:The quota managers implement this interface and control how the disk usage is consumed for cached content storage. Content Services provides two implementations for this:
UnlimitedQuotaStrategy(does not restrict disk usage, thereby effectively disabling the quota function) andStandardQuotaStrategy(attempts to keep usage below the maximum specified in bytes or MB).
The CachingContentStore class is highly configurable and many of its components could be exchanged for other implementations. For example, the lookup table could easily be replaced with a different implementation of SimpleCache than that supplied.
The cached content cleaner (CachedContentCleaner) periodically traverses the directory structure containing the cached content files and deletes the content files that are not in use by the cache. Files are considered not in use by the cache if they have no entry in the lookup table managed by ContentCacheImpl. The content cache cleaner is not a part of the architecture but is a helper object for ContentCacheImpl and allows it to operate more efficiently.
CachingContentStore properties
There are a number of properties that you can configure for the CachingContentStore class.
The following properties are used in the sample context file, caching-content-store-context.xml.sample and can be set in the alfresco-global.properties file. Their default values are provided in the repository.properties file.
| Property | Description |
|---|---|
| system.content.caching.cacheOnInbound | Enables write-through caching. If true, an attempt to write the content to the backing store results in the item being cached. Therefore, the first time an item is read (provided the item has not been removed from the cache in the mean time), the file is already cached locally for faster access times. It is recommended that this property is set to true for most usage scenarios. |
| system.content.caching.maxDeleteWatchCount | Defines the number of times the file must have been observed as being available for deletion by previous cleanup runs before it is actually deleted. The default value is always set to 1, but can be increased if readers obtained from the cache could not be used due to the underlying file being deleted. |
| system.content.caching.contentCleanup.cronExpression | Specifies how often the cached content cleanup job will run, for example 0 0 3 * * ?. The supplied value is a quartz expression and is similar to a Unix cron expression. In this case, the cleaner will run at 3 am every morning. |
| system.content.caching.timeToLiveSeconds | Specifies the maximum time in seconds that an item can exist in the cache. After this time elapses, the item will no longer be cached and a request for the content URL will result in the item being fetched from the backing store and cached afresh. A value of 0 means that items won’t have a TTL parameter applied to them. |
| system.content.caching.timeToIdleSeconds | Specifies the maximum time an item in the cache can exist without being requested, for example 60. Each time the item is accessed, the Time To Idle parameter is refreshed and the item will remain in the cache. |
| system.content.caching.maxElementsInMemory | Applies to the lookup table in the ContentCache. Each content URL requires two entries in the lookup table, so a value of 5000 can allow 2500 content items to be held in memory for the lookup table. |
| system.content.caching.maxElementsOnDisk | Applies to the lookup table in the ContentCache. Each content URL requires two entries in the lookup table, so a value of 10000 can allow 5000 items to be held on disk. |
| system.content.caching.minFileAgeInMillis | Specifies that files must be at least this age before they’re marked for deletion, for example 2000. This also stops unnecessary checks, such as loading and examining the associated properties file. |
| system.content.caching.maxUsageMB | Specifies the maximum disk usage in MB that cached content should consume, for example 4096. In other words, this property defines the disk space quota allocated to the ${dir.cachedcontent} directory. It is used by the StandardQuotaStrategy class as configured in the caching-content-store-context.xml.sample file. |
| system.content.caching.maxFileSizeMB | Specifies the maximum size in MB of any individual file of cached content. Content larger than this size can still be retrieved using the CachingContentStore class but the content won’t be cached. If this property is set to 0, then no size limit’ll apply to the individual files. This property is used by the StandardQuotaStrategy class as configured in the caching-content-store-context.xml.sample file. |
Configure CachingContentStore
You can configure the CachingContentStore class.
To demonstrate step-by-step configuration of the CachingContentStore class, the spring context file, caching-content-store-context.xml.sample is used as a starting point for adding caching to a content store. Once configured, you can activate the sample file by removing the .sample file extension and placing it in your installation extension directory at <ALFRESCO_HOME>/tomcat/shared/classes/alfresco/extension.
-
Define an instance of the
CachingContentStoreclass. This is the top level bean that ties together the CCS as a whole.<bean id="fileContentStore" class="org.alfresco.repo.content.caching.CachingContentStore" init-method="init"> <property name="backingStore" ref="backingStore"/> <property name="cache" ref="contentCache"/> <property name="cacheOnInbound" value="${system.content.caching.cacheOnInbound}"/> <property name="quota" ref="standardQuotaManager"/> </bean>In this case, the
fileContentStorebean is overridden. TheContentServicebean usesfileContentStorebean, so CCS is used automatically. You can also specify a different name and an overriddencontentServicebean. The main collaborators ofbackingStore,cacheandquotarefer to the beans for Backing Store, Content Cache and Quota Manager as shown in the diagram in the CachingContentStore overview topic. EachCachingContentStoreclass should have its own dedicated instances of these collaborators and they should not be shared across otherCachingContentStorebeans, should you have any defined. -
Define a backing store. This CCS uses this ContentStore to provide caching for
TenantRoutingS3ContentStore.<bean id="tenantRoutingContentStore" class="org.alfresco.module.org_alfresco_module_cloud.repo.content.s3store.TenantRoutingS3ContentStore" parent="baseTenantRoutingContentStore"> <property name="defaultRootDir" value="${dir.contentstore}" /> <property name="s3AccessKey" value="${s3.accessKey}" /> <property name="s3SecretKey" value="${s3.secretKey}" /> <property name="s3BucketName" value="${s3.bucketName}" /> <property name="s3BucketLocation" value="${s3.bucketLocation}" /> <property name="s3FlatRoot" value="${s3.flatRoot}" /> <property name="globalProperties"> <ref bean="global-properties" /> </property> </bean>Note: Remember to change this bean’s ID to
backingStorefor use with the preceding XML snippet, or change therefattribute in thefileContentStorebean definition to refer to the correct ID (tenantRoutingContentStore). -
Define a
ContentCache. This object is responsible for placing content into (and retrieving content from) the cache.<bean id="contentCache" class="org.alfresco.repo.content.caching.ContentCacheImpl"> <property name="memoryStore" ref="cachingContentStoreCache"/> <property name="cacheRoot" value="${dir.cachedcontent}"/> </bean>The
ContentCacheImpluses a fast lookup table for determining whether an item is currently cached by the CCS, for controlling the maximum number of items in the cache and their Time To Live (TTL). The lookup table is specified here by thememoryStoreproperty. TheContentCacheImplalso uses a directory on the local filesystem for storing binary content data (the actual content being cached). This directory is specified by thecacheRootproperty. The following code illustrates the bean referencing the specifiedmemoryStorereference:<bean id="cachingContentStoreCache" factory-bean="cacheFactory" factory-method="createCache"> <constructor-arg value="cache.cachingContentStoreCache"/> </bean> -
Now that you’ve configured the key components of the
CachingContentStoreclass, backing store (ContentStore) andContentCache, you can optionally specify a quota manager. If you do not wish to specify the quota manager, then theUnlimitedQuotaStrategywill be used. The example CCS bean expects this bean to be defined:<bean id="standardQuotaManager" class="org.alfresco.repo.content.caching.quota.StandardQuotaStrategy" init-method="init" destroy-method="shutdown"> <property name="maxUsageMB" value="${system.content.caching.maxUsageMB}"/> <property name="maxFileSizeMB" value="${system.content.caching.maxFileSizeMB}"/> <property name="cache" ref="contentCache"/> <property name="cleaner" ref="cachedContentCleaner"/> </bean> -
Finally, to ensure that the disk space is used in a controlled manner, a
CachedContentCleanershould be configured to clean up cached content files that are no longer being used by the cache.<bean id="cachingContentStoreCleanerJobDetail" class="org.springframework.scheduling.quartz.JobDetailBean"> <property name="jobClass"> <value>org.alfresco.repo.content.caching.cleanup.CachedContentCleanupJob</value> </property> <property name="jobDataAsMap"> <map> <entry key="cachedContentCleaner"> <ref bean="cachedContentCleaner" /> </entry> </map> </property> </bean> <bean id="cachedContentCleaner" class="org.alfresco.repo.content.caching.cleanup.CachedContentCleaner" init-method="init"> <property name="minFileAgeMillis" value="${system.content.caching.minFileAgeMillis}"/> <property name="maxDeleteWatchCount" value="${system.content.caching.maxDeleteWatchCount}"/> <property name="cache" ref="contentCache"/> <property name="usageTracker" ref="standardQuotaManager"/> </bean> <bean id="cachingContentStoreCleanerTrigger" class="org.alfresco.util.CronTriggerBean"> <property name="jobDetail"> <ref bean="cachingContentStoreCleanerJobDetail" /> </property> <property name="scheduler"> <ref bean="schedulerFactory" /> </property> <property name="cronExpression"> <value>${system.content.caching.contentCleanup.cronExpression}</value> </property> </bean>Note that both the cleaner and the quota manager limit the usage of disk space but they do not perform the same function. In addition to removing the orphaned content, the cleaner’s job is to remove files that are out of use from the cache due to parameters, such as TTL, which sets the maximum time an item should be used by the CCS. The quota manager exists to set specific requirements in terms of allowed disk space.
A number of property placeholders are used in the specified definitions. You can replace them directly in your configuration with the required values, or you can use the placeholders as they’re and set the values in the
repository.propertiesfile. An advantage of using the property placeholders is that the sample file can be used with very few changes and the appropriate properties can be modified to get the CCS running with little effort.
Aggregating content store
An Aggregating content store (AggregatingContentStore) is a content store implementation that aggregates a set of stores.
Important: The aggregate content store, is not supported as ‘Encrypted content store’.
Note: The Aggregating content store is based upon the Replicating content store that was included in prior releases of Content Services, but supports specifically the content aggregation use case, not content replication.
The Aggregating content store contains a primary store and a set of secondary stores. The order in which the stores appear in the list of participating stores is important. The first store in the list is known as the primary store. Content can be read from any of the stores, as if it were a single store. When the replicator goes to fetch content, the stores are searched from first to last. The stores should therefore, be arranged in order of speed.
For example, if you have a fast (and expensive) local disk, you can use this as your primary store for best performance. The old infrequently used files may be stored on lower cost, slower storage.
When replication is disabled, content is written to the primary store only. The other stores are used to retrieve content and the primary store is not updated with the content.
Example configuration for tiered storage
The following configuration defines an additional tiered storage solution. The default content store is not changed. An additional set of secondary stores is defined (tier1, tier2 and tier3). As content ages (old infrequently used files), it can be moved to lower tiers. If the tiered storage is slow, a Caching content store can be placed in front.
-
In your
alfresco-global.properties file, define three new folder locations:dir.contentstore1=${dir.root}/tier1dir.contentstore2=${dir.root}/tier2dir.contentstore3=${dir.root}/tier3
-
Locate the
<TOMCAT_HOME>/shared/classes/alfresco/extension/aggregating-store-context.xml.samplefile. -
Remove the
.sampleextension from this file.The
aggregating-store-context.xmlfile enables Aggregating content store. The content of this file is shown below. Place theaggregating-store-context.xmlfile in your<TOMCAT_HOME>/shared/classes/alfresco/extensionfolder.
<?xml version='1.0' encoding='UTF-8'?>
<!DOCTYPE beans PUBLIC '-//SPRING//DTD BEAN//EN' 'http://www.springframework.org/dtd/spring-beans.dtd'>

<!-- This file enables an aggregating content store. It should be placed in shared/classes/alfresco/extension -->

<beans>

  <bean id="defaultContentStore" class="org.alfresco.repo.content.filestore.FileContentStore">
      <constructor-arg>
         <value>${dir.contentstore}</value>
      </constructor-arg>
      <!-- Uncomment the property below to add content filesize limit.
      <property name="contentLimitProvider" ref="defaultContentLimitProvider"/>
      -->
  </bean>


  <bean id="tier1ContentStore" class="org.alfresco.repo.content.filestore.FileContentStore">
      <constructor-arg>
         <value>${dir.contentstore1}</value>
      </constructor-arg>
      <!-- Uncomment the property below to add content filesize limit.
      <property name="contentLimitProvider" ref="defaultContentLimitProvider"/>
      -->
  </bean>

  <bean id="tier2ContentStore" class="org.alfresco.repo.content.filestore.FileContentStore">
      <constructor-arg>
         <value>${dir.contentstore2}</value>
      </constructor-arg>
      <!-- Uncomment the property below to add content filesize limit.
      <property name="contentLimitProvider" ref="defaultContentLimitProvider"/>
      -->
  </bean>

  <bean id="tier3ContentStore" class="org.alfresco.repo.content.filestore.FileContentStore">
      <constructor-arg>
         <value>${dir.contentstore3}</value>
      </constructor-arg>
      <!-- Uncomment the property below to add content filesize limit.
      <property name="contentLimitProvider" ref="defaultContentLimitProvider"/>
      -->
  </bean>


  <!-- this is the aggregating content store - the name fileContentStore overrides the alfresco default store -->
  <bean id="fileContentStore"
       class="org.alfresco.repo.content.replication.AggregatingContentStore" >

      <property name="primaryStore" ref="defaultContentStore" />
      <property name="secondaryStores">
          <list>
              <ref bean="tier1ContentStore" />
              <ref bean="tier2ContentStore" />
              <ref bean="tier3ContentStore" />
          </list>
      </property>
  </bean>
</beans>
Encrypted content store
The Encrypted content store is used for content encryption at rest. This information provides an overview of the Encrypted content store, its components, and how it is administered.
Content encryption overview
Use this information to understand Content Services implementation of content encryption using the Encrypted content store.
Important: Once you make the decision to use Encrypted content store for content encryption, it is irrevocable. This is because when a document is written to this content store, it is encrypted. If you decide to revert to an unencrypted content store, the content can’t be decrypted.
Important: If Encrypted content store is enabled on an existing or upgraded Content Services installation, only new content will be encrypted but any existing content won’t be encrypted.
Cryptography process
The Encrypted content store provides content encryption at rest capability. This is done by scrambling plain text into cipher text (encryption) and then back again (decryption) with the help of symmetric and asymmetric keys.
When a document is written to the Encrypted content store, the Encrypted content store uses symmetric encryption to encrypt the document before it is written to the wrapped content store. A new symmetric key is generated each time a document is written to the content store. This means that every document in the system is encrypted with a different symmetric key. Further more, asymmetric encryption (such as RSA) is used to encrypt/decrypt those symmetric encryption/decryption keys. The asymmetric encryption uses a master key which is selected from a set of configured master keys.
The Encrypted content store encrypts content with a master key that is randomly selected from the pool of master keys. No control is provided for using a specific master key for a specific piece of content, as that would allow attackers to target specific master keys when attempting to access or tamper with content.
Content Services uses a set of master keys, which are:
- Selected in a random fashion
- Stored in a password-protected keystore
- Can be retired, in the event of key theft or as part of a standard key retirement process. For more information, see the encryption-related JMX operations in Master key management.
The repository knows which master key was used to encrypt a given symmetric key so that when a user reads a particular document, the repository can decrypt the symmetric key (using that master key) and then use the decrypted symmetric key to decrypt the document content.
Important: Content Services does not store the master key you provide. Instead, we access it from the keystore. If we can’t access that key, it can’t decrypt the content. So, make sure you maintain the master key and Content Services has access to it. Otherwise, you’ll not be able to read the content.
The following diagram shows the implementation of content encryption using the Encrypted content store over the default content store:

Issues to consider before using Encrypted content store
Consider these issues before using Encrypted content store.
- Because encryption is done at the content store level and not just for a few files in the repository, you must make sure whether encryption is needed at the content store level or not.
- Once you make the decision to use Encrypted content store, it is irrevocable. This is because when a document is written to the Encrypted content store, it is encrypted. If you decide to revert to an unencrypted content store, the content can’t be decrypted.
- The Encrypted content store is a wrapper around the File content store. All content will be encrypted. It is not supported to use the Encrypted content store in any other configuration.
- Using multiple content stores is not supported by Encrypted content store. This includes using the Content Store Selector or an Aggregating content store in a repository where Encrypted content store is implemented. This type of configuration is likely to expose encrypted content in an unencrypted store, such as in the version history or when the content is deleted.
- Encrypted content store is separately licensed and requires that you receive a license key from Content Services.
- Multi-tenancy is not supported by Encrypted content store.
Install Encrypted content store
Before you begin, ensure that you have an instance of Content Services installed on your machine.
-
Obtain the license (
.lic) file with content encryption enabled from Alfresco Support. -
Apply the license into the
<ALFRESCO_HOME>/tomcat/shared/classes/alfresco/extension/licensedirectory. -
Generate the RSA master key(s) in a new keystore.
For example, use the following command to generate the master key:
keytool -genkey -alias key1 -storetype jceks -keyalg RSA -keystore <master keystore path> -keysize 2048 -
Due to US export regulations and limitations in the Java Cryptographic Extension (JCE), the length of the symmetric key is not greater than 128 bit in the default configuration. If you’re eligible to unlimited strength encryption, download the Unlimited Strength Jurisdiction Policy files from Oracle and increase the configuration value,
cryptodoc.jce.keygen.defaultSymmetricKeySize. -
Follow the instructions for Configuring the Encrypted content store.
Configure the Encrypted content store
The Encrypted content store is configured using the properties in the alfresco-global.properties file and can also be administered using JMX.
- Global properties
- JMX
To configure the Encrypted content store, set the configuration properties in the alfresco-global.properties file. For example, here is a set of properties which configure the default Java JCE provider implementation with two master keys (override the cryptodoc.jce.providerName property to configure a specific provider):
filecontentstore.subsystem.name=encryptedContentStore
cryptodoc.jce.keystore.path=<path_to_the_keystore>
cryptodoc.jce.keystore.password=<master_password_for_the_keystore>
cryptodoc.jce.key.aliases=<alias_for_the_key>
cryptodoc.jce.key.passwords=<password_for_the_key_itself>
cryptodoc.jce.keygen.defaultSymmetricKeySize=128
Note: On Enterprise, properties edited using JMX are persisted and will override any settings in the
alfresco-global.propertiesfile. Use the JMX client to change the configuration properties on Enterprise.
You can configure the Encrypted content store using the JMX client, such as JConsole on the JMX MBeans > Alfresco > Configuration > ContentStore > managed > encrypted > Attributes tab.

Encrypted content store properties
There are a number of properties that need to be set for the Encrypted content store.
Set these properties in the alfresco-global.properties file.
| Property | Description |
|---|---|
| filecontentstore.subsystem.name | Enables the Encrypted Content Store subsystem, for example, encryptedContentStore. |
| cryptodoc.jce.providerName | Specifies the Java security provider name. If left blank, it indicates using the default provider. You can also select your own provider by setting this property to the provider class name. If a specific provider name is not set, the system selects the most preferred provider. |
| cryptodoc.jce.keystore.type | Specifies the keystore type, for example, jceks. |
| cryptodoc.jce.keystore.path | Specifies the path to the keystore containing the master keys, for example, /opt/alfresco/my_key.jks. |
| cryptodoc.jce.keystore.password | Specifies the keystore password, for example, password. |
| cryptodoc.jce.key.aliases | Specifies a comma-separated list of the aliases/names of the master keys in the master keystore, for example, mkey1,mkey2. These are the aliases used with the keygen tool, for example, encstore. |
| cryptodoc.jce.key.passwords | Specifies a comma-separated list of passwords used to load the keys from the master key store. The position of the password matches the position of the corresponding key alias in the cryptodoc.jce.key.aliases property. This password is used with the keytool command and can be different from the master password. For example, password,password. |
| cryptodoc.jce.keygen.defaultSymmetricKeySize | Specifies the key size to use for the symmetric keys that are used to encrypt/decrypt document content. Note: The default symmetric key size is 128 bits. Users who want better key strength should download and install the Java Cryptography Extension (JCE) Unlimited Strength Jurisdiction Policy Files for the JRE. |
| cryptodoc.jce.keygen.defaultSymmetricAlgorithm | Specifies the symmetric key algorithm. The following properties are used to re-encrypt symmetric keys (for master key revocation). |
| cryptodoc.symmetricKey.reencryption.batch.size | Specifies the number of symmetric keys re-encrypted in each batch, for example, 200. |
| cryptodoc.symmetricKey.reencryption.numThreads | Specifies the number of threads to use to perform re-encryption, for example, 4. |
The keystore path, password, aliases and their password are the common properties you can overwrite to configure Encrypted Content Store using the alfresco-global.properties file.
The JMX interface exposes these properties and allows the user to change them for a running system. For more information, see the following section.
Master key management
If you’ve installed the Oracle Java SE Development Kit (JDK), you can use JMX operations to perform some common tasks for Encrypted content store.
The JMX client, JConsole, allows the user to see the set of current master keys and the total number of symmetric keys encrypted by each master key. It also enables the users to revoke a master key and to add a new master key alias.
Add a new master key
To add a master key, follow the steps below:
-
Add the new master key to the master keystore file.
-
Define the new master key alias and password by one of the following ways:
- Add the key alias and password in the
alfresco-global.propertiesfile; or - Add the key alias and password by using the JMX operations. Follow the sequence of steps from Step 3 onwards.
Note: The values set on a subsystem will mean that the property values from configuration files may be overwritten or ignored. Use the JMX client to set the configuration properties.
- Add the key alias and password in the
-
On the JConsole window, select the MBeans tab.
The available managed beans are displayed in JConsole.
-
Navigate to Alfresco > Configuration > ContentStore > managed > encrypted > Attributes.
The Attribute values window is displayed.
-
-
On the Operation invocation window, click stop to stop the Content Services subsystem.
-

-
On the Attribute values window, add a new key alias in the cryptodoc.jce.key.aliases field and its password in the cryptodoc.jce.key.passwords field. Both these fields accept comma-separated list of values.
Note: While adding a new master key alias, if you add the alias but not the password, the master key will fail to register.
-
Click start to restart and reinitialize the Encrypted Content Store subsystem.
-
Click showMasterKeys to check that the new master key is now being used.
Retire a master key
To retire a master key, follow the sequence of JMX operations below:
-
On the JConsole window, select the MBeans tab.
The available managed beans are displayed in JConsole.
-
Navigate to Alfresco > Configuration > ContentStore > managed > encrypted > Operations.
The Operation invocation window is displayed.
-
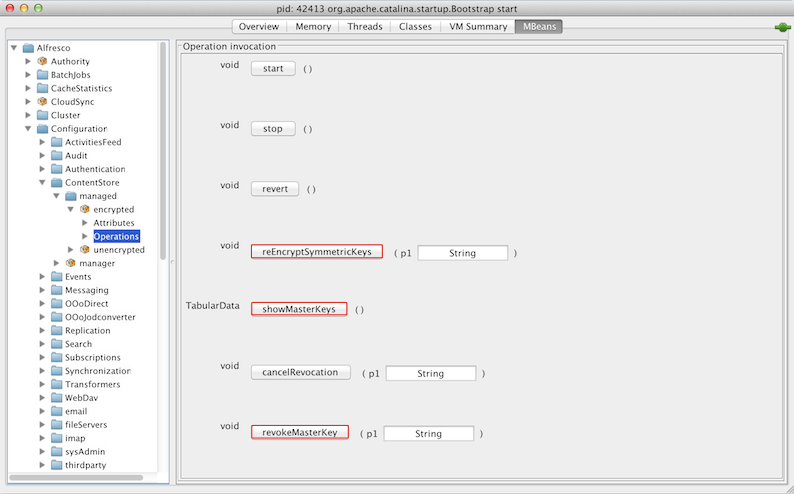
-
For operation revokeMasterKey, enter the alias of the master key to be revoked as parameter p1 and click revokeMasterKey.
The relevant master key won’t be used for encryption.
-
For operation reEncryptSymmetricKeys, enter the alias of the revoked master key as parameter p1 and click reEncryptSymmetricKeys.
This will reencrypt the symmetric keys of this master key with a new master key.
-
Click showMasterKeys to check that there are no outstanding symmetric keys for the revoked master key and that the total number of files that were encrypted using the revoked master key is zero.
-
Click stop to stop the Encrypted content store subsystem.
-
Remove the relevant alias and related password from MBeans > Alfresco > Configuration > ContentStore > managed > encrypted > Attributes > Attribute values window.
-
Click start to restart and reinitialize the Encrypted Content Store subsystem.
Note: If you update or remove a master key using the JMX client on an Enterprise installation, those updates override the values in the
alfresco-global.propertiesfile. Alternatively, one can delete the master key alias and password by editing thealfresco-global.propertiesfile and restarting the repository.Note: Key revocation is not persisted. If you restart this subsystem (or Alfresco) between revoking a master key (Step 3) and removing that key (Step 7), the key will be used again for encryption when this subsystem is initialized again from the key alias list.
Expiry of a master key
The Encrypted content store subsystem does not support automatic expiry of the master key. When a master key expires from the keystore, you must follow the sequence of JMX operations mentioned in the Retire a master key section above to manually retire the master key.
Additional JMX operations
- Click cancelRevocation to cancel revocation of the master key. This ensures that the previously revoked master key is now being used.
- Click reloadMasterKeys to reload the master keys from the keystore file.
Alfresco Content Connector for AWS S3
The Alfresco Content Connector for AWS S3 is an add-on module that provides an alternative content store. It uses Amazon’s Simple Storage Service (S3) as the storage mechanism for Content Services, allowing for virtually unlimited and inexpensive storage.
Alfresco Content Connector for Azure
The Alfresco Content Connector for Azure is an add-on module that provides an alternative content store. It uses Microsoft’s Azure Blob Storage as the storage mechanism for Content Services, allowing for virtually unlimited and inexpensive storage.
Alfresco Content Connector for SAP applications
Alfresco Content Connector for SAP applications is an add-on module that offers seamless integration between Content Services and SAP (R/3, S/4HANA). It connects the structured data in SAP with the unstructured data in Content Services.
Content store selector
The content store selector provides a mechanism to control the store used for the content file associated with a particular content item.
Important: The content store selector, is not supported as ‘Encrypted content store’.
By applying the cm:storeSelector aspect and setting its cm:storeName property to the name of a selectable store, the content will be automatically moved from its current location to the new store. The store does not, therefore, store content itself, it defines and manages those stores that are available for selection.
This allows storage polices to be implemented to control which underlying physical storage is used, based on your applications needs or business policies.
Content store selector configuration example
The following example defines two file stores, in addition to the standard default file store. By setting the cm:storeName property to either of these new stores or the default store, the content is automatically moved from its existing store to the relevant new store.
-
Create a
sample-content-store-selector-context.xmlfile in the<extension>directory. -
Define the new file stores by adding the following bean definitions:
 <bean id="firstSharedFileContentStore" class="org.alfresco.repo.content.filestore.FileContentStore">
    <constructor-arg>
       <value>${dir.root}/storeA</value>
    </constructor-arg>
 </bean>
 <bean id="secondSharedFileContentStore" class="org.alfresco.repo.content.filestore.FileContentStore">
    <constructor-arg>
       <value>${dir.root}/storeB</value>
    </constructor-arg>
 </bean>
This configuration snippet defines two new stores. The physical location is relative to the
dir.rootproperty defined in thealfresco-global.propertiesfile. -
Declare the
storeSelectorContentStoreto be the primary content store by adding the following bean definition:<bean id="contentService" parent="baseContentService"> <property name="store"> <ref bean="storeSelectorContentStore" /> </property> </bean> -
Declare the mapping between store names and store instances.
<bean id="storeSelectorContentStore" parent="storeSelectorContentStoreBase"> <property name="defaultStoreName"> <value>default</value> </property> <property name="storesByName"> <map> <entry key="default"> <ref bean="fileContentStore" /> </entry> <entry key="storeA"> <ref bean="firstSharedFileContentStore" /> </entry> <entry key="storeB"> <ref bean="secondSharedFileContentStore" /> </entry> </map> </property> </bean>The list of stores is defined by the
<property name="storesByName">property. Any stores you want to be available to thestoreSelectorContentStoreshould be listed under this property. -
Add the extra stores to the list to be handled by the
eagerContentStoreCleaner.
Using the new content store
The new content store is set using the cm:storeName property.
The cm:storeName property can be set in number of ways:
- Manually, by exposing this property so its value can be set by Share.
- Running a script action that sets the
cm:storeNameproperty value within the script. - Using a rule that runs a script action to set the property.
The expected behavior is as follows:
- When the
cm:storeSelectoraspect is not present or is removed, the content is copied to a new location in the ‘default’ store. -
When the
cm:storeSelectoraspect is added or changed, the content is copied to the named store.Note: The original content created in the default store will still exist and will be linked to the copy in the new named store location. If you do not want this to occur, the
cm:versionableaspect needs to be removed from the content before applying thecm:storeSelectoraspect, and then re-applied after thecm:storeSelectoraspect has taken affect. - Under normal circumstances, a trail of content will be left in the stores, just as it would be if the content were being modified. The normal processes to clean up the orphaned content will be followed.
Content Store Selector full configuration example
The following example shows the full definition of creating new stores using the Content Store Selector.
This configuration must be saved as an extension, for example, <extension>\sample-content-store-selector-context.xml.
Note: The list of stores available can be set by updating the list under the
<property name="storesByName">property.
<?xml version='1.0' encoding='UTF-8'?>
<!DOCTYPE beans PUBLIC '-//SPRING//DTD BEAN//EN' 'http://www.springframework.org/dtd/spring-beans.dtd'>
<beans>
<bean id="firstSharedFileContentStore" class="org.alfresco.repo.content.filestore.FileContentStore">
<constructor-arg>
<value>${dir.root}/storeA</value>
</constructor-arg>
</bean>
<bean id="secondSharedFileContentStore" class="org.alfresco.repo.content.filestore.FileContentStore">
<constructor-arg>
<value>${dir.root}/storeB</value>
</constructor-arg>
</bean>
<bean id="storeSelectorContentStore" parent="storeSelectorContentStoreBase">
<property name="defaultStoreName">
<value>default</value>
</property>
<property name="storesByName">
<map>
<entry key="default">
<ref bean="fileContentStore" />
</entry>
<entry key="storeA">
<ref bean="firstSharedFileContentStore" />
</entry>
<entry key="storeB">
<ref bean="secondSharedFileContentStore" />
</entry>
</map>
</property>
</bean>
<!-- Point the ContentService to the 'selector' store -->
 <bean id="contentService" parent="baseContentService">
    <property name="store">
        <ref bean="storeSelectorContentStore" />
    </property>
 </bean>
<!-- Add the other stores to the list of stores for cleaning -->
<bean id="eagerContentStoreCleaner" class="org.alfresco.repo.content.cleanup.EagerContentStoreCleaner" init-method="init">
<property name="eagerOrphanCleanup" >
<value>${system.content.eagerOrphanCleanup}</value>
</property>
<property name="stores" >
<list>
<ref bean="fileContentStore" />
<ref bean="firstSharedFileContentStore" />
<ref bean="secondSharedFileContentStore" />
</list>
</property>
<property name="listeners" >
<ref bean="deletedContentBackupListeners" />
</property>
</bean>
</beans>
Customization for Alfresco Share:
The following example shows the configuration of the cm:storeSelector aspect using the share-config-custom.xml file:
<!-- Example config to expose the storeSelector in Share. This should be merged with your existing share-config-custom.xml -->

<!-- Configuring in the cm:storeSelector aspect -->
   <config evaluator="node-type" condition="cm:content">
      <forms>
         <form>

            <field-visibility>
            <!-- aspect: cm:storeSelector -->
            <show id="cm:storeName" />

            </field-visibility>
            <appearance>
               <!-- Store Selector -->
               <field id="cm:storeName" label="Store Name" description="Content Store Name" />
            </appearance>
         </form>
      </forms>
   </config>
   <config evaluator="string-compare" condition="DocumentLibrary" replace="true">
     <aspects>
         <!-- Aspects that a user can see -->
         <visible>
            <aspect name="cm:storeSelector" />
         </visible>
     </aspects>
   </config>
Manage content stores
Use this information to effectively manage the File content store and Deleted content store.
The File content store saves the files or content items on a file system under the root directory. The ${dir.contentstore} property points to the root location on the file system. Files are organized by time to assist with incremental backup.
The Deleted content store saves orphaned files that are removed (nightly, by default) by the content store cleaner. The ${dir.contentstore.deleted} property points to the location where deleted files are stored. The default deleted content store is a file content store.
When you create a file, a .bin file is stored in the default file content store and there is a reference on that .bin file in the database. When you delete the document, Content Services updates the database. When you purge the deleted items, Content Services destroys all references to that .bin file in database. When the scheduled job runs, it scans the database and the contentstore directory and moves everything that is not referenced in the database to the <ALFRESCO_HOME>\alf_data\contentstore.deleted directory. The content of the contentstore.deleted directory is not referenced anywhere. So, you can always delete the contents of this directory (normally just after a backup). You can have your own Operating System cron job that purges contents of this folder periodically.
The repository.properties file defines the fileContentStore and deletedContentStore properties.
# The location of the content store
dir.contentstore=${dir.root}/contentstore
dir.contentstore.deleted=${dir.root}/contentstore.deleted
You can configure these properties by overriding them in the alfresco-global.properties file.
Note: You can use a remote file system but you can’t use the UNC mapped network path with it, for example:
  dir.contentstore=//server1/c/contentstore/contentstore
  dir.contentstore.deleted=//server1/c/contentstore/contentstore.deleted
You need to use a Windows or DOS path.
To customize the behavior of fileContentStore, set the following properties in the alfresco-global.properties file:
| Property | Description |
|---|---|
| system.content.maximumFileSizeLimit | Specifies the value for the maximum permitted size (in bytes) of all content. By default, no limit is specified. |
| dir.contentstore.bucketsPerMinute | Splits the data into a maximum number of buckets within the minute. The default value is zero, which means all the content created within the same minute will live in the same folder in the content store. If a value is specified, the content will be distributed into sub folders based on the second in which it was created. For example, dir.contentstore.bucketsPerMinute=6. |
The fileContentStore can also be configured to randomly distribute content on different volumes. This option can be used together with the bucketsPerMinute configuration. To enable this configuration, create another contentUrlProvider bean and inject it in the fileContentStore, as shown below:
<bean id="volumeAwareContentUrlProvider" class="org.alfresco.repo.content.filestore.VolumeAwareContentUrlProvider">
      <constructor-arg  type="java.lang.String" value="volume1,volume2"/>
</bean>
To select a content store, you have to choose the required subsystem:
filecontentstore.subsystem.name=unencryptedContentStore
The default, unencrypted store is a simple file storage store with its root in dir.contentstore=${dir.root}/contentstore. A date-time file structure is used, which makes the store easy to backup and browse. Most commonly, the dir.contentstore points to a shared file system when Content Services is deployed in a cluster. This is fully supported. Any regular file system backup procedure will work without the danger of corruption or loss of data. As a good practice, you should take the database backup before you take the file system backup.
Clean up orphaned content (purge)
You can delete or purge orphaned content from the content store while the system is running.
The contentStoreCleaner bean identifies and deletes the orphaned content. In the default configuration, the contentStoreCleanerTrigger calls the contentStoreCleaner bean.
<bean id="contentStoreCleaner" class="org.alfresco.repo.content.cleanup.ContentStoreCleaner" >
     ...
     <property name="protectDays" >
        <value>14</value>
     </property>
     <property name="stores" >
        <list>
           <ref bean="fileContentStore" />
        </list>
     </property>
     <property name="listeners" >
        <list>
           <ref bean="deletedContentBackupListener" />
        </list>
     </property>
  </bean>
Properties:
| Property | Description |
|---|---|
| protectDays | Specifies the minimum time that content binaries should be kept in the contentStore.In the above example, if a file is created and immediately deleted, it won’t be cleaned from the contentStore for at least 14 days. The value should be adjusted to account for backup strategies, average content size, and available disk space. Setting this value to zero will result in a system warning as it breaks the transaction model. Also, it is possible to lose content if the orphaned content cleaner runs while the content is being loaded into the system. If the system backup strategy is just to make regular copies, then this value should be greater than the number of days between successive backup runs. |
| store | Displays a list of ContentStore beans to scour for orphaned content. |
| listeners | Specifies the listeners, which are notified when an orphaned content is located. In the above example, the deletedContentBackupListener copies the orphaned content to a separate deletedContentStore. Note that this configuration won’t actually remove the files from the file system but rather move them to the designated deletedContentStore, usually contentstore.deleted. Once an appropriate backup has been performed, the files can be removed from the deletedContentStore via a script or cron job. |
Configure Trashcan Cleaner
The Trashcan Cleaner is a scheduled job that periodically purges old content from your Content Services trashcan.
When content is deleted, the content store can be configured to move the deleted content into a trashcan. The deleted content can easily recovered from the trashcan, if it is deleted by mistake. The content remains in the trashcan until it is purged or cleaned by the Trashcan Cleaner. The Trashcan Cleaner is a scheduled job that will empty your Content Services trashcan.
The Trashcan Cleaner is disabled by default. To configure the Trashcan Cleaner, set the following properties in the alfresco-global.properties file:
| Property | Description |
|---|---|
| trashcan-cleaner.cron | Specifies the cron schedule for the Trashcan Cleaner job. See Scheduled Jobs. For example, 0 30 * * * ?. |
| trashcan-cleaner.keepPeriod | Specifies the period for which trashcan items are kept (in the java.time.Duration format). For example, P1D. |
| trashcan-cleaner.deleteBatchCount | Specifies the number of trashcan items to delete per job run. For example, 1000. |
For example, to configure the scheduled process to clean all the deleted items older than one day to a maximum of 1000 (each execution) each hour at the middle of the hour (30 minutes), add the following properties in the alfresco-global.properties file:
trashcan-cleaner.cron=0 30 * * * ?
trashcan-cleaner.keepPeriod=P1D
trashcan-cleaner.deleteBatchCount=1000
To enable debug logging, set the logger.alfresco-trashcan.name and logger.alfresco-trashcan.level properties in the log4j2.properties file:
logger.alfresco-trashcan.name=org.alfresco.trashcan
logger.alfresco-trashcan.level=debug
The trashcan cleaner is a Simple Module which appears in the Admin Console under the Module Packages section.
http://localhost:8080/alfresco/s/enterprise/admin/admin-systemsummary
To disable the Trashcan Cleaner, add the following to the alfresco-global.properties file:
trashcan-cleaner.cron=* * * * * ? 2099