The Alfresco Application Development Framework (ADF) extension mechanism allows you to add, remove, and change the behavior of your applications. The extension mechanism supports the Digital Workspace, and is the recommended way to make direct changes to its source code.
Customizations that are implemented through the extension mechanism are more maintainable because the changes are modular and isolated from the core of the application. This approach to customizing the Digital Workspace ensures upgrades are easier to manage and test.
Use the Digital Workspace and develop an extension if your use case is mainly covered by the Digital Workspace functionality. However, some additional changes are required to meet the expectations and the requirements. In case of complex changes, a custom ADF based application is an alternative.
How to create an extension
Use this information to develop a hello word extension for the Digital Workspace.
Prerequisites
- Alfresco Content Services - Enterprise Edition.
-
Open your browser and check everything starts up correctly:
http://localhost:8080/alfresco
-
-
Node.js14.x - Download the Digital Workspace project from Nexus.
Create a Digital Workspace extension
Use the Nx developer tools for monorepos to create the Digital Workspace extension.
-
Install
nxcli globally:npm install -g nx -
Create a new extension called
my-extensionfrom the root directory of the Digital Workspace project:nx g @nrwl/angular:lib my-extensionLeave the default values of the command unless you’re familiar with what they mean.
In the
libs/my-extensionpath you’ll find the following structure:- The
srcfolder contains all the typescript source code - The
index.tsfile defines all the inclusions of the extension - The
lib/my-extension.module.tsfile defines the module class for the extension - The
README.mdfile contains documentation - Other files are for testing and configuration
Note: For more on creating libraries using Nx see Angular Nx Tutorial - Step 8: Create Libs
- The
-
Once
my-extensionis created, add the configuration to the extension module by editing the./libs/my-extension/src/lib/my-extension.module.tsfile:// Add the following import to the page. import { provideExtensionConfig } from '@alfresco/adf-extensions'; // Add providers as described below. NgModule({ imports: [CommonModule], providers: [ provideExtensionConfig(['my-extension.json']) ] }) export class MyExtensionModule {} -
Create a directory called
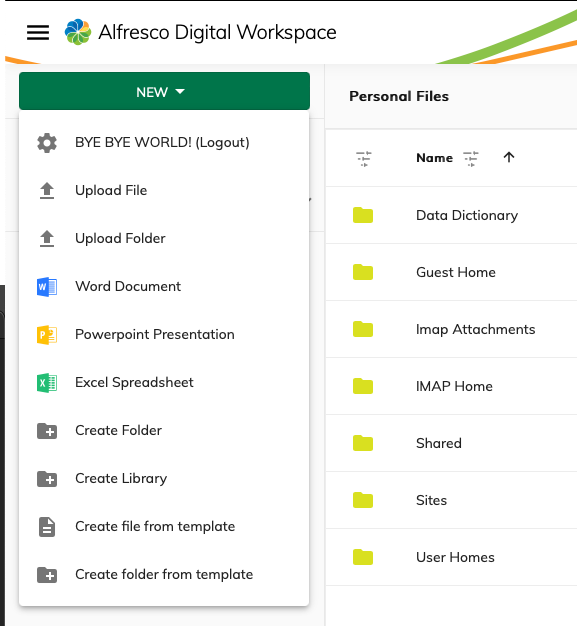
libs/my-extension/assets:This directory is used to program the extension to add a new item called hello world to the New button on the landing page of the Digital Workspace.
-
Create a file called
libs/my-extension/assets/my-extension.jsonwith the following content:{ "$version": "1.0.0", "$id": "my.extension", "$name": "my adf extension", "$description": "my adf extension", "$license": "Apache-2.0", "actions": [], "features": { "create": [ { "id": "my.extension.hello.world", "title": "BYE BYE WORLD! (Logout)", "order": 50, "actions": { "click": "LOGOUT" } } ] }, "routes": [], "rules": [] }Note: After the Digital Workspace extension has been created, ensure the
tsconfig.base.jsonfile includes a link to thelibs/my-extension/src/index.tsfile as part of the paths item. These are default paths that are set during the creation of the extension. It’s useful to verify the paths when troubleshooting. -
Edit the
apps/content-ee/src/app/extensions.module.tsfile to add the extension module to the application using the following format:// Add the following import to the page. import { MyExtensionModule } from '@alfresco-dbp/my-extension'; @NgModule({ imports: [ ..., MyExtensionModule, ], }) export class AppExtensionsModule {} -
Edit the
angular.jsonfile by adding the following configuration to theprojects/content-ee/targets/build/options/assetssection:This configuration ensures the extension is visible from the Digital Workspace app.
{ "input": "libs/my-extension/assets", "output": "/assets/plugins/", "glob": "my-extension.json" }, -
From a command prompt start the Digital Workspace:
npm start content-ee
You have now added a new option to the New button called BYE BYE WORLD!. The new option initiates the logout command from the current Digital Workspace session. For more see Extending and Application Development Framework Tutorials.
Replace existing extension
You can replace an existing extension with a new one you have created. To achieve this you must have an existing extension called my-extension, and its structure must be compliant with the content and structure of the current projects/my-extension file.
-
Run the following command from a command prompt from inside the root folder of the Digital Workspace project:
nx g @nrwl/angular:lib my-extensionNote: Ensure you use the same name as the existing extension, in this example it’s called
my-extension.
Once complete, delete the content of the libs/my-extension directory, and replace it with the source code of the new Digital Workspace extension.
How to add a new page and menu item
You can create a new page and a new menu item in the Digital Workspace. To achieve this you must have a working Digital Workspace extension as well as the full repository. Using the examples above, you should have an extension called my-extension.
-
Create a new folder called
libs/my-extension/src/lib/my-first-page, and add a new file into it calledmy-first-page.component.tswith the following information:import { Component, } from '@angular/core'; @Component({ selector: 'my-first-page', template: "<h1>HELLO WORLD!</h1>" }) export class MyFirstPageComponent {} -
Edit the
my-extension.jsonfile in thelibs/my-extension/assetsfolder and add the following to theroutesarray:{ ..., "routes": [ { "id": "my.extension.myFirstPage", "path": "my-first-page", "parentRoute": "", "layout": "app.layout.main", "component": "my.extension.components.my-first-page", "auth": [ "content-services.auth" ] } ], "rules": [] } -
Declare the component identifier directly in the extension’s module by editing the
libs/my-extension/src/lib/my-extension.module.tsfile with the following:// Add the following imports. import { ExtensionService } from '@alfresco/adf-extensions'; import { MyFirstPageComponent } from './my-first-page/my-first-page.component'; // Change the NgModule as follows. @NgModule({ ..., declarations: [MyFirstPageComponent] }) export class MyExtensionModule { constructor(extensions: ExtensionService) { extensions.setComponents({ 'my.extension.components.my-first-page': MyFirstPageComponent, }); } }You have added a new route (URI) to the application through the extension. You can test everything is working properly by launching the
npm start content-eecommand and pointing your browser tohttp://localhost:4200/#my-first-page. -
To add a menu item that points to the new page, edit the
my-extension.jsonfile in thelibs/my-extension/assetsfolder and add the following to thefeatureselement:{ ... "features": { ..., "navbar": [ { "id": "app.navbar.primary", "items": [ { "id": "app.navbar.libraries.menu", "children": [ { "id": "app.navbar.libraries.all-libraries", "title": "My first page", "description": "My first page", "order": 400, "route": "my-first-page", "rules": { "visible": "app.content-services.isEnabled" } }] }] }] }, ... }
Below you can see what the layout looks like:
