Searching
- You can search globally from all of the main/top level screens which means you can search at any time.
- The Mobile Workspace keeps a recent history of search terms so that previous searches can be quickly repeated.
- Contextual search is available within folders. This search mode will only search within that folder but can be converted to a global search using the quick filter. You can also filter by files and folders within the contextual folder search.
- Search is also available when the device is offline.
Recent Files
The Recent Files view shows all the files that have been created or modified within the last 30 days by the logged in user. The Search API is used to query for changes made by you and includes an extra column to display where the file is located in the content repository.
Favorites
The Favorites view shows all files and folders from the content repository that have been marked as a favorite by the logged in user.
Offline
Offline is a collection of content that is individual to a user and is available when offline. The Mobile Workspace will attempt to keep this collection updated with the latest version wherever possible. You can search files and folders when the device is offline.
Browse
Browse contains the rest of the navigation structure. You can access your libraries, personal files, shared files and discarded files from this screen.
-
Personal Files retrieves all content from the logged-in user’s home area
/User Homes/<username>/in the repository. If the user is an administrator who does not have a home folder then the repository root folder is shown. -
File Libraries retrieves all the sites that the user is a member of, either public, moderated or private. File Libraries is the Libraries component, using the Sites API.
-
The Shared Files view aggregates all files that have been shared by a logged-in user using the QuickShare feature in the content repository.
-
The Trash view shows all the items that a user has deleted. An administrator can see items deleted by all users. The actions available in this view are Restore and Permanently Delete.
Upload files
You can upload single or multiple files within the Mobile Workspace.
-
Log into the Mobile Workspace.
-
Navigate to the Personal Files area.
-
Tap the floating action button (+).
-
Tap Upload Files.
This will open your file repository on your mobile device (for example, Files for iPhone users) where you can select files to upload. This will upload files to the Personal files area. If you want to upload to a specific folder, create a new folder first and upload from inside that folder.
To upload photos, you can use the following options:
| Option | Description |
|---|---|
| Upload photos and videos | Photos are automatically uploaded without EXIF metadata according to the device security system. |
| Upload files | Photos are uploaded with EXIF metadata. |
Share files from another file system
You can share single or multiple files from a different file system with the Mobile Workspace.
-
On your mobile device, select the files you want to share with the Mobile Workspace. For example, in Google Drive.
-
Use the share function within the different file system (for example, ‘Send a Copy’ with Google Drive) and select Workspace.
-
Select the location in the Mobile Workspace to share and store your files, and then tap Upload.
This will upload files to the Personal files area. If you want to upload to a specific folder, create a new folder first and then upload from inside that folder. Files can also be shared this way using the gallery with the Mobile Workspace.
Open the Mobile Workspace to view your files.
Note: When uploading photos using this option, EXIF metadata is not preserved. To preserve the EXIF metadata, upload photos using the Upload files option. For more information, see Upload files.
- On the Recent Files view, a banner displays the sync progress for all files as a percentage complete. Tapping the sync status banner opens a Transfers view with all the files selected to be shared with the Mobile Workspace.
- On the Transfers view, tap the Sync All button to force the files to upload. This is used to complete the transfer when files were shared without an internet connection or if the internet connection is lost.
Create New Folder
You can create new folders within the Mobile Workspace.
-
Log into the Mobile Workspace.
-
Search or navigate to the location you want to create a folder.
-
Tap the floating action button (+).
-
Select New folder to create a new folder.
-
Enter a name for the new folder. Enter an optional description for the folder.
-
Select Save to create the folder or select Cancel to cancel creating a new folder.
Move Files
You can move files within the Mobile Workspace.
-
Log into the Mobile Workspace.
-
Search or navigate to the file you want to move.
-
Tap the vertical ellipsis (⋮).
-
Select Move to open the root Personal Files location.
-
Search or navigate to the new location.
-
Select the Move button to move the file to a new location. Select Cancel to cancel the move and return to the previous screen.
Rename Files
You can rename files within the Mobile Workspace.
-
Log into the Mobile Workspace.
-
Search or navigate to the file you want to rename.
-
Tap the vertical ellipsis (⋮).
-
Select Rename to open a dialog box.
-
Enter a new file name and an optional description.
-
Select Save to save the new file name. Select Cancel to cancel the rename and return to the previous screen.
Scan Documents
You can scan documents within the Mobile Workspace.
-
Log into the Mobile Workspace.
-
Search or navigate to the area you want to add a scanned document.
-
Tap the floating action button (+).
-
Select Scan documents.
- Your device’s camera loads.
- On the first use, you must allow the Mobile Workspace access to use the camera on your device.
-
Position your device to scan and capture a photo of the document. Repeat for additional pages or documents to scan as one file.
-
When all documents are scanned, select Save.
- The scan is saved where you navigated.
- If you do not wish to keep the scan, exit without saving. A dialog box will appear to confirm you want to discard the scan, select Discard. Select Cancel to return to save your scan.
Tasks
You can view, filter, complete, and add comments to tasks while logged into the Mobile Workspace.
Tasks Overview
The Tasks button is located at the bottom between Favorites and Offline. The Tasks list loads active tasks assigned to you or created by you. Task priority colors are set as the following: Low (green), Medium (orange), and High (red). Tasks will refresh when you scroll down to the end of the task list or when you tap the refresh button. The refresh button will also reset filters.
- A Dark mode for Tasks can be set within user Settings under Appearance.
- If you are unable to view tasks, you will see this error: This account is not configured on the process services.
Task Filters
Filters can be set for Status, Due date, and Task Name. Filter chips are shown at the top of the Task list and will show the active filter.
-
Select a filter chip.
-
Follow the directions for each filter as follows:
- A Status filter can be set by selecting Active or Completed and then select Apply. The Status filter chip label will show the active filter, so “Completed” instead of “Status”.
- Select Due date to set a custom, date-ranged filter. From and To start and end fields are set using a calendar date picker. Only one date needs to be set.
- Select Task Name to filter tasks by name. Enter your search in a text field. This filter does not apply to priority and is not case sensitive.
-
Select Apply to set the filter and Reset to reset the filter to default. The X in the top right closes the window and returns you to the Task list.
-
The filter chips will show the active filters and the refresh button will reset the filters.
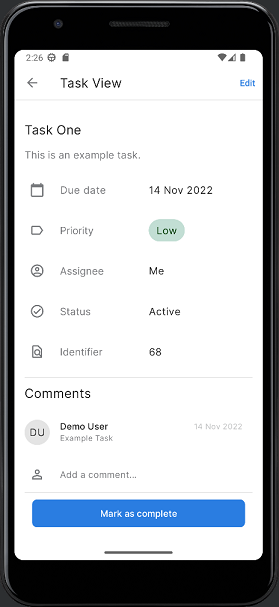
Task view
Within the Task view are details about the task: Task name, Due date, Priority, Assignee, Status, and Identifier. There is a back arrow to exit the Task view and return to the Task list.
Individual tasks have a Comments section below the task details. The most recent comment is shown with the user’s icon, user name, date the comment was added, and the user’s comment. If there is more than one comment, you will see a link to View all. The link Add a comment… is below the existing comments.
Attached files is a section below Comments that shows the number of attached files to the task. The link View all displays an Attached files page when there are more than four attachments. Tapping an attachment will download the file to preview with a popup and Cancel option.
Complete Tasks
You can complete tasks if the task is assigned to you.
-
Open a task from the Task list.
At the bottom of the task is a Mark as Complete floating action button.
-
Tap the Mark as Complete button.
A popup is displayed: Are you sure you want to complete the task? You will no longer be able to make any changes.
A completed task can be viewed, but enters a read-only mode. No comments or attachments can be added to a completed task.
-
Select Confirm to complete the task. Select Cancel to return to the task.
Reassign task
You can reassign a task to another person.
-
Open a task from the Task list.
-
Tap Edit on the top right.
-
Tap the Edit icon next to the Assignee name.
-
Search for a new assignee using their name or email address.
-
Select the new assignee and then tap Done.
The task has been reassigned.
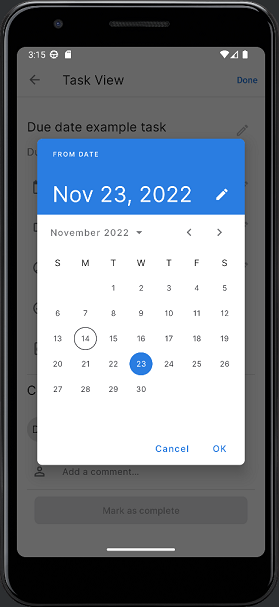
Change task due date
You can change the due date of a task.
-
Open a task from the Task list.
-
Tap Edit on the top right.
-
Tap the Edit icon next to Due date.
-
Select the new due date and tap OK.
-
Select Done
Add attachments to a task
You can add attachments to a task.
-
Open a task from the Task list.
-
Tap Add attachments, at the bottom of the window.
You can add attachments by either taking a photo or video using your mobile device, by uploading a photo or video using storage accessible to your mobile device, or you can upload any other types of files that are accessible to your mobile device. Once you have added an attachment they will display below the Attached files section at the bottom of the window.
Note: You may need to scroll further down the page to see all the attachments.

Share custom URLs
You can share custom Workspace links provided by the URL Schema functionality. The link can go directly to a particular folder or files, for example Personal Files, Custom Folder, or File Preview. You’ll first land in the mobile browser, and after that you’ll be prompted to log in based on file permissions.
-
Tap on the custom Workspace URL:
You’re prompted to open the link with a browser.
-
Select a browser to view the content:
- On iOS, you’re asked to open the link using the Alfresco Mobile application (Alfresco Mobile Workspace) or download Mobile Workspace from the App Store.
- On Android, you’re asked to open the link using the Alfresco Mobile application (Alfresco Mobile Workspace). Tap the link to open the Mobile app or you’ll be redirected to the Play Store if the app is not installed.
-
Tap Open in App to view the content in the Mobile Workspace application.
Note: File and URL access depend on permissions set in Mobile Workspace.
Workflow Management
You can create and manage workflows within the Mobile Workspace. Workflows allow you to expand on the functionality provided by tasks by assigning a set of parameters to them. You can attach files to an existing workflow or create a new one using a file that has been added previously. Workflows can be assigned to an individual user or a group of users.
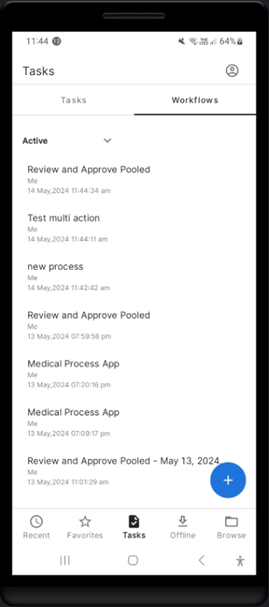
You can access workflows in two ways by either creating a workflow from the context menu of an existing file, or using the Tasks menu to set up the workflow. The Tasks section is divided into two parts: Tasks and Workflows.
To set up a workflow, you can either:
- Create a new workflow from the context menu of an existing file.
- Starting from the Workflows tab, tap the floating action button (+), and then select a workflow.
Manage Forms
You can manage a wide variety of forms directly from your mobile device. All standard form components are available in the Mobile Workspace, allowing you to complete a task by filling out forms tailored to your specific use case.
Forms in the Mobile Workspace are integrated into tasks within a workflow process. This enables you to enter, validate, and edit data, attach files, provide consent, and assign tasks to users seamlessly.
You can also distribute tasks among groups, allowing any member of the group to claim and work on a task.
Form Components
The following components are included in the default form:
- Text
- Multi-line text
- Number
- Checkbox
- Date
- Date and time
- Dropdown
- Amount
- Radio Buttons
- People
- Group of People
- Hyperlink
- Attach File
- Attach Folder
- Display value
- Display text
Workflow with Task
The workflow process manages the completion of all tasks in a specific sequence. You can view and filter workflow processes, start new ones, or track ongoing processes. The workflow process is complete when all associated tasks are finished.
Note: A workflow with a single task is completed once this task is finished.
To initiate a workflow process and start completing tasks, see Start a Workflow.
Start a Workflow
To begin completing tasks within a workflow, you must first initiate the workflow.
Note: You can start workflows from either the context menu of an existing file or the Tasks menu.
To start a workflow from the Tasks menu:
-
Log on to the Mobile Workspace.
-
Tap Tasks and select the Workflows tab.
The Workflows tab is displayed with a list of all active workflows assigned to you or created by you.
-
Tap the floating action button (+) to expand a list of workflows and select a workflow.
The Start workflow form is displayed to enter basic details. Available fields and components may vary depending on the workflow.
-
Fill out the required fields. Required fields are marked with an asterisk.
Note: To start the workflow process, you must complete all required fields.
-
Tap Start workflow.
The workflow has been started, and it is listed in the Workflows tab under Active.
Once a workflow has been started, you can proceed to complete all tasks within it. To complete tasks, see Complete Task Forms.
Note: If a workflow process assigns tasks to groups (referred to as a pooled process), you must first claim the task before you can start working on it. For more information, see Claim a Task.
To view and filter workflows, see View and Filter Workflows.
View and Filter Workflows
All workflows created by you or assigned to you are available from the Tasks menu. You can view workflow’s details after selecting a workflow from the Workflows tab.
Filtering options allow you to categorize workflows by their statuses: all, active, completed.
To view and filter workflows:
-
Log on to the Mobile Workspace.
-
Tap Tasks and select the Workflows tab.
-
To view all workflows, tap the downward-facing arrow next to Active and select All.
All active workflows are displayed.
-
To view completed workflows, tap the downward-facing arrow and select Completed.
All completed workflows are displayed.
-
To view details of a workflow, select the workflow from the list.
The following details of the selected workflow are displayed:
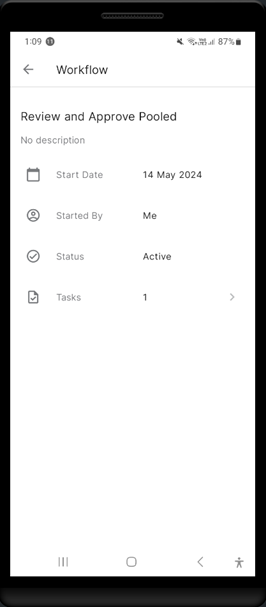
Detail Description Start Date Specifies the date when a workflow was started. Started By Specifies the person who started a workflow. Status Specifies the status of a workflow. The following statuses are available: active, completed. Tasks Specifies the number of tasks related to a workflow.
Claim a Task
If a workflow assigns tasks to groups, you must first claim the task before you can start working on it.
To claim a task:
-
From the Tasks tab, select task status as Queued in the filter options.
-
Tap Apply.
The Tasks screen is displayed with a task to claim at the top.
-
Open a task and select Claim.
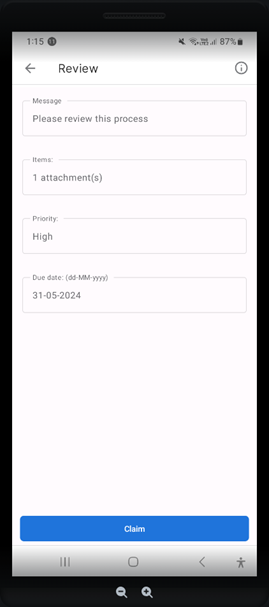
The task is assigned to you, and you can start working on it.
If you claim a task by mistake, you can release it. To release a task, see Release a Task.
Release a Task
If you claim a task by mistake, you can release it.
To release a task:
-
From the Workflows tab, open a workflow.
-
Tap Tasks.
The Tasks screen is displayed with a task to release at the top.
-
Open a task and select Release from the Actions.
The task is available for other users in the group.
Complete Tasks in Workflow
Tasks within a workflow process are displayed sequentially, one by one. After you complete a task, the next task in a sequence will be automatically displayed for you to complete.
To complete tasks:
-
From the Workflows tab, open a workflow.
The details of the workflow are displayed.
-
Tap Tasks.
The Tasks screen is displayed with a task to complete at the top.
-
Open the task and fill out the form. Available fields and components may vary depending on the task.
Note: Tasks may require from you to add attachments. To upload files, see Attach Files.
-
Once you complete the form, do one of the following:
-
To save the task without completing it, tap Save. The task remains assigned to you, and you can perform additional work as needed.
-
To complete the task, tap Complete. The task is completed, the next task in the workflow is displayed.
-
-
Repeat steps 3 through 4 to complete all the task forms.
Once all the tasks are completed, the workflow is completed.
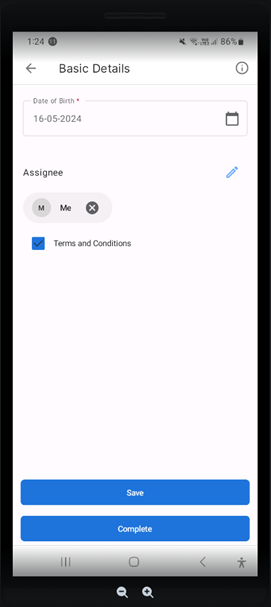
View and Edit Task Details
You can view and edit task details in a workflow process.
To view and edit task details:
-
From the Workflows tab, open a workflow.
The details of the workflow are displayed.
-
Tap Tasks.
The Tasks screen is displayed with a list of tasks.
-
Open a task from the list.
-
Tap the info icon in the upper-right corner.
The following details of the task are displayed in the Task View screen:
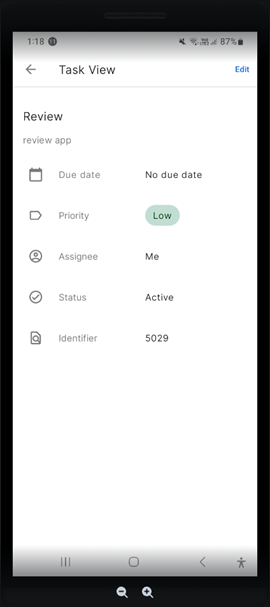
Detail Description Description Specifies the description of a task. Due date Specifies the date a task is due. Priority Specifies the priority of a task. Task priority colors are set as the following: Low (green), Medium (orange), and High (red). Assignee Specifies the person assigned to a task. Status Specifies the status of a workflow. The following statuses are available: active, completed. Identifier Specifies the unique number of a task. -
Tap Edit in the upper-right corner to edit the details.
-
Edit the details as needed and tap Save.
The changes are reflected in the Task View screen.
Attach Files
If a task requires you to attach files, you can attach the files by selecting the attachment icon ![]() .
.
To attach files:
- Open a task that requires adding attachments.
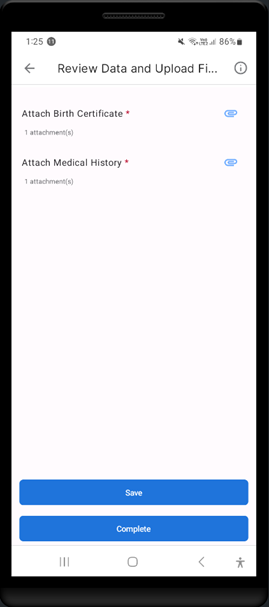
-
Select the attachment icon
 .
.The Attached files screen is displayed.
-
Tap the floating action button (+) to expand the menu.
-
Select one of the following options:
Option Description Take photos or videos You can take a photo and upload it to a task. Upload photos and videos Photos are automatically uploaded without EXIF metadata according to the device security system. Upload files Files are uploaded. Photos are uploaded with EXIF metadata. -
Select one or multiple files or photos and tap Add(X), where X is the number of selected files or photos.
The files or photos are attached and listed in the Attached files screen.
Note: If an attachment section is designed to upload only one attachment, for example birth certificate, you can select only one file or photo.
-
Navigate to the task screen by tapping the left arrow.
The attachments are listed under headers.
-
Once you finish attaching files, do one of the following:
-
To save the task without completing it, tap Save. The task remains assigned to you, and you can perform additional work or edit it as needed.
-
To complete the task, tap Complete. The task is completed, the next task in a sequence is displayed or the workflow is completed.
-
Complete a Workflow
A workflow is completed once all tasks within it are finished. To finish tasks, see Complete Tasks in Workflow.
Multiple Selection
You can select multiple files within the Mobile Workspace. Multiple Selection allows you to perform actions on multiple items. You can select up to 25 files in a page. The Start Workflow option will only work for files. The available actions will differ depending on your starting point. To begin Multiple Selecting, long press on any file.
The following actions are available:
- Add to Favorites
- Start Workflow
- Move
- Make available offline
- Move to Trash
- Remove from Favorites
- Restore
- Delete Permanently