Process Services can be accessed by default under /activiti-app, for example http://localhost:8080/activiti-app.
The landing page
The landing page is your user interface to Process Services. Each tile gives you tools for distinct sets of tasks:
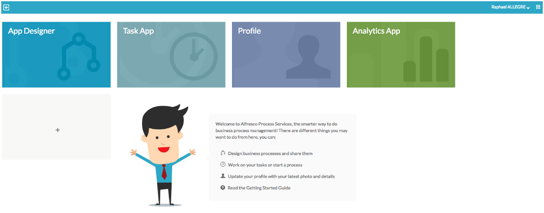
The landing page is the starting point from which you can use:
- App Designer - to design your processes.
- My Tasks - to view your task inbox or queue.
- Profile management / Identity management - to manage user and group capabilities
- Analytics - to generate reports on process performance
Depending on the capabilities of your account you may or may not get access to the App Designer or Analytics.
Profile management will appear for you only if you are a user. This is where you manage your personal information. If you have administrator capabilities, then Profile management will be displayed as Identity management. Use this tile to access your profile page as well as to manage user, group, and capability management pages for your tenant or the whole system.
You can click on the Process Services logo at any time to return to your landing page.
Your landing page is dynamic, and new tiles will appear when you create new process apps in the App Designer and deploy them in the Task App.
You’ll also see a list of shortcuts for tasks you might want to do next.
Note: If you are an administrator, your landing page is slightly different. Instead of the Profile management tile, you’ll find a more powerful set of tools called the Identity management tile.
All pages display the App Navigator icon in the far-right corner of the header. It provides useful 1-click shortcuts to various parts of the app. You can navigate instantly to all your process models, tasks, processes, stencils, forms, decision tables, quickly start any process, view the tasks and processes for a published and deployed app, or view and change your profile. As you deploy process apps, the App Navigator will also show shortcuts for the newly created process apps.
Task App
Use the Task App to access your task list and work on tasks assigned to you from the Processes tab. This is also where you initiate new processes and tasks.
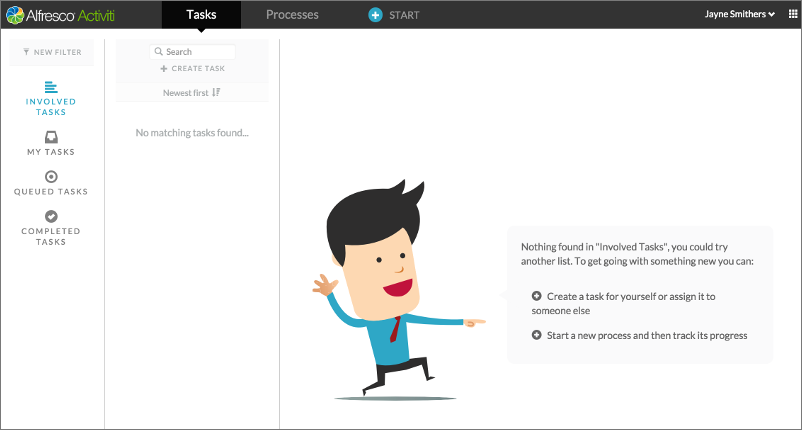
The Task App menu bar has tabs for working with tasks, processes, reports, and a Start button, which is a shortcut to start a process using a published process definition.
Note: If you haven’t created any tasks for yourself, and there are no tasks assigned for you from current processes or from other users, then James will appear with shortcuts to help you create a task or start a published process.
Tasks tab
The Tasks tab is organized into three columns.
- The left column lets you filter the list of displayed tasks. There are four pre-defined filters and a New Filter control which lets you define and name your own filters. Any filters you create are added to the list of displayed filters.
- The middle column provides tools for creating new tasks, and lists the tasks included by the current active filter. Click on the accordion icon above the list of tasks to change the default display order from Newest first to oldest first, Due last order, or Due first order.
- The right column is displayed when you click on a task in the middle column. It displays the selected task details and also tools for completing open tasks and for viewing the audit log of a completed task.
Note: The Audit log button is only available for a completed process instance or a completed task.
Using a new filter in tasks and processes
When you create a new filter in the Tasks tab or Processes tab, you can filter by process definition, the state of the task/process, by task name, and by assignment. You can also change the default sort order.
-
Process definition
Select an active (running) process name, and display only those tasks that are associated with that process.
-
State
Choose to display tasks or processes based on its state. For tasks, select Completed or Open. Completed is selected by default. For processes, select Running, complete, or All. Running is selected by default.
-
Assignment
Select tasks in which you are involved, or tasks that have been assigned to you, or tasks where you are one of the several candidates. This is only applicable to the Tasks tab.
-
Sort
Sort the list by Newest first, Oldest first, Due last, or Due first.
-
Task name / Process Name
Type a string to search for matching task names or process name depending on the tab you’re in.
-
Filter icon and name
Select an icon for your new filter by clicking on the funnel icon, and specify a name for the filter.
Note: If you have no tasks or processes running, then James will appear with a shortcut to let you create a new task for yourself or start an existing process and track its progress.
Processes tab
Use the Processes tab to start a new process from a list of published process definitions. The Processes tab is organized into three columns similar to the Tasks tab (see above) except that instead of tasks, process details are displayed. You can also create a new filter to filter by process definitions, process state, and by process name.
Reports tab
Use the Reports tab to generate reports based on the available parameters. You can view the reports that you saved in the Analytics App. For more information, see Analytics App.
Profile management
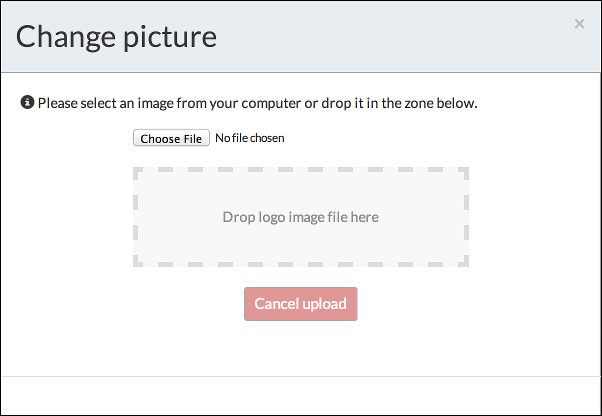
You can add a photo to your profile.
To edit your profile, click Profile management.
On the Personal page you can edit your details, such as your name, change your password, and view your group membership and capabilities.
To add your photo, click the image to the left of your name and upload the desired photo.
Identity management
These are operations to manage tenants, groups and users. This is useful for example to bootstrap environments with the correct identity data.
Tenants tab
Use the Tenants tab for creating new tenants, and modifying existing tenants.
By default, the details of the currently selected tenant are displayed. You can edit the name of the current tenant and configure various settings as follows:
-
Logo - Add or update your existing logo.
-
Events - A log of management events for the tenant.
-
Alfresco repositories - Configure your on-premise repositories. See Create Alfresco repository.
-
Endpoints - Configure your RESTful endpoints and Basic Authentication for endpoints.
-
Data sources - Register your data sources for using in Data Model.
-
Document templates - Upload a Microsoft Word (.docx) file that can be used as a template in processes.
-
Email templates - Create new custom email templates, view or edit the existing templates (both standard and custom). For information on creating custom templates, see next section about Custom email templates.
-
Config - Configure settings for Box metadata support, validate decision table expressions, and enable or disable the option for involved users to edit forms. In addition, you can define the minimum length for the password, and the date format for forms (for example, D-M-YYYY).
Custom email templates
Create custom email templates to send an email to the assigned user of a user task after the task is assigned to them.
Custom email templates can be created centrally or within an application when it is being designed.
The following predefined variables can be used depending on the assignment of the user task:
| Assignment | Variable |
|---|---|
| Single User Task | taskCreator, taskName, taskDirectUrl, homeUrl |
| Group Task | groupName, taskName, taskDirectUrl, homeUrl |
| Candidate User Task | taskName, taskDirectUrl, homeUrl |
Custom email templates can be created at the tenant level or per application:
Tenant level templates
Note: Users require the Administration of tenant of this group permission to manage email templates.
- Navigate to Identity Management > Tenants > Email templates.
- Select Create new email template on the Custom email templates tab.
- Write and save a new custom email template with a name, subject and email body.
Existing custom templates can managed, edited and deleted in the same location.
Application level templates
- Add a user task to a process and check the Allow email notifications property for it.
- Select the Custom template property in the same user task.
- Write and save a new custom email template with a name, subject and email body.
Users tab
The users tab provides tools for managing users. The current users are displayed on the right panel. You can select from the list of users and use Select an action to change details, status, account type, password, and primary group of the user. In addition, you can create a new user, or filter the list of current users by status, account type, email or name, and company.
Capabilities tab
Use the Capabilities tab for managing the capabilities and groups of users that are available for this tenant.
There are two types of groups:
-
Capability groups - Groups that can be granted with variety of capabilities.
-
Organization groups - Functional groups that reflect the structure of your organization.
The following capability groups are available by default:
-
Analytics-users - Access the Analytics app to view reports.
-
Superusers - Administration of tenant of this group gives full administration rights for the current tenant to the selected group.
-
App Designer - Access to App Designer app that allows you to design and publish process definitions.
In addition, an Administrator can grant to the following capabilities to any of the capabilities groups:
-
Access Analytics app
-
Access App Designer app
-
Access the REST API
-
Access to all tenants’ models
-
Administration of tenant of this group
-
Publish app to user dashboard
-
Upload license
You create and delete capabilities groups, add and remove users to and from a group, and add and remove capabilities to and from all users in a group.
Organization tab
Use the Organization tab to create functional groups that reflect the structure of your organization. Groups are used to grant access to apps or tasks. You can also add and remove users to and from a group, and create subgroups within a group.
Create a group
- Click Create group.
- Enter a name, for example Group 1 and Group 2.
- Click Save.
Group 1
Group 2
Result: Group 1 and Group 2 have been created as groups.
Create a subgroup
- Select a group, for example Group 1.
- Click Create subgroup.
- Enter a name, for example Group 1.1.
- Click Save.
Group 1
Group 1.1
Group 2
Result: Group 1.1 has been created as a subgroup of Group 1.
Delete a group
- Select a group to delete, for example Group 1.
- Click the delete button (trashcan icon).
- Click the delete button again.
Group 1 (deactivated)
Group 2 (deactivated)
Group 1.1 (deactivated)
Result: Group 1 has now been deleted.
Note: When you first click the delete button a group, it will be deactivated, until all its tasks are complete. To delete the group completely, click the delete button a second time. When you delete a group, this will delete all its subgroups.
Add users to a group
- Select a group to add users to.
- Search for a user to add, for example user1.
- Select the user from dropdown menu.
| Name | |
|---|---|
| user1@app.activiti.com | user1 |
Result: user1 has been added to the group.
Assign a group manager
- Select a group to assign a manager to.
- Click select user next to Group manager.
- Search for a user to appoint as manager, for example user2.
- Select the user from the dropdown menu.
Result: user2 has been appointed as the group manager.
Note: All changes made in the Organization tab are listed in the Tenants tab under Events.
Analytics App
Use the Analytics tile to add standard reports and configure custom reports for performance and throughput statistics of your processes. You can view the Analytics App tile only if your account has the Analytics capability. Before generating process reports, make sure to run your processes at least a few times.

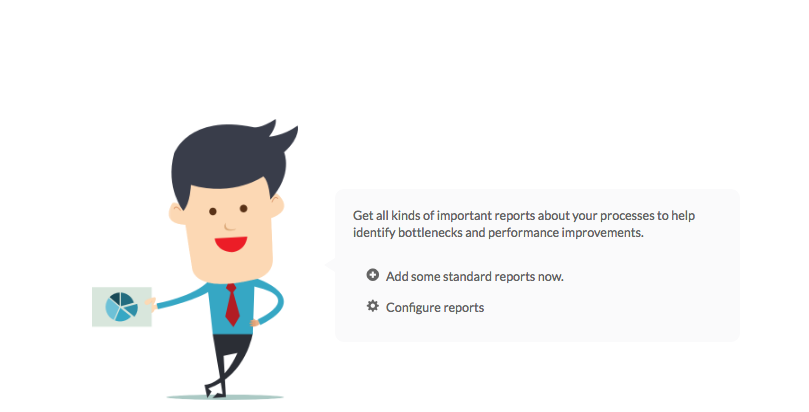
When you visit the Analytics App for the first time, you’ll see some useful hints on the welcome screen.
The Analytics App has the following tabs:
- Reports - Use this to add standard reports in Process Services and view the existing reports.
- Configure - Use this to configure standard reports and custom reports.
Configure standard reports
In Process Services, you can add Standard reports at a click of a button. You can choose to add all standard reports at once or configure only the reports you’re interested in. For example, you can configure your report panel to isolate Task related reports such as Task overview and Task service level agreement reports, or custom reports that are based on generated reports (see Customizing reports).
Add standard reports
-
From the Analytics app > Reports tab, click Add some standard reports now link. The following standard reports appear in your Reports panel on the left:
- Process definition heat map
- Process definition overview
- Process instances overview
- Task overview
- Task service level agreement
Alternatively, you can also add the same set of standard reports via the Configure tab. To remove your existing reports from the Reports panel, click Reset all my reports.
Once you have added the standard reports, you can access them from the Reports panel and generate them based on the required filter parameters. If the data is available, it will be presented in graph and tabular form, depending on the report selected.
Filter reports
You can filter most reports by the following parameters:
- Date range
- Process definition
- Process Status
- Task (Task related report only)
- Task Status (Task related report only)
Some reports such as Task service level agreement and Process instances overview reports have additional parameters.
Customize reports
You can customize reports by selecting the Process Status and Date Range parameters. You can also create new reports by modifying the filter option of an existing report and saving it with a new name.
Generate and save a Task overview report
-
Sign in to Process Services as a user with Administrator privileges.
-
Click Analytics App > Configure and then Task overview.
-
Select from the following filter options:
- Process Definition - Process definitions for the selected user.
- Date Range - Tasks from Today, Yesterday, Last 7 days, Previous month, Current year, or Custom Range.
- Task Status - All tasks, Active, or Complete.
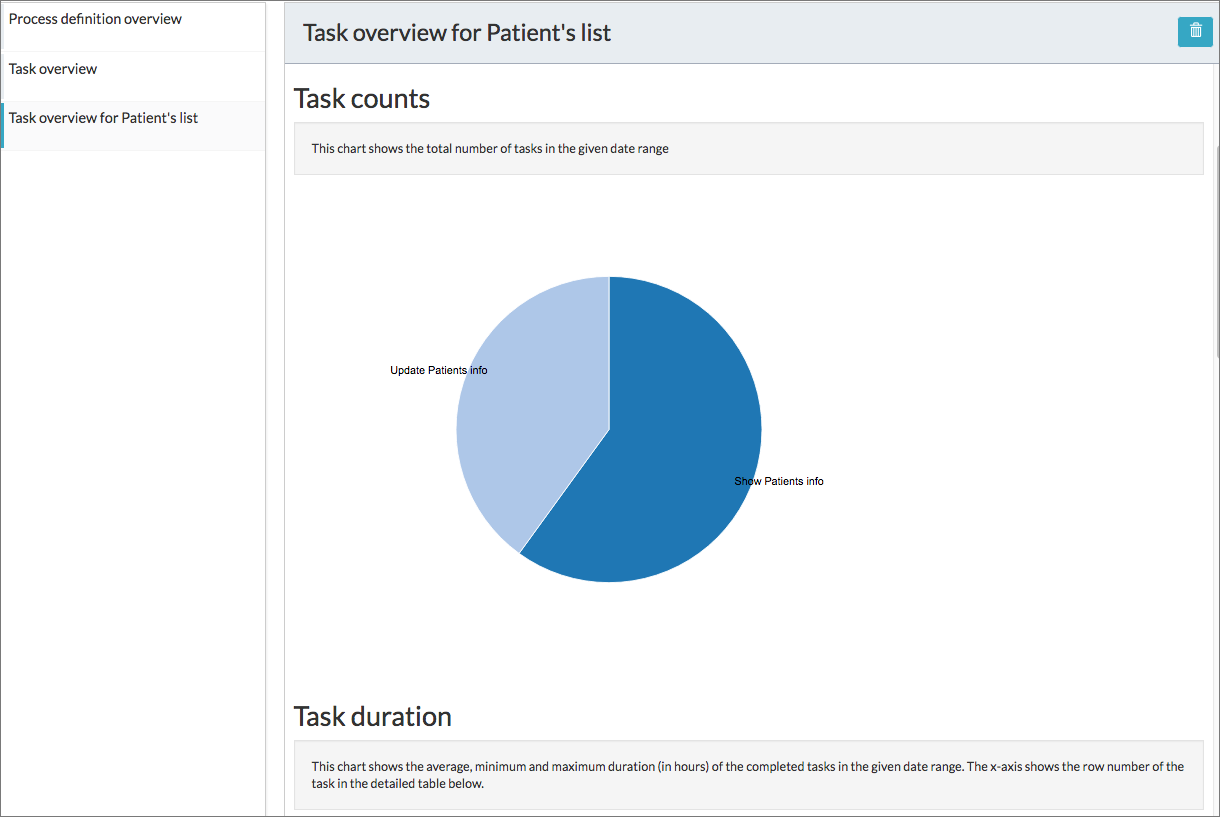
- Aggregate dates by - Tasks by hour, day, week, month, or year. Relevant data for Task Counts, Task counts by assignee, Number of tasks divided by date interval, Task Duration, and statistics of all tasks are presented in graphical, tabular, and table formats. In addition, there’s an option to view the previous chart data in a table format.
-
Click Export Data to generate the report in csv format.
-
Optionally, to save the report with the selected filter options, click Save this report. You can also choose to save the report by a new name for easy identification. For example, if your report is specific to a task called Patients List, you could save the report as Task overview for Patients’ list.
You can generate all other reports in the same way by using the appropriate filter options. You are now ready to explore the advanced reporting and analytic features in Process Services.