The Step Editor guides you through creating a business process through a sequence of simple steps. The processes you create using the step editor do not exploit the full power of BPMN 2.0 like those created by the BPMN editor, but you can use it to design both simple and quite complex process models, without knowledge of BPMN 2.0.
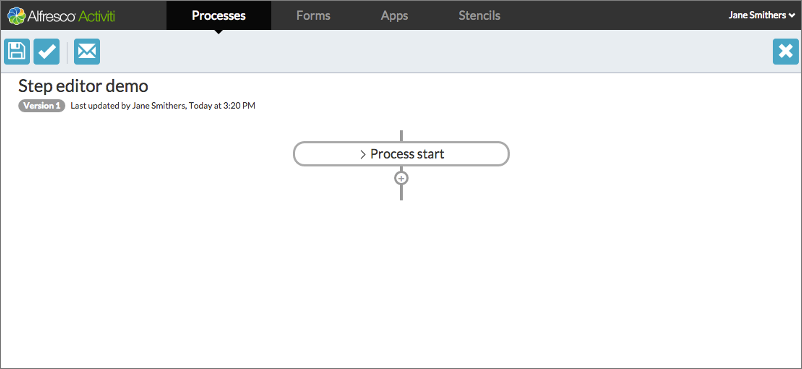
The editor has a menu bar with buttons to save your model, validate that the model is a complete BPMN 2.0 model definition, provide feedback to the Process Services team, and to close the editor.
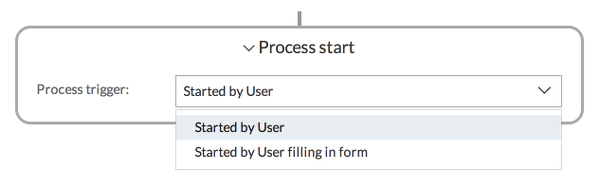
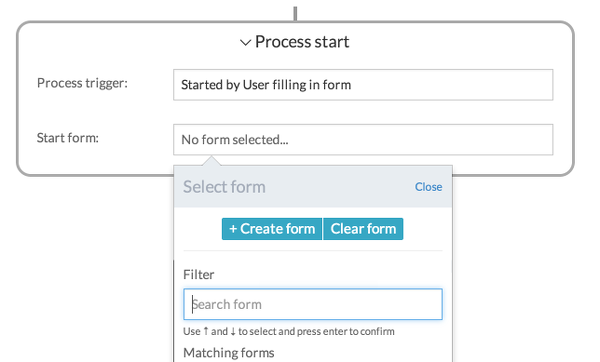
When you open the step editor on a new process definition, you can see the first step, the Process start step is already added to the process diagram for you. When you mouse-over a step, the stop becomes click-able. Click on it, and the details of the step are displayed and can be edited. This design principle is reflected throughout the Process Services app. You can mouse-over and click text areas to modify their content, and variables to change their values. So for the Process start step, you can click on the single Process trigger variable and choose the trigger type:
The editor will guide you in creating your process. For example, when a form is required, it will present you with a list of existing forms and provide you with a button to create a new form.
Below the last step in a sequence, there is a + (plus) icon. Click on this to add a step to your process.
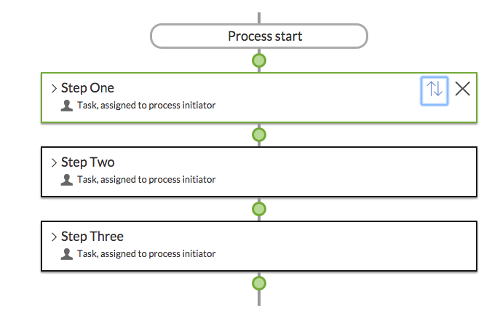
You can move steps around in your process Click in the top-right of the step and the step will be outlined in green, and the + icons will change to green discs.
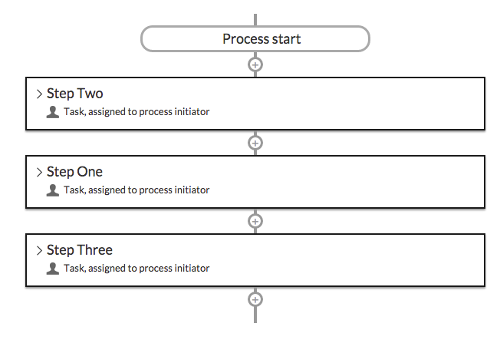
Click the green disk at which you want your highlighted step to move, and the step is moved to that position in the flow:
In addition to the Process start step, there are five types of step you can add to your process.
Create a process
To create a process definition / model with the Step Editor, follow these steps:
- Select App Designer from the Activiti App dashboard.
- Select Create Process. The Create a new business process model dialog box appears.
- Give the process model a name and a description,
- Then select the Step Editor as the Editor type.
- Click Create new model. The Step Editor page is displayed. By default, Step Editor includes a number of Steps, however this depends on the Stencil that you selected for editing the process model.
-
Click Process start to expand and start by setting the process trigger to User filling a form.
-
Click Create form to create a new form or select an existing form from your Forms library. The Form Editor is displayed.
Note: Any form that’s created this way will not be available in your Forms library because it was created as part of this process model. To create a form that you can reuse in other process models, you must create it from the main Forms page. In this example, the form is defined in the Step Editor.
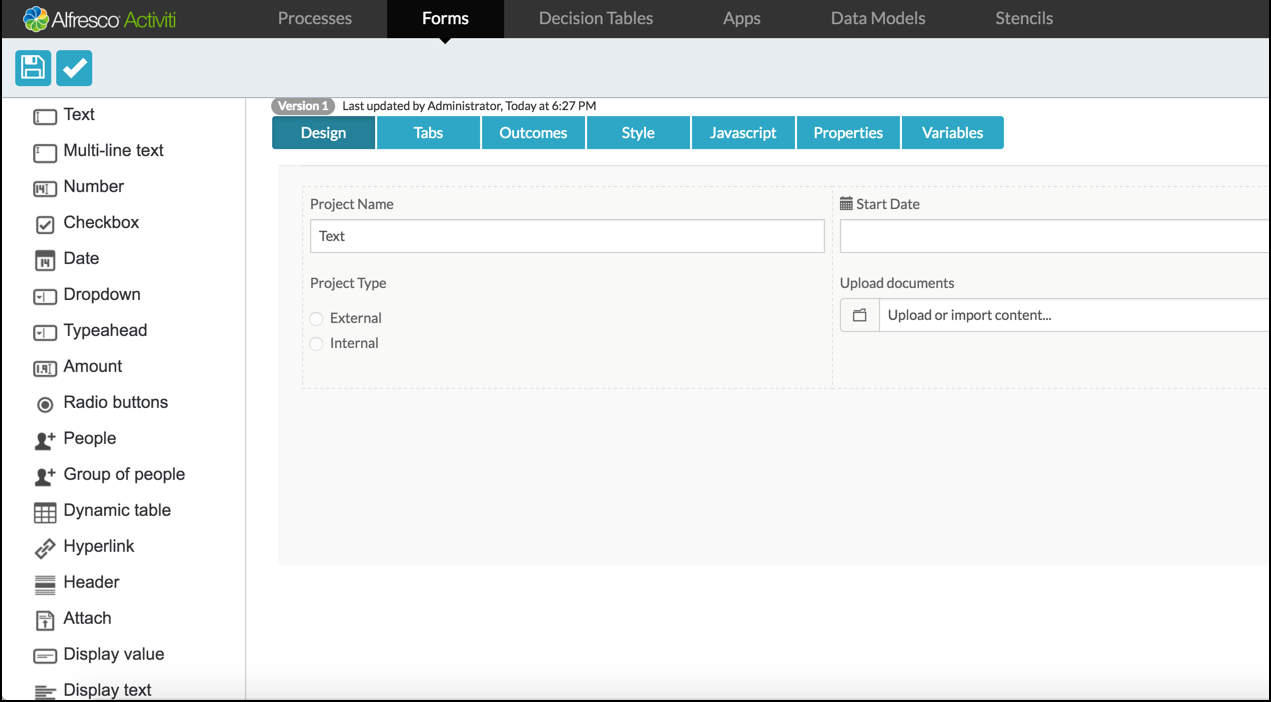
The Forms editor has the following tabs:
- Design - Define the layout of form fields from the palette.
- Tabs - Customize tab names to display in the form.
- Outcomes - Define the outcome buttons for the form.
-
Style - Define the style (css) for the form elements. For example, adding the following style in the Style panel will convert the field background to blue:
.fields { background-color: blue; } -
Javascript - Define javascript code for an element in the form. For example:
// __var currentUser = scope.$root.account;__ __console.log(currentUser);__ __alert ("Hello World!");__ - Properties - Define custom properties (metadata) for the form. This is particularly useful when using a custom form renderer (Jave API or Rest API) to retrieve the properties.
-
Variables - Define variables in the form.
You can design the form layout by dragging and dropping the required field type from the palette on the left to the form editor.

For each field dropped in the Design area, you can hover over it and edit the field properties using the pencil icon. Alternatively, click X to remove a field from the form.
Note: The options that become available in the edit view are determined by the field type selected from the palette. For example, a checkbox field has General, Visibility, and Style tabs, whereas a radio button field type might have an additional tab called Options.
Add labels for the selected fields. Optionally, you can reference a display label with the value entered by a user running the process. In addition, you can also define if the field is required to be filled before the form can be completed.
- When you’ve finished designing the form, click Save. You’ll be returned to the Step Editor.
- Click the + (plus) icon at the bottom of the Process start box to add the first step in your process. The steps available to you are defined by the Stencil you associated the model with. The default stencil includes a Human step that can be used to assign a task to the user.
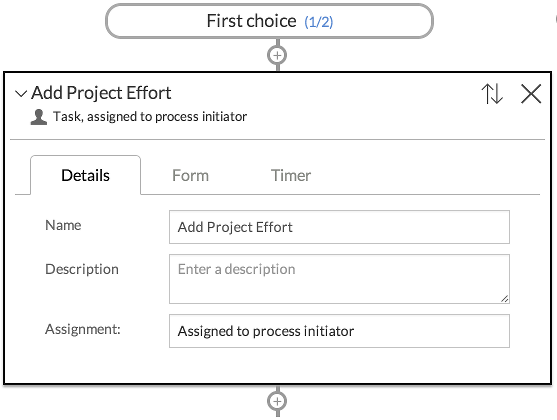
- Select the Human step and fill in a name within the step box that you just created.


You can also specify who this task should be assigned to. For example:
- Someone who initiated the process
- A single user
- A set of candidate users or depending on the type of account, a group of users.
Note: When a task is assigned to a group or a list of candidate users, all of those users can see the task in their tasks list, however to complete the task they must claim it first.
Assign tasks to a process
To simplify a process, assign all tasks to the process initiator (i.e. the person who started the process) so that you can run the process and have the tasks assigned to yourself.
- Click Forms > Create Form. The Create a new form dialog box appears.
- Enter a form name and click Save.
- Drag a multiline text field and drop it to the form. Name the label as Review comment.
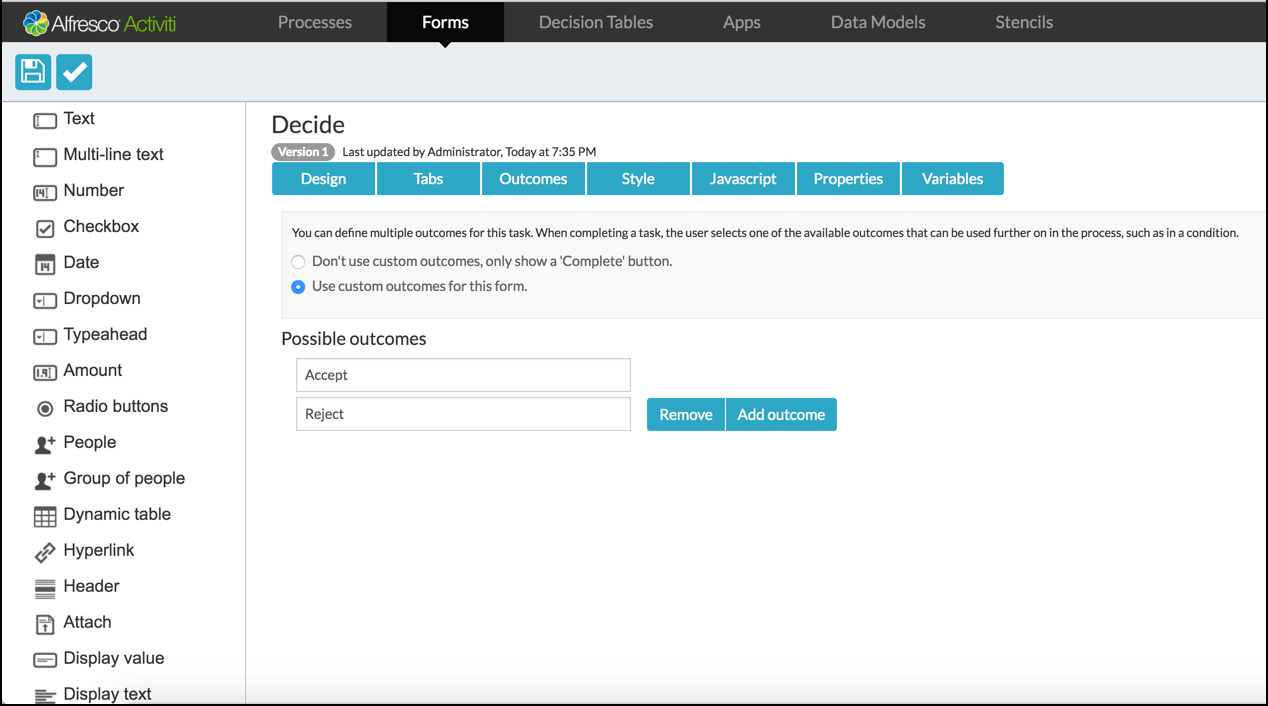
- Click the Outcomes tab and then select Use custom outcomes for this form.
-
In possible outcomes, add the following outcomes and then save the form:
-
Accept
-
Reject
The next step depends on the outcome selected in the previous step.
-
-
Add a Choice step by clicking the + (plus) icon below the Review Project step.
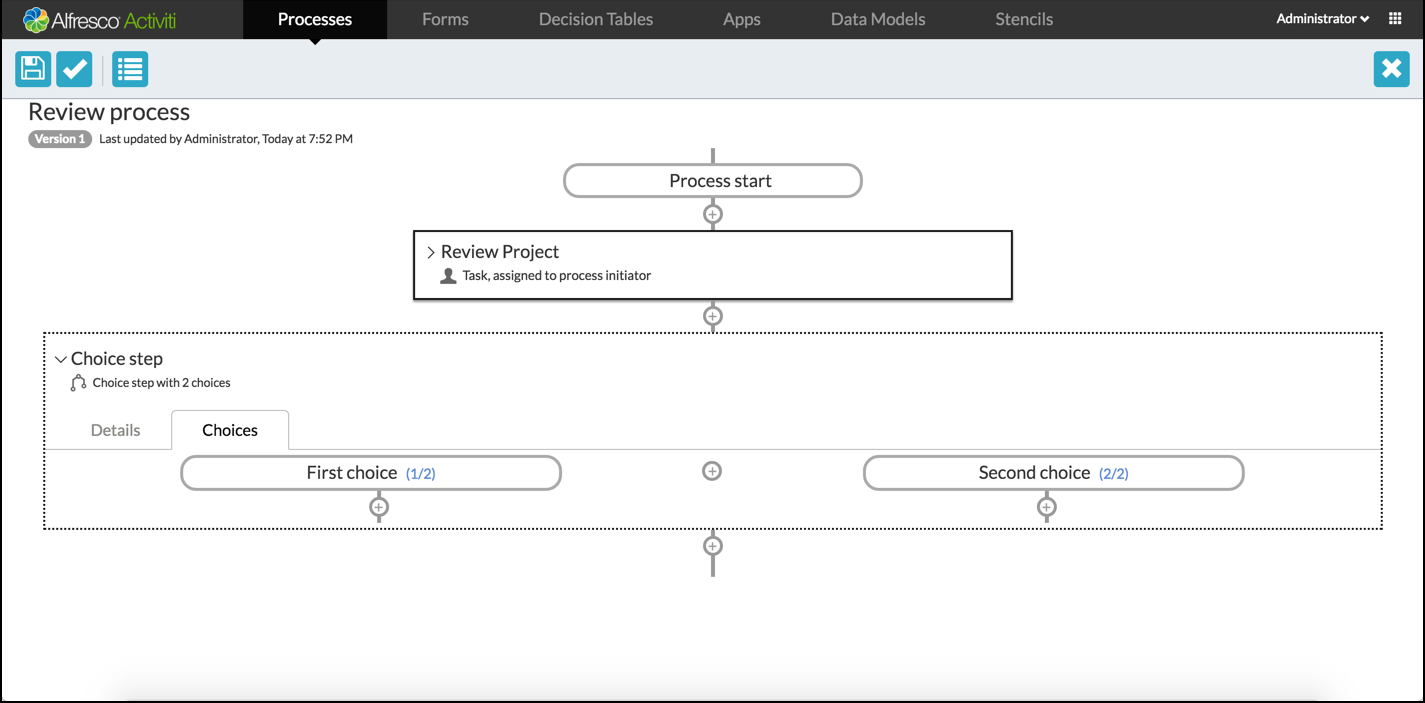
You can also add additional choices by clicking the + (plus) icon in the center of the Choice step.
- Click the relevant choice box to set the condition for the selected choice. The Edit choice dialog appears where you can select the condition based on the existing form fields or outcomes.
-
For the first choice, click Form Outcome and select the following values: Review form > Equal > Accept.

-
Click Save. Repeat the same for second choice: Review form > Equal > Reject.
Note: Provide a meaningful name for the choice steps if you can.
-
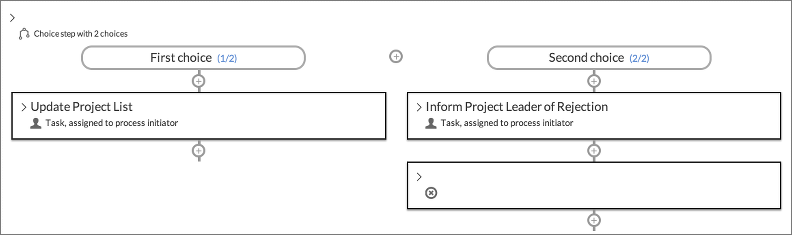
Add a task that should be done once the project review is accepted by clicking the + under the First choice box.
-
Now, add a simple human task called Update Project List. Under the Second choice box, add a human task with a name Inform Project Leader of Rejection. The aim is for the process to stop when the rejection task is completed. Therefore, add a Stop step to the bottom of this task.
-
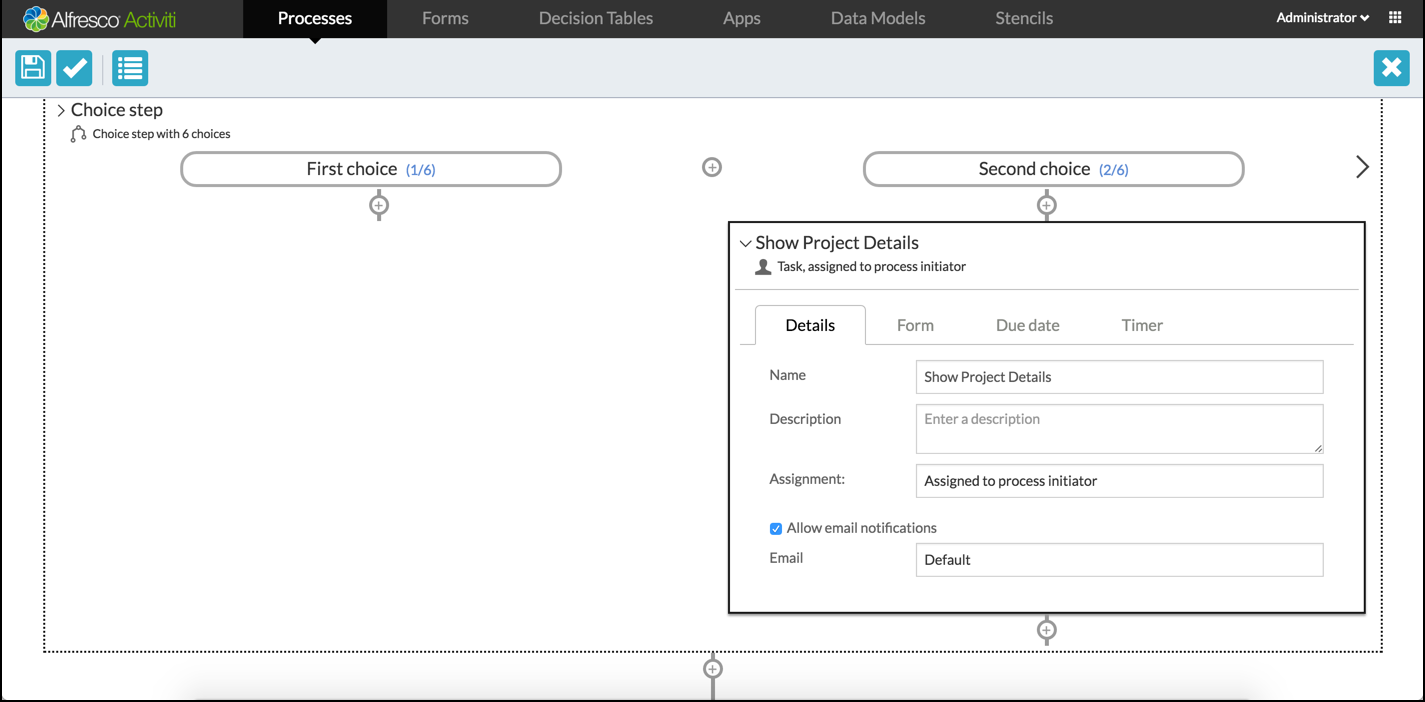
Continue with adding steps to the First choice, or in this case continue to add them after completing the Choice step by clicking the + at the very bottom. We’ll just add a Human task with the name Show Project Details.
-
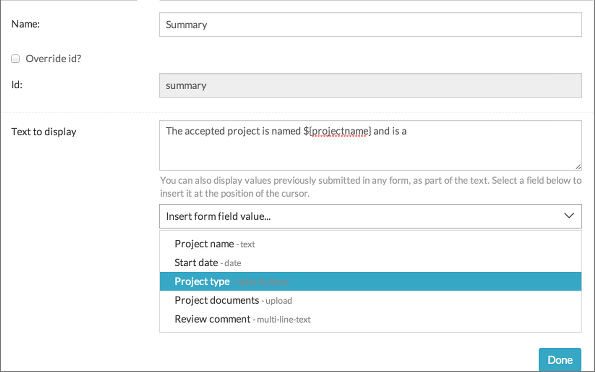
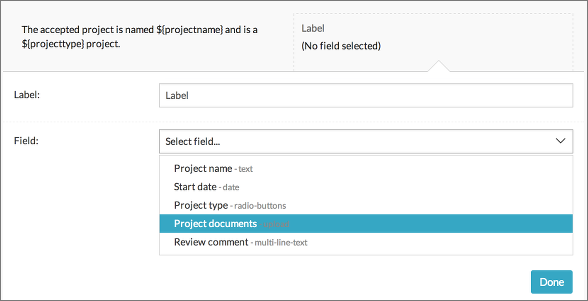
On the Forms tab for this task, create a new form. Drag a Display text field from the palette and enter the text message to display. The text can contain references to values added by a user in previous forms. There is a helper drop down that you can select from to insert the given reference at the cursor position in the text.
-
Add some text as shown. Then drag a Display value field from the palette and set it to display the project files by selecting the appropriate field from the list.
- Save the form to return to the Step Editor. In addition, save the process model you’ve just designed.
All your processes are listed with a thumbnail of the process. You can edit a process from the list by clicking Visual Editor. For any additional information about a model, click the thumbnail itself or the Show Details button on the top right corner of the thumbnail. This takes you to the Details page for the process model where you can see the preview model as well as the actions that you can perform on it.

Tips:
- When you edit and save a model, you can choose for the changes to be saved as a new version.
- Previous versions can be accessed from the History popup, as can any commentary from the Comments popup, where you can add further comments.
- Other action buttons are self-explanatory such as deleting, starring (favorites), sharing, and downloading the model.
Create a process app to host the process
Now that we have a process defined, it will need to be hosted in a so called Process App, which in turn is published to the Dashboard. Let’s create a Process App using the Apps page.
- Click App Designer on your dashboard then click the Apps tab and select Create App.
- Select an icon and theme for the tile. You can have an app without any process definitions linked to it, which lets you create a simple custom task list.
-
Click Edit included models to use the process we’ve just defined, and select from the lists to add a model.

-
Save the app and select the option to publish the app in the Save dialog to return the Apps list view.
You can do similar actions on an app in its Details page for all models, such as deleting and sharing. You can also publish the app directly instead of doing it via the Save dialog. Publishing an app makes it available to everyone you’ve shared it with to add to their landing page. Let’s add it to our landing page so we can see our process in action.
- On your landing page, click the tile with the + (plus) icon. The Add app to landing page dialog appears.
- Choose the apps you want to add and click Deploy. A new tile will be added to your landing page.
Manage Processes and Tasks
To work with process instances and task instances created from a process model you use the Tasks and Processes applications.
Start a process
-
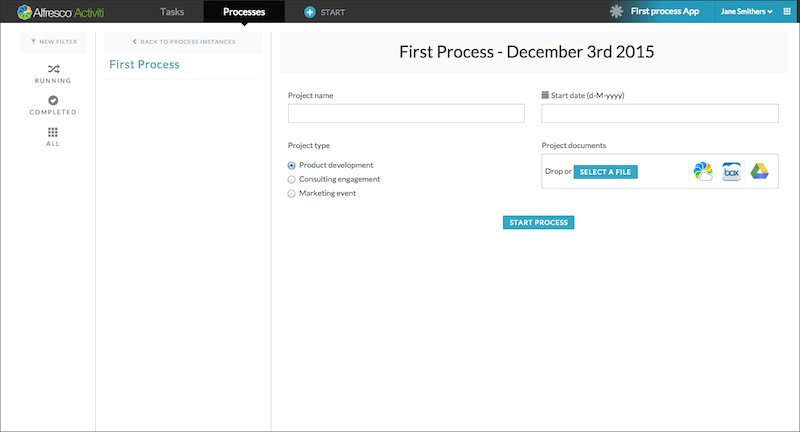
Click + START in the menu bar area. A list of available processes are displayed, which in our case will be only one. When you select it, the Start form we created above is displayed. You can also change the name by clicking the title on the right panel. By default the current date is added to the name of the process.
-
Fill in the form and click Start Process.
You will be returned to the Processes page, showing the details of the newly started process in your process list.

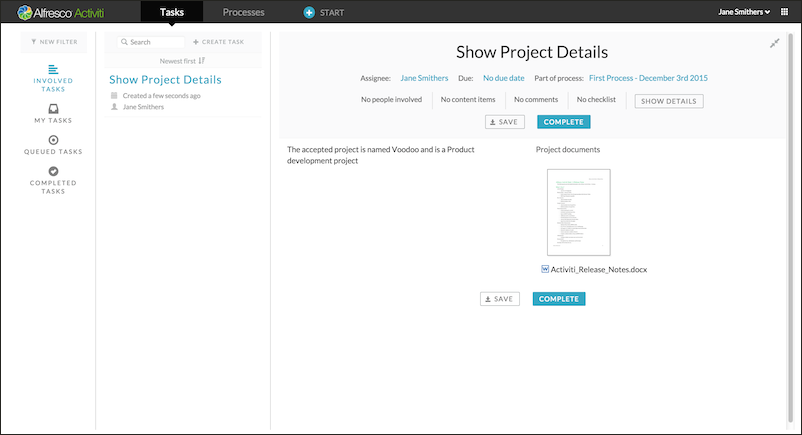
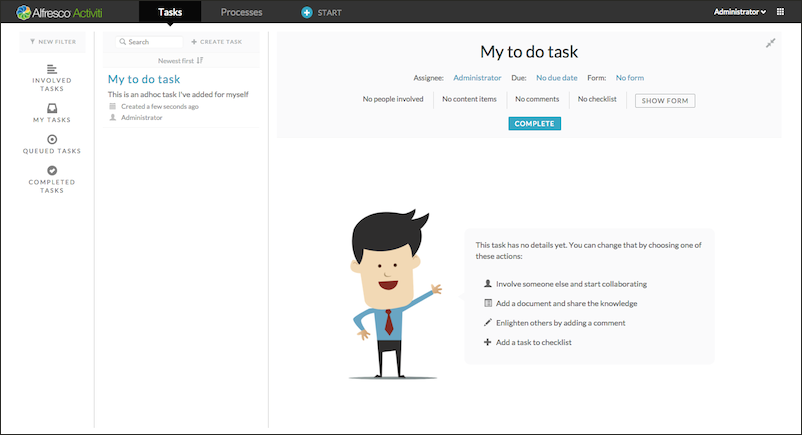
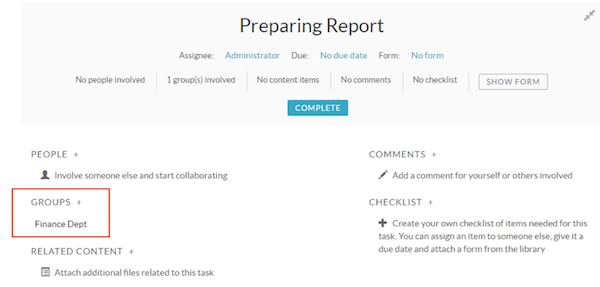
You can always view a process to see what the current and completed tasks are, as well as add comments that will be available for anyone involved in the process at any stage. If you go to the Task page that we just created, you will see the first step in the process is that of a task to review the project, and accept or reject it. The task was assigned to you because it was set to the process initiator, and you started the process.

Before you fill in the review summary and choose accept or reject, you can still add people, documents, and comments by clicking on the Show details button in the task header area. You can get back to the form from there by clicking the Show form button. If you click the Accept button, the Review Project task will disappear and instead a new task, Update Project List will appear. This is because you defined it as the next choice step in the Step Editor, if the choice was to accept the project. You can just click the Complete button to move to the next step, which is a task to show the details of the accepted project.
Manage tasks
- Click Tasks in the menu bar area. This will only show the tasks created within this app or as part of the processes from the app.
-
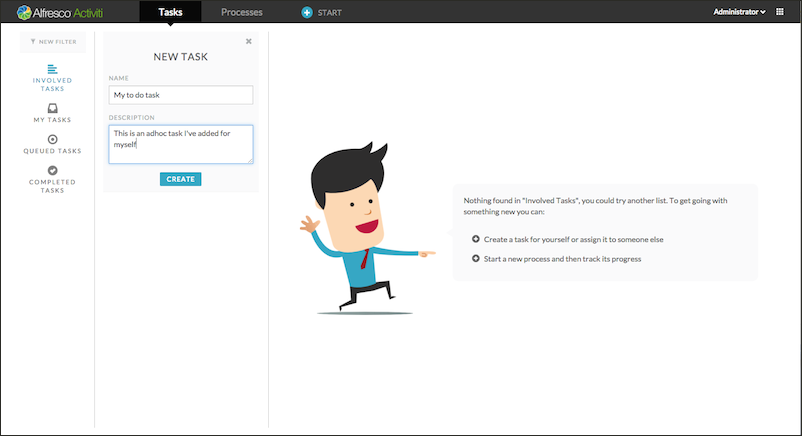
Click on the hint box next to James to create a task and fill in some text. You will now have a task in your task list.
-
Complete a task by clicking Complete. The task will no longer be available in your task list. Before you click Complete, you can do a variety of things with a task, such as give it a due date or assign it to someone else.
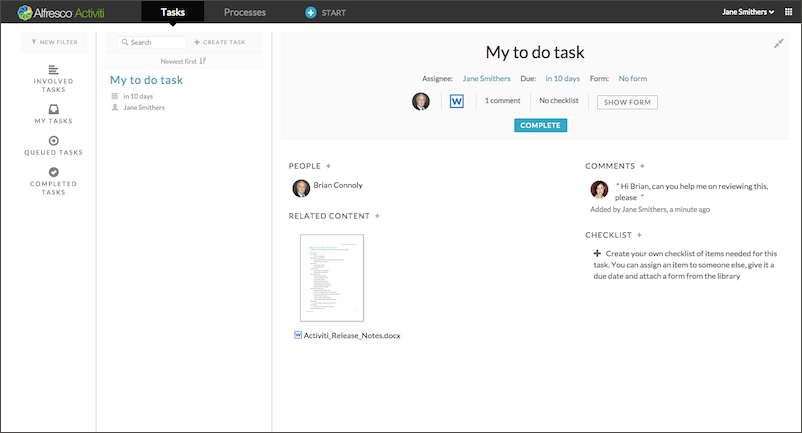
When you involve someone else in a task, it will appear in their tasks list. This enables them to contribute to the task such as add comments, documents, and even involve more people. However, only the person who is assigned the task with can actually complete it. In the following example we’ve added a document, a comment, and involved a person.
-
Click Complete. If you wish to view that task again, you can click the Completed Tasks filter on the left pane. By default, you will see all tasks you are involved with, however you can customize your view to:
- Tasks that are directly assigned to you
- Tasks where you are listed as a candidate
- Tasks that belong to the group you’re member of
Note: Not all user accounts may have groups assigned.
Now that the tasks have been created, let’s start the process we designed earlier.
When you complete this task, your task list and your process list will be empty. If you prefer to see all your tasks and processes in one place rather than through different process apps, you can use the My Tasks tile to get your complete task and process lists.
Using Involved Tasks
As well as allowing individual collaboration on a task, you can also involve groups. You can use this feature as an alternative to manually selecting multiple individuals when involving them with a task.
Use these instructions to extend task involvement to include groups of users.
-
Click Task App.
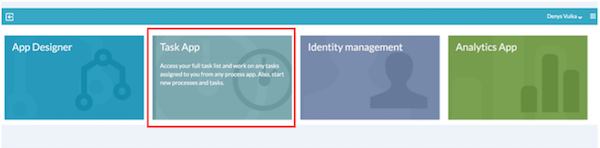
The Tasks App screen is displayed and the involved Tasks option is highlighted.
-
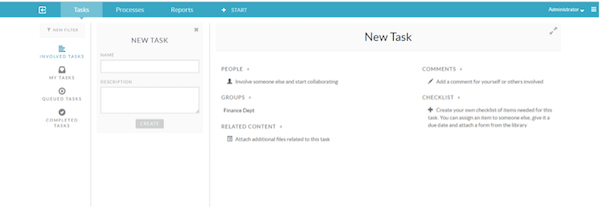
Create a new Involved Task.
-
Enter the task name in the NAME field.
-
Click CREATE.
The new Involved Task is displayed.

-
-
Click Invite groups of people and start collaborating.
-
Specify the name of the group you want to collaborate with on the task.

If the group exists, the matching group name is displayed on the screen.

-
Select the matching group.
-
Click Groups + to add more groups.

-
Click Complete to complete the group involved task.
Different types of steps
The following section goes through the different types of steps you can use. The types of step are:
Human step
A human step is a task to be completed by a user. You choose who to assign the task to, provide a form for that user to complete, define a due date for the task, and set a timer. If a timer is triggered, it will allow Process Services to take an action related to the task, such as reassign it to another user and so on.
The Human step dialog is divided into four tabs:
Details tab
| Property | Description |
|---|---|
| Id | A unique identifier for this element |
| Name | A name for the task. |
| Documentation | A description of the task. |
| Assignment | Configure to who this task should be assigned. You can assign the task to one of the following assignees: Assigned to process initiator The user that started the process instance, which could be you, or a user you have shared the process definition with. The process initiator is the default assignee. Assigned to process initiator’s (primary) group manager The group manager of the user that started the process instance. Assigned to single user When selected, an additional Assignee field is displayed enabling you to search for a single user or select someone using an email address. If that person is not currently an Process Services user, they will receive an invite. Assigned to group manager When selected, an additional Group field is displayed enabling you to search for a group manager or select a form field (providing you have defined a form). Only users that have a primary group defined will have a group manager. You can define a primary group via Identity Management > Users > Select an action > Change primary group. Candidate users When selected, an additional Candidates field is displayed enabling you to add one or more candidates. You can add Process Services users or select someone using an email address. If that person is not currently an Process Services user, they will receive an invite. All of the selected candidates are eligible to complete the task. The task will show up in their Queued tasks task list. The task is not assigned until they have claimed it, which will make the user the assignee. Candidate groups When selected, an additional Groups field is displayed enabling you to add one or more groups of Process Services users. The task will show up in their Queued tasks task list. The task is not assigned until they’ve claimed it. The other users won’t see that task in a task list anymore. Allow process initiator to complete a task When checked, the user that started the process instance (process initiator) can complete the task. This is checked by default. This option is available only for Candidate Groups, Candidate Users, and Assign to single user options. |
Form tab
You can select a form to display when the task runs. You can select an existing form, or create a new one. Forms that you create here while designing your process definition are accessible to steps in this process definition only. Forms that you have designed in the Forms tab of the Process Services app can be reused by any process definition owned by someone you have shared the form with. Both types of form are listed in the chooser dialog. You can filter the available list of forms by entering text in the Filter box.
Due date tab
If you specify a Due date, then the time remaining until that date will be displayed in the task details when the process is running. If the task is not completed in that time, then the amount of time since the due date is displayed. You have the following options for setting a due date:
-
No due date for this task
This is the default value.
-
Fixed duration after creation
Specifies a Due date in years, months, days, hours, minutes and seconds after the task is started.
-
Based on field
Select a date field from a list of those available in forms of this process definition. You can add or subtract a specified amount of time in years, months, days, hours, minutes and seconds from the value of the chosen date field to create a Due date.
-
Based on variable
Select a variable from the list of those available in forms of this process. You can add or subtract a specified amount of time in years, months, days, hours, minutes and seconds from the value of the chosen date field to create a Due date.
Timer tab
Timer is similar to Due date, except you specify a time after which some action will be performed on the task by Process Services. You can also specify an action for the task to be taken when the timer completes.
You have three options for setting a timer:
-
No action
This is the default value.
-
Reassign task
You specify another assignee in exactly the same way as you specify the original assignee on the Details tab. When the timer completes, the task is assigned to the specified user, candidates users, or candidate groups.
-
Keep task
When you specify Keep task, a new Timer date reached substep appears inside the current step with the + icon underneath it. You can add one or more subtasks inside this step by clicking this icon. When the timer completes, the task remains active, and the first substep becomes active too. The process continues running substeps as each substep is completed. Note that when you specify substeps here, the list of steps available now includes a Go to step. This allows you to choose one of the main process steps to run after this one.
-
End task
When you specify End task, a new Timer date reached substep appears inside the current step with the + icon underneath it. You can add one or more subtasks inside this step by clicking this icon. When the timer completes, the task ends, and the first substep becomes active. The process continues running substeps as each substep is completed. Note that when you specify substeps here, the list of steps available now includes a Goto step. This allows you to choose one of the main process steps to run after this one.
-
End the process
When the timer completes, all active tasks in the process are canceled and the process ends.
Email step
When an email step starts in a running process, it sends an email with a fixed text body and a fixed title to a single or multiple recipients.
The email step dialog contains two tabs that let you fully define the task.
Name and Description are simple text fields that help you and others to identify the task in your task list.
Recipient type lets you choose who receives the email defined in this step:
-
Process initiator recipient
The user who starts the process is the sole recipient of the email. This is the default.
-
Single user recipient
If you choose this option, a Recipient field is displayed to allow you to search for single user or select someone using an email address.
-
Multiple user recipients
If you choose this option a second Recipients field is displayed to allow you add one or more users. You can add Process Services users or select someone using an email address.
Choice step
A choice step enables you to start one of two or more sequences of substeps for your process, based on conditions.
Use the Name and Description fields in the choice step dialog to define the task for your task list.
When you select the Choices tab for a new choice step, it shows two choice boxes. You can use the + (plus) icon between them to add more choices. Click the choice box you to edit the choice and name it.
You can also add from one of the following conditions:
-
No condition
This choice runs its sub-steps if none of the other choices conditions are met. Note that only one of the choices in a choice step can specify this condition for the model to validate. This is the default.
-
Form field
This choice runs its sub-steps if the value of a field in a form satisfies a conditional statement. If you click this option, the following options are available:
- Select a field in a form that is used in this process definition.
- Choose an operator from equal, not equal, less than, greater than, less than or equal to, greater than or equal to, empty, not empty.
- Specify a value. For example, select a radio button field named direction from a form, choose the equals operator, and type the value Left.
-
Form outcome
This choice runs its substeps if the outcome of a form that matches the one specified for the choice is selected by the person assigned with the task. If you click this option, the following options are available:
- Select an outcome of a form used in this process definition.
- Choose an operator from equals or Not equals.
- Select a value of the outcome from the list. For example, select an outcome named direction from a form, choose the Equals operator, and choose the value Turn left from the drop-down list.
There are two steps that you can add at the end of a substep sequence in a choice step that change the flow of control in the process. See next 2 sections.
End process Step
An end process step is available only when defining a substep within a choice step. You use an end process step to stop the process within a choice step in your process definition. Since this is a terminal step, no + (plus) icon appears after the step.
In the End process step dialog > Details tab, define the task name and description.
Goto step
The Goto step is available only when defining a substep within a choice step. You use a goto step to jump to a named step within your process definition. Like the End process step, it is a terminal step and no + (plus) icon appears after it.
- In the Goto step dialog > Details tab, type a Name and Description in order to help you and others to identify the tasks in your task list.
-
Select a Goto step in this process definition to follow next.
The process definition used here illustrates models for driving a car. If you turn left, then you continue your journey. As long as you continue turning left, your journey continues. If you turn right, you drive a short distance to your final destination. The goto step provides two ways of managing the flow of control in a process:
- You can implement repetition, as illustrated.
- You can also move the flow of tasks to another step in the current process.
Sub process step
A sub process step enables you to create a step that itself contains a sequence of steps that constitute a complete process definition. When saved, this definition is added to the list of substeps available to your main process definition. This gives you a method of managing complex processes by refining repeated sequences of steps into a sub step. This can make your process definition easier to comprehend visually.
The sub step dialog contains one tab that lets you fully define the task.
A sub process lets you choose a sub process that you have already defined in this process definition, or you can create a new sub process that is reusable in this process definition.
REST call step
This step allows you make an arbitrary REST call. You can define a full endpoint directly or use an endpoint defined by an administrator on your Process Services server. You can supply parameters to the call directly in the URL or from process variables in forms, and you can extract properties from the JSON response into process variables for use in your process definition.
Note: A user with administration privileges will need to add endpoints for standard REST calls, with Username and Password pairs that are permitted for basic authentication. An administrator can add these endpoints and authentications on the Tenant page of the Identity Management app. The benefit of using standard endpoints is that they can be easily switched for test and deployment configurations. It is also possible to use a REST step to call the Process Services REST API.
The REST call step dialog contains four tabs that let you fully define the call.
Name and Description are simple text fields that help you and others to identify the task in your task list.
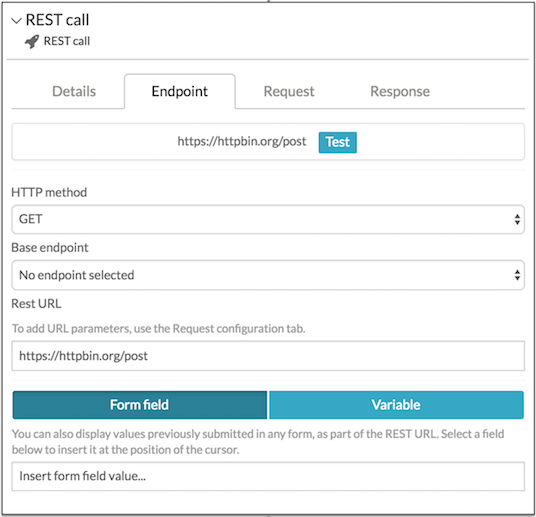
You define the URL for your REST call in this tab.
-
HTTP Method
This is the method associated with the REST call. The default is GET, but you must select between GET, POST, PUT, and DELETE based on the documentation for your chosen API call. The example shown in the screenshot, is using the
api/enterprise/app-versionREST call, which is documented as a GET call. -
Base endpoint
You select one from a list of endpoints that have been defined by your administrator. In the example the endpoint for the local Process Services server REST API,
http://localhost:8080/activiti-app/, has been chosen. -
Rest URL
Copy the URL fragment from your selected REST API call. In this example we are using
api/enterprise/app-version.You may also choose to enter the full URL, especially for REST services that have not been defined by your administrator, for example,
http://httpbin.org/post. This can be useful during development and prototyping cycles.In all cases, you can use the Test button to test your endpoint.
-
Form Field/Variables
You can insert values previously submitted in any form (or variables) in your process definition, into the REST URL. The value will be inserted at the position of the cursor in the Rest url field.
Some REST calls require a JSON request body. You can add one or more JSON properties using this tab.
For each property you define the name, property type and value. The value can either be a fixed value, or you can select the value of a form field from a list of available form fields in your process definition.
REST calls return a JSON response body. You can define one or more pairs JSON response properties and process variables. When the step completes, each process variable will contain the value of the returned response property. You can use those values later in your process. In this example, the returned JSON property edition will be contained in the process variable activitiedition, which is a form field in a form used for displaying the edition string later in the process definition.
For complex and nested POST request bodies, specify a JSON Template which is evaluated at run-time. The JSON editor provides syntax highlighting and will highlight any JSON syntax errors on the line number indicator.

Generate document step
Use this step to generate a Microsoft Word or PDF document from a template in Microsoft Word. The process step will substitute any variables you place in the template document with process and form variables. You can upload global template documents for use by all users, or upload personal template documents for your own use.
Note: A user with administration privileges can upload global templates. An administrator can add templates on the Tenant page of the Identity Management app.
The Generate Document step dialog contains the following tabs to define the task:
-
Details tab
- Name and Description - Type the name and description of your task.
- Output name - Type the name of your output document.
- Output format - Click the format that you want to view your generated document: PDF or Word.
-
Template tab
Select from a list of company templates that an administrator has uploaded or upload your own personal templates by clicking Upload Template. In the above example, the
offer.docxcompany template is selected.You can also filter the list of company templates with a search string, and download any template to see what form and process variable substitutions are made in the template.
-
Variable tab
Enter a variable name that you have used in the document.
In the template, you can substitute
<<[name]>>in the output document with the form variable name, for example:
Templates are processed using the LINQ reporting engine.
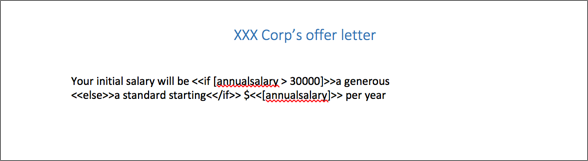
You can also use expressions to build more complex templates. For example, the following excerpt was used in an HR offer letter of XXX Corp called offer-letter.docx:
    Your initial salary will be <<if [annualsalary > 30000]>>a generous
<<else>>a standard starting<</if>> $<<[annualsalary]>> per year
The sample template referred above uses conditional expressions that tests the value of the form variable annualsalary and outputs one of the two different text phrases, depending on that value.
To test the offer.docx template, create a process definition that uses the template. For example:
- Create a process with the option started by user filling in a form.
- Create a form called starter with four fields: a text field with the ID name, a set of radio buttons with the ID department, and two number fields with the IDs annualsalary and annualbonus.
- Once you have filled the form, the Generate Document step will take the
offer.docxtemplate (mentioned above) and generate a document with a name defined by value of the Variable tab,offer-letter.docx. - Create an app to include the process definition that you just defined, and then publish the app.
- Click Start Process. The Generate Document step is executed and the
offer-letter.docxdocument is generated.
In this example, the Generate Document step is the last step in the process definition, therefore you can view and download the generated document of the completed process in the Process Services process view.
Decision step
The decision step enables you to create a Decision Table. A decision table is an easier expression to creating business rules.
See the Business rules - decision tables section for more details on Decision Tables.
Content-related step
Use this section to link create content related steps.
Retrieve Alfresco Properties
The Retrieve Alfresco Properties option enables you to retrieve content-specific properties from Alfresco Content Services and map it to a form field or variable, for example, properties of a document. You can retrieve document information after a document is added or referenced via the Attachment form field in the Share Connector.
| Property | Description |
|---|---|
| Id | A unique identifier for this element. |
| Name | A name for this element. |
| Documentation | A description of this element. |
| Alfresco properties | Retrieves Alfresco Content Services properties for content stored in the form editor or variable, and allows mapping them. |
Update Alfresco Properties
The Update Alfresco Properties option enables you to update content-specific properties in Alfresco Content Services using a form field or variable. For example, you can update properties of a document linked from Alfresco Content Services via a form attachment field, or process variable.
The Properties sheet displays the same fields as Retrieve Alfresco properties, except that is used for updating properties rather than retrieving.
Call Alfresco Action
The Call Alfresco Action enables you to invoke standard Alfresco Content Services actions from Process Services.
Note: Alfresco Actions are asynchronous. This is important to note if you have multiple tasks executing against the same node(s) in Alfresco Content Services. To control a sequence of actions against a node, use a Service Task instead.
| Property | Description |
|---|---|
| Id | A unique identifier for this element. |
| Name | A name for this element. |
| Documentation | A description of this element. |
| Content | Retrieves properties Alfresco Content Services for content stored in the form editor or variable. |
| Act as | Identity of the caller: Process Initiator or Specific User. Selecting Specific User lets you select a different user. |
| Repository | Changes the repository account. For example: Alfresco Content Services. |
| Action | Lists a range of actions specific to Alfresco Content Services. Select the options to make changes to the default name and value depending on your requirement. The options are as follows: extract-metadata Extracts embedded metadata from files and added to the file properties. Alfresco Content Services supports Microsoft Office document properties, LibreOffice, and a number of other formats. move Moves the files and subfolders to the locations of your choices in Share if you edit the following value with the exact location of your document in Share: workspace://SpacesStore/<ID>.add aspect Adds a property aspect to files for additional behaviors or properties. specialise-type Changes a file’s content type, if applicable. For example, you can changes a standard file into a policy document and adds the appropriate metadata for that content type. script Runs a custom JavaScript script from the Data Dictionary/Scripts folder. There are a number of sample scripts available. The list can vary depending on how Alfresco Content Services is configured. check-in Checks in files that are currently checked out. For example, files will be checked in before being moved to another folder. Select the option to indicate whether they will be checked in as minor or major versions. transform and copy content Action for transforming and copying content. You can add copies of files, in the format of your choice, to another location. For example, you can generate a copy of a Word document in PDF format in a different folder. remove-features Removes a property aspect from files to remove functionality or properties. check-out Checks out files automatically with a working copy created in the location of your choice. Select the option to associate a name or type with the file. copy Creates copies of files in the location of your choice. Set the additional deep-copy and overwrite-copy options to true if you want to copy or overwrite sub-folders and their contents. transform-image Action for transforming and copying image files in the format of your choice to another location. For example, you can generate a copy of GIF file in PNG format in a different folder. |
Publish to Alfresco
This step enables you to write a document or all documents uploaded in your process to an Alfresco Content Services on-premise repository.
Note: A user with administration privileges will need to add accounts for the Alfresco Content Services repositories that you can publish to. An administrator can add repositories on the Tenant page of the Identity Management app. The list of repositories you can publish to is then shown on your Personal Info page. If you click on a repository, an account to access the repository is added for you.
The Publish to Alfresco step dialog contains three tabs that let you fully define the task.
Name and Description are simple text fields that help you and others to identify the task in your task list.
-
Publish all content loaded in process
This is the default. All files that have been uploaded in an upload field in a form before this step are published to the specified location in the repository
-
Publish content uploaded in field
If you select this option a second field Form field displays a list of form fields from all the forms in your process. You can select one from the list.
-
Destination
This is the folder in an Alfresco repository to which the selected content will be published. Click Select Folder to display a dialog that lets you choose a folder from the available Alfresco repositories defined in your Process Services app. Once you have selected a folder, the repository details and folder path are displayed in this field.
-
Subfolder
If you check create or reuse subfolder, a second field Based on field displays a list of fields from all the forms in your process. You can select one from the list. A folder with a name based on the content of the selected field will be created or reused within the specified destination folder to publish the content selected. If you do not select this option, all the items of content will be published directly to the specified destination folder.
Publish to Box
This is similar to the Publish to Alfresco step, but for Box.
Note that a Box account needs to be configured in the Identity Management > Personal tab.
Publish to Google Drive
This is similar to the Publish to Alfresco task step, but for Google Drive.
Note that a Google Drive account doesn’t need to be configured. A popup shows up when you have to select a document/folder and no account is found. This popup will allow you to log in with the Google Drive credentials and use this account thereafter.