There are many situations in a business process where you wish to evaluate some data you have collected and come to some conclusion or decision. Business rules provide a natural way to express the logic of decision making. Typical decision examples are calculating discounts, credit ratings, who to assign tasks to, what service level (SLA) to use, and so on.
There are business rule systems that are hugely complex and intended for a wide range of uses. You can, of course, integrate Process Services to these systems if they provide what you need. Often, within a business process, the rules can be very focused and need to be managed by business users. This is where Process Services decision tables provide a natural solution.
In a decision table you only test, set and create variables using a set of business rules. There are no other side effects possible, such as calling out to external systems, because these are not needed: a process can do all this using the full range of its BPM capabilities before or after a Decision Table task.
You can think of a Decision Table as a spreadsheet that allows you to define a row for each business rule, with columns representing each variable that needs to be tested or set. There are two parts to a rule: the conditions (if they all match, the rule “succeeds”) and the conclusions (then set some values). In each cell of the table there can be a value expression that is used to try and match against variable’s values, or to calculate the value to set. When a Decision Table is evaluated, it tries all the rules in turn (so ordering of rules matters), testing and setting values. Depending on how you want the rules to be interpreted, you can set the rules to stop as soon as one rule matches and succeeds in setting its values, or to run through all the rules, setting values for every matching rule. If it runs through all rules, you can think of the last successful rule winning, as it may overwrite values that were set for the same variables in other successful rules.
Decision tables follow the Decision Model Notation (DMN) specification.
In the following, we will create a simple process that makes use of a Decision task and its Decision Table. We will use the BPMN editor, but you can just as well use the Step editor to achieve the same result.
First let’s take a look at the process we want to create:

In this “Annual Work Review” process, a user can enter the details of his or hers achievements for the current year, and if the work efforts have gone beyond the employee’s obligations a bonus will be given and an email sent notifying the user about it. The logic to decide if a bonus should be given or not is implemented using a Decision Table in the “Calculate bonus” Decision task above. Before we take a look at the Decision Table itself, let’s quickly take a look at the tasks before the “Calculate bonus” Decision task.
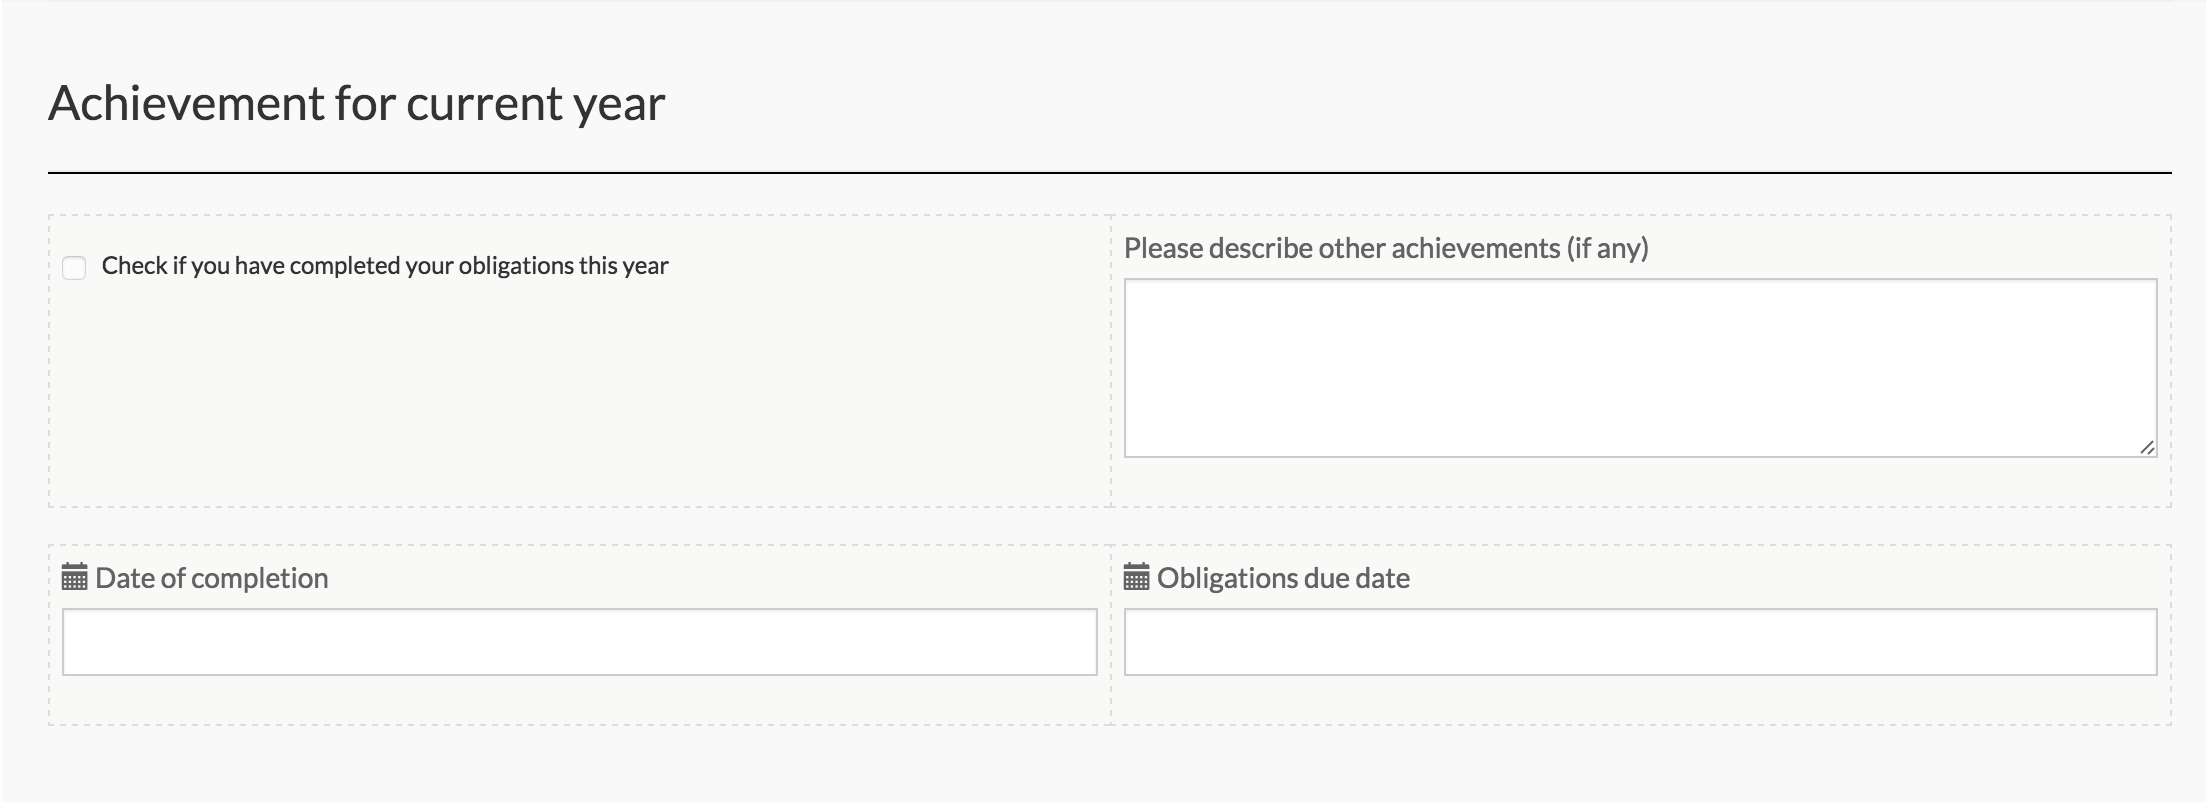
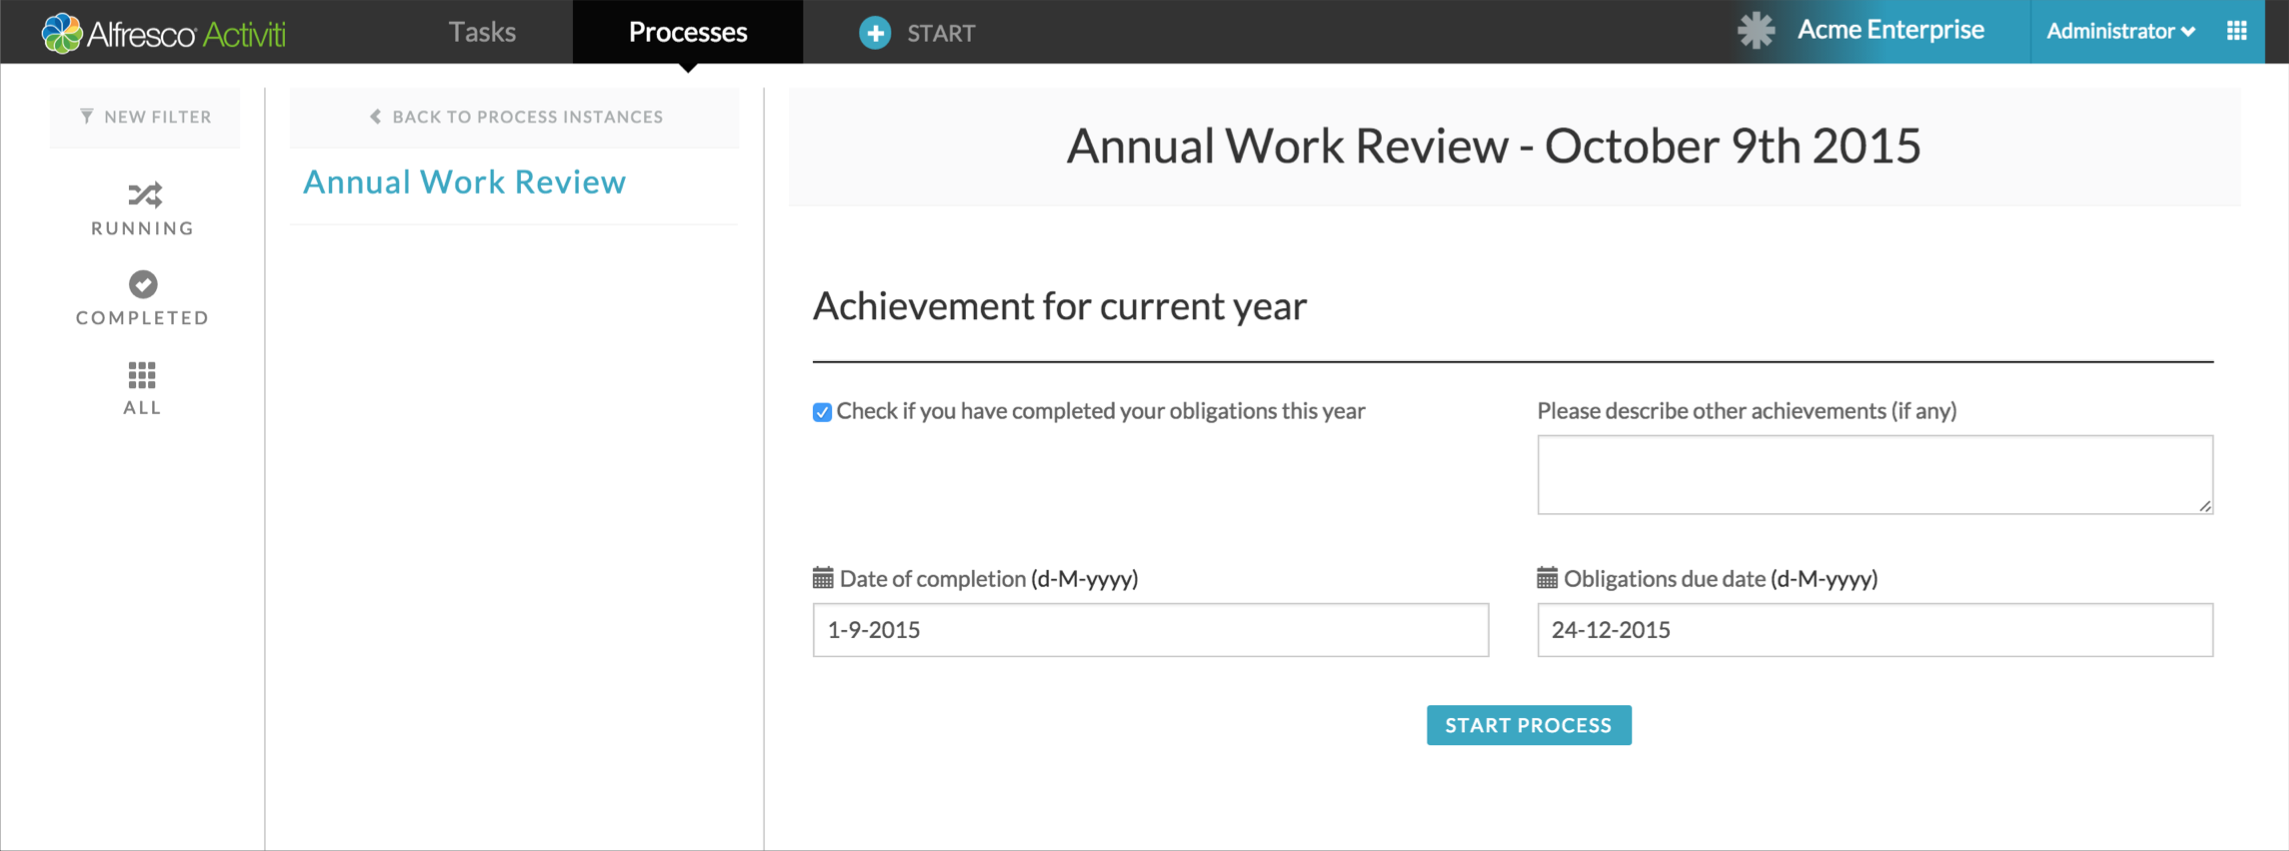
The process’ start form is shown below and defines 4 fields: obligationsCompleted (boolean), additionalAchievements (string), completedDate (date) and dueDate (date). See the Form editor section for more information on how to create forms.
The second task in the process is a “Script task” that we are using to load some demo user data. It has format javascript and declares 2 variables: yearsOfService (integer) and salary (integer) in the Variables property dialog. In the Script property dialog for the script task the following code has been added to get some employee data:
execution.setVariable("salary", 1000);
execution.setVariable("yearsOfService", 5);
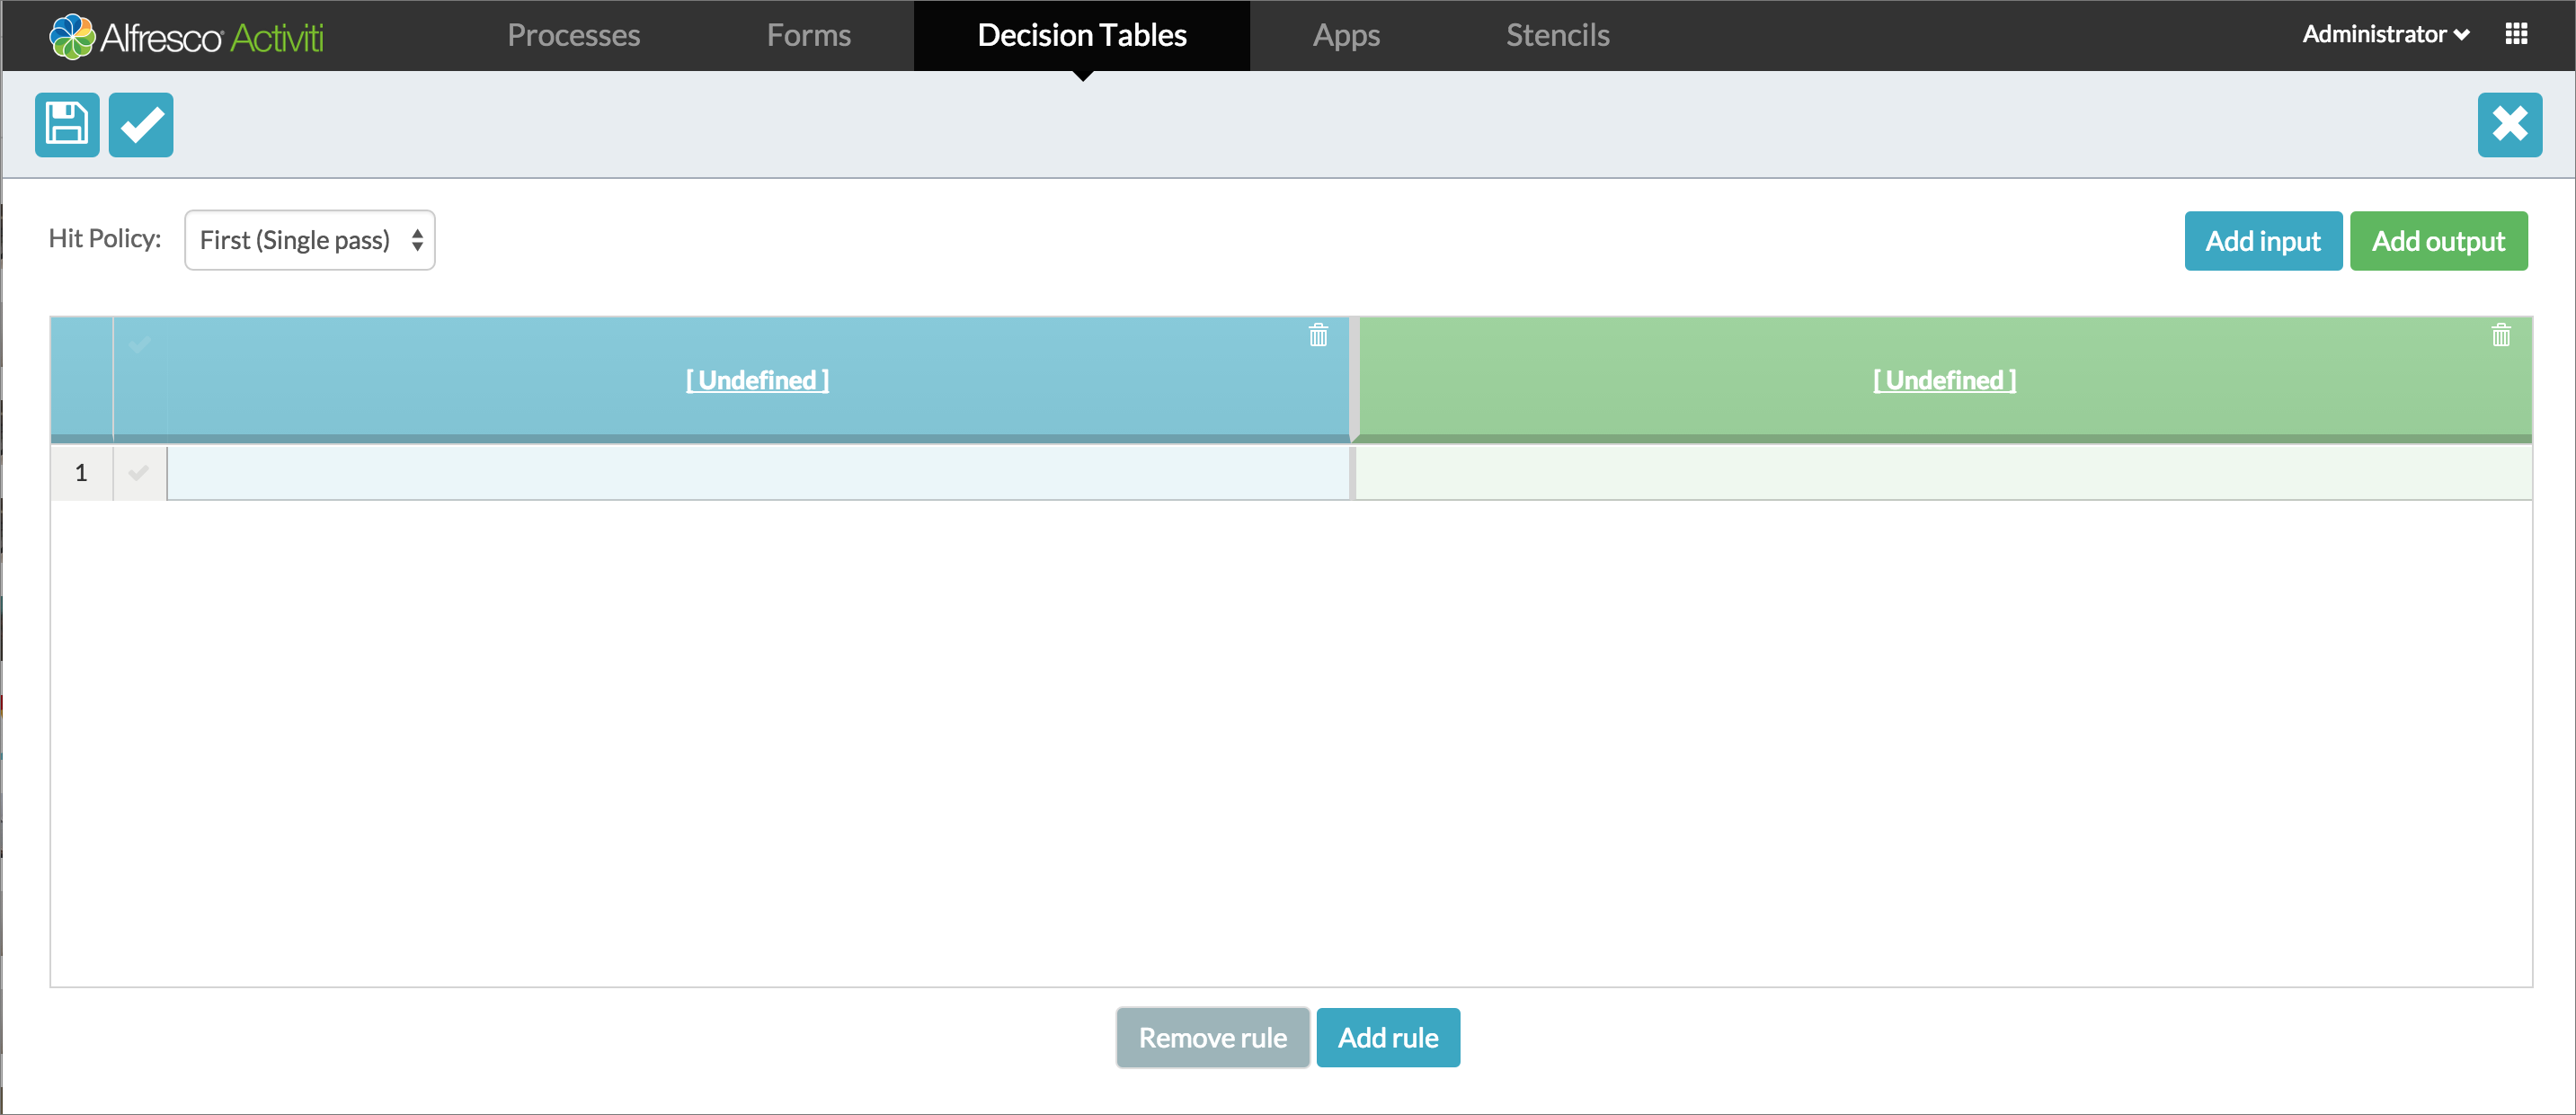
Now we are ready to create our Decision Table that will have all the input values it needs to decide if a bonus should be given or not. The decision task is created by dragging and dropping a “Decision Task” from the “Activities” section in the editor palette. The only mandatory property is the “Referenced decision table” property in which you should choose “New decision table”. Enter “Calculate Bonus” as the name and click the “Create decision table” button to be taken to the decision table editor, as shown below.
Before starting to look at the details of the editor, let’s start by looking at the rules that we want to create to decide if a bonus should be given or not. The logic (or the rules) we will create can be seen in the Decision Table below:

The logic can be summarized as:
- IF the user has completed the obligations AND has performed additional achievements AND has worked for the company more than 5 years AND completed the obligations 3 months before the due date
- THEN the bonus is 5% of the salary
- IF the user has completed the obligations AND has performed additional achievements
- THEN the bonus is 3% of the salary
- IF the user has completed the obligations AND has worked for the company more than 5 years
- THEN the bonus is 3% of the salary
- IF the user has completed the obligations AND completed the obligations 3 months before the due date
- THEN the bonus is 3% of the salary
- IF none of the rules above matched (empty cells are treated as an automatic match)
- THEN the user gets no bonus
The expressions in each cell is an MVEL expression. MVEL is an embeddable scripting language that you can read more about here. Note though that you don’t have to write MVEL syntax yourself but can use the edit icon in each cell to display a structured expression dialog where you can create these expressions through a simple interface. Once you are familiar with the syntax you can just enter them directly in the cells, like editing a spreadsheet.
Note: By default it is NOT possible to type in any MVEL expression, but only a sub-set that is supported by the structured expression editor. If you want to be able to write more complex MVEL expressions, you may do so globally by your system administrator setting the
validator.editor.dmn.expressionproperty inactiviti-app.propertiestofalse. By disabling the default validation you will be able to run any MVEL expression, but you will not get the same help validating that your syntax is correct. Also, you will get a warning message in the structured editor when trying to open an expression it isn’t able to recognize.
Even if you don’t know MVEL, most expressions are self-explanatory. The complex date expression < fn_subtractDate(dueDate,0,3,0) probably requires a small explanation though. A custom calculation for dates is
used that takes the dueDate as the first parameter and then will calculate a date value by subtracting from it the last 3 parameters for years, months and days. In this case the expression checks if the completedDate is 3 months before the due date.
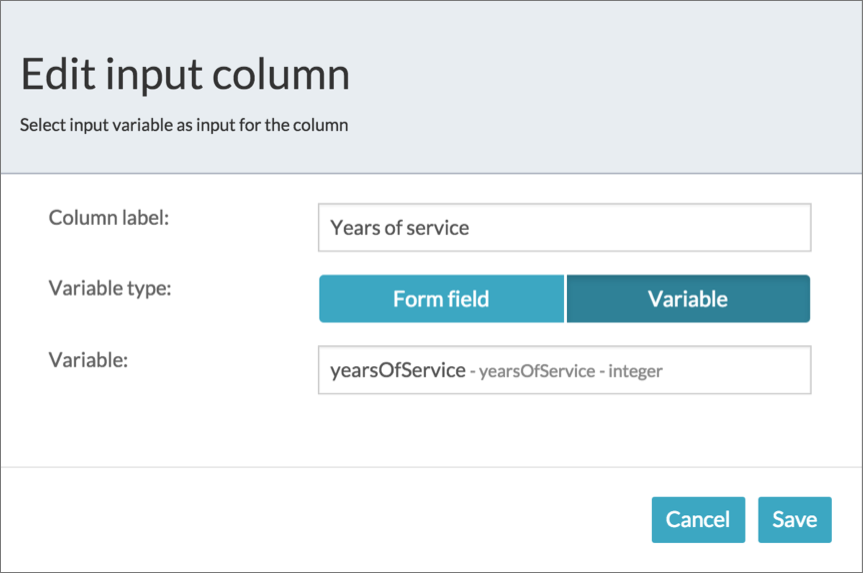
Now create the decision table for yourself. The first thing you need to do is add four input expressions using the Add input button in the Decision Table editor. For each of these, select the process variable or form field to use as input for the column. When adding yearsOfService it should look like the following.
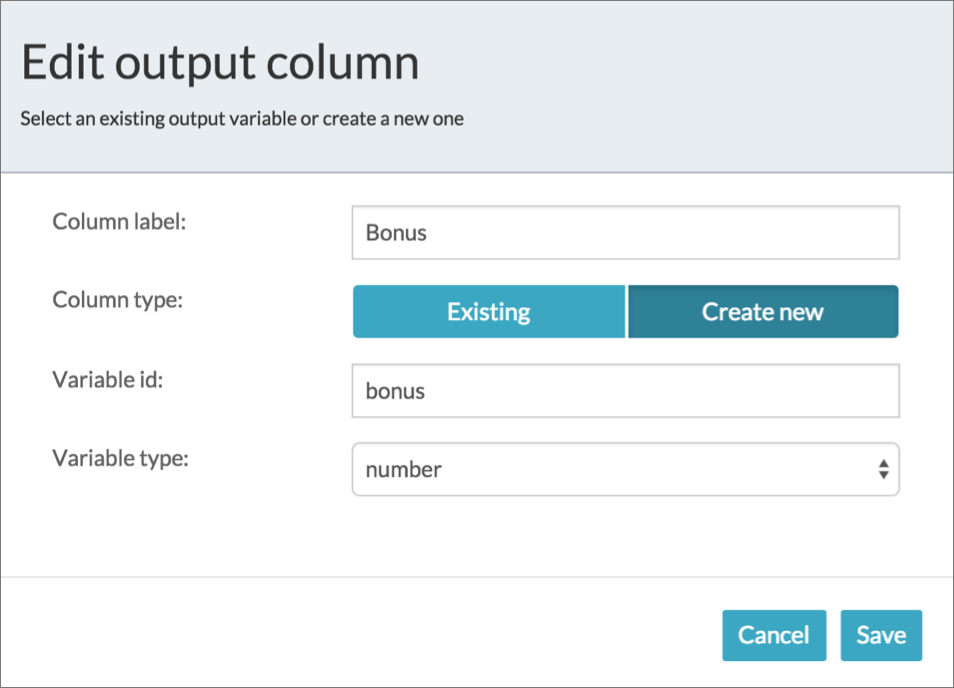
Then you need to add an output column by clicking Add output, making sure the dialog looks as below to create a new process variable named bonus.
Time to add our rules. Feel free to type them directly into the cell or use the structured editor (which pops up when clicking the edit icon to the right in each cell). Below you can see how the structured editor looks like when adding the date expression from above.

When done, click Validate to make sure your decision table doesn’t contain errors. Note that once you click Validate, the editor will validate your table for every change you make. When you’re happy with your table, click the save icon. You will be prompted to give a “Decision Table key” which can be any value unique to the process.
Back at the BPMN editor add an “Exclusive gateway” and from it add a new “End event” by clicking the circle with the thick border. Select the arrow that connects them and enable the “Default flow” property.
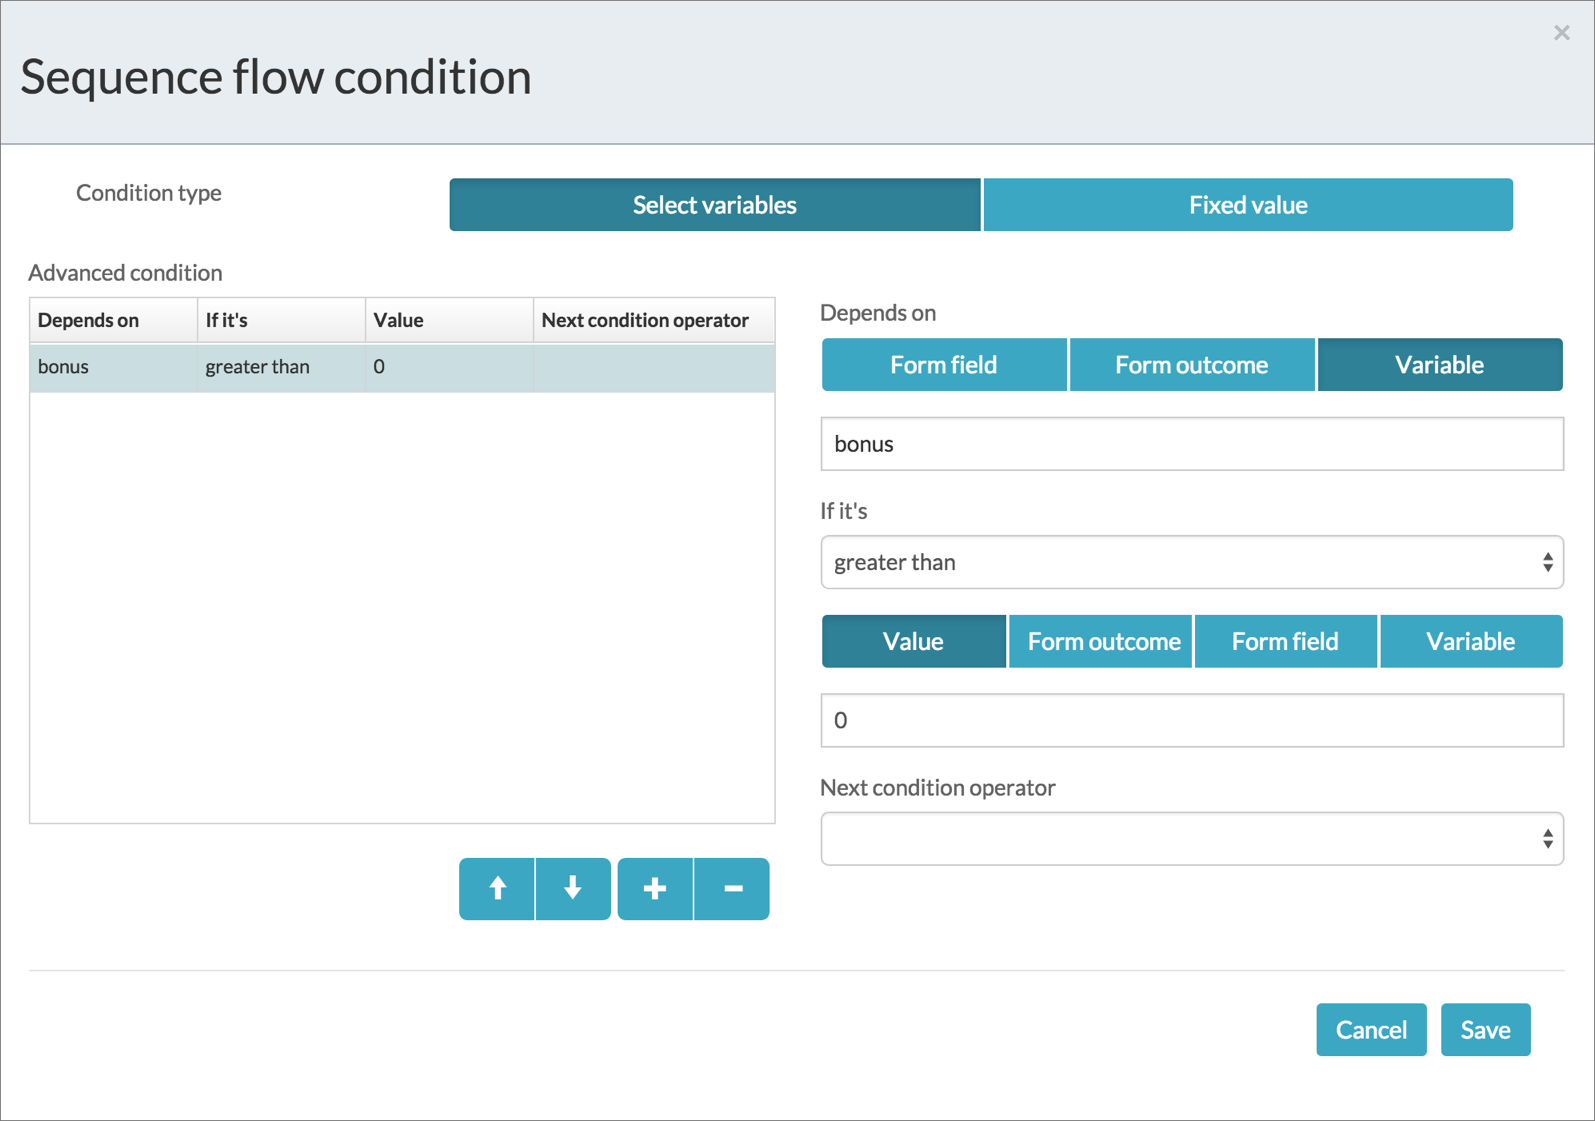
Now drag and drop a “Mail task” and set its “To” property’s “Fixed value” to ${emailBean.getProcessInitiator(execution)} so it sends the email to the initiator of the process. Then enter values for its “Subject” and “Text” (or “Html”) properties. Add a sequence flow arrow to connect the gateway to the email task and make sure to set its “Flow condition” property to have an advanced condition as in the image below.
Finally, draw the sequence flow arrow from the mail task to the end event.
We are now ready to use our Decision Table in the Task app. Once you have deployed your process, start an Annual Work Review process by entering the following details in its Start form and click Start Process.
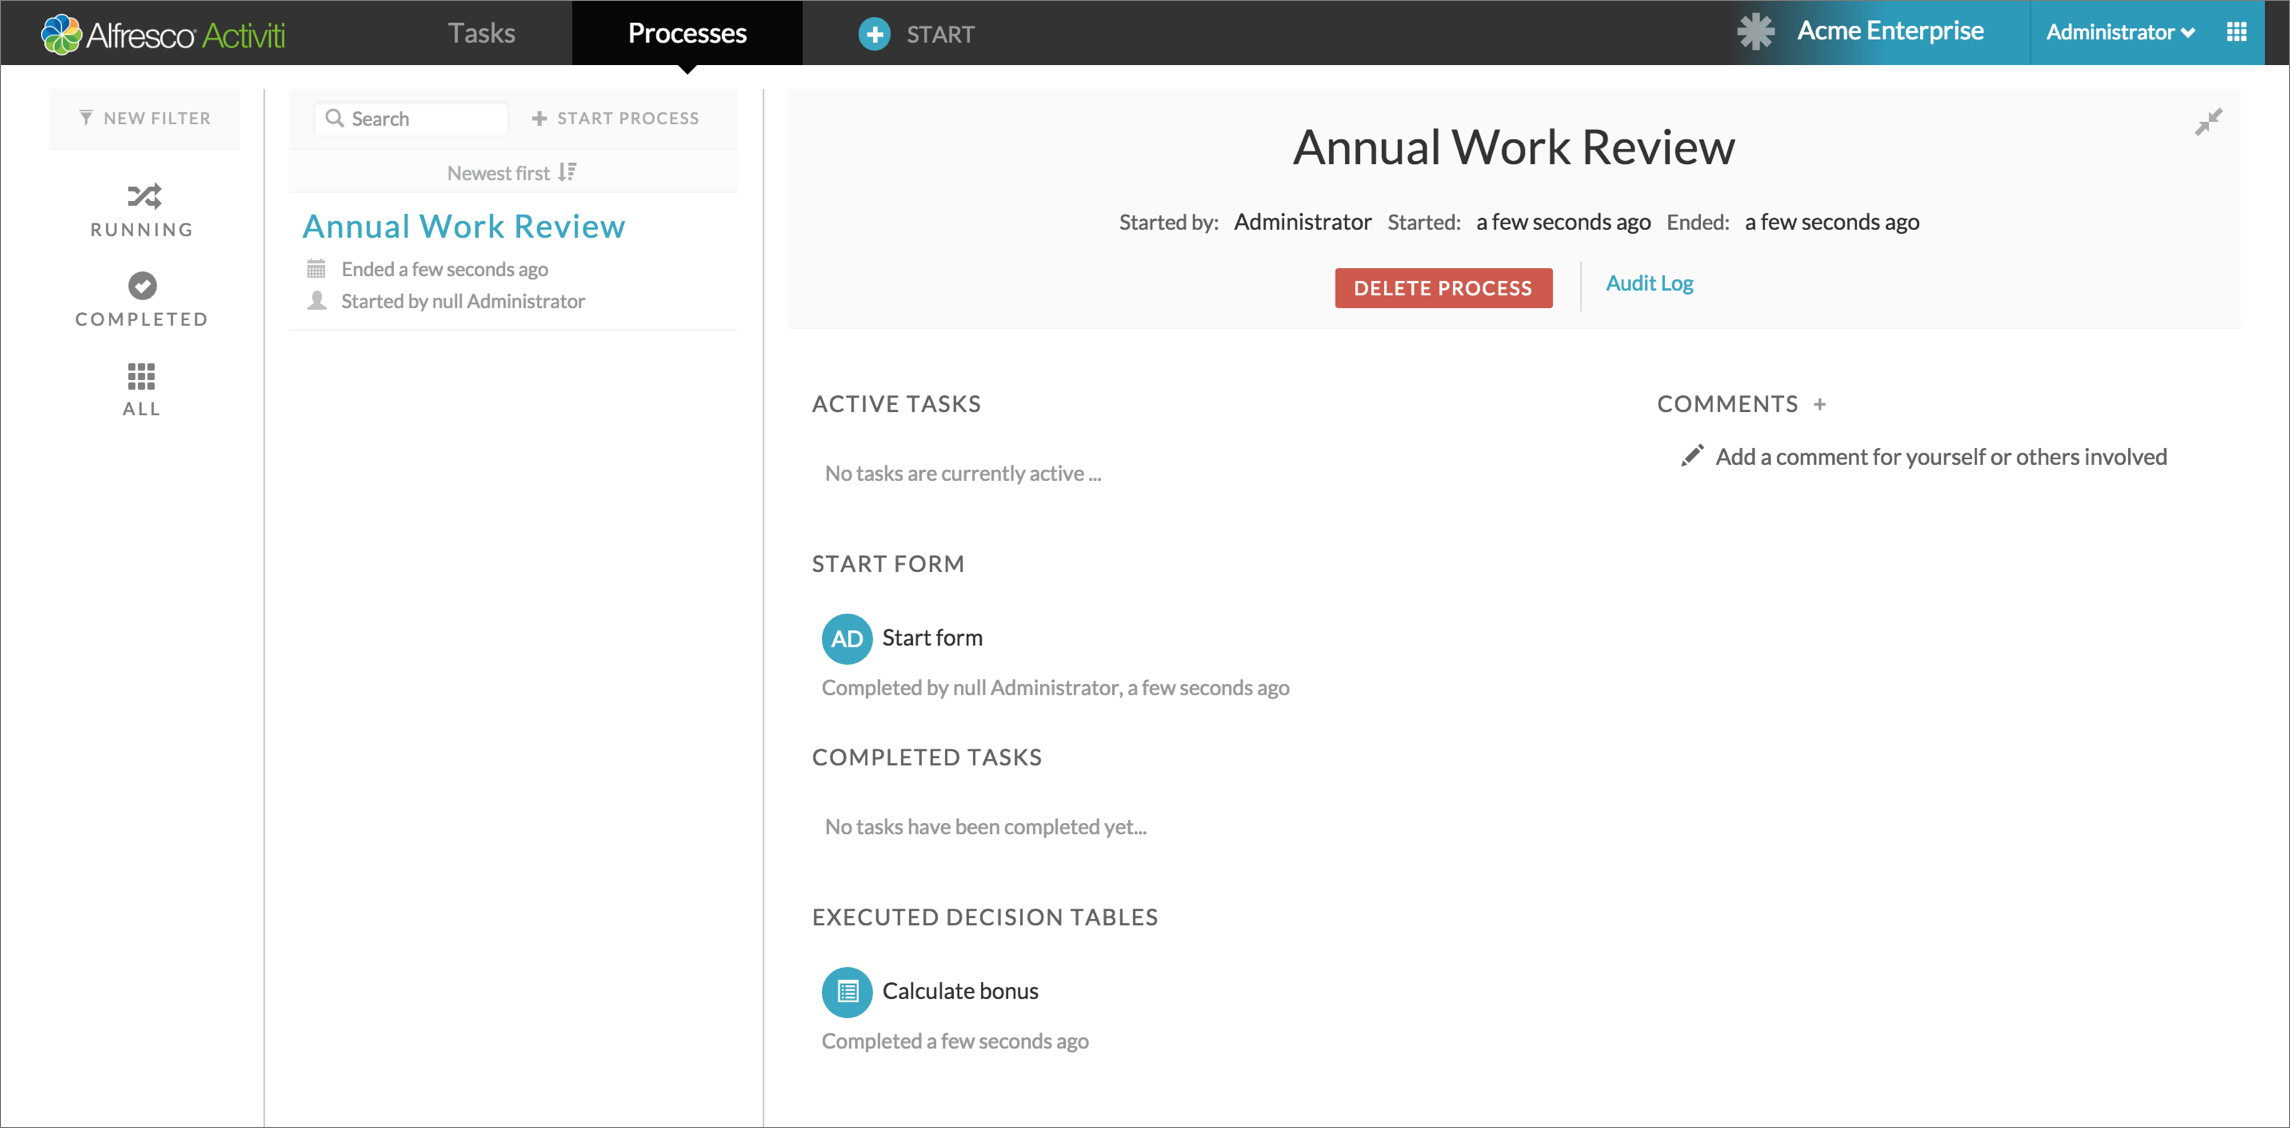
The process detail view is displayed as shown below. After a decision table is executed in a process, it is listed in the Executed Decision Tables section. If something caused the decision table to fail during execution, a red icon with a message is displayed stating an error occurred. Click the Calculate Bonus decision table in the user interface to see details about the decision table and its evaluation.
A decision table is a bit like a black box. You can see the history of it when it was executed. In the image below you can see the audit trail of the decision table.
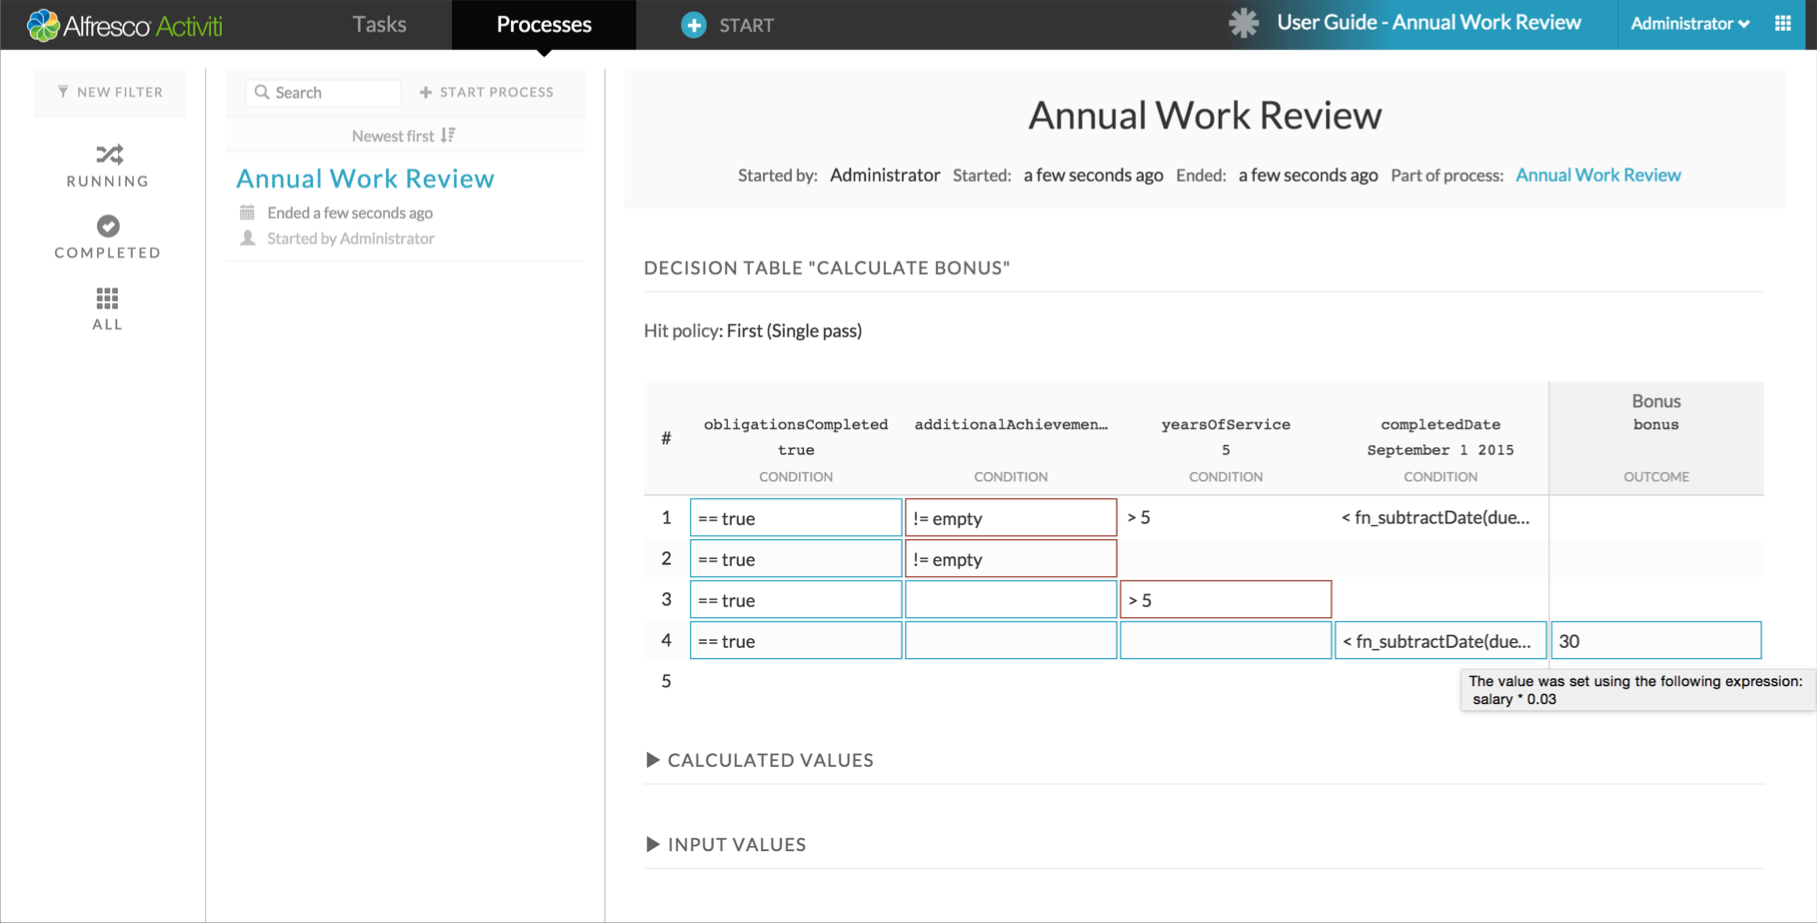
An input cell marked with a blue border indicates that the expression in the cell matched the input value. If a cell border is red it means it did not match. If it has no border it means it wasn’t evaluated at all (for example, a previous cell had failed to match and is shown as red). If an exception occurs during evaluation it is also marked with a red border, but also with a red error icon in the right part of the cell.
An output cell only displays the value that was set by its expression. A blue border indicates that it was successfully set. A red border indicates an error occurred during execution of the cell expression. For tooltip information, position your cursor over a cell. An example of this can be seen in the image above where the output cell sets the bonus to “30”: hover over the cell and the expression used to calculate the value is displayed.
To see a list of all the input values that were provided to the decision table before execution, click the “Input values” section and you will see the table below.

To see a list of all the output values that were set by the decision table after execution, click the “Output values” section and you will see the table below.

You may have noticed that we haven’t yet mentioned anything about the decision table’s “Hit policy”. The hit policy decides “how” the decision table will be executed when rules succeed (a “hit”). In our decision table we have selected “First (single pass)”, which means the decision engine will execute all rules in the given order until it has found a rule where all cell expressions match their input values. Then no further rules will be tested and the outcome expressions specified on the successful rule will be used to set the output values.
Empty cells are considered to be an automatic match, meaning that a rule with only empty cells will always be treated as succeeding (a hit). In our decision table we have such a rule in row #5, but with the input we gave, it will find a match on row #4 and the rule on row #5 will never get tested.
If we change the Hit policy in our table to be “Any (single pass)” the result after executing the decision table will be different. The execution evaluate all rows until the last rule, even if it found a rule that matched on a previous row.
Given the rules in our example, the Any hit policy does not make much sense, since the result would always be that bonus is set to “0” because the last rule always matches, no matter what input is given.