A Data Model enables you to access and manipulate data related to a business process in Process Services. For example, you can define a data model that maps to a relational database (via JDBC) or a custom API to connect to an external source such as a patient database or a customer database.
To use the Data Model functionality effectively, perform one or all of the following steps:
- Reference an entity while mapping variables.
- Make entity fields visible in the process by mapping them.
- Reference mapped entity fields in forms when creating or editing forms.
- Reference entity fields in expressions when creating or maintaining decision tables.
Connect a data model to a relational database
You can establish connection from your process with a relational database. To enable the connection, you must first register the data source for your tenant in the Identity Management app in Process Services.
To configure the data source follow these steps:
- In the Identity Management app, click Tenants > Data sources.
- Click the + (plus icon) and configure the following settings (see the
activiti-app.propertiesfile for more details):- Name – Name of your data source. For example, modeler.
- JDBC url – The JDBC URL used to connect to the database. For example:
jdbc:mysql://127.0.0.1:3306/modeler?characterEncoding=UTF-8. - Driver class – The JDBC driver used to connect to the database. For example:
com.mysql.jdbc.Driver. - Username & Password – The username and password of the account used to connect to the database.
- Click Save.
Define data models
Once defined, Data Models enable you to read, insert, update, and delete entities while working through your process.
When configuring data source and data models for DBMSs you will normally require the JDBC driver to be available at run-time. Process Services is only supplied with the driver for the H2 database. For other DBMSs (MySQL, Oracle, PostgreSQL) make sure that the relevant JDBC drivers are in the classpath, for example the Tomcat library path or <Process Services Installation>/tomcat/webapps/activiti-app/WEB-INF/lib.
You can either manually define a data model or import it from an existing data source, such as a relational database schema or an Alfresco Content Services content model.
To define a data model follow these steps:
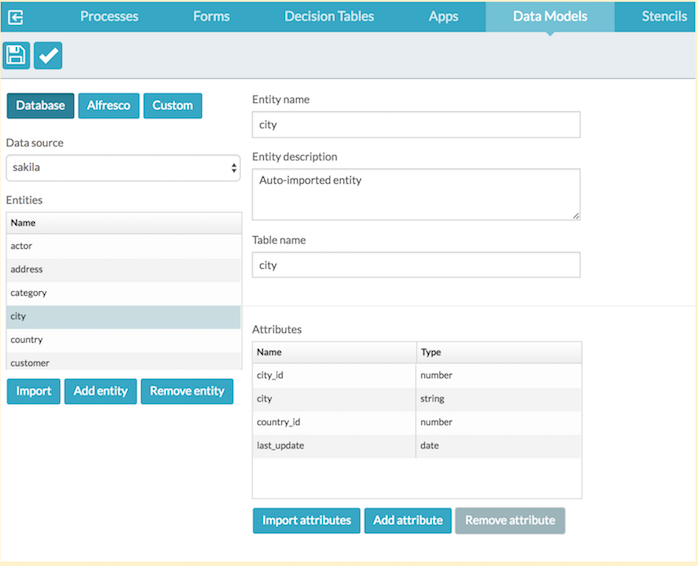
- From the App Designer, click Data Models. The Data Models page is displayed.
- Click Create Data Model. The Create a new data model dialog box appears. Or to import an existing data model, click Import Data Model.
- Select the data source that you defined in Identity Management.
- Click Add Entity and enter data in the following fields:
- Entity name – The name you want to use for the entity, for example, Customer.
- Entity description (optional) – Description of the entity.
- Table name – The database table name that you want the entity to be mapped to, for example Customer.
- Attributes – Displays the entity attributes as you add them.
- Click Add Attribute and enter data in the following fields:
- Attribute name – Name you want to use for the attribute, for example, Customer Id.
- Attribute description (optional) – Description of the attribute.
- Column name – Column name as specified in the database, for example, id.
- Attribute type – One of the following attribute types: String, number, date.
- Primary key – Select to indicate if the attribute is a primary key or not.
- Database generated value (autoincrement) - Select this if the primary key is set to autoincrement in the database.
- Required – Select to indicate if the attribute should be mandatory or not.
- Save the data model.
Note: The Remove entity and Remove attribute buttons can be used to remove entities and attributes respectively.
Import data models
Use these instructions to import a data model from a database schema.
To import a data model follow these steps:
- From the App Designer, click Data Models. The Data Models page is displayed.
- Click Create Data Model. The Create a new data model dialog box appears. Or to import an existing data model, click Import Data Model.
- Select the data source that you defined in Identity Management.
-
Click Import. This examines the RDBMS of the datasource and creates an entity and an attribute for each table. In this example, we use the MySQL sample database, Sakila.
- You can now change the attributes, save the model, and use it as if it was created manually.
- If you attempt to re-import a database schema, you can either:
- cancel the operation,
- skip overwriting the existing entities and only import entities added since the last import, or
- overwrite all entities.
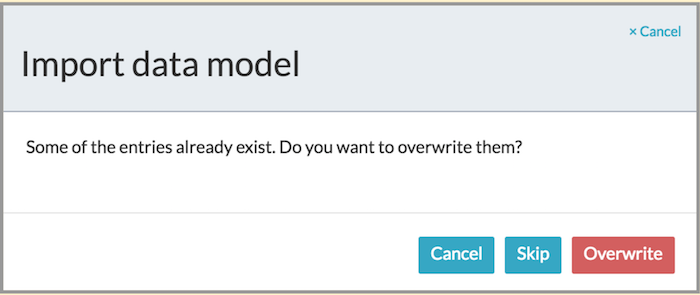
If you overwrite, any changes made to the entities and the attributes since your last import will be lost.
-
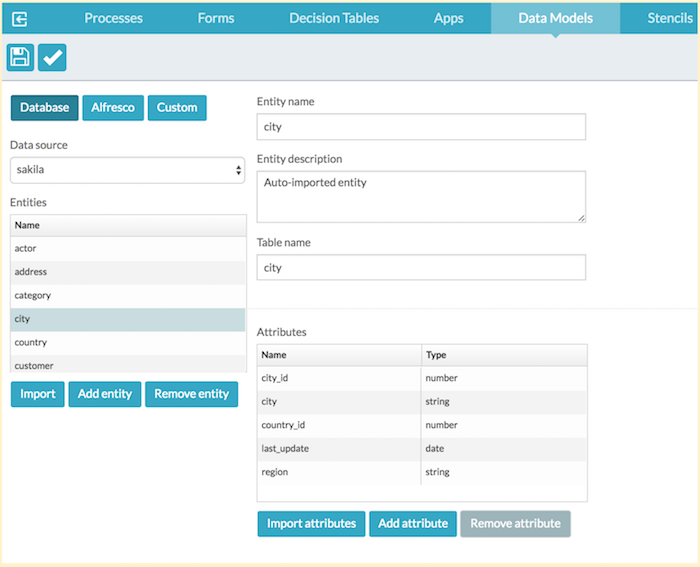
You may also use Import attributes for individual entities which updates the attributes of the selected entity. This is useful if you have only made changes to a single table. In our example, the field region was added in the city table.
To import attributes:
- Select the entity you want to update.
- Click Import attributes.
- You will prompted again to select how to handle the existing attributes.
You can either:
- cancel the operation,
- skip overwriting the existing entities and only import entities added since the last import, or
- overwrite all entities. Select Skip overwriting existing attributes if you have renamed attributes and you want to save your changes while adding new attributes. Select Overwrite if you want to reset the changes you have made to the attributes and bring in new additions.
Using the data model in a process
Once you have defined the data model for a database data source, the next step is to use them in forms, decision tables, and process conditions, by mapping them into form fields or process variables. For example, to use patients’ information, you can map their information such as their name and address into your forms.
To start accessing data using your data model, follow these steps:
-
From the App Designer, create a simple business process model with a BPMN task that includes a Start event, Store entity task, and an End task.

- From the BPMN editor, select the Start event and then click Referenced Form to select an existing form, or create a new form. The Form reference dialog box appears.
- Select the form that you want to customize and click Open.
- In the selected form, drag a text type field from the palette, rename it as Company name and then save it.
- From the BPMN editor, click Form field to data model mapping. A dialog box to change value for form field to data mapping appears.
-
Map the fields for Company Name as shown below:

-
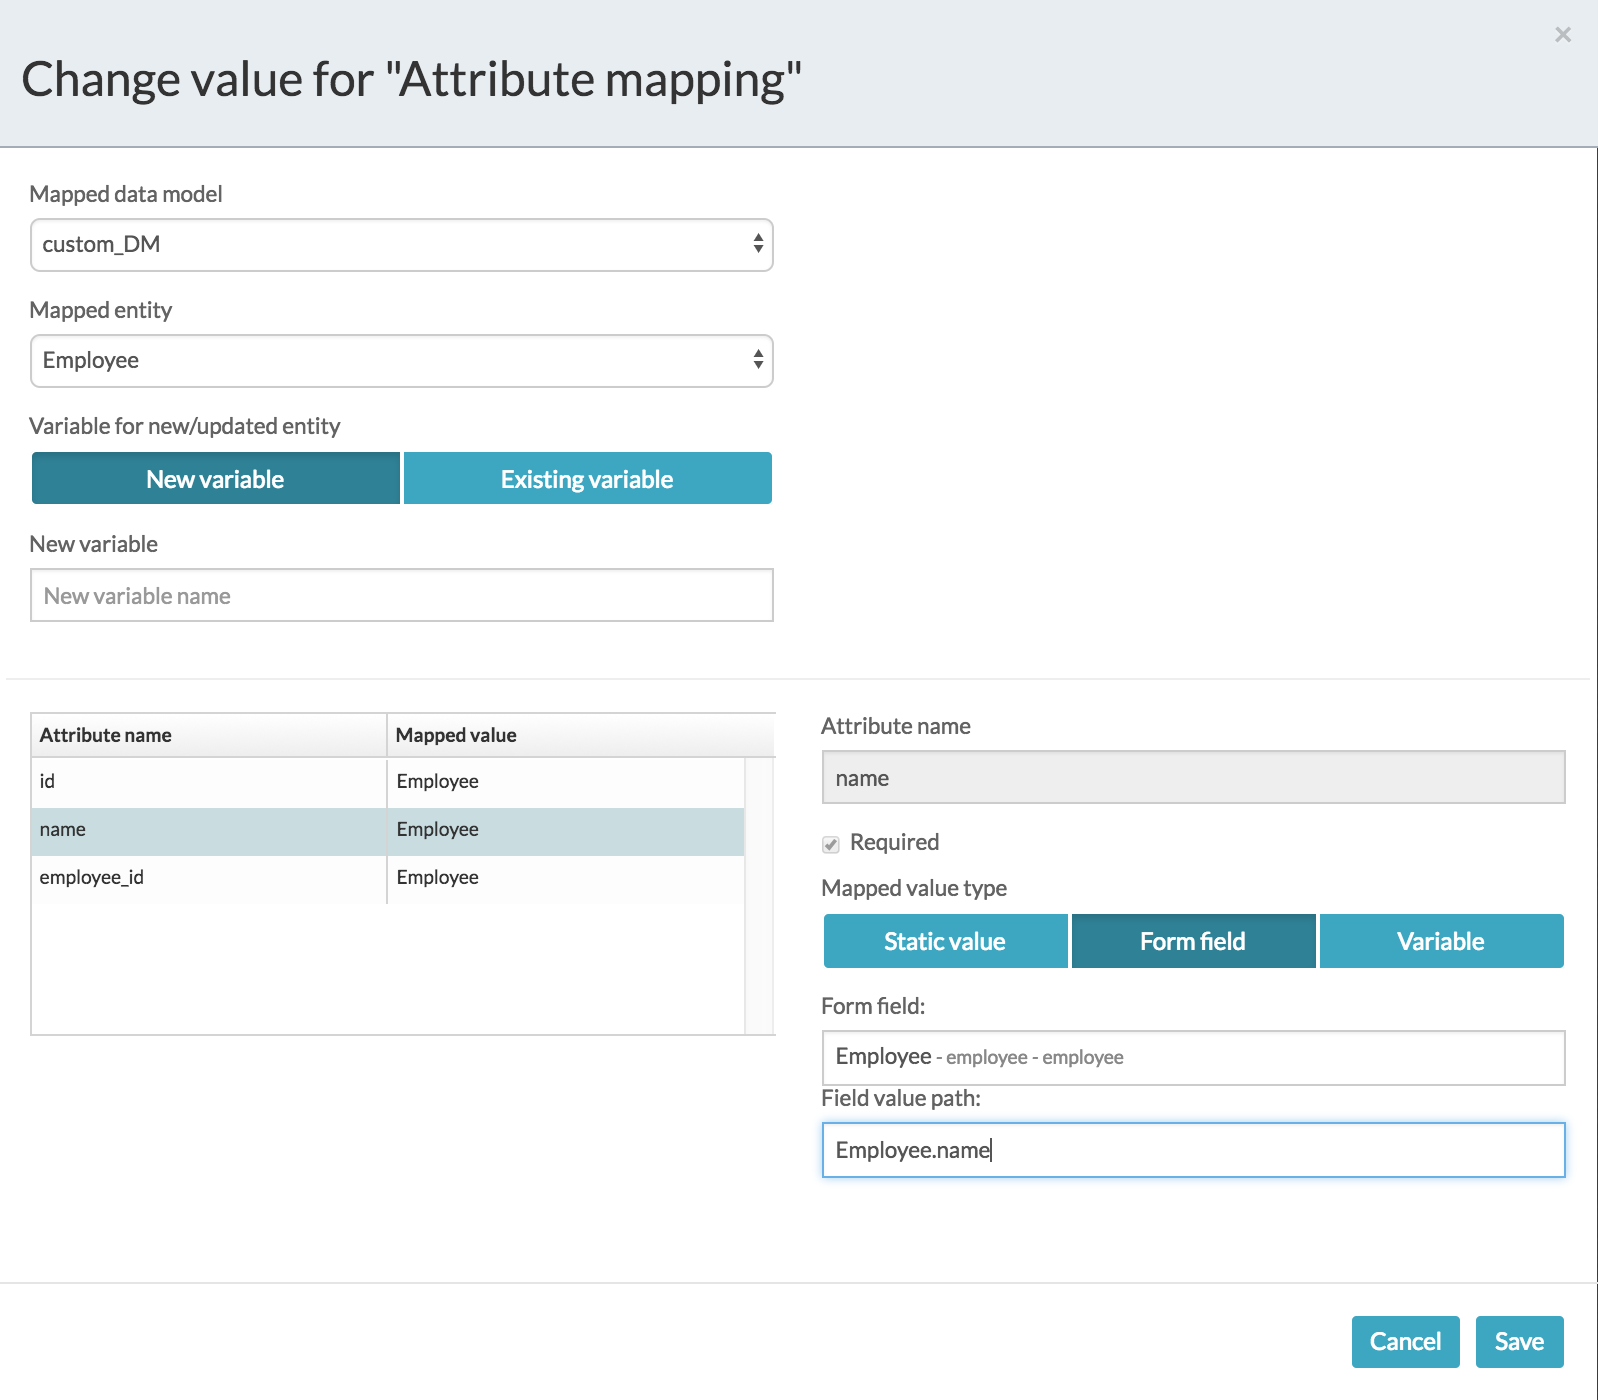
From the BPMN editor, click the Store entity task and then Attribute mapping to edit the mappings. The Change value for Attribute mapping dialog box appears.
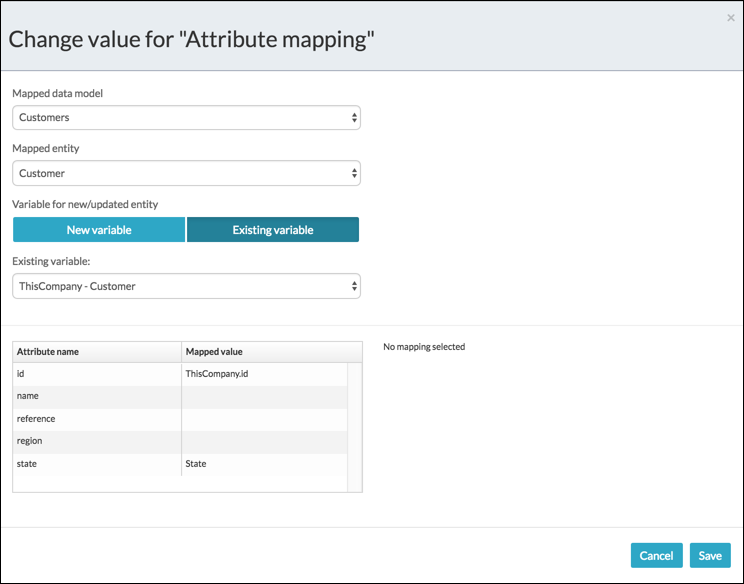
- Select the Mapped data model and Mapped entity.
- Add a new variable or use an existing variable. In this case, select an existing one: ThisCompany – Customer.
-
Map the attribute names with mapped value by selecting the required attribute in the Attribute table as shown below:

- Configure the variable for the selected mapping, and then click Save.
- Publish your app and verify the data connection by making changes to the process data.
Map complex custom control values
Process Services provides capability to write data from a complex custom control to a data model, allowing the data in the custom control to be externalized.
Developers can define a ‘value path’ that is stored in Process Services and made available to the developer at runtime, allowing them programmatic access to the information in the custom control. This information can then be extracted into a custom data model.
The implementation uses the Alfresco data model service AlfrescoCustomDataModelService to connect the custom data models to external sources and perform custom data operations. The value path should be injected into the wrapper bean class to make it available with the mapped complex data model field at application runtime. The value path value is stored in JSON format in the database.
An optional ‘Field value path’ is available for custom controls in the Attribute mapping for the ‘Store Entity task’.
- From the BPMN editor, click the Store Entity task containing your attribute mappings.
-
Click Attribute mapping to edit the mappings. The Change value for Attribute mapping dialog dialog box appears.
- Click on an entry in the Attribute table and then click the Form field tab.
- Select the custom control from the Form field dropdown list and assign a value path in the Field value path field.
- Click Save to save your changes.
- The values from the custom control will be made available in the specified value path at runtime.
Note: The developer must manage the protocol for storing data in a custom control (such as JSON in a text field) and the data extraction scheme (such as the developer implemented and documented syntax for extraction) for mapping custom control values.
Note: The developer is also responsible for taking the data storage protocol and mapping scheme available to them and writing values to the custom control. This also extends to making sure the field value path is specified correctly, as exception handling is not included.
Save data using your data model
As you collect new data about an entity, you may wish to save this back to the database. However, as this is not done automatically when a form is saved, you must create a task in your process to explicitly save the data you want.
To save data using the data model, follow these steps:
- From the App Designer, edit the business process model you created above to access data.
- In the Visual Editor, drag the Store entity task activity type from the palette and place before the process End.
- Remove the link from the selected task and connect the Store task between it and the process End.
- Edit the Store entity task activity and click the attribute mapping field. Configure the following settings in the Attribute Mapping dialog box:
- Mapped data model – Select the data model to map your entity with.
- Mapped entity – Select the entity to map your data model with.
- New Variable/ existing variable – Create a new variable or select an existing variable.
- Attribute name – Map the attribute names with the relevant form fields by selecting the relevant form field value from the drop-down list. For example, Customer Id with ID and Customer name with Name.
- Mapped value type – Select one of the value types for mapping attributes. In the above example, Form field was selected. However, you can also map your attributes with a static field or variable.
- Create a new app definition and associate your process with it.
- Deploy the app and test it by updating the data. For example:
- Open your app and click + START. The form fields that you defined in your process appear.
- Edit an existing Id (column name) with a new customer name and verify if the changes appear in your database.
Sample database table
While working on the data model functionality, locate or create a database table and its columns from your database and make sure to create matching attributes in your Data Model. For example, the following customer table was used for the customer data model in the above sections.

Create data models for folders
You can map entities to the Alfresco Content Services repository to create data models for Alfresco Content Services folders.
Configure the data source
Before defining a data model for Alfresco Content Services folders entities, you need to establish a repository connection and register the data source in your tenant.
- In the Identity Management app, click Tenants then Alfresco Repositories.
- Click + and set the followings:
- Name - Name of the Alfresco Content Services repository, for example, local
- Repository Base URL – This is the base URL for the repository, for example,
http://localhost:8080/alfresco - Share Base URL – This is the base URL for the Alfresco Share installation, for example,
http://localhost:8080/share - Alfresco version – The version of the Alfresco Content Services repository, usually version 4.2 or higher
- Click Save.
Define folder entity data models
Once you’ve configured the data source you can define folder entity data models.
-
Select the Alfresco Data Model type.
This loads the repository source menu.
-
Select Repository source then click Add entity to add an entity that maps to custom folder node in the repository.
-
Give the entity a name, such as Custom Folder.
-
Specify the node type, including any aspects that should be applied. In this example select TODO. This is an instruction to create the folder with a custom type.
Tip: Use commas to separate type and aspects.
Note: Use the
F:prefix for the type as it’s a custom type. -
Specify any custom aspects to apply and any out-of-the-box aspects if needed, for example
cm:titled.Note: These are also referred to as secondary types in the CMIS standard.
-
After you’ve entered the type and aspects definitions, specify all other relevant properties. There following properties are mandatory:
cmis:name(orcm:name) - used to specify the name of the new nodecmis:parentId- used to specify what parent node the new node should be created under
When creating a new entity the Data Model designer automatically creates the required fields as well as the most commonly used attributes:
Attribute Name Content Services Property Entity Time ID sys:node-uuidstring Name cm:namedatasource.driverstring Title cm:titledatasource.urlstring Created cm:createddate Creator cm:creatorstring Modified cm:modifieddate Modifier cm:modifierstring Parent cm:parentIdstring All folder entities require at least one attribute that maps to the
cm:nameproperty. It can also map to thecmis:nameproperty, if you prefer to use CMIS property names. -
After the entity and the default attributes are generated, click Add Attribute to add entities to map the remaining folder properties.
-
When you’re done, click Save.
Import content models
With Alfresco Content Services you can define and use custom content models using either XML or the Alfresco Share Model Manager. You can import content models and use them in your data models.
See Model Manager for more details.
-
Export the model from Alfresco Content Services.
-
Unzip the downloaded file.
This creates a folder with two XML files.
- the content model definition, with a file name similar to
.xml - the content modeler configuration file with a file name similar to
CMM_<content model name>_module.xml. This is only required for re-importing a model into Alfresco Share so isn’t relevant for the import operation.
- the content model definition, with a file name similar to
-
In the App Designer select Data Models and create a new (or edit an existing) folder data model.
-
On the Entities list click Import.
This prompts you to select the content model file.
-
Go to the location of the unarchived file and select the content model file, for example,
healthCareModel.xml. Ignore theCMM<mode name> _module xmlfile.
-
Click Open and the corresponding entry and attributes are created.

Unlike database schemas, importing a content model doesn’t overwrite an existing entity if it’s currently selected. If the name already exists then an error will be displayed. If it doesn’t exist then a new entity is created with the content models using the type name (
<type name=”.. >) as the entities name.You need to activate the content model in Alfresco Share to use it in deployed process applications.
Using folder entities in process applications
When you’ve created a folder data model, you can use it in several ways.
- Create a folder entity in the Alfresco Content Services repository with the folder metadata
- Update an existing folder entity in the Alfresco Content Services repository using the Store Entity Task
- Retrieve and display the folder entity and its related metadata in a form
Create folder entities
You can create an Alfresco Content Services folder entity in Alfresco Content Services repository with the folder metadata.
-
In the App Designer create a new or open an existing process in the BPMN Editor.
-
Create a new BPMN process and add your logic to collect the folder entity data.
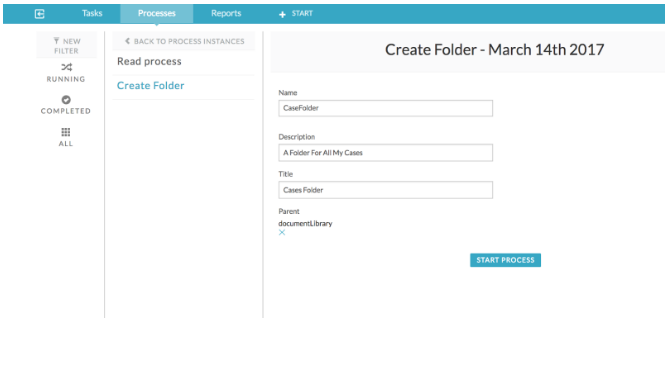
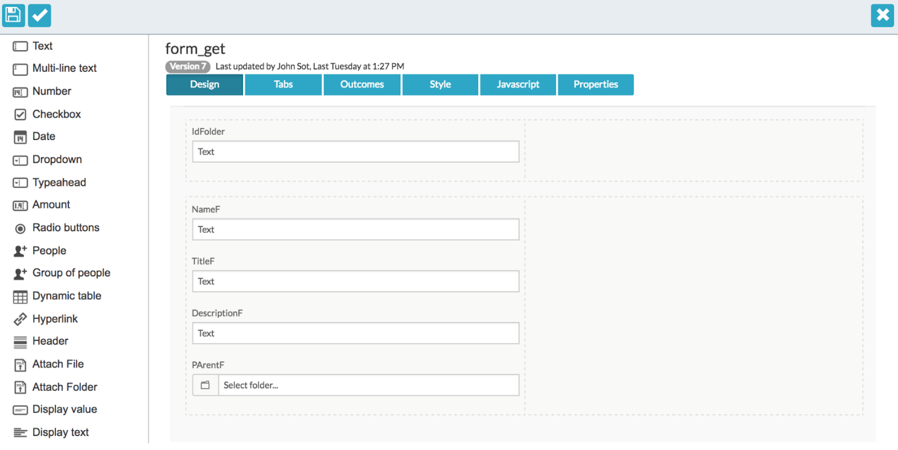
This is usually a form with the appropriate fields, as in the following example. This example uses a form to provide the Name, Description, and Title for the folder entity and under the parent folder, and is used as the referenced form of the start task.
-
From the Components List of the BPMN Editor, drag and drop a Store Entity Task.
-
Select the Store Entity Task and make it a Create Folder.
-
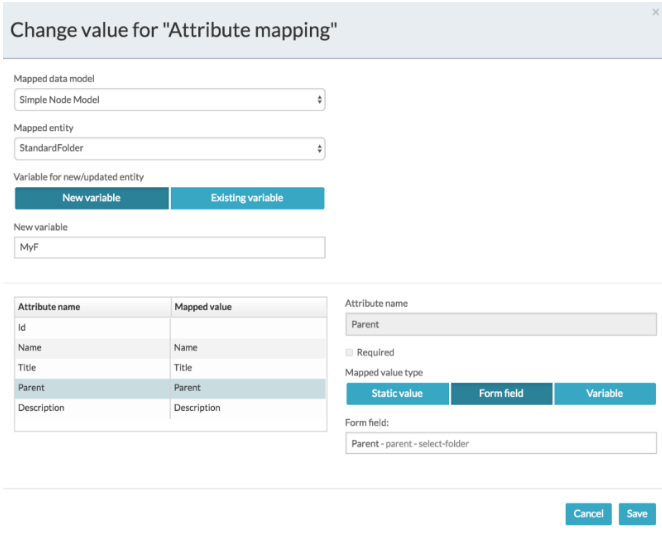
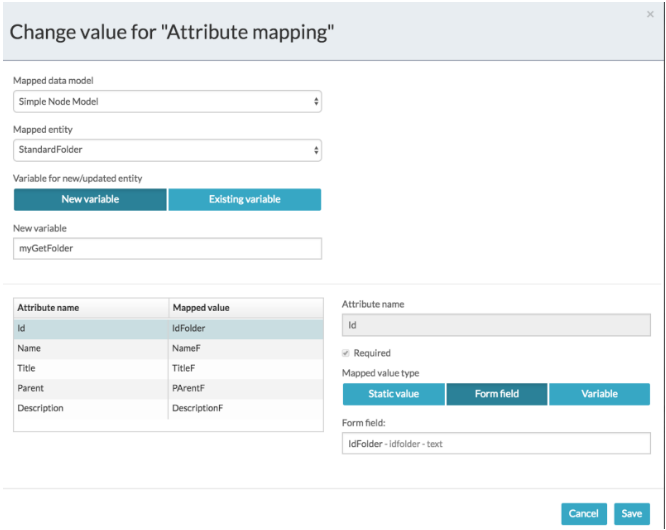
Click on the Attribute Mapping property.
-
From the Mapping Configuration screen select the relevant data model. In this example the Simple Folder Model is used.
-
Click New variable to store the result of creating an folder entity. In this example MyF is used.
This can be used in expressions, parameters, and other mappings later on in the process. Use this variable to retrieve the ID of the folder entity for future operations such as update or retrieve.
-
For each folder data model attribute listed in Attribute name, select a form field to use for mapping the form fields to the attributes to be stored. You can also select process variables, but in this example the values from the form are used.
-
Leave the Id attribute empty.
This indicates to the task that a new folder should be created. Specifying the Id updates an existing folder.
-
Enter a Name attribute to be used as the name of the new folder.
-
Click Save.
-
Save the process then publish and deploy the application.
-
Start a process and enter the details in the start form.
-
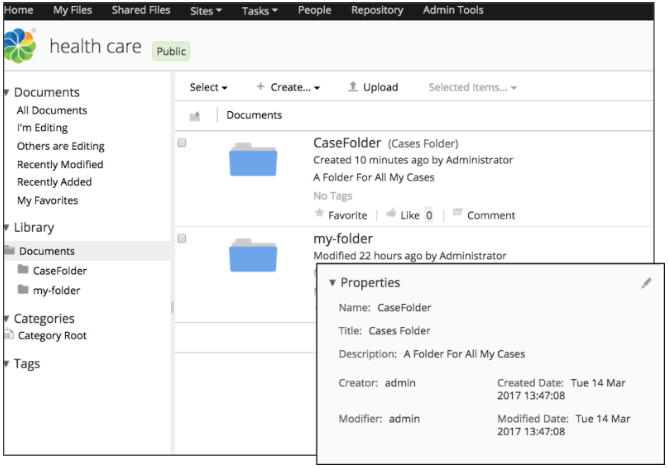
Click Start Process.
The new process instance is created. You can sign in to Alfresco Share and see the new folder created, and see that in the properties the Name, Title, and Description are set to the values entered in the form.
Configure the folder entity parent
To create a folder entity you need to provide a parent for the entity parent folder. This can be configured in three different ways.
-
As part of an end-user form
-
Specify the folder entity parent as in create folder entities.
-
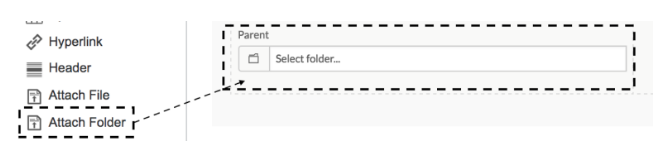
In the Form Designer drag and drop the new Attach Folder field.
-
Click the configure option
 for the new field to display the Field Configuration screen.
 -
Click Attach Folder options.

-
Enter the Repository source.
This is the Alfresco Content Services repository where folder entities will be stored.
-
Click Select folder for the Start folder and select a parent folder.
This is the folder under which the folder entity will be stored.
You can choose whether to allow users to change the default value and select a new folder. This means the user can select folders in collaborative processes where folders are available. This also allows administrators to provide folder-based grouping of content. For example, the administrator can define a number of different folders for each region.
Alternatively, you can hide this field and enforce a single parent throughout the process application.
-
-
Default parent setting via a configuration process
This is a variation of the previous method. The parent folder is created and stored as the default for other processes to store all their folder entities.
-
Create a form to use to configure the parent folder.
-
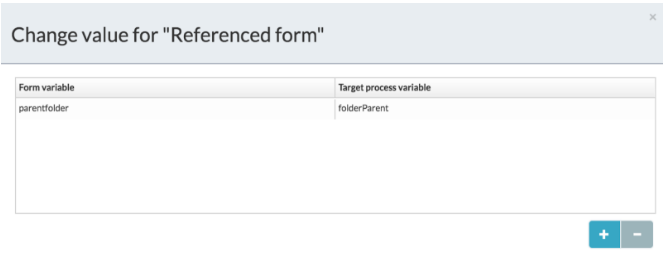
Use variable mapping to map the Attach Folder field to a process variable, for example
folderParent.
You can now use the default folder parent value in various ways, including:
- Storing it as a persisted configuration setting and using in other processes
- Mapping it to a model attribute in the Store Entity task

This method stops the user from knowing the details of where the entity is stored. You’ll need to create a process starting with a form that allows the user to select a parent folder.
-
-
Programmatically
The previous approach is possible because parent folder information is stored in a process variable as JSON, for example:
{ "path": { "id": "47cb278d-c775-444f-a23e-b9f2d92390da", "title":"documentLibrary > my-folder", "folderTree":[{"id":"ec5eb0ec-76a0-4175-adbf-dcf3842ed00c","title":"documentLibrary","simpleType":"folder","folder":true}, {"id":"47cb278d-c775-444f-a23e-b9f2d92390da","title":"my-folder","simpleType":"folder","folder":true}] }, "account": {"id":"alfresco-1", "name":"local"}, "site": {"id":"health-care", "title":"health care"} }The Store Entity task can recognize the JSON format and extract the values needed. Process developers can construct the parent folder dynamically in code, scripting, or expressions, and store it in a process variable.
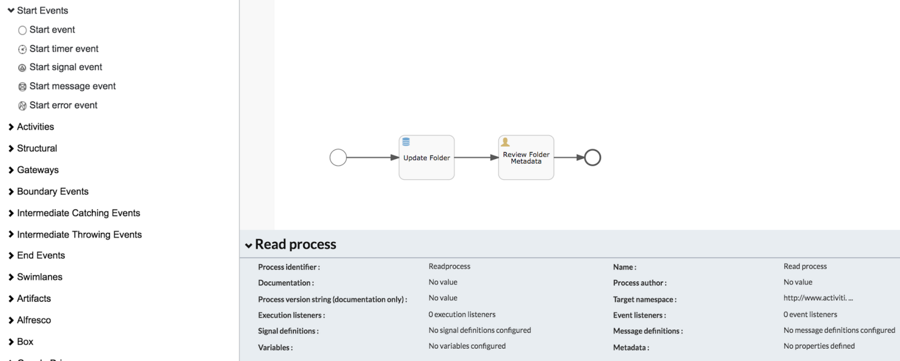
Update folder entities
Updating a Alfresco Content Services folder entity is similar to creating one using Store Entity tasks, with different key mapped fields.
-
In the App Designer create a new or open an existing process in the BPMN Editor.
-
Select Start and click on the reference form.
-
Create a form similar to those created in create folder entities.
-
Click Save and Close to return to the BPMN Process Editor.
-
From the Components List of the BPMN Editor, drag and drop a Store Entity Task.
-
Click on the Attribute Mapping property.
-
From the Mapping Configuration screen select the relevant data model. In this example the Simple Folder Model is used.
-
Select a previously created variable holding a folder entity or click New variable to store the result of updating the folder entity.
-
For each folder data model attribute listed in Attribute name, select a form field to use for mapping the form fields to the attributes to be updated.
Unlike the creation operation, the Id attribute is required to update the folder entity. Alternatively, you can supply the parent folder and name of folder instead of the folder id. When you supply a folder id and folder name this renames the folder.
-
Click Save.
-
Save the process then publish and deploy the application.
-
In the application start a new process.
-
Select the parent folder of the folder entity and type in the name of the folder you want to update.
-
Type in a new description and title and click Start Process.
You can sign in to Alfresco Share open the folder to see the updated Title and Description.
Retrieve and use a folder entity
As with other data models, there are two ways you can retrieve Alfresco Content Services folder entities and use them in a process or decision table.
-
Using the form field to data model mapping
Using the form field to data model mapping property in a start or user task to map the form fields to the models attributes. Follow the same process described in Using the data model in a process.
-
Using variables obtained from Stored Entity tasks
When creating or updating folder entities, the entity can be stored in a variable.
Note:
MyFandGetMyFolderwere the examples in create folder entities and update folder entities.These variables can then be used in the process expressions and parameters, forms, or decision tables. To use a variable in a form:
-
Extend the example you created in Updating folder entities by adding a User Task action.
-
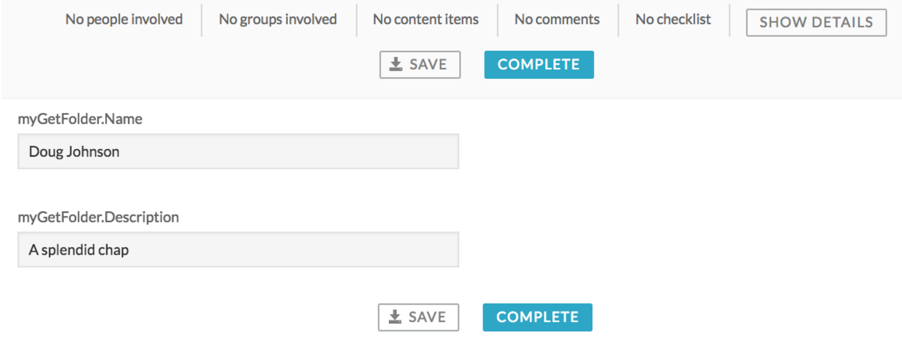
Create a new form display folder.

-
From the form control toolbox drag and drop a Display Value field.
-
Use the field configuration to select the variable.
Note: The
myGetFoldervariable is an object with all the model attributes listed. -
Select a Name and Description.


-
Click Save.
-
Save the process then publish and deploy the application.
-
Create a new process and then create folder entities and update folder entities.
After updating the folder entity a new task is created which uses the Display Folder name to show the entity attributes.
-