Process Workspace is a new, easy to use app for you to work with your tasks and processes, and it gives you the flexibility to work on either a web interface or on mobile.
Process Workspace is a front-end application that is packaged and deployed separately from the Process Services application.
For more information about installation, see Install Process Workspace
Open the application
Process Workspace runs in a web browser. To open Process Workspace, use the following steps.
-
Enter the URL into your browser:
http://localhost:8080/process-workspace/Where
localhost:8080represents the host name and the port number of where Process Workspace is hosted.You’ll see the login page.
-
Enter your user name and password for Process Workspace.
When you log in, you’ll see your Apps Page.
Applications page
When you login to Process Workspace, you’ll see your Apps Page displaying the tiles that you have available. Each tile shows a process definition that gives you tools for a distinct set of tasks.
In the following image, you’ll see that there is a Claim Review Process tile. Your Apps Page may show more tiles.
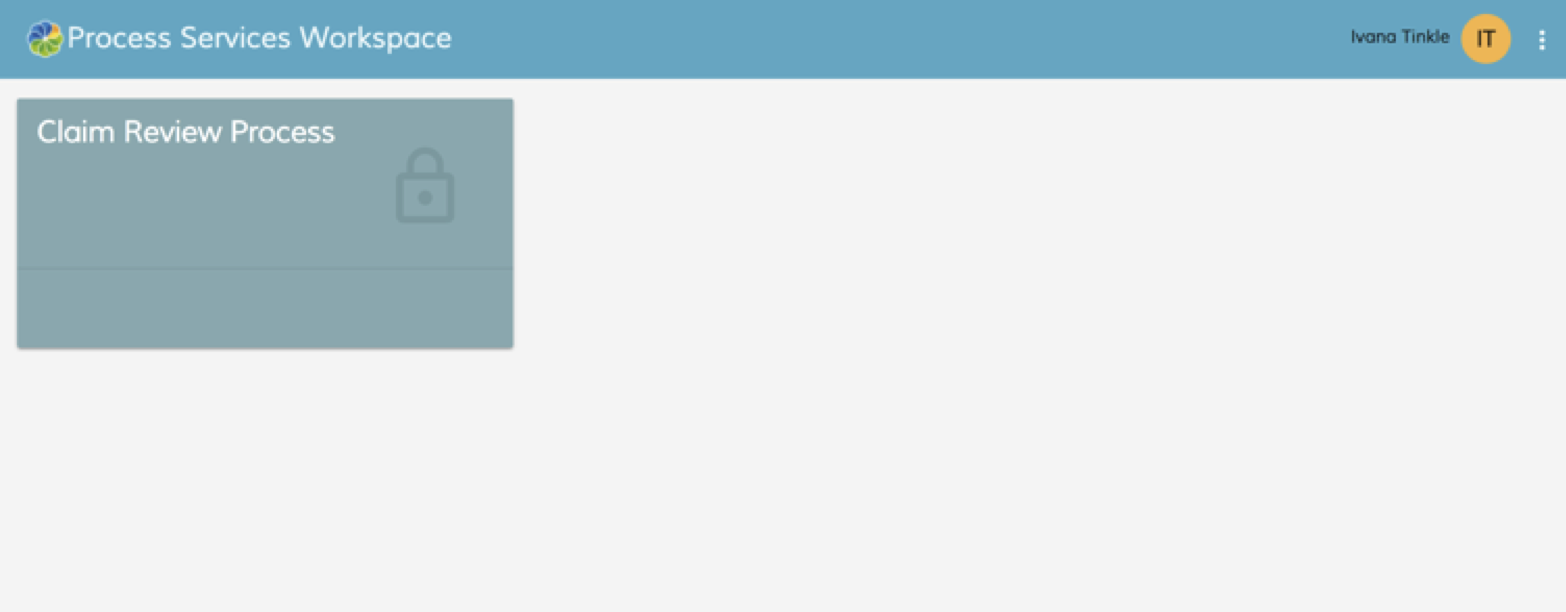
Click on an apps tile to display the Process Workspace dashboard for this.
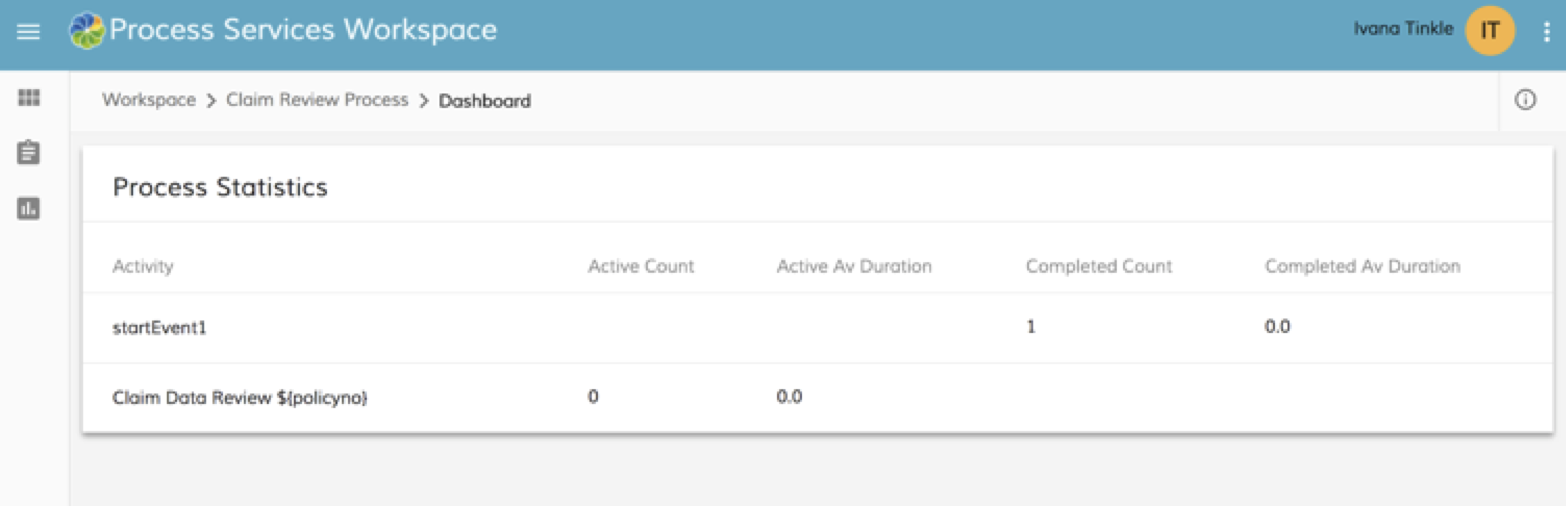
The dashboard
The Process Workspace dashboard lets you review the statistics for a process definition. This information gives you an overview of the activity.
The Process Workspace dashboard has two menu modes:
- Minimized
- Expanded
When you first open the dashboard, you’ll see the minimized menu mode.
The following image shows the Process Workspace dashboard with the minimized menu. Your menu choices are shown on the left side of the dashboard.
To change to the expanded menu mode, click ![]() . The following image shows the Process Workspace dashboard with the expanded menu.
. The following image shows the Process Workspace dashboard with the expanded menu.

The following information is available on each activity.
| Statistic | Description |
|---|---|
| Activity | The name of the activity. |
| Active Count | The number of activities that are active. |
| Active Average Duration | The average time spent on an activity. |
| Completed Count | The number of completed activities. |
| Completed Average Duration | The average time taken to complete an activity. |
When you are using Process Workspace, you can return to the Dashboard by clicking ![]() .
.
Change dashboard settings
The Dashboard Settings lets you filter the data for the current process to customize the information on the dashboard.
-
Click
 .
.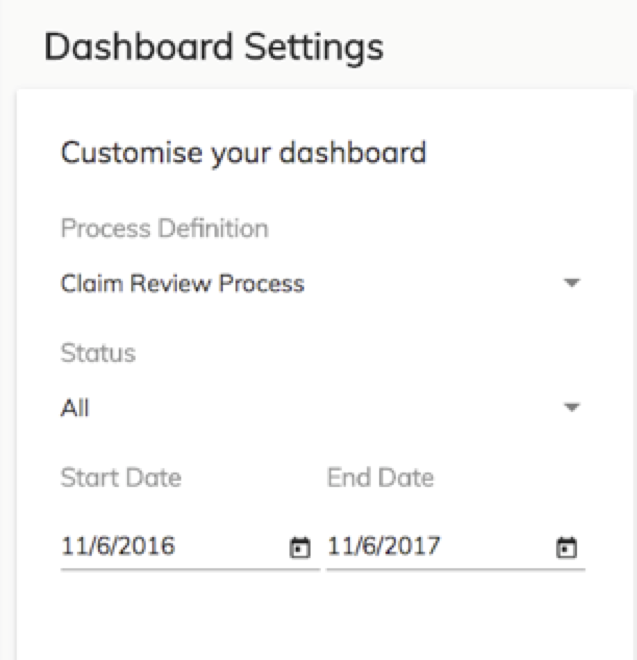
The Dashboard Settings pane displays in the right-side of the dashboard.
-
Change the settings to display the statistics that you want.
- Process Definition - select an alternative process definition to display
- Status - select All, Complete, or Active events
- Start Date and End Date - select the date range for the events
-
Click
to close the Dashboard Settings pane.
Working with tasks
Process Workspace lets you view existing tasks and create new tasks. The task list lets you work on tasks assigned to you from any process app.
You can see all of the tasks that you are working with on the My Tasks list. To view your tasks, click ![]() .
.
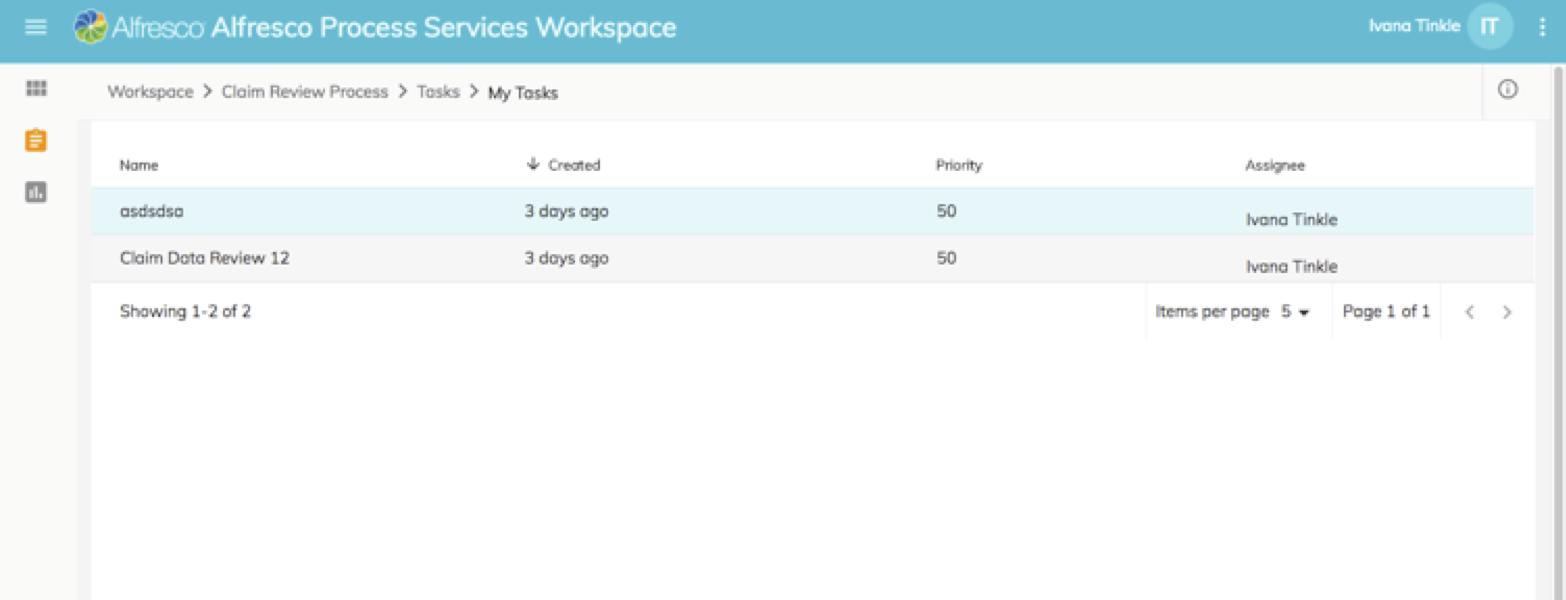
You’ll see the My Tasks page, which shows the tasks created within this app or as part of the processes from the app. New tasks that you create will appear in the My Tasks list.
To view a task, double-click on a task in the task list. A new page opens showing the task form. This provides options to save, approve or reject the task.
You can control the number of tasks displayed on the page. Click the down arrow next to Items per page and select a value from the list. The page refreshes to display the number of items you chose.
To view a task, double-click on a task in the task list. A new page opens showing the task form. This provides options to save, approve or reject the task.
Create a task
Create new tasks for yourself or to assign to others.
These steps vary depending on whether you are using the minimized or expanded menu.
-
From the Process Workspace Apps Page, select a process definition.
-
Click
 (minimum menu) or click Create (expanded menu).
 -
Select New Task.
The Start Task window appears.
-
Add the details for the new task.
- Name - Enter a name for the new task. You’ll not be able to click Start until you enter a name.
- Description - Add a description for the task.
- Choose Date - Add a date using the format
DD/MM/YYY, or click and select the date from the calendar.
 - Assignee - Choose to whom you want to assign the task. Leave this empty if the task if for you.
- Form - Choose a task form.
-
Click Start.
The new task appears in My Tasks.
View task details and activity
You can view the detailed information about your active tasks.
-
From the My Tasks page, single click a tasks in the list to select it.
You’ll see the Details and Activity tabs on the right side of the page. The Details tab displays information about the currently selected task. The Activity tab allows you to add comments related to the task.
-
Click Details.
You’ll see the information about the task.
- Assignee - shows to whom the tasks is assigned.
- Status - shows the status of the task, which can be running, completed
- Priority - shows a number that represents the priority of the task.
- Due Date - shows the due date of the tasks or you can add a date by clicking and selecting the date from the calendar.
- Category - shows any associated categories
- Parent Name - shows the name of the process app to which this task belongs
- Created By - shows the name of the person who created this task
- ID - shows the unique identifying number of this task
- Description - shows the description of the task that was used when the task was created
- Form Name - shows the name of the form that provides the additional form fields for this task
You can also add people and groups. Click
 . Type the name of the person to search, and then click ADD.
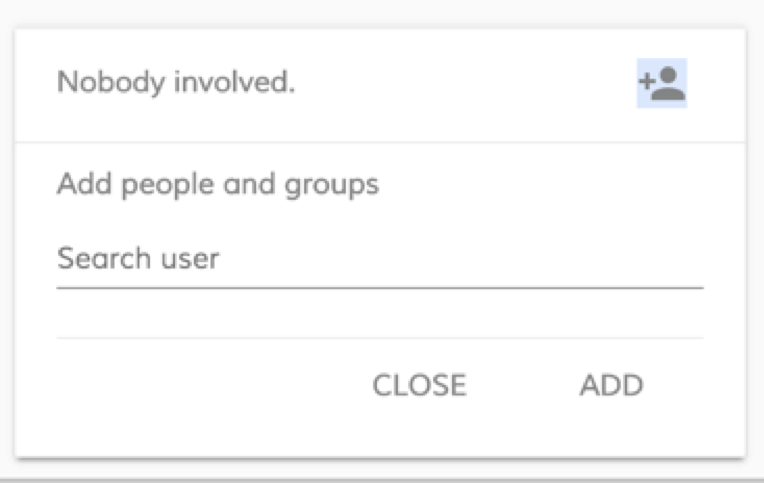
You’ll see the name of the person in the list of people this task is shared with.
-
Click Activity.
You’ll see the comments made by you and others about this task. The comments list shows the name of the person who created the comment, along with the comment text and the date and time it was made.
To add your own comment, type into the Add a comment field.
-
Click
 to close the details and activity.
Attach files to a task
You can upload a file that you wish to be attached to a task.
-
From the My Tasks page, click on a task, and then click
 on the right-side.
 -
Click ACTIVITY.
An attachment page appears.

Drag and drop files to this page. You can also click
 to upload files using your file browser.
You will see the list of files in the attachment page.
Task audit PDF
Process Workspace lets you download a PDF file that shows a summary of the task, including the task details and activity. This file is called the Task Audit.
-
From the My Tasks page, click
 to produce a Task Audit PDF.
 -
The file downloads.
Working with processes
Process Workspace lets you view existing processes and create new processes.
The Processes list shows the details of the currently running processes.
To view your processes, click ![]() .
.

If you are using the expanded menu, you can see a more complete list of processes and you can filter the list for Running, Completed and All processes.
New processes that you create will appear in this list.
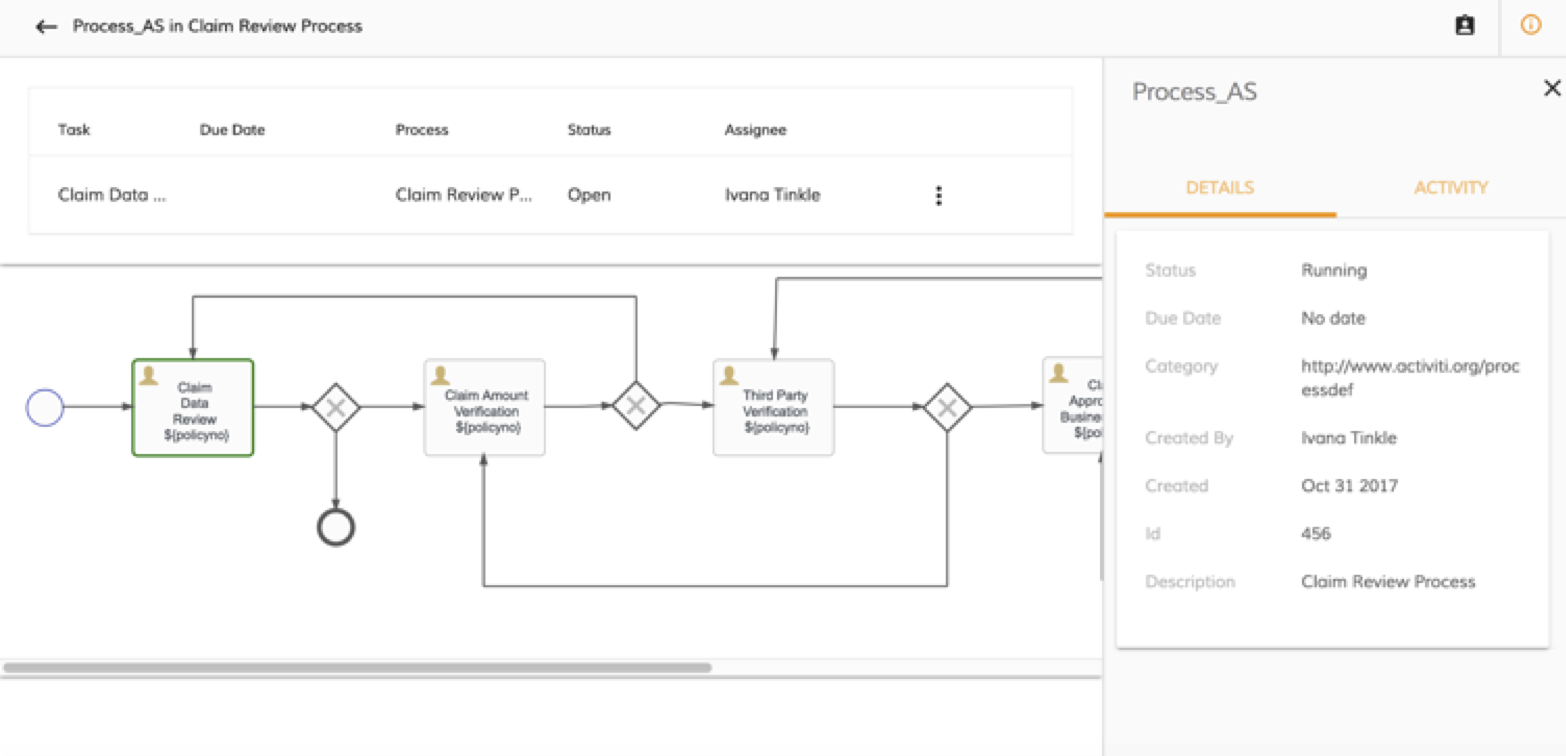
Double-click on a row in the process list to see a list of active tasks. Below this, a process diagram of the active process appears.
Create a process
Create new processes for yourself or for other to use.
These steps vary depending on whether you are using the minimized or expanded menu.
-
From the Process Workspace Apps Page, select a process definition.
-
Click
(minimum menu) or click Create (expanded menu). -
Select New Process.
The Start Process window appears.
-
Add the details for the new process.
- Process Name - Enter a name for the new process. You’ll not be able to click Start Process until you enter a name.
- Select Process - Choose the name of a process definition from the list of available processes. When you choose a process from the list, you’ll see the additional fields that are required. Enter the details in the additional field.
-
Click Start Process.
Your process appears in the Process list.
View process details and activity
You can view the detailed information about your active processes.
-
From the Processes page, single click a process name to select it.
You’ll see the Details and Activity tabs on the right side of the page. The Details tab displays information about the currently selected process. The Activity tab allows you to add comments related to the process.
-
Click Details.
You’ll see the information about the process.
- Status - shows the status of the process
- Due Date - shows the due date of the process or you can add a date by clicking and selecting the date from the calendar.
- Category - shows any associated categories
- Created By - shows the name of the person who created this process
- ID - shows the unique identifying number of this process
- Description - shows the description of the process that was used when the process was created
-
Click Activity.
You’ll see the comments made by you and others about this process. The comments list shows the name of the person who created the comment, along with the comment text and the date and time it was made.
To add your own comment, type into the Add a comment field.
-
Click
to close the details and activity.
View process workflow
You can view the workflow for the process.
The left-hand pane displays a list of active tasks, below which a diagram of the process model appears.
-
From the Processes list, double-click on a process.
You’ll see a list of active tasks and the process workflow diagram for this process.
-
Click
 and click View Task.
You’ll then see the detailed information for the current task.
-
Click
 to return to the Processes list.
Use Process Workspace in another language
The default language used in Process Workspace is English. You can change the language.
-
From Process Workspace, click
 .
. -
Select Languages.
You’ll see the list of languages that are available.
-
Choose the language that you wish to use.
- English
- French
- German
- Italian
- Spanish
- Japanese
- Dutch
- Brazilian Portuguese
- Norwegian
- Russian
- Simplified Chinese
The user interface text for Process Workspace changes to the selected language.