This section goes through the high level architecture of Process Services and using the Process Services Administrator application.
Architecture
Process Services is a suite of components on top of the Activiti BPMN 2.0 platform that can be run on-premise or hosted on a private or public cloud, single, or multitenant.
For more information about Activiti BPM, see Activiti.org.
The following diagram gives a high-level overview of the technical components in Process Services.

Process Services is packaged as a standard Java Web application (WAR file) that can be deployed in any supported Java web container. The WAR file contains the Java logic, REST API resources, and the user interface HTML and JavaScript files. The application is stateless, which means it does not use any sessions, and requests can be handled by any node in a clustered setup (see Cluster configuration and monitoring for more information on multi-node setup).
Technical implementation details
- The Process Engine (enterprise edition) is embedded within Process Services and directly used through its Java API.
- The ReST API has two parts:
- The ReST API that exposes operations in the context of the applications that are part of Process Services. This ReST API is used by the user interface and should be used in most cases.
- The ReST API that exposes the core engine API directly. Note that this interface is intended for highly custom applications as it exposes the full capabilities and data within the Process Engine. Consequently, a user with the tenant admin or tenant manager role is needed to access this part of the ReST API for security reasons.
- The application requires Java 7 and is compliant with JEE 6 technologies. The Process Engine itself also supports Java 6, however for components such as Elasticsearch, Process Services requires Java 7 or Java 8. Review the Supported platforms list for more information on supported platforms.
- The backend logic specific to the Process Services logic is implemented using Spring 4 and JPA (Hibernate).
- All user interfaces are written using HTML5 and AngularJS.
Process Services uses the following external systems:
- A relational database.
- An Elasticsearch installation. Note that the application ships with an embedded Elasticsearch by default.
- A file system (shared file system in multi-node setup) where content is stored.
- An identity management store such as LDAP or Active Directory (optional). By default, a database-backed user and group store is used.
The Process Engine is managed using the Administrator application. This is also provided as a WAR file.
The App Designer is an Eclipse plugin that can be used by developers to create BPMN 2.0 process definitions within their Eclipse IDE. You can also configure the plugin to pull and push process definition models.
The application can also connect to other on-premise or cloud systems, such as Alfresco Content Services, Box, and Google Drive (not shown in the diagram).
To learn more about Process Services architecture, see our Alfresco ArchiTech Talks video.
Multi-node clustered setup
You can run the application on multiple servers, for performance, resilience or for failover reasons. The application architecture is designed to be stateless. This means that any server can handle any request from any user. When using multiple servers, it is enough to have a traditional load balancer (or proxy) in front of the servers running the Process Services application. Scaling out is done in a “horizontal” way, by adding more servers behind the load balancer.
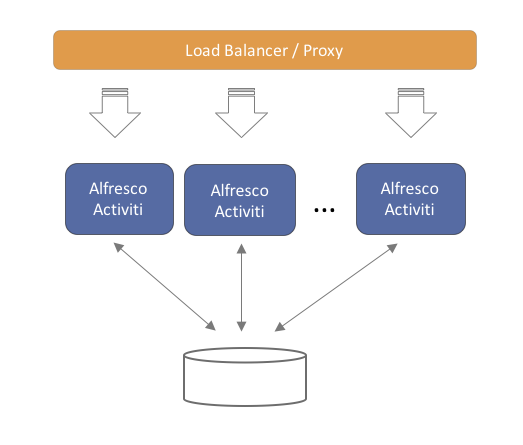
Note that each of the servers will connect to the same relational database. While scaling out by adding more servers, make sure that the database can handle the additional load.
Logging in Process Services
There are several customization options for logging in Process Services.
Process Services uses Logback for logging.
Process Services installs with the default Logback configuration reading from <Tomcat install location>/webapps/activiti-app/WEB-INF/classes/logback.xml and the equivalent location for Process Services Administrator.
The default configuration can be overridden by placing your own logback.xml or logback-test.xml in <Tomcat install location>/lib.
By default Process Services logs to the console. To log to file, edit the logging configuration file to specify a file appender and location. For example:
<appender name="FILE" class="ch.qos.logback.core.FileAppender">
  <file>${LOG_DIR}/activiti-app.log</file>
  <append>true</append>
    <encoder>
      <pattern>%-4relative [%thread] %-5level %logger{35} - %msg%n</pattern>
    </encoder>
</appender>
It is possible to configure Logback to rescan the configuration file for any modifications made at regular intervals, without having to restart the application server by adding the following line to your custom logback.xml file:
<configuration scan="true" scanPeriod="45 seconds">
Additional configuration options are also available for customizing logging.
Process Services Administrator
The Administrator app can be used to inspect and manage the data for a Process Engine (or cluster of engines). It’s also used for cluster configuration and monitoring. It is distributed as a separate web application (WAR file).
Typically, there is one single Administrator application for multiple environments (for example, development, testing, production, and so on), which is accessed by a handful of users (system administrators). Generally, it is not necessary to have multiple instances of this application running.
The Process Engine is cluster-enabled so, together with the Process Services Administrator, a user can configure and monitor a cluster (or multiple different clusters) through a graphical user interface. The clustered engines will use the same configuration and will report metrics and status back to the Process Services Administrator where they are displayed.
See install Process Services Administrator to install the Process Services Administrator application.
Administrator database configuration
The database for the Administrator app is configured using the following properties. See the Database configuration section for more information about how to configure Process Services.
For example (using MySQL):
datasource.driver=com.mysql.jdbc.Driver
datasource.url=jdbc:mysql://127.0.0.1:3306/activitiadmin?characterEncoding=UTF-8
datasource.username=alfresco
datasource.password=alfresco
hibernate.dialect=org.hibernate.dialect.MySQLDialect
Cluster configuration and monitoring
Process Services Administrator can show the process data and manage the configuration of multiple clusters. In this context a cluster is a number of Process Engines that logically belong together. Note that this does not relate to the way that these engines are architecturally set up: embedded, exposed through REST, with or without a load balancer in front, and so on.
Also note that the Administrator is capable of inspecting the information of each Process Engine (if configured correctly). It is not, therefore, solely bound to using the Process Engine in Process Services, but to all enterprise Process Engines.
Multiple clusters can be configured and managed through the Process Services Administrator. This is displayed in the drop-down in the top-right corner:

Note. Each of the engines in a cluster should point to the same database schema.
To access the data of a cluster, the Administrator application uses one Process Services REST application per cluster (to avoid direct access to the database from the Administrator or potentially to manage different engine versions).
The REST API endpoints can be included in your application using the Maven artifact com.activiti.activiti-rest. It is configured in a similar way as the Administrator.
No special setup is needed when using Process Services, as it contains the necessary REST API endpoints out of the box.
As shown in the diagram below, any cluster can consist of multiple engine nodes (pointing to the same database schema), the data that is managed in the Administrator is fetched through an Process Services REST application only.

In the same drop-down as shown above, a new cluster can be created. Note that a user will be created when doing so. This user is configured with the role of cluster manager and is used to send information to the HTTP REST API of the Administrator application, but it cannot log in into the Administrator application as a regular user for safety reasons.
The REST endpoint for each cluster can be configured through the Administrator. Simply change the settings for the endpoint on the Configuration > Engine page while the cluster of choice is selected in the drop-down in the top-right corner. The current endpoint configuration is also shown on this page:

The Process Engine and the Administrator app communicate through HTTP REST calls. To send or get information from the Administrator app, you must configure the Process Engine with a correct URL and credentials.
For the engine, this can be done programmatically:
processEngineConfig.enableClusterConfig();
processEngineConfig.setEnterpriseAdminAppUrl("http://localhost:8081/activiti-admin");
processEngineConfig.setEnterpriseClusterName("development");
processEngineConfig.setEnterpriseClusterUserName("dev");
processEngineConfig.setEnterpriseClusterPassword("dev");
processEngineConfig.setEnterpriseMetricSendingInterval(30);
This configures the base HTTP API URL, the name of the cluster that the engine is part of, the credentials of the user allowed to send data to the API and the time interval between sending data to the Administrator application (in seconds).
Process Services includes the Process Engine. To enable engine clustering you can set the properties (similar to the programmatical approach) directly in the configuration file:
cluster.enable=true
cluster.config.adminapp.url=http://localhost:8081/activiti-admin
cluster.config.name=development
cluster.config.username=dev
cluster.config.password=dev
cluster.config.metricsendinginterval=30
Process Services also sends extra metrics to the Administrator application. To configure the rate of sending, a cron expression can be set (by default the same as the rate of sending for the Process Engine):
cluster.config.app.metricsendingcronexpression=0/30 * * * * ?
Alternatively, you can generate a jar file with these settings through the Configuration > Generate cluster jar button. If you place the jar file on the classpath (or used as a Maven dependency if using a local Maven repository) of an engine or Process Services application, it will have precedence over the properties files.
Once the application is running, metrics for that node in the cluster are shown in the Admin application:

In the Admin application, the following two settings can be changed:
cluster.monitoring.max.inactive.time=600000
cluster.monitoring.inactive.check.cronexpression=0 0/5 * * * ?
cluster.monitoring.max.inactive.time: This a period of time, expressed in milliseconds, that indicates when a node is deemed to be inactive and is removed from the list of nodes of a cluster (nor will it appear in the monitoring section of the application). When a node is properly shut down, it will send out an event indicating it is shut down. From that point on, the data will be kept in memory for the amount of time indicated here. When a node is not properly shut down (for example, hardware failure), this is the period of time before removal, since the time the last event is received. Make sure the value here is higher than the sending interval of the nodes, to avoid that nodes incorrectly removed. By default10 minutes.cluster.monitoring.inactive.check.cronexpression: A cron expression that configures when the check for inactive nodes is made. When executed, this will mark any node that hasn’t been active forcluster.monitoring.max.inactive.timeseconds, as an inactive node. By default, every5 minutes.
Cluster master configuration
For each cluster, a master configuration can be defined. When the instance boots up, it will request the master configuration data from the Administrator application. For this to work, the cluster.x properties (or equivalent programmatic setters) listed above need to be set correctly.
There is one additional property that can be set: cluster.master.cfg.required=. This is a boolean value, which if set to true will stop the instance from booting up when the Admin app could not be reached or no master configuration is defined. In case of false, the instance will boot up using the local properties file instead of the master configuration.
The master configuration works for both clusters of embedded Process Engines or Process Services instances. The two can not be mixed within the same cluster though.
Note: When changing the master configuration, the cluster instances would need a reboot. The Administrator application will show a warning for that node too in the monitoring tab, saying the master configuration currently being used is incorrect.
HTTP communication with Administrator
Communication with the Administrator Application is done using HTTP REST calls. The calls use HTTP Basic Authentication for security, but do use different users, depending on the use case.
Process Services and the Administrator Application do not share user stores because:
- Typically, there are only a handful of users involved with the Administrator Application.
- The Administrator Application can be used independently.
The following pictures gives a high-level overview:
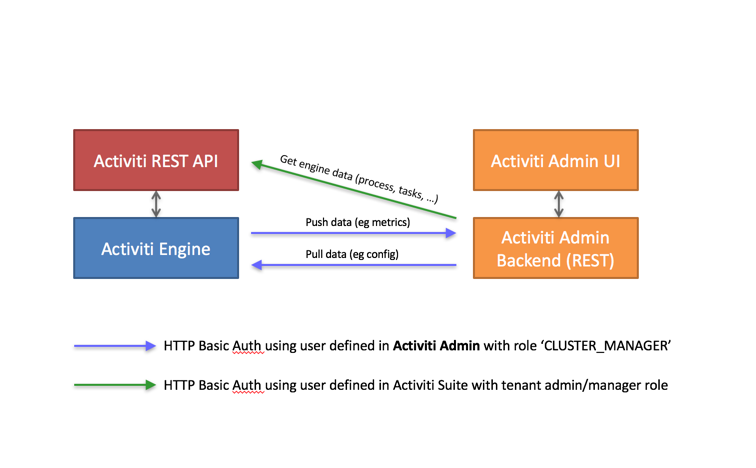
- The Process Engine pushes and pulls data to and from the Administrator Application REST API. These calls use basic authentication with a user defined in the Administrator Application user store (relational database). Such a user is automatically created when a new cluster configuration is created (see above), but its credentials need to be configured on the engine/Suite app side (see the
cluster.xxproperties.) - The Administrator Application allows you to browse and manage data in an Enterprise Process Engine. It calls the REST API to do so, using a user defined in the user store of the Suite Application (or any other authentication mechanism for the embedded engine use case).
For Process Services: The user needs to have a Tenant Admin or Tenant Manager role, as the Administrator Application gives access to all data of the engine.
The following diagram illustrates what this means for an end user:

An end user logs in through the UI, both on the Suite as the Admin Application. Again, the user store is not shared between the two.
It’s important to understand that the HTTP REST calls done against the Suite REST API, are done using the credentials of the Suite application using a user defined in the user store of the Suite Application. This user can be configured through the Administrator Application UI.
In case of using LDAP, a equivalent reasoning is made:

The user that logs into the Administrator Application is defined in the relational database of the Administrator Application. However, the HTTP REST call will now use a user that is defined in LDAP.
Configure the REST app for use with the Administrator application
When using the Process Engine embedded in a custom application (or multiple embedded engines), it is still needed to set up a REST endpoint that the Administrator application can use to communicate with to see and manage data in the engines cluster.
Process Services already contains this REST API, so you must add this additional REST app.
Out of the box, the REST application is configured to have a default admin user for authentication and uses an in memory H2 database. The latter of course needs to be changed to point to the same database as the engines are using.
The easiest way to do this, is to change the properties in the /WEB-INF/classes/META-INF/db.properties file with the correct datasource parameters. Make sure the driver jar is on the classpath.
To change default user, change the settings in /WEB-INF/classes/META-INF/engine.properties. In the same file, you can also configure the following basic engine settings:
engine.schema.update: Indicates if the database schema should be upgraded after booting the engine (if this is needed). The default value istrue.engine.asyncexecutor.enabled: Indicates if the async job executor is enabled. By default, it is set tofalse, as this is better done on the engine nodes itself otherwise you would have to make sure the classpath has all the delegates used in the various processes.engine.asyncexecutor.activate: Instructs the Process Engine to start the Async executor thread pool at startup. The default value isfalse.engine.history.level: The history level of the process engine. Make sure this matches the history level in the other engines in the cluster, as otherwise this might lead to inconsistent data. The default value isaudit.
If these two property files are insufficient in configuring the process engine, you can override the complete process engine configuration in a Spring xml file located at /WEB-INF/classes/META-INF/activiti-custom-context.xml. Uncomment the bean definitions and configure the engine without restrictions, similar to a normal Activiti Process Engine configuration.
The out-of-the-box datasource uses C3P0 as connection pooling framework. In the same file, you can configure this datasource and transaction manager.
The application uses Spring Security for authentication. By default, it will use the Process Services identityService to store and validate the user. To change it, add a bean with id authenticationProvider to /WEB-INF/classes/META-INF/activiti-custom-context.xml. The class should implement the org.springframework.security.authentication.AuthenticationProvider interface (see Spring docs for multiple implementations).
Note: The Rest app is not compatible with using a master configuration. It needs to be configured through the properties or the spring context XML.
Using Process Services Administrator application
Use the Administrator application to perform basic administration functions in Process Services. For example, you can inspect the state of Process Engines, delete an app, view when an app was deployed, or monitor clusters.
The Administrator application has the following tabs:
- Apps - Use for deleting apps, redeploying an app to another cluster, and downloading apps.
- Deployments - View the current deployment and its content such as process definitions, deploy time, tenant information and so on.
- Definitions - View process definitions and their related instances.
- Instances - View running or completed process instances for each process definition. You can also see related information for each process definition, such as, tasks, variables, subprocesses, jobs, decision tables, and forms information. In addition, you can download binary process data for troubleshooting process issues.
- Tasks - View tasks information and perform actions on them, such as edit, assign/claim, delegate, complete tasks. In addition, you can view task forms, sub tasks, variables, and identity links for a particular task.
- Jobs - View the current job details based on its Process Instance ID, due date, and Job Id. Exceptions are displayed if the jobs failed to execute (For example, if a mail server could not be reached).
- Monitoring - Enables you to monitor the cluster information.
- Configuration - Add and configure cluster information. See Cluster configuration and monitoring for more information.
Deploy apps
You can deploy apps in various ways in the Administrator application. For example, you can upload and publish an app model from a zip file, deploy an existing app from one cluster to another, or redeploy an existing app model to another cluster. Deploying app models to another cluster is particularly useful when your app needs to be progressed from staging to production or copied from the development environment to production. However, when any changes made to the development environment need to be carried over to production, you should select the target cluster (the production system in this case) in the Administrator application and redeploy your app.
- To upload and publish an app model from a zip file, in the Administrator application, click Apps > Publish an app model.
Prerequisite: Make sure you have configured at least two clusters. To create a new cluster, select Clusters list > Create new cluster.

To deploy an app model to a different cluster:
- Go to Admin App > Apps and then select an app model.
- Click Publish an app model. The Publish app model dialog box appears.
- Select Publish app to another cluster and select the cluster you want your app to be published to.
- Click Publish.
To redeploy an existing app to a different cluster:
- Go to Admin App > Apps tab.
- Select the app that you need to move to a different cluster, and then click Redploy an app to another cluster. A dialog box to select a cluster appears.
- Select the cluster that you would like your app to be moved to, and then click Deploy. If the process app already exists, it is versioned and updated.
To download an app:
- Go to Admin App > Apps tab.
- Select the app that you want to download.
- Click Download app.
To delete an app:
- Go to Admin App > Apps tab.
- Select the app that you want to delete.
- Click Delete App.
Download binary process data
Sometimes, you may experience an issue with a process and you need to resolve the problem. The Administrator app gives you the option to download the binary process data for use in troubleshooting and investigating process issues.
-
Go to the Administrator app and then click Instances.
-
Find the binary process data from the variables list.

-
Click the download button.
The
 button appears for binary variables only as the process designer detects the underlying object type.
The binary process data is downloaded to the local machine. The file is provided in a serialized binary format.
Note: It is not possible to upload binary process data files.
Read-only access to the Administrator app
You may have users in your organization who assist when debugging problems and need to access the information in the Administrator app, but who don’t need to make changes. You can give these users permission for read-only access to the Administrator app. This ensures that these users are able to contribute to issue trouble shooting without accidentally breaking any operational processes.
A read-only user can log in just like any other user but their permissions control the ready-only option.
Note: The read only admin is a feature to avoid accidental changes to the system by trusted users. If you don’t trust such a user, we do not advise giving them access to a read only admin view account. This feature ensures a level of security for the UI only and it is possible for a user with read-only UI permission to make changes through the REST API.
-
Create the user in the Administrator app.
-
Click the Read only user check box.

-
Click Create user.
The new user can log in and access the Administration app but does not have the ability to make any changes.