You can add security controls to files, records, folders, and
Note: When you install Enterprise the Security Controls features are installed at the same time.
Security controls is the collective term for security classifications and security groups, which in turn are made up of one or more security marks.
There is one predefined Classification security group, but you can add as many additional security groups as you need.
Files, records, folders, and categories can be classified using the Classify option to apply a security classification and security marks.
You can set up classification guides so that users can auto-classify content.
When an item is classified it can only be seen by those with the required security clearance, and the security classification
level is shown on screen. Users without the necessary security clearance won’t have access to it or even know that it’s there.
When a classified file is
User security clearance is set for a user (or user group) by assigning security marks to them.
You can create Classification Reasons to help identify and align the reasons why content is classified. Governance Services comes pre-configured with some common classification reasons but you can edit, delete, and make your own.
Tip: Security controls are configured and assigned through the standard Alfresco Admin Tools, and can be used completely independently of a records management site if required.
Classification life cycle
If you have the required security clearance and file permissions can classify and reclassify files, records, folders, and categories.
-
An Alfresco Administrator can create security controls. Go to Admin Tools > Security Controls > Configure > Security Marks.

-
An Alfresco Administrator assigns security clearance levels to a user. Go to Admin Tools > Security Controls > Configure > Assign.

-
You are given the file permissions needed to edit files/records.

-
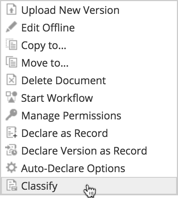
Select to classify a file, record, folder, or category.
-
Selects security classification and/or security marks.
-
The classified item is only seen by those with the required security clearance.

-
You can reclassify the item as required, following the Downgrade Schedule or Declassification Schedule where appropriate.

How security controls work
Both the predefined Classification security group and any custom security groups function in largely the same way, with a few important differences.
In both cases you can apply security marks to both records, folders, and categories in a Records Management site, and files and folders in a standard Alfresco site. These same marks are applied to users to set their security clearance levels.
When you
Note: Standard Alfresco permissions and Records Management permissions continue to apply as well as any additional classifications.
Classification security group
There are four classification levels you can apply to files and records:
- Top Secret
- Secret
- Confidential
- Unclassified (typically used to differentiate a file or record that used to be classified, or will become so in future)
There are three clearance levels that can be assigned to users:
- Top Secret - Can see files and records with any classification level
- Secret - Can see secret, confidential and unclassified files and records
- Confidential - Can see confidential and unclassified files and records
Note: The default Alfresco Administrator has Top Secret clearance. All other users have No Clearance until their clearance is changed.
You can’t classify a file higher than your own security level. So if your security clearance is Confidential, you can’t classify a file as Top Secret.
Security clearance levels are enforced for files and records that have been classified. For example, if a record has been classified as Top Secret, then:
- User 1 (Top Secret clearance) - can see and work with the record
- User 2 (Confidential clearance) - doesn’t see the record in the
File Plan
User 1 would see the following, whereas User 2 would only see the Unclassified file that has no classification label:

When you set security classification for a file or record you must record a reason for the classification. Downgrade and declassification schedule option give additional control over the classification lifecycle.
Custom security groups
You can create an unlimited number of security groups, which in turn can contain an unlimited number of security marks. The marks are then applied to files and records and assigned to users.
When you create a new security group there are three Group Types available:
-
All= Users must have all security marks from the group that are applied to a file to see that file.
Example: A Security Group named Training contains security marks of Media and Data Handling. To see a file marked as both Media or Data Handling, then a user must have both Media and Data Handling clearance.
-
Any = Users must have at least one of the security marks from the group that are applied to a file to see that file.
Example: A Security Group named Nationality contains security marks of UK, US, and Aus. To see a file marked as UK and US, then a user must have UK and / or US clearance.
-
Hierarchical = Security marks are ranked in the order they’re created. The mark created first in a security group has the greatest clearance, the one created last the least clearance.
Example: The predefined Classification group has marks of Top Secret, Secret, and Classified. To see a file classified as Secret, then the user must have Secret or Top Secret clearance.
Using the above examples, if a record has been classified as Media, Data Handling, US, and UK, then:
- User 1 (Media, Data Handling, and UK) - can see and work with the record
- User 2 (Media and UK) - doesn’t see the record in the File Plan
Note: Files and records aren’t visibly labelled with custom security marks in the same way as they are with security classification marks.
How security clearance works
Security clearance is the assignment of security marks to users.
Once marks are applied to content then users can only see that content if they have the required security clearance.
Note: Standard Alfresco permissions and Records Management permissions continue to apply as well as any security clearance.
When security groups are created there are three different Group Types available, and each one controls how the user sees content, see How security controls work.
Users with Alfresco Administrator permissions can set and edit the security clearance of users and user groups.
When assigning marks to users or user groups, marks that are inherited from another group aren’t shown. Only marks that are assigned directly to this user / group are displayed. If a user (or group) has inherited security marks from a group, then these are added to their directly assigned marks.
Hierarchy based security clearance
For hierarchy based security groups such as the prefined Classification group, a user who is assigned one mark and inherits another has the clearance of the higher of the two. For example, a user who has Confidential clearance directly assigned, and has inherited Top Secret clearance from a group, will have Top Secret Clearance.
Non-hierarchy based security clearance
For non-hierarchy based security groups the security marks are added together, so that a user who is directly assigned the UK mark, and inherits the US mark from a group, will have clearance for both UK and US marked files.
How classification guides work
You’ll usually have a number of common classification requirements for different types of content. For example, all staff records may require the same security levels to access them.
Instead of setting these individually, you can create classification guides to use as
templates for
You can create as many classification guides as you want and make them as complex or as simple as you need.
Each guide is made up of one or more topics. A topic can contain further subtopics, or a set of instructions. If you select to add instructions you can choose security classification, including a classification agency and reasons and downgrade and declassification schedules, as well as any additional security marks that are set up.
You can choose to make a guide available for use in classification by setting it to On, or to leave it Off until you’re ready for it to be used.
When people are classifying content they can select to Add Instructions and browse through the classification guides to find the instructions they want. When the instructions are applied to content then all the security classifications and controls the instructions contain are automatically applied to that content.
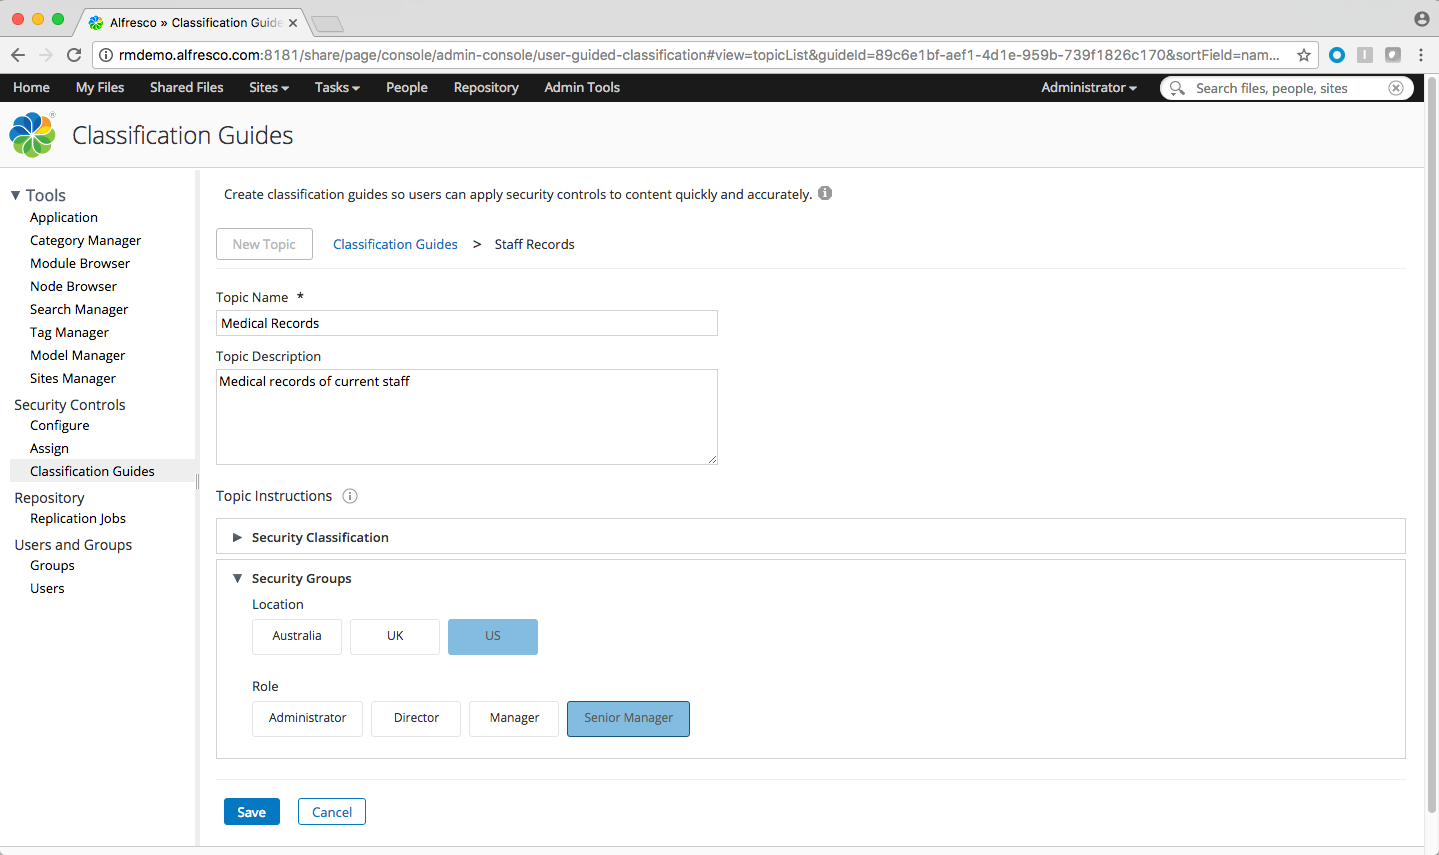
Example
The following example shows a classification guide for Staff Records. This guide contains a topic named Medical Records which has has instructions to include the US and Senior Manager security marks.
If a file was classified using these instructions then it would only be visible to users who have security clearance for US and Senior Manager levels.
Creating a security group
Each security group is made up of one or more security marks.
These marks can then be assigned to users and content to control which users can see which content.
For example, the predefined security group is Classification and contains the marks Top Secret, Secret, and Confidential. Only users assigned to the Top Secret mark can see files that have been marked as Top Secret. This works in the same way for any additional security groups that you set up.
You can set up additional security groups to match your company requirements, for example, security groups for nationality and job role.
-
Click Admin Tools and then click Security Controls > Configure.
-
Click Create Security Group.
-
Enter a name for the security group.
-
Select a Group Type for how security clearance will be applied for this group:
-
All= Users must have all security marks from the group that are applied to a file to see that file.
Example: A Security Group named Training contains security marks of Media and Data Handling. To see a file marked as both Media or Data Handling, then a user must have both Media and Data Handling clearance.
-
Any = Users must have at least one of the security marks from the group that are applied to a file to see that file.
Example: A Security Group named Nationality contains security marks of UK, US, and Aus. To see a file classified as UK and US, then a user must have UK and / or US clearance.
-
Hierarchical = Security marks are ranked in the order they’re created. The mark created first in a security group has the greatest clearance, the one created last the least clearance.
Example: The predefined Classification group has marks of Top Secret, Secret, and Classified. To see a file classified as Secret, then the user must have Secret or Top Secret clearance.
-
-
Click Create.
Once you’ve created a security group you can:
- Click on the group to add security marks to it
- Click
 to edit the group name.
 -
Click
 to delete the group. You can’t delete a group or its marks if it contains marks that are assigned to content.
Note: No-one else can access a security group until you add security marks to it.
Once marks are added to the group, only users who have been assigned one of the marks can see the group.
Adding security marks to a security group
You can add multiple security marks to a security group.
These marks can then be assigned to users and content to control which users can see which content.
For example, the predefined security group is Classification and contains the marks Top Secret, Secret, and Confidential. Only users assigned to the Top Secret mark can see files that have been marked as Top Secret.
You can set up additional security groups to match your company requirements, for example, security groups for nationality and job role.
-
Click Admin Tools and then click Security Controls > Configure.
-
Click on a security group.
Tip: You can’t add security marks to the predefined Classification security group.
-
Enter a name for a new security mark.
You can use the same names for marks in different security groups, but within a security group each name must be unique.
-
Click Create.
-
Now repeat until you have added all the security marks you want to (you can always add more later).
Note: You can always click
 to delete a security mark from the group. You can’t delete a mark that’s been assigned to a file. If you delete the last mark from a group then no-one else can access the group until you add marks to it.
Setting security clearance
Alfresco Administrators can assign different clearance levels to users and groups that give access to files and records within their clearance level.
Note: You need to have the Alfresco Administrator role to set security clearance. You can’t change the clearance level of the default Alfresco Administrator.
-
Click Admin Tools and then click Security Controls > Assign.
Users and groups are shown with their current classification clearance (the predefined security group).
- Top Secret - Can see all files and records with any classification level
- Secret - Can see secret, confidential, and unclassified files and records
- Confidential - Can see confidential, and unclassified files and records
- No Clearance - Can see unclassified files and records
Hover over Details to see all security groups and security marks assigned to a user.
Note: You won’t see marks assigned to a user if you don’t have clearance for them.
-
Type a user’s name or group name into the filter box to find the user / group.
Tip: You can sort users by clicking Name, and view a user profile by clicking a user name.
Click to select to view Groups and Users, or just Users or Groups.
-
Hover over a user or group and click Set Security Controls next to them to change the security groups and marks they’re assigned.
Note: You can only assign Security Marks for the groups you are a part of.
-
Currently assigned security marks are highlighted. Click a security mark to assign it to the user / group, and again to unassign it.
Note: Marks that are inherited from another group aren’t shown, only marks that are assigned directly to this user / group.
-
Click Apply, and any changes you’ve made are applied.
Note: If a user has marks assigned that you don’t have access to then these will be unaffected by any changes you make.
Creating classification guides
Classification guides can be used to quickly
You can create an unlimited number of guides, and each one can contain one or more topics. Topics can then contain either subtopics or instructions.
Instructions are a collection of security marks and classification details. When you classify content with a topic (or topics) it’s classification details are populated with those in the topic.
You can build up guides and they won’t be available for use until you set them to On. Find out more in How classification guides work.
-
Click Admin Tools and then click Security Controls > Classification Guides.
-
Click New Guide.
-
Enter a name for the guide.
-
Enter an Originating Organization, for example, government or other body.
-
Enter a guide
publication date . This is the date when the guide should be made available. -
Select whether to make the guide available for classifying content.
If it’s not yet ready then you can leave it Off and switch in On at a later stage.
-
Click Save.
The guide is now listed and you can now add topics to it.
-
Click on the guide name then click New Topic.
Tip: You can click on a guide (not the guide name) then click
to edit the guide, or to delete it. -
Enter a name and optional description for the topic.
You can now click Save and add sub-topics, or select instructions to add to a topic.
-
To add instructions click on Security Classifications and/or Security Groups:
- Security Classifications - Select a classification level, a classification reason, and any other required classification details
-
Security Groups - Select all the required security marks
Note: You cannot use security marks you do not posses when classifying content, unless you also use a security mark you do posses from the same group. If you have a security mark from a security group ‘any’ then you can view and assign all other marks from that group. When using marks (either when Classifying Content or creating Instructions) that you don’t posses, you must include a mark from the same group to avoid losing access to the content. An error will appear if you attempt to create an instruction using only a mark you don’t have, or have not included a mark from the same group.
-
Click Save.
If the guide is switched On then users can select from the topics it contains to automatically classify content.
Note: If you delete a guide containing instructions that are currently being used to classify content, then the content will retain its classification.
If you edit a guide’s instructions then that won’t modify the classification level or marks applied to content previously classified using that instruction.
Classifying records, record folders, and record categories
You can
There are four security classification levels that you can assign. Security groups provide additional classification options.
Note: You can also classify files in Alfresco sites.
See Classification rules and tips for more on classifying content.
You can autoclassify by adding instructions, manually apply classifications and security marks, or both.
-
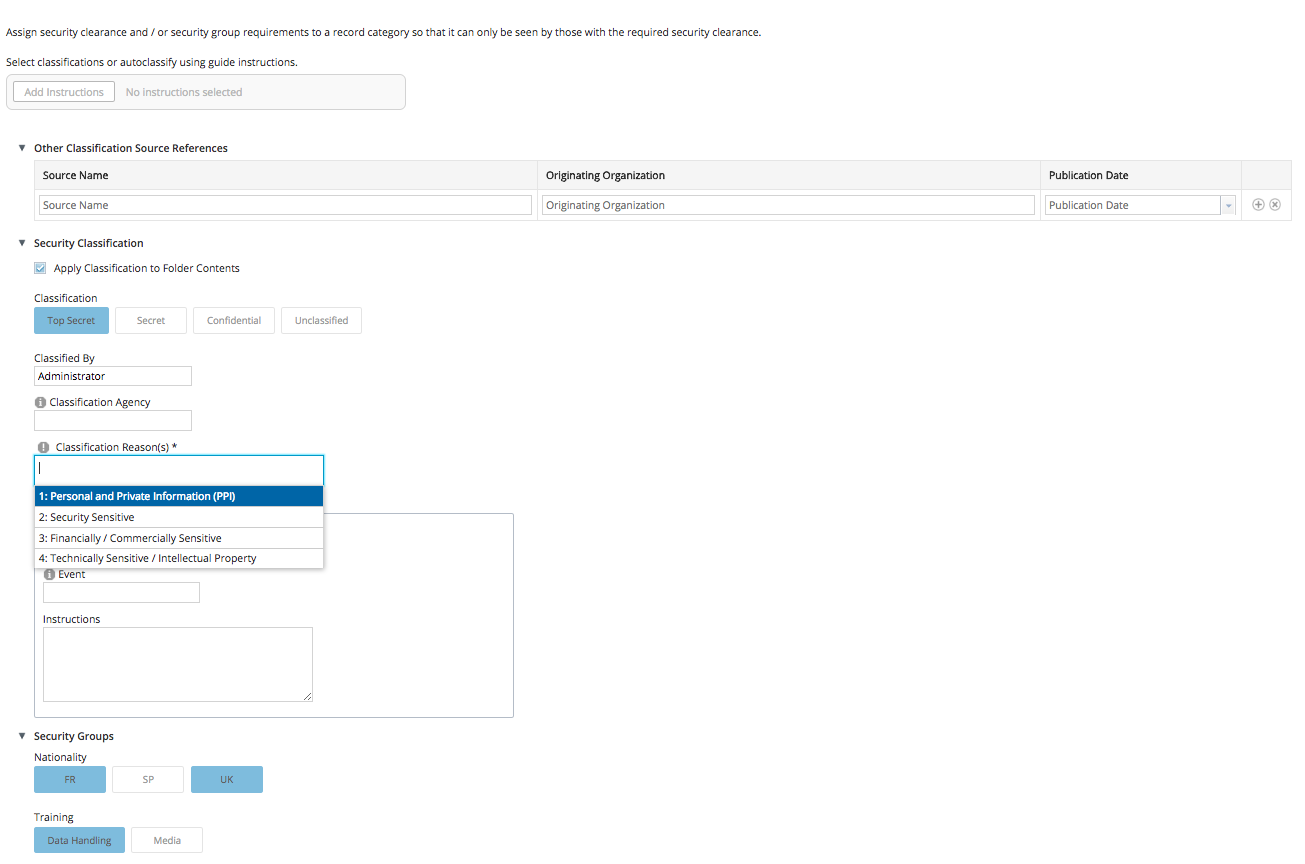
In the File Plan hover over a record, folder, or category and select More, then Classify.
You can classify using both Security Classification and Security Groups. You’ll only see the classification options that you have security clearance for.
-
To autoclassify:
-
Click Add Instructions.
-
Click on a guide to view its topics.
-
Click
 next to the topic you want to apply instructions from then click Select.
Tip: You can click View to check what classification level and security marks the topic instructions contain.
-
Repeat for as many topics as you want to add.
-
Click Apply.
All the topics you’ve selected will have their instructions applied to the item you’re classifying.
Tip: If topics contain instructions that clash then the higher level of classification will apply. For example if you add two topics, one with a classification level of Top Secret, and one with Secret, then the Top Secret level will apply.
-
To add Other Classification Source References
Note: This step is not required to classify an item.
-
Enter the name of the source document from which the classification of the item has been derived.
-
Enter the name of the organization that produced the document.
-
Enter the
publication date of the document. -
To manually add classifications and security marks:
-
If you want to classify a folder and its contents, select Apply Classification to Folder Contents.
This option is only visible when classifying a folder. Only the top level folder and its immediate children are classified and only the metadata of the parent is carried over to the children. If a new child object is added at a later date it does not inherit the properties of its parent.
-
Select a classification from:
- Top Secret
- Secret
- Confidential
- Unclassified
Tip: If you select Unclassified then the item will be available to all users.
-
Enter a classification agency, for example, government or other body (optional).
-
Select one or more classification reasons from the list of available reasons.
-
You can optionally set a Downgrade Schedule or a Declassification Schedule.
Downgrade Schedule
Set a schedule for when the item will be downgraded, for example, from Top Secret to Secret. You can enter a specific date for the downgrade to take place, an event that means a downgrade should be considered, and instructions on how to carry out the downgrade. All of these are optional, but once you’ve entered a downgrade date, event, or both, you’re required to enter instructions.
Declassification Schedule
Set a schedule for when the item will be declassified. This means when its classification level will be set to Unclassified. You can enter a specific date for the declassification to take place, an event that means declassification should be considered, and exemptions for when declassification shouldn’t take place. All of these are optional.
Note: Downgrade and declassification schedules are not automated. Any reclassification needs to be done manually.
-
Click security marks to apply them to the item, and again to remove them.
See How security controls work for more details.
-
Click Classify.
The item now displays its classification level, and can only be seen by those with the required security clearance.
Tip: Items set to Unclassified with no applied security marks can be seen by all users.
The classification reason and classification-related properties can be seen in the Properties when you preview the item.
Classification Reasons
Once configured Classification Reasons are used because they provide you with information relevant to your organization about why an item is being classified.
-
Go to > Admin Tools > Security Controls > Configure and then the Classification Reasons tab.
-
Enter a Reason Code and a Description for the new Classification Reason and click the Add icon.
Use the other icons to Delete and Edit the other Classification Reasons.
Classification rules and tips
When you classify content there are a few rules that help you maintain secure classification.
Security clearance and permissions
If a user doesn’t have the required security clearance, then they won’t be able to see record, folders, or categories that have been classified. For example, if a record has been classified as Top Secret, then:
- User 1 (Top Secret clearance) - can see and work with the record, following the usual Alfresco permission rules.
- User 2 (Confidential clearance) - doesn’t see the record.
To classify records, folders, or categories:
- You must have permissions to edit them. This means having a Read and File permission on them.
- You must have been given a security clearance higher than No Clearance (unless the item is set as Unclassified).
You also can’t classify items higher than your own security level. So if your classification clearance is Confidential, you can’t classify a record as Top Secret.
CAUTION:
Users with Admin permissions can classify repository top level folders such as the Data Dictionary and Sites. It’s recommended to not do this to avoid potential issues for other users.
Classifying folders and categories
When you classify folders and categories, there may be restrictions on the levels you can set if they contain content that has already been classified. As such you might want to consider classifying folders and categories before you classify their content. The rules are:
- Items can’t be classified higher than the folder or category they are in (not applicable if the folder or category hasn’t been classsified).
- A folder or category can’t be classified lower than any items it contains.
- Classified items can’t be moved, copied, or linked to folder or categories lower than their classification.
Declassification
An item can be declassified when it is no longer considered to be classified. Declassification occurs after a period of time has elapsed or an event occurs.
Go to Admin Tools > Security Controls > Configure to review the following declassification settings.
Governance Services comes configured with some common Declassification Exemptions but you can edit, delete, and create your own. You use these when you want to record the reasoning why the declassification time frame isn’t being followed. Typically this occurs when you want to extend the Declassification Time Frame for some of your items in the repository.
You can also configure the Declassification Time Frame which determines how long by default, items in the repository are classified for until they are eligible for declassification. You have the option to adjust the Declassification Time Frame for new files or for all files in the repository. If there is an exemption attached to an item in the repository, its declassification time frame wont change if you change the settings on the Declassification Time Frame page.
Note: When using the feature ensure you read the information messages that are offered before you make any changes.
Declassification Exemptions
Declassification Exemptions are used when classifying content to indicate why the default Declassification Time Frame should not be applied.
-
Go to > Admin Tools > Security Controls > Configure > Declassification Exemptionstab.
-
Enter an Exemption Code and a Description for the new Declassification Exemption and click the Add icon.
Use the other icons to Delete and Edit the other Declassification Exemptions.
Change Declassification Time Frame
The Declassification Time Frame screen is where you set the declassification period your system will use when declassifying items in Governance Services.
-
Go to Admin Tools > Security Controls > Configure > Declassification Time Frame tab.
The Calendar Icon displays the current Declassification Time Frame.
-
Select a new Declassification Time Frame from the drop down list and click Save.
-
Click Apply to Existing Items if you want to change the Declassification Time Frame of items already in Governance Services.
This process may take some time to complete.
Reclassifying content
You can edit classification details and change the assigned security marks, as well as reclassifying content to downgrade, upgrade, and declassify it.
When a file, record, folder, or
You also can’t reclassify a content higher than your own security level. So if your security clearance is Confidential, you can’t reclassify content as Top Secret.
See Classification rules and tips for more on classifying content.
Note: Content can be reclassified multiple times.
-
Hover over a classified file, record, folder, or category and select More, then Edit Classification.
-
Autoclassify by clicking Add Instructions, or edit the classification manually using the steps below.
-
Select a classification from:
- Top Secret
- Secret
- Confidential
- Unclassified
Tip: If you select unclassified then the content will be available to all users. The classification reason can be seen in its properties when you preview files and records or view the details of folders and categories.
-
You can edit most fields without choosing a new classification. If you select a new classification then you need to state who is doing the reclassification and the reason for doing it.
Note: If the content has previously been reclassified then the person who classified it and their reason are displayed. You can edit these if required.
-
Update other Security Classification details as required.
-
Click security marks to apply them to the content, and again to remove them.
See How security controls work for more details.
-
Click Save.
The content now displays its classification level, and can only be seen by those with the required security clearance.
Tip: Content set to Unclassified with no applied security marks can be seen by all users.
Note: The option to Share a file (not applicable for records) is no longer available for Top Secret, Secret, or Confidential files. When a file is declared as a record it retains its classification level and any security marks.
The classification reason and classification-related properties can be seen in its properties when you preview files and records or view the details of folders and categories.