Customizations that are implemented through the extension mechanism are more maintainable because the changes are modular and isolated from the core of the application. This approach to customizing the Digital Workspace (ADW) ensures upgrades are easier to manage and test. It is the recommended way to customize your digital workspace.
Develop an extension if your use case is mainly covered by the Digital Workspace functionality. However, some additional changes are required to meet the expectations and the requirements. In your use case requires complex changes, a custom Alfresco Application Development Framework (ADF)-based application is an alternative.
Extending Digital Workspace requires skills in Angular. You also need to be familiar with the Digital Workspace architecture for more complex use cases. The extension mechanism allows you to add, remove, and change the behavior of your applications.
How the ADW extension works
Digital Workspace relies on three main elements to achieve the dynamic extendability:
- Angular Dependency Injection
- ADF Extension Mechanism
- NgRx Store
The following diagram provide an overview of the composition of an extension and the different actors involved:
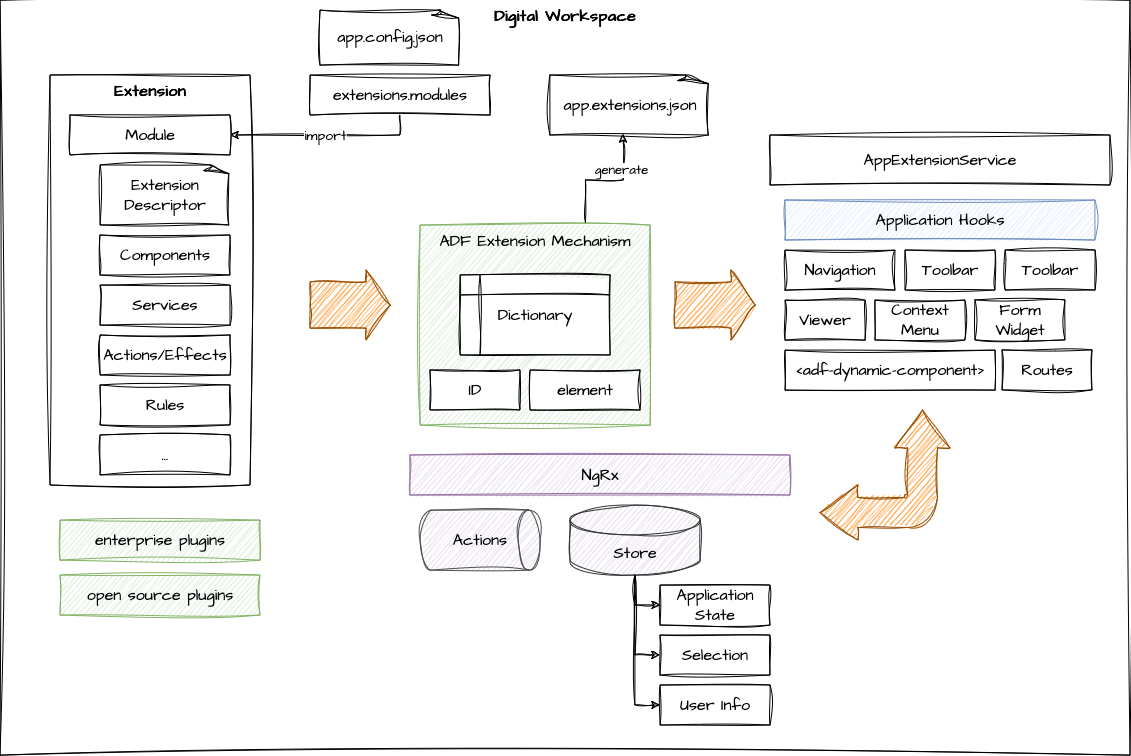
Anatomy of an extension
Each extension is an Angular library that contains an extension descriptor in the form of a JSON file, an Angular module that acts as the root, and exposes all the elements that compose the feature, such as actions, components, services, rules.
The descriptor declares how the extension is assembled in the ADW application, linking hooks with the extension element. The module must be imported in extensions.module.ts to be included in the application bundle, which executes the import, and registrations of all the elements with the Extension Mechanism and the Store.
On startup
The Digital Workspace application module imports the Extensions module, and each extension is imported in the bundle. Each module is responsible for declaring components, actions, and rules by providing a unique ID (string) associated with the element to be loaded. After this process ends, a dictionary of IDs → elements is loaded. Each module also declares a descriptor file that is loaded and merged together with other files. The result of the merge is written into app.extensions.json.
The app.extensions.json file is loaded by the AppExtensionService. This dynamically loads the extensions into the proper hook using the ADF Extension Mechanism.
Create your first ADW extension
Use this information to develop an extension for the Digital Workspace.
You can find the Digital Workspace source code in Alfresco’s Nexus repository. Log in and search for “digital-workspace” on the Nexus repository website, available at https://nexus.alfresco.com/nexus/.
Alfresco customers can request Nexus credentials by logging a support ticket via Hyland Community. These credentials are required to access private (Enterprise-only) artifacts from the Nexus repository.
Prerequisites
- Node.js
- See the Supported platforms page for the required version.
- Alfresco Content Service deployed locally or remotely:
- The example URL uses the format:
https://your.alfresco.backend.com.
- The example URL uses the format:
- Digital Workspace source code.
- Your preferred integrated development environment (IDE), such as Visual Studio Code (VS Code).
- (Optional) Nx Console plugin for VS Code.
Build and run Digital Workspace
Ensure that you can build and run Digital Workspace.
-
Start your preferred Terminal application and install the packages:
npm i -
Edit the
.envfile to configure the Content Services backend:BASE_URL=https://your.alfresco.backend.com -
Edit
apps/content-ee/src/app.config.jsonto configure authentication:"authType": "OAUTH" or "BASIC"The BASE URL defined earlier is also used for authentication.
-
Run the application:
npm run start content-ee
Scaffolding
The scaffolding process requires several steps:
- Creating a library to host your customizations.
- Connecting the extension to the ADW application.
- Creating your first extension.
Create library to host your customizations
-
Create a folder where you would like to place the extensions. i.e.
/workspace/extensions.Note: Keep your customizations separate from the original code so future upgrades are easier.
-
Run the
@nx/angularlibrary generator using the following command as a template:npx nx generate @nx/angular:library --name=@myorg/my-extension --buildable=true --directory=extensions/myextension --publishable=true --importPath=@myorg/my-extension --projectNameAndRootFormat=as-provided -- unitTestRunner=none --no-interactive --dry-runSet each option based on the following descriptions:
Options Description name The name of the library. directory A directory where the library is placed. importPath The library name used for the import, like @myorg/my-awesome-lib. This must be a validnpmpackage name.
Tip: Use the same value provided for the--nameoption.All the commands provided to generate code have the
--dry-runflag. This gives you the opportunity to review the code before applying changes.See the official Nx Angular library documentation for more details.
-
Run the previous command without the
--dry-runflag when you’re happy with the result.npx nx ..is the preferred command to run instead of having globalnxinstalled. With Nx globally installed, it is easy to encounter version mismatches and issues with the cache.
Validate the changes
-
Check in
tsconfig.base.jsonthat an import path exists and points to the correct entry point:"@myorg/my-extension": ["extensions/my-extension/src/index.ts"], -
Test
npm iis working:If you start getting errors due to package conflicts, run
npm iwith the--legacy-peer-depsoption.
Connect the extension to the ADW application
To connect your extension the Digital Workspace, you’ll need to import the module with your customizations, and include the assets folder in the build process.
-
Import the
NgModuleinto the ADW application by adding it to theimportsstatement in./apps/content-ee/src/app/extension.module.ts:import { MyAdwCustomizationsModule } from '@myorg/my-adw-customizations'; @NgModule({ imports: [ environment.plugins.aca_aos ? AosExtensionModule : [], environment.plugins.aca_about ? AcaAboutModule : [], environment.plugins.adw_governance ? RecordModule : [], environment.plugins.adw_aps1 ? ProcessServicesExtensionModule : [], environment.plugins.adw_content_services ? ContentServicesExtensionModule : [], environment.plugins.adw_office365 ? MicrosoftOfficeOnlineIntegrationExtensionModule : [], environment.plugins.adw_analytics ? ContentEeAnalyticsModule : [], MyExtensionModule ], providers: [ { provide: PACKAGE_JSON, useValue: packageJson }, { provide: DEV_MODE_TOKEN, useValue: true }, ], }) export class AppExtensionsModule {}Note: If VS Code shows a lot of errors when opening the file, due to being unable to resolve the modules, it may be connected to the absence of
tsconfig.jsonin thecontent-eeapp.This is not a blocker, and one solution is to create a
tsconfig.jsonfile alongsidetsconfig.app.jsonwith the following content:{ "extends": "./tsconfig.app.json" } -
Add your source code to the application bundle by including the
assetsfolders in the build process.This guarantees that the files are taken into account during the application build process.
Asset Type Input Expected Destination Descriptor file extensions/EXT_NAME/descriptor/assets/pluginsTranslations extensions/EXT_NAME/i18n/assets/plugin-name/i18nAssets extensions/EXT_NAME/assets/assets/ -
Edit the
./apps/content-ee/project.jsonfile by adding the following configuration to thetargets.build.options.assetssection:{ "input": "extensions/my-extension/descriptor", "output": "/assets/plugins", "glob": "*.json" }, { "input": "extensions/my-extension/i18n", "output": "/assets/my-extension/i18n", "glob": "**/*" }, { "input": "extensions/my-extension/assets", "output": "/assets/", "glob": "**/*" }You may not need the entire configuration, but we’ll add them once to cover more scenarios.
Create your first extension
To create your first extension, create a descriptor file, and provide the configuration file to the module.
-
Create a
descriptorfolder with an extension descriptor file inside, i.e.myorg.my-extension.json.- The file name must be unique inside the application.
- Choose a name that does not conflict with other extensions.
- The descriptor file follows the schema in
alfresco-content-app/extension.schema.jsonof thehttps://github.com/Alfresco/alfresco-content-app/GitHub repository.
The minimal content of the descriptor file (shown below) should include the fields used for the About box only:
{ "$version": "0.1.0", "$id": "my-extension-id", "$name": "your plugin name", "$vendor": "Your amazing company", "$license": "LGPL-3.0", "$description": "Just a hello world" }This is an example of the About box:
-
Provide the configuration file to the module.
Inform the application to load the extension descriptor, using the
provideExtensionConfigfunction from@alfresco/adfextensions.import { NgModule } from '@angular/core'; import { CommonModule } from '@angular/common'; import { provideExtensionConfig } from '@alfresco/adf-extensions'; @NgModule({ imports: [CommonModule], providers: [provideExtensionConfig(['myorg.my-extension.json'])], }) export class MyAdwExtensionModule {} -
Test the configuration by running:
npm run start content-eeThe application should run without issues or visible changes. If you inspect the network you should be able to find your JSON file loaded together with the other plugins.
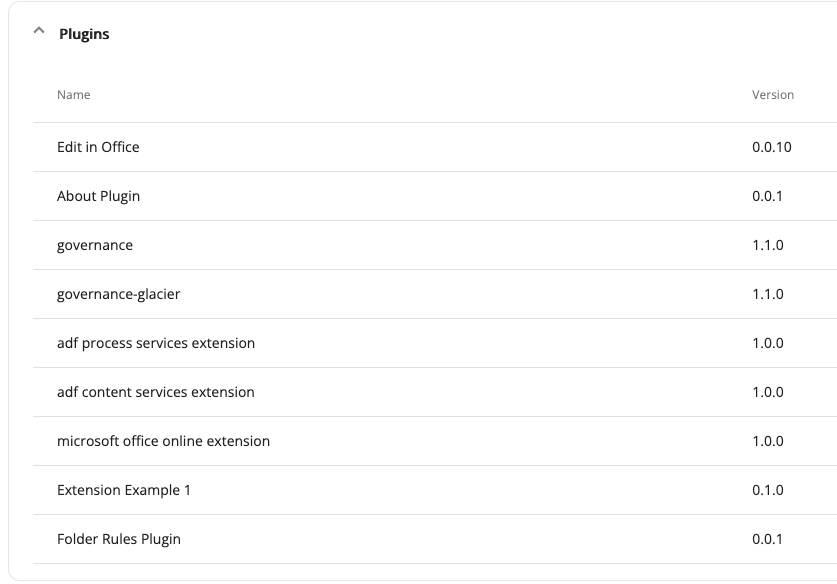
Your extension is displayed in the plugin list in the About box:
Add a new page
To add a new page, define a new route in the application, assign a page component, and then create a navigation bar item.
-
Define a new route in the descriptor file:
"routes": [ { "id": "app.route.my-unique-route-id", "parentRoute": "", "path": "first-route", "layout": "app.layout.main", "component": "my-extension-id.pages.hello.page", "data": { }, "auth": ["content-services.auth", "extension-data-loader-guard.auth"] } ],Apart from
parentRoute, the other options are comparable to the one you normally specify in an Angular application, Angular Route. The key options areid,path, andcomponent.Internal references for how this works are defined in the
Alfresco/alfresco-content-appGitHub repository - search foralfresco-content-app/projects/aca-shared/src/lib/services/router.extension.service.ts -
To assign a page component, first create a component for the page, and then link the created component with the component ID defined in the descriptor file.
-
You can create a component for the page either manually, if you want to follow the Angular standard, or by using the CLI.
npx nx generate @schematics/angular:component --name=hello --project=@myorg/my-extension --skipTests=true --standalone=true --type=page --no-interactive --dry-run- In the example, you can change the
--nameand--projectto your preference. - When you’re happy with the proposed changes, remove the
--dry-runoption and run the command again.
- In the example, you can change the
-
In your extension module, import the extension service using Angular dependency injection, and assign the component to the unique ID in the descriptor file.
The code should look like this:
import { ExtensionService, provideExtensionConfig, } from '@alfresco/adf-extensions'; import { HelloPage } from './hello/hello.page'; @NgModule({ imports: [CommonModule], providers: [provideExtensionConfig(['myorg.my-extension.json'])], }) export class MyExtensionModule { constructor(private extensionService: ExtensionService) { this.extensionService.setComponents({ 'my-extension-id.pages.hello.page': HelloPage, }); } }You can test if the change worked by accessing the defined route using the URL
http://localhost:4200/#/first-route. The exact URL may vary depending on your configuration.
-
-
Create a navigation bar item.
There are several options for adding the navbar item, depending on where you want to show your item in the navigation. The options are:
- As a single item
- Inside existing groups
- In a new group
These options are described in the following sections.
Example - adding the navbar item as a single item
Adding an item as a single item requires …
"features": {
"navbar": [
{
"id": "app.navbar.primary",
"items": [
{
"id": "app.navbar.hello",
"title": "Hello World",
"route": "app.route.my-unique-route-id",
"description": "Hello World",
"order": 100,
"rules": {
"visible": "app.content-services.isEnabled"
}
}
]
}
]
}
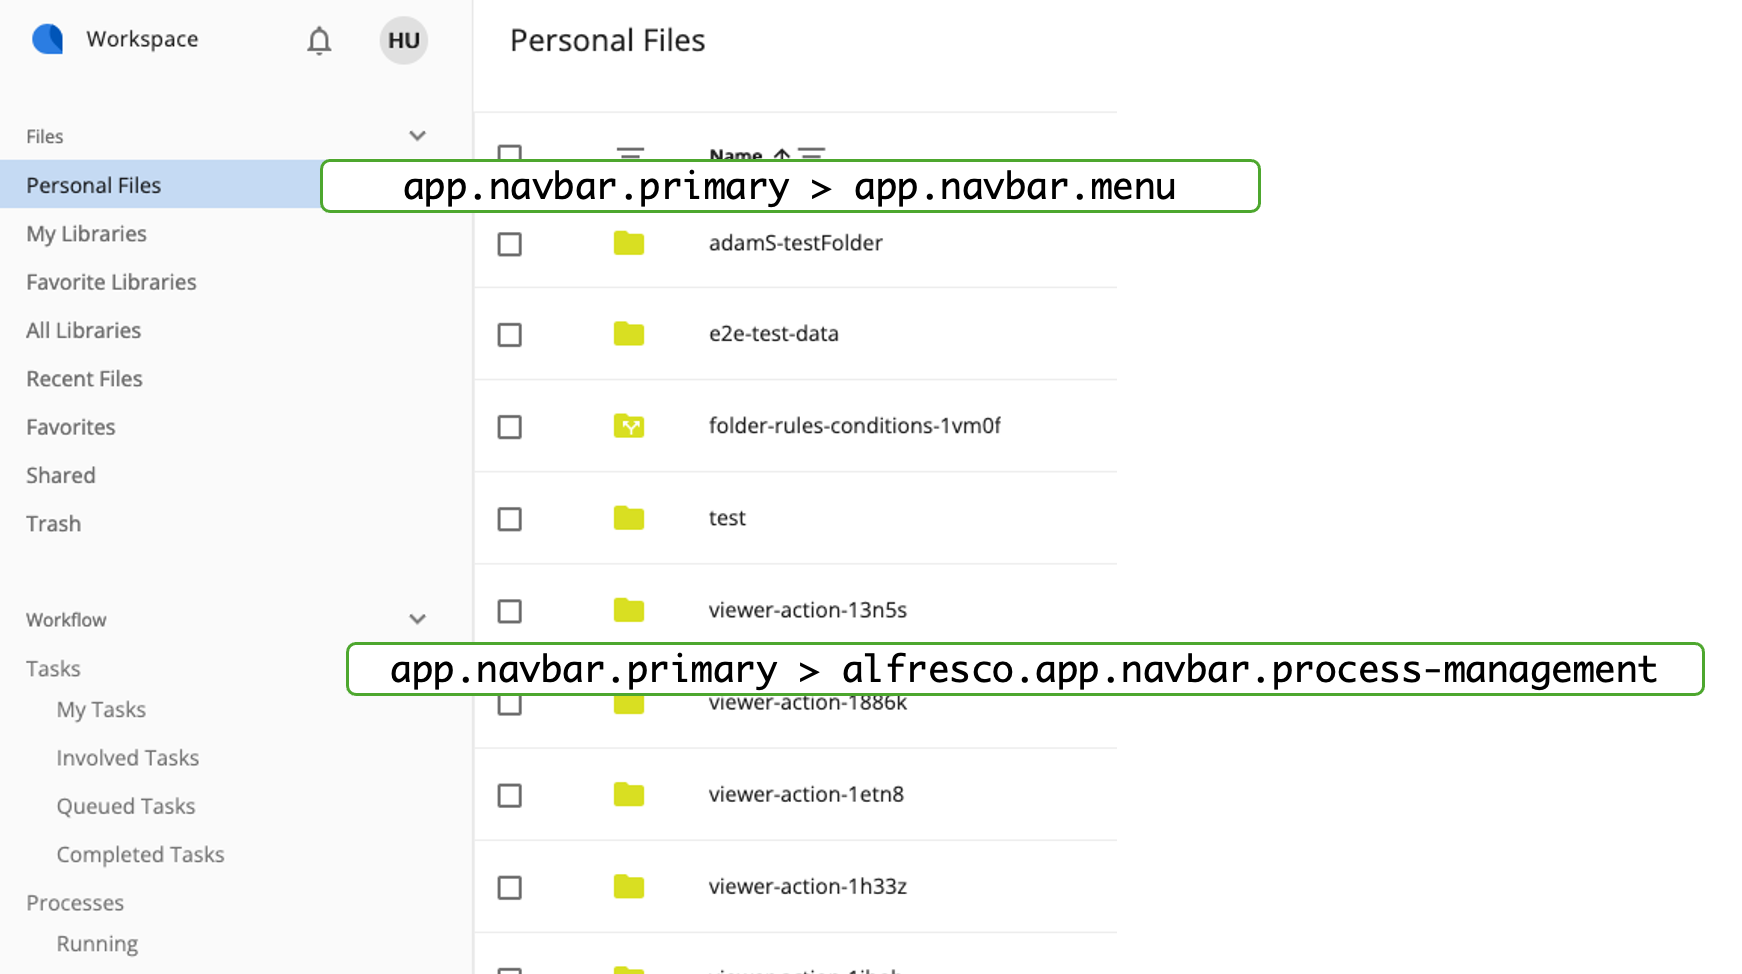
Example - adding the navbar item inside existing groups
Adding an item in an existing group requires matching an id. In the following example, you can see the IDs required for the Files and Workflow sections:
"features": {
"navbar": [
{
"id": "app.navbar.primary",
"items": [
{
"id": "app.navbar.menu",
"children": [
{
"id": "app.navbar.hello2",
"title": "Hello in Content Group",
"route": "app.route.my-unique-route-id",
"description": "Hello World inside File",
"order": 90,
"rules": {
"visible": "app.content-services.isEnabled"
}
}
],
"description": "Hello World",
"rules": {
"visible": "app.content-services.isEnabled"
}
}
]
}
]
}
Inside each group, the order of the element is controlled by the order attribute.
Example - adding the navbar item in a new group
Similar to the example for updating an existing group, you can create an item with children that translates to a group in the navbar. If the ID differs from the out-of-the-box ID, a new group is created in the navbar with a name that equals to what’s specified in the descriptor property.
"features": {
"navbar": [
{
"id": "app.navbar.primary",
"items": [
{
"id": "app.navbar.new-name",
"children": [
{
"id": "app.navbar.hello2",
"title": "Hello in Content Group",
"route": "app.route.my-unique-route-id",
"description": "Hello World inside File",
"order": 90,
"rules": {
"visible": "app.content-services.isEnabled"
}
}
],
"title": "Hello World",
"description": "Hello World",
"rules": {
"visible": "app.content-services.isEnabled"
}
}
]
}
]
}
ADW extension points
Extend the viewer
To extend the viewer, create the new viewer component, register the custom viewer, and declare the new viewer in the descriptor.
-
Generate a new component to create a new viewer component:
npx nx generate @nx/angular:component --name=custom-viewer --directory=./extensions/my-customization/viewer/custom-viewer --standalone=true --nameAndDirectoryFormat=as-provided --no-interactive --dry-run -
Register the custom viewer:
import { NgModule } from '@angular/core'; import { CommonModule } from '@angular/common'; import { ExtensionService, provideExtensionConfig } from '@alfresco/adf-extensions'; import { CustomViewerComponent } from './viewer/custom-viewer/customViewer.component'; @NgModule({ imports: [CommonModule, CustomViewerComponent], providers: [provideExtensionConfig(['myorg.my-customization.json'])] }) export class MyCustomizationModule { constructor(extension : ExtensionService) { extension.setComponents({'my-org.components.custom-viewer': CustomViewerComponent, }) } } -
Declare the new viewer in the descriptor:
"viewer" : { "extensions" : [ { "fileExtension": "pdf", "component": "my-org.components.custom-viewer" } ] }