Tutorials associated with the Share Header, which contains the menu and title.
The Share Header is fully implemented in Aikau.
Customizing the Share Header style
Extension Point: Surf Extension Modules
Description:
This tutorial demonstrates how the style used in the Share Header can be changed in an easy way. We will see how the background color, foreground color, and so on. can be customized for the main menu. This tutorial will also introduce you to the Aikau debug mode so you can find out what widgets are available, and the CSS files that they use. Which means you can find out what LESS variables are available to set custom values for.
The main takeaway from this tutorial is that you can easily customize an existing, or custom, theme by redefining LESS variables. And you can easily find out what Aikau widgets that are used for different components in the UI.
Implementation Steps:
A simple and effective way to customize the Share header, and other parts of the Share UI that uses Aikau widgets, is to follow these steps:
- Enable Aikau Debug mode so you can inspect Aikau pages and widgets
- Identify what Aikau widgets that are used to produce the content that should be customized (that is, the Share Header)
- Find out what CSS files that are used by the relevant widgets
- Inspect the CSS files and find out what LESS variables you can work with
- Override an out-of-the-box Theme, or create a custom Theme, by redefining one or more LESS variables
Related Information:
This tutorial assumes that you are familiar with the Share Header, which contains the main menu and the title. The Header is implemented with the new Aikau development framework and it is possible to customize the CSS files used by the Header widgets via LESS variables.
Source Code: Go to code
This tutorial assumes you have created a new SDK All-In-One project.
Tutorial implementation steps:
-
Identify what Aikau widgets that are used to produce the content that should be customized (that is, the Share Header with the Main Menu).
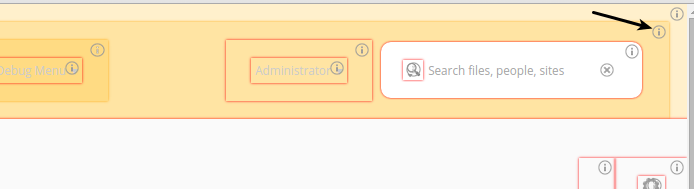
For this we use the Developer View in Share. To enable it select the Debug Menu > Toggle Developer View menu item from the top main menu. The Share UI should change so you see red boxes around Aikau widgets:

Note that it is only the Share Header that has been implemented with Aikau so far, and a few other pages. So the red boxes are only marking content in the Header (Menu and Title), the rest of the Dashboard page, dashlets, footer, and so on. is not implemented in Aikau, and hence not marked. To customize the background color for the main menu we need to click the information icon (i) in the upper right corner of the big black box surrounding the main menu:
Clicking this (i) icon brings up an information box as follows:
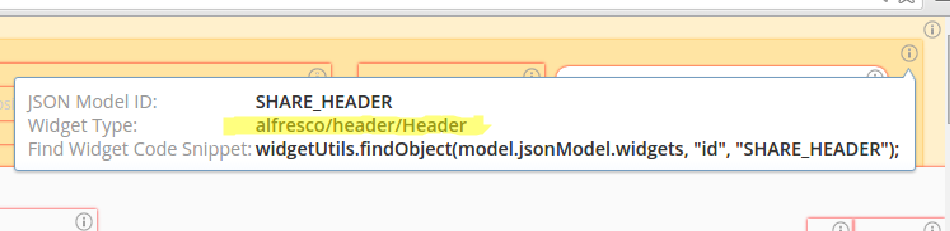
This tells us that the Aikau widget we are looking for is
alfresco/header/Header. To find out what stylesheet (CSS) it uses we can lookup the widget source code online (Aikau is open source). Navigate to the documentation site for Aikau (http://dev.alfresco.com/resource/docs/aikau-jsdoc/), and then search for the widget there. In the source code you should see what CSS file it uses by looking at thecssRequirements: [{cssFile:"./css/Header.css"}]variable.We can find out more about this CSS file by looking at the full source code on GitHub. Here we can see a number of CSS classes that control the style of the header, which contains the menu and title:
.@{alfresco} .alf-home-icon {
   background: url("./images/home.png");
   background-repeat: no-repeat;
   height: 16px;
   width: 16px;
   display: block;
   float: left;
}

.@{alfresco} .navigation-menu {
   margin-top: 23px;
}

.@{alfresco} .title-menu {
   margin-top: 23px;
}

.@{alfresco} .alfresco-header-Header {
   background-color: @header-primary-background-color;
   color: @header-primary-font-color;
   font-family: Open Sans,arial,helvetica,clean,sans-serif;
   padding: 0;
   width: auto;
}

/* Sets the highlight on the menu bar items in the header bar ONLY */
.@{alfresco} .alfresco-header-Header .alfresco-menus-AlfMenuBar .dijitMenuPassive .dijitMenuItemHover {
   background-color: @header-hover-background-color;
   color: @header-hover-font-color;
}
. . .
What we should be looking for here are so called LESS variables. These are our way into customizing the Header component style.
Warning: It might be tempting to override these CSS classes with a custom CSS file, such as this:
.alfresco-share .alfresco-header-Header {
    background-color: #799212; /* Overriding the black background color */
}
This should be avoided as this will make upgrades very difficult and it is not supported. LESS variables and themes are the supported way to change the style of Share.
Looking at the Header CSS file we can see that there are quite a few LESS variables that we can work with:
@header-primary-background-color
@header-primary-font-color
@header-hover-background-color
@header-hover-font-color
@header-focus-background-color
@header-focus-font-color
@header-menubar-font-color
@header-dropdown-menu-font-color
What LESS variables that are available differs slightly between versions of Share, and what Aikau version that is brought in. The best thing you can do is, find out what exact version of Aikau that is being used, for example
aikau-1.0.25.2.jar(checktomcat/webapps/share/WEB-INF/lib). Then make sure it is a version that is newer than Aikau version 1.0.18, which was the first version to introduce LESS. You can find theHeader.cssfile in the/META-INF/js/aikau/<aikau version>/alfresco/header/css/directory in the JAR file, which means that you can check exactly what LESS variables are available for you to use. -
Decide if you want to customize an existing theme or use a custom theme.
Customizing the style of the header can be done either by overriding an existing theme, such as the Green Theme, or by creating a new custom theme. In this exercise we will customize the out-of-the-box Green Theme. If we are just customization LESS variables, and we don’t need to change anything else in the Green Theme, then it is enough to just create a Green Theme XML file and override the LESS variables. There is no need to copy over the complete theme directory like when creating a custom theme.
-
Create a new themes directory under the
aio/aio-share-jar/src/main/resources/alfresco/web-extension/site-datadirectory.This is the standard directory in the Spring Surf model for theme files.
-
Create a new Green Theme XML file called
greenTheme.xmlin the themes directory.This file will contain the overridden LESS variables. It is important that the file name is the same as it is for the Green Theme in the Share webapp, see
tomcat/webapps/share/WEB-INF/classes/alfresco/site-data/themes. Otherwise we will not be overriding the Green Theme but instead start creating a custom theme. -
Override the required LESS variables.
Overriding the default values for the LESS variables, which are defined in the defaults.less file in Aikau, is currently done by adding a particular element to the Theme XML file. A Theme is defined by an XML file that lives in the
themessub-folder of the client’s Surf configuration folder. In our example thegreenTheme.xmlfile looks like this:<?xml version='1.0' encoding='UTF-8'?> <theme> <title>Green Theme Override</title> <title-id>theme.greenTheme</title-id> <css-tokens> <!-- Aikau related LESS variables (requires Aikau 1.0.18 or newer) --> <less-variables> @header-background-color: #799212; @header-font-color: #ccc; @header-hover-background-color: orange; @header-hover-font-color: green; @header-focus-background-color: yellow; @header-focus-font-color: red; @header-menubar-font-color: pink; @header-dropdown-menu-font-color: purple; </less-variables> </css-tokens> </theme> -
The implementation of this sample is now done, build and start the application server as follows:
/all-in-one$ ./run.sh build_start -
Now, log in to Share (
http://localhost:8080/share) and change them to Green Theme (via the Share Admin Tools). You should then see the main menu with the green background color, pink font color, and other changes:
Customizing the Share Header menu
The Share header menu can be readily customized. For example, you can add or remove menu items.
In this tutorial you use the SDK All-In-One project. The tutorial assumes you are using an IDE to edit the Maven project files. You should also be familiar with the Introducing SurfBug topic.
You are going to add several customizations to the Share header menu. The tutorial is split into several parts.
Customizing the admin tools menu
This tutorial shows you how to customize the Share header admin tools menu item.
In this tutorial you add several customizations to the Share Header Menu. Your customization will be implemented as a Surf Extension Modules.
-
Create a new SDK All-In-One project.
-
In the
aio/aio-share-jar/src/main/resources/alfresco/web-extension/site-webscriptsfolder create a new folder calledtutorialsNote:
tutorialsis the path to the web script in this case, you can use a different path if required. -
In your IDE, navigate to the new
tutorialsfolder and create a new webscript file calledshare-header.get.jswith the following contents:// Find the admin menu - it'll only be present if the current user is Admin... var adminMenu = widgetUtils.findObject(model.jsonModel, "id", "HEADER_ADMIN_CONSOLE"); if (adminMenu != null) { // Change the widget to a menu bar popup adminMenu.name = "alfresco/header/AlfMenuBarPopup"; // Remove the targetUrl attribute - this isn't strictly necessary but is "cleaner" delete adminMenu.config.targetUrl; // Add a new "widgets" array to the configuration... adminMenu.config.widgets = [ { name: "alfresco/menus/AlfMenuGroup", config: { label: "Tools", // I'm not bothering with localisation - but you could get localised values using msg.get("..") widgets: [ { name: "alfresco/header/AlfMenuItem", config: { label: "Application", targetUrl: "console/admin-console/application" } }, { name: "alfresco/header/AlfMenuItem", config: { label: "Category Manager", targetUrl: "console/admin-console/category-manager" } }, { name: "alfresco/header/AlfMenuItem", config: { label: "Node Browser", targetUrl: "console/admin-console/node-browser" } }, { name: "alfresco/header/AlfMenuItem", config: { label: "Tag Manager", targetUrl: "console/admin-console/tag-management" } } ] } }, { name: "alfresco/menus/AlfMenuGroup", config: { label: "File Management", widgets: [ { name: "alfresco/header/AlfMenuItem", config: { label: "Trashcan", targetUrl: "console/admin-console/trashcan" } } ] } }, { name: "alfresco/menus/AlfMenuGroup", config: { label: "Content Publishing", widgets: [ { name: "alfresco/header/AlfMenuItem", config: { label: "Channel Manager", targetUrl: "console/admin-console/channel-admin" } } ] } }, { name: "alfresco/menus/AlfMenuGroup", config: { label: "Repository", widgets: [ { name: "alfresco/header/AlfMenuItem", config: { label: "Replication Jobs", targetUrl: "console/admin-console/replication-jobs" } } ] } }, { name: "alfresco/menus/AlfMenuGroup", config: { label: "Users and Groups", widgets: [ { name: "alfresco/header/AlfMenuItem", config: { label: "Groups", targetUrl: "console/admin-console/groups" } }, { name: "alfresco/header/AlfMenuItem", config: { label: "Users", targetUrl: "console/admin-console/users" } } ] } } ]; } -
In your IDE navigate to the
aio/aio-share-jar/src/main/resources/alfresco/web-extension/site-data/extensionsfolder, and create a new extension file calledcustom-header-extension.xmlthat contains the following extension definition:<extension> <modules> <module> <id>Custom Share Header Menu</id> <version>1.0</version> <customizations> <customization> <targetPackageRoot>org.alfresco.share.header</targetPackageRoot> <sourcePackageRoot>tutorials</sourcePackageRoot> </customization> </customizations> </module> </modules> </extension> -
To build and run the new Surf extension module see working with an AIO project.
-
Note: The extension module needs to be deployed before it will be visible. In your browser, go to
http://localhost:8080/share/service/modules/deploy.You see a list of available Modules and a list of deployed Modules.
-
Select Custom Share Header Menu and click Add to move it into the Deployed Modules list.
-
Click Apply Changes.
Note that the Last update time stamp changes. You only need to do this action once as Module Deployment data is saved into the repository.
- Now log back in to Share and click on the Admin Tools menu item - you can see it is now a drop-down menu list.
Customizing the Sites menu
This tutorial shows you how to customize the Share header menu sites item.
You should complete the previous tutorial before attempting this one.
In this tutorial you will customize the Share main menu so that the Sites menu item includes additional functionality. The Sites menu item is modified so that if a site under Recent Sites is selected, then the individual pages of that site are displayed as additional menu items, allowing you to navigate directly to a specific site page. Individual pages displayed include Site Dashboard, Document Library and Site Members.
-
Navigate to the
aio/aio-share-jar/src/main/resources/META-INF/resources/aio-share-jar/js/tutorialsfolder. -
Create a new file
SitesMenu.jsin the tutorials folder with the following contents:define(["dojo/_base/declare", "alfresco/header/AlfSitesMenu", "alfresco/core/CoreXhr", "dojo/_base/lang", "dojo/_base/array", "dojo/aspect", "dijit/registry", "alfresco/menus/AlfMenuGroup", "alfresco/header/AlfMenuItem", "alfresco/header/AlfCascadingMenu", "dojo/dom-style", "dijit/popup"], function(declare, AlfSitesMenu, AlfXhr, lang, array, aspect, registry, AlfMenuGroup, AlfMenuItem, AlfCascadingMenu, domStyle, popup) { return declare([AlfSitesMenu, AlfXhr], { /** * Adds an individual menu item. * * @instance * @param {object} group The group to add the menu item to * @param {object} widget The menu item to add * @param {integer} index The index to add the menu item at. */ _addMenuItem: function tutorials_SitesMenu___addMenuItem(group, widget, index) { if (group == this.recentGroup) { // Create a basic group for holding the favourites... var sitePageList = new AlfMenuGroup({ widgets: [{ name: "alfresco/header/AlfMenuItem", config: { label: "Loading..." } }] }); // Create the cascading menu item to popout the favourites list... var siteCascade = new AlfCascadingMenu(widget.config); // Set up the sites cascading popup to asynchronously load the pages upon request... siteCascade.popup.onOpen = dojo.hitch(this, "loadSitePages", widget.config.siteShortName, sitePageList); // Add the list into the cascading menu... siteCascade.popup.addChild(sitePageList); // Add the default menu items... group.addChild(siteCascade); } else { // If we're not adding a Recent Sites menu item then just default to the normal action this.inherited(arguments); } }, /** * This variable will be used to keep track of which sites pages have been loaded. It is initialised * to null and populated as page data is loaded. * * @instance * @type {object} * @default null */ _sitePagesLoaded: null, /** * This function is hitched to the each sites cascading menu so that when it is clicked a XHR request is made * to retrieve the pages for the site. * * @instance * @param {string} siteShortName The short name of the site to load the pages for * @param {object} sitePageList A reference to the alfresco/menus/AlfMenuGroup widget that the site pages should be added to */ loadSitePages: function tutorials_SitesMenu__loadSitePages(siteShortName, sitePageList) { if (this._sitePagesLoaded != null && this._sitePagesLoaded[siteShortName] == true) { this.alfLog("log", "Site pages already loaded for: " + siteShortName); } else { this.alfLog("log", "Loading pages for site: " + siteShortName); this.serviceXhr({url : Alfresco.constants.URL_SERVICECONTEXT + "tutorials/site/" + siteShortName, method: "GET", siteShortName: siteShortName, // Including the site short name will make it available in the "sitePagesLoaded" callback "originalRequestConfig" sitePageList: sitePageList, // ...as will the sitePageList menu group successCallback: this.sitePagesLoaded, callbackScope: this}); } }, /** * This function is "hitched" from the serviceXhr call in the "loadSitePages" function and handles the response * from the asynchronous request to get site pages. It clears the original "Loading..." menu item and adds in * each of the site page links. * * @instance * @param {object} response The response from the request * @param {object} originalRequestConfig The configuration passed on the original request */ sitePagesLoaded: function tutorials_SitesMenu__loadSitePages(response, originalRequestConfig) { this.alfLog("log", "Site pages data loaded successfully", response); // Initialise the object that keeps track of which pages have been loaded if it has not // previously been initialised... if (this._sitePagesLoaded == null) { this._sitePagesLoaded = {}; } // Record that the site pages have been loaded to prevent them from being loaded again... this._sitePagesLoaded[originalRequestConfig.siteShortName] = true; // Check for keyboard access by seeing if the first child is focused... var focusFirstChild = (originalRequestConfig.sitePageList && originalRequestConfig.sitePageList.getChildren().length > 0 && originalRequestConfig.sitePageList.getChildren()[0].focused); // Remove the loading item... array.forEach(originalRequestConfig.sitePageList.getChildren(), function(widget, index) { originalRequestConfig.sitePageList.removeChild(widget); }); // Add the site pages... if (response.sitePages && response.sitePages.length > 0) { array.forEach(response.sitePages, function(sitePage, index) { this.alfLog("log", "Adding site page menu item", sitePage); var item = new AlfMenuItem(sitePage); originalRequestConfig.sitePageList.addChild(item); }, this); } else { // TODO: Should add some error handling here - but has been left out as Example for Blog post only covers "golden path" } if (focusFirstChild) { // Focus the first site page... originalRequestConfig.sitePageList.focusFirstChild(); } } }); }); -
Edit the file
aio/aio-share-jar/src/main/resources/alfresco/web-extension/site-webscripts/tutorials/share-header.get.js, created in the previous tutorial, and add the following code at the end of the file://Find the "Sites" menu... var sitesMenu = widgetUtils.findObject(model.jsonModel, "id", "HEADER_SITES_MENU"); if (sitesMenu != null) { // Change the widget to our custom menu... sitesMenu.name = "tutorials/SitesMenu"; } -
Create a new XML file in the folder
aio/aio-share-jar/src/main/resources/alfresco/web-extension/site-webscripts/tutorialscalledsite-pages.get.desc.xml, with the following content:<webscript> <shortname>Get the pages for the requested site</shortname> <description>This WebScript is added to allow the tutorials/SitesMenu widget to asynchronously request the page for each site</description> <url>/tutorials/site/{shortname}</url> <format default="json"></format> </webscript> -
In the same folder create a new JavaScript file called
site-pages.get.js, with the following content:<import resource="classpath:/alfresco/site-webscripts/org/alfresco/share/imports/share-header.lib.js"> // We need to set up a fake page structure to allow the page-centric imported function to work... page = { url: { templateArgs: { site: url.templateArgs.shortname}}}; // Create a new object in the model for the pages and add in the default dashboard page... model.pages = [ { label: msg.get("page.siteDashboard.title"), targetUrl: "site/" + url.templateArgs.shortname + "/dashboard" } ] // Call the "getSitesPages" function imported from the "share-header.lib.js" file... // Iterate over the configured pages and add the details to the model... var pages = getSitePages(); if (pages != null) { for (var i=0; i<pages.length; i++) { model.pages.push({ label: (pages[i].sitePageTitle) ? pages[i].sitePageTitle : pages[i].title, targetUrl: "site/" + url.templateArgs.shortname + "/" + pages[i].pageUrl }); } } // Finally push in the "site-members" page (the other default page)... model.pages.push({ label: msg.get("page.siteMembers.title"), targetUrl: "site/" + url.templateArgs.shortname + "/site-members" }); -
Create a new file in the same folder called
site-pages.get.json.ftl, with the following content:<#escape x as jsonUtils.encodeJSONString(x)> { "sitePages": [ <#list pages as page> { "label": "${page.label}", "targetUrl": "${page.targetUrl}" }<#if page_has_next>,</#if> </#list> ] } </#escape>You have now created the three essential pieces of the web script - the JavaScript code, the FreeMarker template and the web script definition file.
-
To build and run the updated Surf extension module see working with an AIO project.
-
Now log back in to Share and select the Sites menu item. Click a site under Recent Sites. You will see that there are now additional menu items including Site Dashboard, Document Library, and Site Members. Click on one of these menu items to test it. For example, if you click on the Site Members items you will be taken to the Site Members page for that site.
Removing a menu item
This tutorial shows you how to remove menu items.
You should complete the previous tutorials before attempting this one.
In this tutorial you customize the Share header menu. In the previous two tutorials you saw how to add menu items and
customize them. In this one you learn how to remove menu items. This is demonstrated using two different techniques:
using a built-in helper function,widgetUtils.deleteObjectFromArray, and through configuration exposed by
the alfresco/header/AlfSitesMenu widget.
-
In the first part of this tutorial you use the helper function
widgetUtils.deleteObjectFromArrayto remove menu items. This function takes three arguments:- The object to remove the widget definition from (you can typically just use
model.jsonModel) - The attribute to search for (you should use
id) - The value to match against the target attribute (the
idattribute of the widget definition to remove)
For example, to remove the My Files link from the menu bar you would include the following code in the file
share-header.get.js(see the two previous tutorials):widgetUtils.deleteObjectFromArray(model.jsonModel, "id", "HEADER_MY_FILES");Try this out by removing the My Files menu item.
- The object to remove the widget definition from (you can typically just use
-
In your IDE edit the file
share-header.get.jsthat you created in the previous tutorials. -
At the end of the file add the following code:
widgetUtils.deleteObjectFromArray(model.jsonModel, "id", "HEADER_MY_FILES");Save the file.
-
To build and run the updated Surf extension module see working with an AIO project.
-
Log in to Share, you will see that the My Files menu item is no longer present on the main menu.
In this part of the tutorial you have seen how to use the helper function to remove a menu item. Note your code could have been more complex. For example, to hide MyFiles for users who are not admins you could use the following code:
if (!user.isAdmin) { widgetUtils.deleteObjectFromArray(model.jsonModel, "id", "HEADER_MY_FILES"); } -
In this part of the tutorial you see how to remove items from the Sites drop-down menu. Although you saw how to customize the Sites menu in the previous tutorial, you can also use configuration attributes that allow the easy removal of Site menu items.
These boolean attributes are as follows:
Attribute Description showCreateSite Controls whether the Create Site menu item is displayed. showSiteFinder Controls whether the Site Finder menu item is displayed. showUsefulGroup Controls whether the Useful menu group is displayed. Will override showCreateSite,showSiteFinderandshowFavourites.showRecentSites Controls whether the Recent Sites menu group is displayed. showFavourites Controls whether the Favourites menu item and favourite controls (such as add/remove) are displayed. For example, to hide the Site Finder, you would include the following code in
share-header.get.js:// Find the "Sites" menu... var sitesMenu = widgetUtils.findObject(model.jsonModel, "id", "HEADER_SITES_MENU"); if (sitesMenu != null) { // Hide the site finder... sitesMenu.config.showSiteFinder = false; } -
In your IDE edit the file
share-header.get.jsthat you created in the previous tutorials. -
At the end of the file add the following code:
// Find the "Sites" menu... var sitesMenu = widgetUtils.findObject(model.jsonModel, "id", "HEADER_SITES_MENU"); if (sitesMenu != null) { // Hide the site finder... sitesMenu.config.showSiteFinder = false; }Save the file.
-
To build and run the updated Surf extension module see working with an AIO project.
-
Log in to Share. Select the Sites menu item from the main menu bar, you will see that the Site Finder is no longer present on the drop-down menu.
In this tutorial, you used two techniques for removing menu items from the main header menu bar.