You now have a choice of selecting your organization’s user interface experience: Salesforce Classic UI or the new Salesforce Lightning UI.
The Lightning Experience offers a more streamlined user experience by providing tools to create components that are reusable across applications and devices.
To begin, install the AMP files and then install the app in Salesforce. Depending on what’s the best layout for your organization, choose one of the following UIs:
Prerequisites
There are a number of software requirements for using the Salesforce Connector.
See Supported platforms for specific versions.
Alfresco requirements
- Alfresco Content Services
- Identity Service (if you plan to use Single Sign On (SSO))
Note: Support for Salesforce Community is only available when using Alfresco Cloud (PaaS).
Salesforce requirements
Salesforce Group is the minimum requirement. See Salesforce Connected Apps for guidance on levels of Salesforce required with connected apps.
Java requirements
- OpenJDK 17.
Other requirements
Your Salesforce and Alfresco instances must be on a shared network or otherwise accessible in order to share information.
Support for multiple Salesforce organizations
Starting from version 3.1, the Salesforce Connector provides support for multiple Salesforce organizations (or instances) adds the ability to connect a single Content Services instance to multiple Salesforce organizations. This may be a combination of Production and Sandbox organizations. The detailed steps are included in Step 4 of the installation steps for the Salesforce Classic and Lightning Experience.
Step 1: Install AMP files
Download and install the AMP files to connect to Salesforce.
Make sure you are running the correct versions of operating system and software before you install the AMP files. See Prerequisites for using Salesforce Connector for more information.
-
Stop the Alfresco server.
-
Browse to Hyland Community, download and unzip the Salesforce zip package.
-
Copy the provided AMP files to the Alfresco
ampsandamps_sharedirectories.Copy this file to the
ampsdirectory:alfresco-content-connector-for-salesforce-repo-3.1.x.amp
Copy this file to the
amps_sharedirectory:alfresco-content-connector-for-salesforce-share-3.1.x.amp
-
To install the AMP files, run the
apply_amps.batfile from the Alfrescobindirectory.Check the output from the script to ensure that the AMP files have installed successfully.
-
Restart the Alfresco server.
-
If you are running Alfresco One 5.1 or later, check for any
Aikau * Module Config.xmlfiles, and delete them.Use the Node Browser (
http://host:port/alfresco/s/enterprise/admin/admin-nodebrowserfor Alfresco One 5.0 andhttp://host:port/alfresco/s/admin/admin-nodebrowserfor Alfresco One 5.1) using thisxpath:/app:company_home/st:sites/cm:surf-config/cm:module-deployments -
Locate the
share-config-custom.xml.samplefile.This sample configuration file is shipped with in Salesforce zip file and shows the required rules (and properties) that need to be added to the
CSRFPolicyto allow Salesforce logouts.-
If you are using Alfresco Share as your service provider, and you have custom
CSRFPolicyconfigurations in your installation, copy and paste theSALESFORCE SPECIFIC CONFIGsection of the sample file into your customCSRFPolicyfilter, and save. -
If you have a
share-config-custom.xmlfile in your Alfresco Share installation, merge the contents ofshare-config-custom.xml.sampleinto yourshare-config-custom.xmlfile, and save. -
Alternatively, if you do not have a
share-config-custom.xmlin your Alfresco Share installation, renameshare-config-custom.xml.sampletoshare-config-custom.xml. -
Review the details in the
CSRFPolicysection for accuracy.
-
-
Test that the AMPs have been applied successfully.
Using your administrator logon, go to:
http://localhost:8080/alfresco/s/enterprise/admin/admin-salesforcewhere
localhostis your Alfresco host name, and8080is your port number. You’ll see the Salesforce settings that you will need to link Alfresco to Salesforce. -
Create a new site to hold your Salesforce content.
Log on to Alfresco:
http://localhost:8080/sharewhere
localhostis your Alfresco host name, and8080is your port number. Follow these instructions: Creating sites. You can use this as your default site for Salesforce.
Step 2: Install the Salesforce connector app
The Alfresco Content Connector app is available on the Salesforce AppExchange.
This task assumes that you are installing the app through the AppExchange.
If you’ve been provided a URL to install the Salesforce Connector, log in to Salesforce, and paste the URL you’ve been given into your browser. Select the required security level option, click Install, and then click Done when the installation is complete.
-
Search for Alfresco Content Connector in the Salesforce AppExchange, and download the app.
Note: You’ll need to log in the AppExchange first.
-
Click Get it Now to download.
-
Confirm whether you want to Install in production or Install in sandbox environment.
Selecting Install in production will install the Alfresco Content Connector to your live Salesforce environment.
-
Read the terms and conditions then click Confirm and Install.
Note: You might be prompted to re-enter your Salesforce login details.
The Package Installation Details screen displays the package details, including the package name, version name, version number, the publisher name, description of the application, and the package components.
-
Click Continue.
-
Select the required security level option in the Choose security level screen.
You have three options:
- Install for Admins Only
- Install for All Users
- Install for Specific Profiles…
Note: Selecting a security level can have an effect on future usage. When choosing a level you may be required to manually adjust permissions for users, profiles, or permission sets along with adding those users, profiles, and permission sets directly on classes, Visualforce pages, and/or the Connected App Definition.
Specifically, you may need to adjust permissions on the
AlfrescoCanvasLifeCycleHandlerand add the API Enabled permission on a profile.Permission Sets and Profiles can also be used with the Connected App Definition to control who can see/use the Connector within a page layout.
Consult with your Salesforce Admin in your organizations best practices when applying permissions.
-
Click Next, then on the next screen click Install.
-
Click Done when the installation is complete.
After a few seconds the Install Complete screen displays confirming that the Alfresco Content Connector is installed.
From here you can choose to View Components, View Dependencies, or Uninstall.
Depending on what’s the best layout for your organization, you can choose either to Install the Salesforce Connector - Lightning Experience or Install the Salesforce Connector - Classic.
Install Salesforce Connector - Lightning Experience
Use this information to install the AMP files in Alfresco, and the Alfresco App in Salesforce with the Lightning Experience UI.
Step 3: Configure app in Salesforce
After you’ve installed the app, create a new connected app definition using the Salesforce Setup menu.
Make sure that you’ve downloaded the Alfresco Content Connector app, as described in Step 2: Install the app in Salesforce. In this task, you’ll use the Setup menu in Salesforce to customize the install. You need administrator rights to make these changes.
-
In your Salesforce account, find Setup. This is accessible by clicking the gear icon,
 , from the top-right toolbar on the Salesforce page.
See Explore the Salesforce Setup Menu for more guidance on where to find this.
Search for Apps in the Quick Find search bar, and click App Manager to see your installed apps.
-
Click New Connected App to create a new connected app.

This new app extends the standard connector to work for your organization. Use the following settings:
- Connected App Name: Name your app something memorable and unique; for example,
Alfresco On-Premise -
API Name: Choose a meaningful name. This is the name used by the API and managed packages. The name must be less than or equal to 40 characters.
Note: A suggested name is
Alfresco_for_Salesforce. You’ll need to remember the API Name when you configure the Alfresco Setup tab.Note: If this is not set up correctly, you’ll see an error message. See Troubleshooting for guidance.
- Contact Email: Enter an administrator email address.
- Check Enable OAuth Settings.
- Callback URL: this field is not used, but does need to be completed. You can set this to
https://www.alfresco.com/dummy_callback. -
In Selected OAuth Scopes add the following scopes:
Full access (full)Perform requests on your behalf at any time (refresh_token, offline_access)
- Check Force.com Canvas.
-
In Canvas App URL, enter a secure (https) URL that points to the Alfresco Share environment, that you have configured with the Alfresco Content Connector. You also need a suffix of
share/page/sfdc/canvas/signedrequest. For example:https://localhost:8443/share/page/sfdc/canvas/signedrequest - Access Method: Select Signed Request (POST)
-
Add these Locations:
Chatter TabLayouts and Mobile CardsLightning ComponentVisualforce Page
These are locations in Salesforce where the canvas app can be displayed.
- In Lifecycle Class, look up the options and select
AlfrescoCanvasLifeCycleHandler. - Click Save to save your settings.
Next, you’ll need to manage the connected app that you’ve just created.
- Connected App Name: Name your app something memorable and unique; for example,
-
For the new connected app, click Manage to set permissions and accessibility.
-
In the OAuth policies section, enter these values:
- Permitted Users: Select
Admin approved users are pre-authorized. Click OK to accept the Salesforce message. - IP Relaxation: Select
Enforce IP restrictions. - Refresh Token Policy: Select the
Refresh token is valid until revokedradio button. - Save your settings.
- Permitted Users: Select
-
In the Manage Profiles section, click Manage Profiles, check the required profiles, and Save your settings.
For example, select
System AdministratorandStandard User. We’ll now find the consumer secret ready to paste into Alfresco.
Step 4: Enable Salesforce in the Admin Console
You’ll need to copy the Salesforce consumer key and consumer secret from your connected app into the Alfresco Admin Console. These credentials prove that Alfresco has permission to be displayed in and communicate with Salesforce.
Make sure that you’ve applied your AMP files, downloaded the Alfresco Content Connector app, and created a connected app, as described in the previous sections. You need administrator rights to make these changes.
-
In your Salesforce account, click the gear icon
from the top-right toolbar on the Salesforce page, and click Setup Home. -
Under PLATFORM TOOLS, click Apps > App Manager.
-
On the Lightning Experience App Manager screen, click the down-arrow icon for the app that you created in Step 3: Configure the app in Salesforce and select View.

-
In the API (Enable OAuth Settings) section, click Manage Consumer Details to reveal the Consumer Key and Secret. You’ll return to this screen to copy the code for both fields.

-
In a separate browser window, log on to the Salesforce page of the Alfresco Admin Console with your administrator credentials:
http://localhost:8080/alfresco/service/enterprise/admin/admin-salesforcewhere
localhost:8080is your Alfresco host name and port. -
In the Admin Console window, click Add Connection.
A new window opens that allows you to enter the Salesforce Organization Id, Salesforce Consumer Token, and Salesforce Consumer Secret.
-
Paste your Salesforce Org Id into Salesforce Org Id.
Here’s how to find your Organization Id in your Salesforce account:
- Navigate to Salesforce Settings.
- Click on Company Settings.
-
Select Company Information.
The Salesforce.com Organization Id is shown in this window.
-
From the Salesforce window, copy your Consumer Key and paste it into the Admin Console Salesforce Consumer Token.
-
From the Salesforce window, copy your Consumer Secret and paste it into the Admin Console Salesforce Consumer Secret.
You can optionally hide the password when you have pasted it into the Admin Console.
-
Select the Salesforce Environment Type that Alfresco should use.
There are two options:
Production(the default value) andSandbox:
-
Save the new connection by clicking the Save button.
-
(Optional) You can change the list size of records that are displayed.
Enter a number in Recently Viewed Records List Size to specify how many recent Salesforce records are displayed when you link an Alfresco file or folder with a record. The default setting is
20records.Note: Alternatively, you can set this in your
alfresco-global.propertiesfile usingsfdc.canvas.recordMruSize.For example:
sfdc.canvas.recordMruSize=10 -
Save your settings.
Once a connection is created, you can add additional connections, if needed. You can also remove or update an existing connection. Removing a connection won’t remove any content.
Important:
- Upgrading the Salesforce Connector requires you to re-add any previous connections.
- Re-adding the connection won’t affect any content that you’ve previously added through the Salesforce Connector.
In the Salesforce Record Folder, you’ll now see a new metadata field: Organization Id. This can help you differentiate Salesforce records added through different Salesforce organizations. A link is also added in the folder description of the Salesforce Record, if no other value is currently present. This link allows you to directly navigate to the Salesforce Record.
Step 5: Add an Alfresco site and map metadata in Salesforce
Configure the Alfresco site that you want to point to, and map your metadata.
Make sure that you’ve downloaded the Alfresco Content Connector app, as described in Step 2:. Install the app in Salesforce. You need administrator rights to make these changes.
-
In Salesforce, click Alfresco Content Connector. This is available from the App Launcher.
-
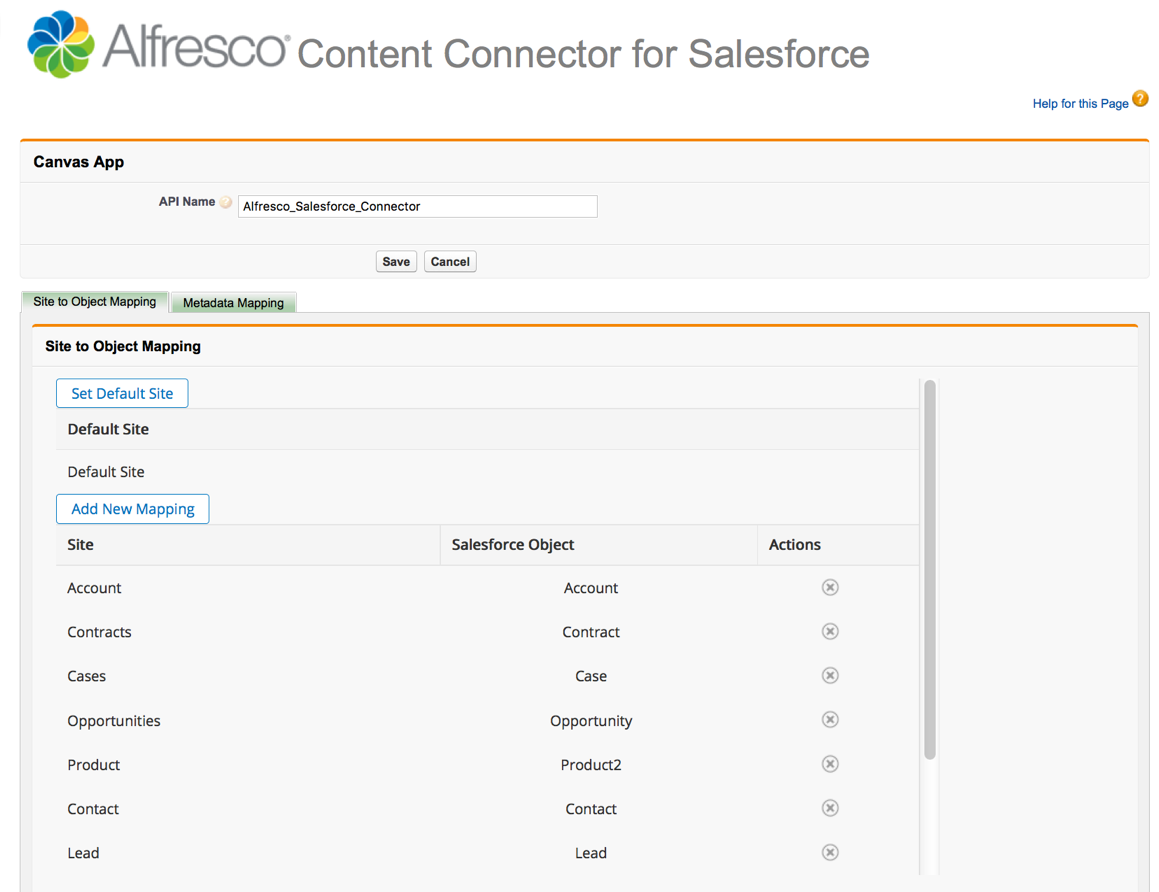
Click the Alfresco Setup tab and in API Name, enter the API name of the connected app definition you created in Step 3: Configure the app in Salesforce.
Note: The API name must be less than or equal to 40 characters.
If your API name appears as
Alfresco_Content_Connector_for_Salesforce, then you must to change it toAlfresco_for_Salesforce.This sets the Alfresco site that you want to use for your content. If this isn’t set up correctly, you’ll see an error message. See Troubleshooting for guidance.
-
You’ll see two tabs; Site to Object Mapping and Metadata Mapping. Select a tab and you’ll see the Alfresco login screen. Log in to your connected Alfresco instance.
This is a sample screen, before logging in:

The Site to Object Mapping and Metadata Mapping tabs set where Salesforce puts content in Alfresco.
Note: Metadata mapping is available with Alfresco One 5.1 and later versions only.
It can take a little while for Alfresco to load the first time you log in, or after an Alfresco server restart.
-
In Site to Object Mapping:
-
Click Set Default Site and choose the site that you want to set as the default entry point for your organization, and Save.
-
Click Add New Mapping to specify where content of a specific Salesforce object type should be stored in Alfresco. Pick a site and an object type that maps to that site.
For example, you can map documents with a Contracts object type to a site that contains only contracts in Alfresco, or you can map sensitive HR data to an HR object type. Your mappings are then displayed in a table.
-
-
In Metadata Mapping:
-
Choose a Salesforce object and select from the list of associated properties.
This defines what Salesforce properties or metadata that you want to share with Alfresco.
-
Click OK.
A new Salesforce object type is created, with a matching Alfresco model with an associated aspect, and the specified properties. This creates a new model in Alfresco.
You can enable or disable an object model. If a model is:
Enabled: metadata is synchronized with the Alfresco object model.Disabled: metadata can’t be synchronized with the Alfresco object model.
Note: Models are inactive when they are added to Salesforce, and can be deleted while they’re inactive. A model can be explicitly activated and deactivated. A model can be deleted only if it’s deactivated and has not been used. If the model has been used and a user attempts to delete it, an error message is issued explaining that it can’t be removed. See Content modeling with Model Manager for more.
Note: Do not edit the prefix of a Salesforce model, as this can make your model unusable. Also, do not update the model in the Model Manager in Share.
Here is an example of a completed Alfresco Setup tab:
-
Step 6: Add the Alfresco app using a Salesforce Lightning Component
To allow the Alfresco Content Connector to appear in the Lightning experience view of Salesforce you need to add a Salesforce lightning component.
Make sure that you’ve downloaded the Alfresco Content Connector app, as described in Step 2: Install the app in Salesforce. You need administrator rights to make these changes. You also need to have a custom Salesforce domain that has been deployed and activated for your users, for more see Configure SSO for Salesforce.
To create the Lightning Component follow these steps:
-
Login to Salesforce Lightning view with an administrator account.
-
Click the gear icon
from the top-right toolbar on the Salesforce page and select Developer Console. -
Go to File > New > Lightning Component.
You will see the New Lightning Bundle window.
-
Enter a Name and a Description and click Submit.
Note: You do not need to select any of the check boxes.
-
Select the Component part of the bundle by clicking COMPONENT in the right hand pane.
-
Remove any code already in there, and copy and paste the following code snippet into the window.
<aura:component implements="flexipage:availableForRecordHome,force:hasRecordId,force:hasSObjectName"> <aura:attribute name="canvasParameters" type="string" /> <aura:handler name="init" value="{!this}" action="{!c.doInit}"/> <force:canvasApp developerName="THE NAME OF YOUR CANVAS APP" height="450px" width="1300px" parameters="{!v.canvasParameters}"/> </aura:component> -
Edit the code and add the name of your Canvas App as the value of the
developerNameproperty. -
Select the Controller part of the bundle by clicking CONTROLLER in the right hand pane.
-
Remove any code already in there, and copy and paste the following code snippet into the window.
({ doInit : function(cmp, evt, helper) { var recordId = cmp.get("v.recordId"); var sObjectName = cmp.get("v.sObjectName"); cmp.set("v.canvasParameters", JSON.stringify({ recordId: recordId, type: sObjectName })); } }) -
Click File and Save All.
-
Edit your Record page by clicking the gear icon
and then clicking Edit. -
Under the Custom heading in the left hand pane drag over and then drop the component into the desired location on the Activity tab of the Record page.
Note: If your Component is not visible you will see a message that will instruct you to deploy your domain.
-
Click the Activation button on the top right, to activate your change.
Review the Activation Opportunity Record Page and assign the level you want for this component.
-
Click Close.
-
Click the Save button on the top right and then the Salesforce Back button directly above it.
The component is now ready to use.
Install Salesforce Connector - Classic
Use this information to install the AMP files in Alfresco, and the Alfresco App in Salesforce with the Classic UI.
Step 3: Configure app in Salesforce
After you’ve installed the app, create a new connected app definition using the Salesforce Setup menu.
Make sure that you’ve downloaded the Alfresco Content Connector app, as described in Install the app in Salesforce. In this task, you’ll use the Setup menu in Salesforce to customize the install. You need administrator rights to make these changes.
-
In your Salesforce account, find Setup. This is often on the toolbar or under your name (see Explore the Salesforce Setup Menu for more guidance on where to find this).
Search for Apps in the Quick Find search bar, and in App Setup click Create > Apps to see your installed apps.
-
Scroll down to Connected Apps and click New to create a new connected app.

This new app extends the standard connector to work for your organization. Use the following settings:
- Connected App Name: Name your app something memorable and unique; for example,
Alfresco On-Premise -
API Name: Choose a meaningful name. This is the name used by the API and managed packages. The name must be less than or equal to 40 characters.
Note: A suggested name is
Alfresco_for_Salesforce. You’ll need to remember the API Name when you configure the Alfresco Setup tab.Note: If this is not set up correctly, you’ll see an error message. See Troubleshooting for guidance.
- Contact Email: Enter an administrator email address.
- Check Enable OAuth Settings.
- Callback URL: this field is not used, but does need to be completed. You can set this to
https://www.alfresco.com/dummy_callback. - In Selected OAuth Scopes add the following scopes:
Full access (full)Perform requests on your behalf at any time (refresh_token, offline_access)
- Check Force.com Canvas.
-
In Canvas App URL, enter a secure (https) URL that points to the Alfresco Share environment, that you have configured with the Alfresco Content Connector. You also need a suffix of
share/page/sfdc/canvas/signedrequest. For example:https://localhost:8443/share/page/sfdc/canvas/signedrequest - Access Method: Select
Signed Request (POST) -
Add these Locations:
Chatter TabLayouts and Mobile CardsVisualforce Page
These are locations in Salesforce where the canvas app can be displayed.
- In Lifecycle Class, look up the options and select
AlfrescoCanvasLifeCycleHandler. - Click Save to save your settings.
Next, you’ll need to manage the connected app that you have just created.
- Connected App Name: Name your app something memorable and unique; for example,
-
For the new connected app, click Manage to set permissions and accessibility.
-
In the OAuth policies section, enter these values:
- Permitted Users: Select
Admin approved users are pre-authorized. Click OK to accept the Salesforce message. - IP Relaxation: Select
Enforce IP restrictions. - Refresh Token Policy: Select the
Refresh token is valid until revokedradio button. - Save your settings.
- Permitted Users: Select
-
In the Manage Profiles section, click Manage Profiles, check the required profiles, and Save your settings.
For example, select System Administrator and Standard User. We will now find the consumer secret ready to paste into Alfresco.
Step 4: Enable Salesforce in the Admin Console
You’ll need to copy the Salesforce consumer key and consumer secret and from your connected app into the Alfresco Admin Console. These credentials prove that Alfresco has permission to be displayed in and communicate with Salesforce.
Make sure that you’ve applied your AMP files, downloaded the Alfresco Content Connector app, and created a connected app, as described in the previous topics. You need administrator rights to make these changes.
-
In your Salesforce Setup menu, click Create > Apps, and then the connected app name that you created in Step 3: Configure the app in Salesforce.
-
In the API (Enable OAuth Settings) section, click Manage Consumer Details to reveal the Consumer Key and Secret. You’ll return to this screen to copy the code for both fields.
-
In a separate browser window, log on to the Salesforce page of the Alfresco Admin Console with your administrator credentials:
http://localhost:8080/alfresco/service/enterprise/admin/admin-salesforcewhere
localhost:8080is your Alfresco host name and port. -
In the Admin Console window, click Add Connection.
A new window opens that allows you to enter the Salesforce Organization Id, Salesforce Consumer Token, and Salesforce Consumer Secret.
-
Paste your Salesforce Org Id into Salesforce Org Id.
Here’s how to find your Organization Id in your Salesforce account:
- Navigate to Salesforce Settings.
- Click on Company Settings.
-
Select Company Information.
The Salesforce.com Organization Id is shown in this window.
-
From the Salesforce window, copy your Consumer Key and paste it into the Admin Console Salesforce Consumer Token.
-
From the Salesforce window, copy your Consumer Secret and paste it into the Admin Console Salesforce Consumer Secret.
You can optionally hide the password when you have pasted it into the Admin Console.
-
Select the Salesforce Environment Type that Alfresco should use.
There are two options:
Production(the default value) andSandbox: -
Save the new connection by clicking the Save button.
-
(Optional) You can change the list size of records that are displayed.
Enter a number in Recently Viewed Records List Size to specify how many recent Salesforce records are displayed when you link an Alfresco file or folder with a record. The default setting is 20 records.
Note: Alternatively, you can set this in your
alfresco-global.propertiesfile usingsfdc.canvas.recordMruSize. For example:sfdc.canvas.recordMruSize=10 -
Save your settings.
Once a connection is created, you can add additional connections, if needed. You can also remove or update an existing connection. Removing a connection won’t remove any content.
Important:
- Upgrading the Salesforce Connector requires you to re-add any previous connections.
- Re-adding the connection won’t affect any content that you’ve previously added through the Salesforce Connector.
In the Salesforce Record Folder, you’ll now see a new metadata field: Organization Id. This can help you differentiate Salesforce records added through different Salesforce organizations. A link is also added in the folder description of the Salesforce Record, if no other value is currently present. This link allows you to directly navigate to the Salesforce Record.
Step 5: Add an Alfresco site and map metadata in Salesforce
Configure the Alfresco site that you want to point to, and map your metadata.
Make sure that you’ve downloaded the Alfresco Content Connector app, as described in Step 2: Install the app in Salesforce. You need administrator rights to make these changes.
-
In Salesforce, click Alfresco Content Connector. This is available from the Force.com App Menu.
-
Click the Alfresco Setup tab and in API Name, enter the API name of the connected app definition you created in Configure the app in Salesforce.
Note: The API name must be less than or equal to 40 characters.
If your API name appears as
Alfresco_Content_Connector_for_Salesforcethen you must to change it toAlfresco_for_Salesforce.This sets the Alfresco site that you want to use for Alfresco content. If this is not set up correctly, you’ll see an error message. See Troubleshooting for guidance.
-
You’ll see two tabs; Site to Object Mapping and Metadata Mapping. Select a tab and you’ll see the Alfresco login screen. Log on to your connected Alfresco instance.
This is a sample screen, before logging on to Alfresco:
The Site to Object Mapping and Metadata Mapping tabs set where Salesforce puts content in Alfresco.
Note: Metadata mapping is available with Alfresco One 5.1 and later versions only.
It can take a little while for Alfresco to load the first time you first log in, or after an Alfresco server restart.
-
In Site to Object Mapping:
-
Click Set Default Site and choose the site that you want to set as the default entry point for your organization, and Save.
-
Click Add New Mapping to specify where content of a specific Salesforce object type should be stored in Alfresco. Pick a site and an object type that maps to that site.
For example, you can map documents with a Contracts object type to a site that contains only contracts in Alfresco, or you can map sensitive HR data to an HR object type. Your mappings are then displayed in a table.
-
-
In Metadata Mapping, choose a Salesforce object and select from the list of associated properties.
This defines what Salesforce properties or metadata that you want to share with Alfresco. Click OK and a new Salesforce object type is created, with a matching Alfresco model with an associated aspect, and the specified properties. This creates a new model in Alfresco.
You can enable or disable an object model. If a model is:
Enabled: metadata is synchronized with the Alfresco object model.Disabled: metadata can’t be synchronized with the Alfresco object model.
Note: Models are inactive when they are added to Salesforce, and can be deleted while they are inactive. A model can be explicitly activated and deactivated. A model can be deleted only if it is deactivated and has not been used. If the model has been used and a user attempts to delete it, an error message is issued explaining that it can’t removed. See Content modeling with Model Manager for more.
Note: Do not edit the prefix of a Salesforce model, as this can make your model unusable.
Here is an example of a completed Alfresco Setup tab:
Step 6: Add the Alfresco app in Salesforce
There are two ways to add the Connector in Salesforce Classic: as a Canvas Component or as a Visualforce Page.
Add the Alfresco app in Salesforce (Canvas Component)
Lastly, you’ll need to load the Alfresco canvas app for page layouts. You can add the app to any record type that supports layouts (for example; Accounts, Cases, and Opportunities). This is done by setting Alfresco for Salesforce example page layouts as the default for selected user profiles.
Make sure that you’ve downloaded the Alfresco Content Connector app, as described in Step 2: Install the app in Salesforce. You need administrator rights to make these changes.
-
In your Salesforce account, find Setup. This is often on the toolbar or under your name (see Explore the Salesforce Setup Menu for more guidance on where to find this).
Search for
Page Layoutsin the Quick Find search bar, and in App Setup > Customize, choose the page layout for your selected page type (for example, Accounts). -
Click Edit next to the layout you want and add the Alfresco app to the layout:
-
From the available components in the scrollable window, select Canvas Apps.
-
You might need to add a new section, depending on your page layout.
If you need to add a new section, set it to 1-Column with a minimum height of 350 pixels (400 pixels is the recommended height). Click OK. Drag and drop the section onto your layout, and save the changes, before adding the new canvas app.
-
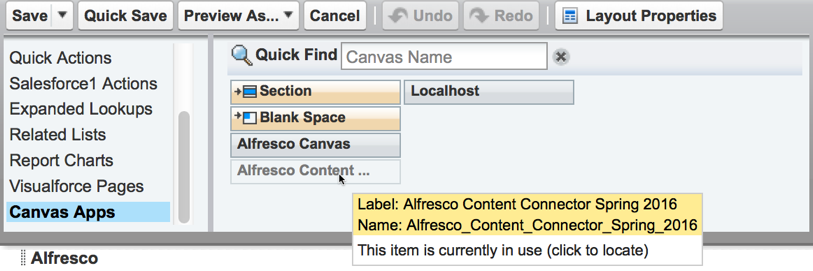
Click the canvas app that matches the Alfresco Content Connector connected app that you created in Step 3: Configure the app in Salesforce, and drag it to where you want it on your page.
You can add a canvas app only once to a page. If you’ve already added the app, Salesforce shows you where on the page it has been added.
-
Set the canvas app to display in 1-Column with a minimum height of 350 pixels (400 pixels is the recommended height), and click OK.
If the Alfresco widget is too small, you can’t see all the buttons and elements. For instance, it is not possible to log in as the buttons are not visible.
-
Save your changes.
It can take a little while for the Alfresco widget to load for the first time.
-
Open a record that has the new page layout. You should now be able to see an Alfresco section, with a Files tab. You can add files here by dragging and dropping them, or by using the Upload button.
You can also add new folders with the Create button. Equally, any files added in Alfresco can be seen in this window. This content is stored directly in Alfresco and can be viewed either in Salesforce, or in your usual Alfresco site.
-
Adding the Alfresco app in Salesforce (Visualforce Page)
Lastly, you’ll need to load the Alfresco canvas app for page layouts. You can add the app to any record type that supports layouts (for example; Accounts, Cases, and Opportunities). This is done by setting Alfresco for Salesforce example page layouts as the default for selected user profiles.
Make sure that you’ve downloaded the Alfresco Content Connector app, as described in Step 2: Install the app in Salesforce. You need administrator rights to make these changes.
To create the Visualforce Pages for each object where you want the app to appear, follow these steps:
-
In your Salesforce account, find Setup. This is accessible by clicking the gear icon
from the top-right toolbar on the Salesforce page. See How to find Setup for more guidance.From Setup, enter Visualforce Pages in the Quick Find search bar and then select Visualforce Pages.
-
Click New to open the Visualforce Page editor.
-
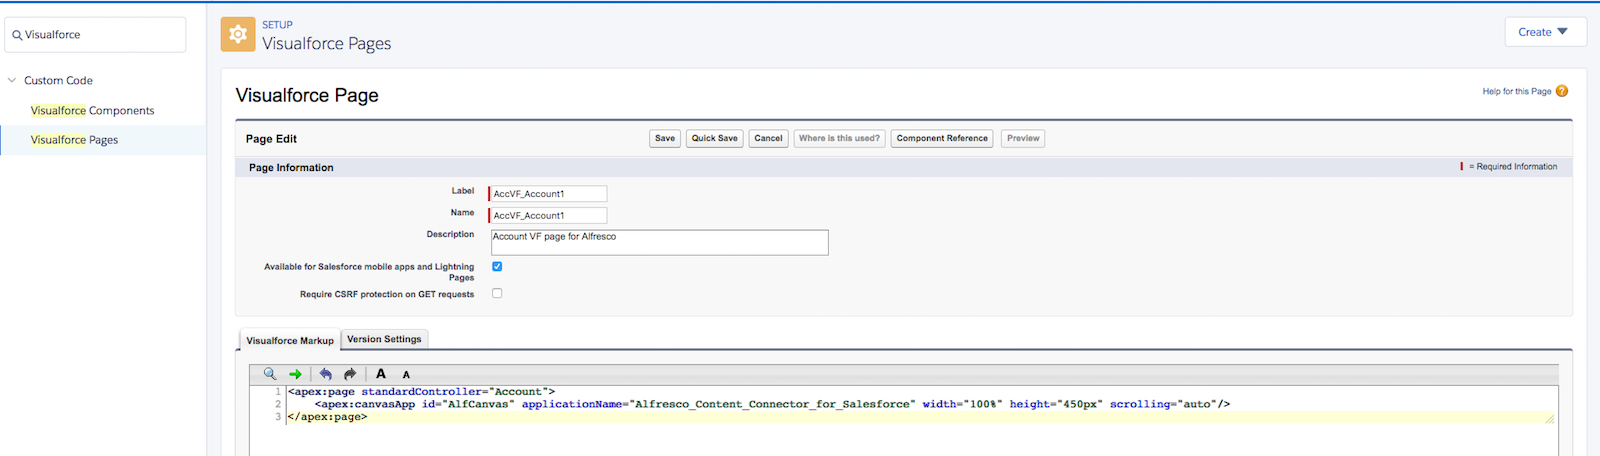
Enter a Label for the page. The label is displayed where the page appears in the page layout.
-
Enter a Name for the page.
-
Check Available for Salesforce mobile apps and Lightning Pages.
-
Copy and paste the following code in the Visualforce Markup editor:
<apex:page standardController="{Your Object Name}"> <apex:canvasApp id="AlfCanvas" applicationName="{Your Connected App API Name}" width="100%" height="450px" scrolling="auto"/> </apex:page>Note: Replace
{Your Object Name}with thesObjectorcustom object APIname where you want the app to appear. For example,Account,Lead,Asset, ortraining__c. Note: Replace the {Your Connected App API Name}with the API Name you set when creating the Connected App definition. For example,Alfresco_Content_Connector_for_Salesforce.
-
-
Save your settings.
Repeat Step 2 and 3 for every object where you want the app to appear.
-
Now for each Salesforce object where you want the app to appear, you need to add the Visualforce page you just created in the Lightning page layout. To do so, follow these steps:
-
For example, if the Salesforce object is
Account, then on the Salesforce page, click Accounts.The ACCOUNTS screen appears listing all the accounts.
-
Click the account where you want the Visualforce page to appear.
-
Click the gear icon
from the top-right toolbar on the Salesforce page. -
Click Edit Page.
-
Select Visualforce from the Standard components list in the scrollable window.
You can drag and place the component where you want it on the page.
-
Specify a Label for the Visualforce page. If no label is specified, the default label of the Visualforce page is used.
-
Select the Visualforce page you have created from the Visualforce Page Name drop-down list. This field is mandatory.
-
Specify a minimum Height of 450 pixels.
-
Save your settings.
If you’re editing the page for the first, you may need to activate the page if this is the first time you are editing the page.
It can take a little while for the Alfresco widget to load for the first time.
-
-
Open a record that has the new page layout. You should now be able to see an Alfresco section, with a Files tab. You can add files here by dragging and dropping them, or by using the Upload button.
You can also add new folders with the Create button. Equally, any files added in Alfresco can be seen in this window. This content is stored directly in Alfresco and can be viewed either in Salesforce, or in your usual Alfresco site.
Uninstall the Salesforce app and AMP files
Remove the Alfresco package in Salesforce and then use the Module Management Tool (MMT) and remove the AMP files.
-
In your Salesforce account, find Setup. This is often on the toolbar or under your name (see Explore the Salesforce Setup Menu for more guidance on where to find this).
Search for
Installedin the Quick Find search bar, and click Installed Packages. -
Click Uninstall next to the Alfresco Content Connector package, and confirm that you want to uninstall the package.
For more information about removing packages in Salesforce, see Uninstalling a Package.
-
Stop the server.
-
Use the information in Uninstalling an AMP file to uninstall the AMP files for Salesforce.
-
Restart the server.