The following are tutorials related to pages in the Share Web Application (share.war).
Adding content to a Surf page
Extension Point: Surf Extension Modules
Description:
This tutorial demonstrates how to add some extra content to the Footer on each page. The steps you need to take to do this can be applied also when adding content to other parts of a page.
Implementation Steps:
A simple and effective way to add content to a Surf page is to follow these steps:
- Create a Web Script that returns the content to be displayed.
- Find a page component that is located where you want to add new content, such as the footer in our case.
- Add a new sub-component to the page component, referencing the new Web Script.
- Use a Surf Extension module to deploy the new sub-component.
Related Information:
This tutorial assumes that you are familiar with the Spring Surf development framework. If you are new to it then read up on it here before starting this tutorial. If you have not already done so you should also review the Introducing SurfBug topic as this tool is used in this tutorial.
Source Code: Go to code
This tutorial assumes you have generated an SDK All-In-One project.
Tutorial implementation steps:
-
In the Share JAR project create a new directory as follows for the Web Script:
aio/aio-share-jar/src/main/resources/alfresco/web-extension/site-webscripts/org/alfresco/tutorials. -
Add a Web Script descriptor file called
new-content.get.desc.xmlto the/tutorialsdirectory:<webscript> <shortname>New Page Content</shortname> <description>Add new content to a Surf Page</description> <url>/tutorials/new-content</url> <family>Share Tutorials</family> </webscript> -
Add a web script template file called
new-content.get.html.ftlto the/tutorialsdirectory:<div> Hello World! </div> -
Identify which component to add the new sub-component to.
For this we use the SurfBug tool. Once the tool is activated (from
http://localhost:8080/share/page/surfBugStatus) we can identify the component on the page as follows:
Here we have scrolled to the bottom of the Dashboard page as we want to add our new content to the footer. Then we have clicked on the last component enclosed in red lines. This brings up the above black information box where we can see the
region-id,source-id, andscopevalues that we are looking for. -
Add a new Surf Extension Modules file called add-page-content-extension-modules.xml to the
aio/aio-share-jar/src/main/resources/alfresco/web-extension/site-data/extensionsdirectory (note. it is important to give this file a unique name when several Share JARs are installed, otherwise the last one wins):<extension> <modules> <module> <id>Add new content to footer</id> <version>1.0</version> <auto-deploy>true</auto-deploy> <components> <component> <region-id>footer</region-id> <source-id>global</source-id> <scope>global</scope> <sub-components> <sub-component id="New_Content" index="25"> <url>/tutorials/new-content</url> </sub-component> </sub-components> </component> </components> </module> </modules> </extension>What we are doing here is adding a new sub-component to the existing component identified by the region-id
footerand the source-idglobal.The sub-component
urlpoints to the new Web Script that we just created.The sub-component’s content can be displayed either before or after the default sub-component, which is the one with the
idset todefault. The position of the content is based on theindexattribute value, which is set to 25 in our case. Thedefaultsub-component will have anindexof 50 so our new sub-component will be displayed before it.The
idof the new sub-component need to be unique within the main component (i.e. the footer) and the iddefaultis reserved.This module will be deployed automatically when the application server is started as we have the
auto-deployproperty set totrue. -
The implementation of this sample is now done, build and start the application server as follows:
/all-in-one$ mvn clean install alfresco:run -
Now, log in to Alfresco Share (
http://localhost:8080/share) and you will see the content (Hello World!) from the new web script displayed just above the footer:
Note: A Surf Extension module like this can be deployed and undeployed during runtime. And this means that an Administrator can control when different customizations should be visible or hidden. This is managed via the Module deployment page that can be found at:
http://localhost:8080/share/service/modules/deploy.
Removing content from a Surf page
Extension Point: Surf Extension Modules
Description:
This tutorial demonstrates how to prevent content from being rendered in a Surf page. This tutorial also shows how to use evaluations to decide whether content should be rendered or not.
Implementation Steps:
A simple and effective way to remove content from a Surf page is to follow these steps:
- Locate the component that corresponds to the content you want to remove from the page.
- Make a note of the region-id, source-id, and scope information for the component.
- Override the component definition and add an evaluator that resolves to not rendering the component.
- Use a Surf Extension module to deploy the overridden component definition.
Related Information:
This tutorial assumes that you are familiar with the Spring Surf development framework. If you are new to it then read up on it here before starting this tutorial. If you have not already done so you should also review the Introducing SurfBug topic as this tool is used in this tutorial.
Source Code: Go to code
This tutorial assumes you have generated an SDK All-In-One project.
Tutorial implementation steps:
-
Identify which component that corresponds to the content that should be removed.
For this we use the SurfBug tool. Once the tool is activated (from
http://localhost:8080/share/page/surfBugStatus) we can identify the component on the page as follows:
In this case we have clicked on the “My Sites” dashlet, which brings up the above black information box where we can see the
region-id,source-id, andscopevalues that we need to be able to hide the dashlet. -
Add a new Surf Extension Modules file called
remove-page-content-extension-modules.xmlto theaio/aio-share-jar/src/main/resources/alfresco/web-extension/site-data/extensionsdirectory (note. it is important to give this file a unique name when several Share JARs are installed, otherwise the last one wins):<extension> <modules> <module> <id>Remove content from Share (hide My Sites)</id> <version>1.0</version> <auto-deploy>true</auto-deploy> <components> <component> <region-id>component-1-1</region-id> <source-id>user/{userid}/dashboard</source-id> <scope>page</scope> <sub-components> <sub-component id="default"> <evaluations> <evaluation id="guaranteedToHide"> <render>false</render> </evaluation> </evaluations> </sub-component> </sub-components> </component> </components> </module> </modules> </extension>What we are doing here is overriding the
defaultsub-component and putting in a new evaluation for it. The targeted component is identified with the values we got via SurfBug. So we set region-id tocomponent-1-1, source-id touser/{userid}/dashboard, and scope topage. Note that we are changing thesource-idfrom the specific one for Administrators (i.e.user/admin/dashboard) to one that is valid for all user dashboards.The sub-component evaluation definition is quite simple, we just give it a unique “bogus”
idand set rendering tofalse. This evaluation definition is guaranteed to hide the component.This module will be deployed automatically when the application server is started as we have the
auto-deployproperty set totrue. -
The implementation of this sample is now done, build and start the application server as follows:
/all-in-one$ mvn clean install alfresco:run -
Now, log in to Share (
http://localhost:8080/share) and you will no longer see the “My Sites” dashlet on the Dashboard (that is, the “My Tasks” dashlet has taken its place):
Note: A Surf Extension module like this can be deployed and undeployed during runtime. And this means that an Administrator can control when different customizations should be visible or hidden. This is managed via the Module deployment page that can be found at:
http://localhost:8080/share/service/modules/deploy. -
Further information
Some features introduced in this tutorial are explained in more detail in the following sections:
Parametrized source-id mapping: Every Share user gets their own dashboard page, which enables them to customize the layout to suit their own needs, but each user dashboard is generated from a single preset. In this tutorial you specify
user/{userid}/dashboard. Note the use of theuseridvariable. This allows you to change the appearance of the dashboard for any user, not just the admin user.Extending existing sub-components: When the dashboard pages were first created, the concept of sub-components in Surf did not exist. Consequently, if you search through the existing dashboard configuration files you will not find sub-components specified. Surf automatically converts these “legacy” components into the new extensible components containing a single sub-component with the ID “default”.
This allows you to add new content to these legacy components through sub-components, or customize the original content without affecting any new content. In the previous configuration XML, you can change the behavior of the components through modification of the default sub-component.
Note that multiple modules can extend the same component, which is why the deployment order of modules is important.
Sub-component evaluations: Every sub-component can optionally have zero or more evaluations. Each evaluation acts like an AND gate to a series of evaluators where an evaluation is considered successful if no evaluators fail. If an evaluation contains no evaluators, it is still considered to have evaluated successfully because nothing has failed.
The purpose of an evaluation is to change the behavior of a sub-component in one of three ways:
- Change the Web Script that renders the content by specifying a new URL.
- Change the default properties (and/or provide new properties) that are passed to the Web Script.
- Control whether or not the sub-component is actually rendered.
In this example, you are simply overriding the default behavior of the sub-component to prevent it from rendering by setting the
<render>element to have a value offalse(this defaults totrue) if not defined.
Customizing (web script properties) the footer text for a Surf page
Extension Point: Surf Extension Modules
Description:
This tutorial demonstrates how to customize the page footer web script i18n properties to change the existing text in the footer. The tutorial walks through how to find the related component and web script.
Implementation Steps:
It is often necessary to customize different parts of a Surf web script. This tutorial shows you how to customize the i18n properties files for a web script. The approach looks something like this:
- Find the page component that corresponds to the content that should be changed.
- Identify the web script that is used to deliver the content.
- Identify what part of the web script need changing to achieve the customization, in this case the properties file, which contains the existing footer text for Content Services and Alfresco Community Edition.
- Create your customized version of the
{web script id}.get_{lang}.propertiesfile. - Use a Surf Extension module to define the web script override.
Related Information:
This tutorial assumes that you are familiar with the Spring Surf development framework. If you are new to it then read up on it here before starting this tutorial. If you have not already done so you should also review the Introducing SurfBug topic as this tool is used in this tutorial.
Source Code: Go to code
This tutorial assumes you have generated an SDK All-In-One project.
Tutorial implementation steps:
-
Identify the web script that delivers the content that should be customized.
For this we use the SurfBug tool. Once the tool is activated (from
http://localhost:8080/share/page/surfBugStatus) we can identify the web script as follows:
Here we have scrolled to the bottom of the Dashboard page where the footer is located. Then we have clicked on the last component enclosed in red lines and representing the footer. This brings up the above black box that contains information about what web script that is delivering the content for the footer component (and then also the properties). In this case it is the
footer.get.*web script in packageorg.alfresco.components.footerthat we need to target. You can also identify the web script via the URL (that is,/components/footer). -
In the Share JAR project create a new web script override package
org.alfresco.tutorials.customization.footer.i18n.The directory path that needs to be created is:
aio/aio-share-jar/src/main/resources/alfresco/web-extension/site-webscripts/org/alfresco/tutorials/customization/footer/i18n.We can choose any package path we want and then specify it in the Surf Extension Module, we will see this in a bit. However, it is important that we use a package path that will not clash with another Extension Module, deployed by some other JAR.
For example, if we just used
org.alfresco.tutorials.customization.footerand then another JAR was deployed with some other customization to the footer, using the same package path. Then if one extension module is undeployed its customizations will still be picked up if the other module is active. This is because both modules are using the same package path. -
Add our version of the web script properties file for English called
footer.get_en.propertiesto the/tutorials/customization/footer/i18ndirectory:label.copyright=This is free software. Copyright Alfresco forever label.copyright.enterprise=This is the software you pay for. Copyright Alfresco foreverTo know what the property names are we first lookup the original properties file, which is located in the
tomcat/webapps/share/WEB-INF/classes/alfresco/site-webscripts/org/alfresco/components/footerdirectory. -
Add a new Surf Extension Modules file called
customize-webscript-i18n-props-extension-modules.xmlto theaio/aio-share-jar/src/main/resources/alfresco/web-extension/site-data/extensionsdirectory (note. it is important to give this file a unique name when several Share JARs are installed, otherwise the last one wins):<extension> <modules> <module> <id>Customize i18n labels for Footer</id> <version>1.0</version> <auto-deploy>true</auto-deploy> <customizations> <customization> <targetPackageRoot>org.alfresco.components.footer</targetPackageRoot> <sourcePackageRoot>org.alfresco.tutorials.customization.footer.i18n</sourcePackageRoot> </customization> </customizations> </module> </modules> </extension>This extension module identifies the package with the web script that we want to override by setting the
targetPackageRootproperty. When we have set what web script to override we use thesourcePackageRootproperty to tell Content Services where to pick up the customized web script files.This module will be deployed automatically when the application server is started as we have the
auto-deployproperty set totrue. -
The implementation of this sample is now done, build and start the application server as follows:
/all-in-one$ mvn clean install alfresco:run -
Now, log in to Share (
http://localhost:8080/share) and you will see the new footer text displayed as follows:
Note: A Surf Extension module like this can be deployed and undeployed during runtime. And this means that an Administrator can control when different customizations should be visible or hidden. This is managed via the Module deployment page that can be found at:
http://localhost:8080/share/service/modules/deploy.
Customizing (web script controller) the WebView dashlet on the Dashboard page
Extension Point: Surf Extension Modules
Description:
This tutorial demonstrates how to customize the WebView dashlet web script controller so the Alfresco Home page is displayed by default. The tutorial walks through how to find the related component and web script.
Implementation Steps:
It is often necessary to customize different parts of a Surf web script. This tutorial shows you how to customize the controller for a web script. The approach looks something like this:
- Find the page component that corresponds to the content that should be changed.
- Identify the web script that is used to deliver the content.
- Identify what part of the web script need changing to achieve the customization, in this case the controller as we can set the page that should be loaded by default in the model.
- Create your version of the
{web script id}.get.jsfile. - Use a Surf Extension module to define the web script override.
Related Information:
This tutorial assumes that you are familiar with the Spring Surf development framework. If you are new to it then read up on it here before starting this tutorial. If you have not already done so you should also review the Introducing SurfBug topic as this tool is used in this tutorial.
Source Code: Go to code
This tutorial assumes you have generated an SDK All-In-One project.
Tutorial implementation steps:
-
Add the WebView dashlet to the default dashboard for users.
The WebView dashlet is not part of the default dashboard for users so we need to add it in order to be able to work with it when implementing this customization.
The easiest way to add a dashlet permanently to the user dashboard is to define a new preset for the dashboard layout with id
user-dashboard. Create a new presets directory under theaio/aio-share-jar/src/main/resources/alfresco/web-extension/site-datadirectory.Now, add a file called
presets.xmlto the new presets directory:<?xml version='1.0' encoding='UTF-8'?> <presets> <!-- Override wll known preset used to generate the default User dashboard. Add the Web View Dashlet so we can check if customization works. --> <preset id="user-dashboard"> <components> <!-- title <component> <scope>page</scope> <region-id>title</region-id> <source-id>user/${userid}/dashboard</source-id> <url>/components/title/user-dashboard-title</url> </component> --> <!-- dashboard components --> <component> <scope>page</scope> <region-id>full-width-dashlet</region-id> <source-id>user/${userid}/dashboard</source-id> <url>/components/dashlets/dynamic-welcome</url> <properties> <dashboardType>user</dashboardType> </properties> </component> <component> <scope>page</scope> <region-id>component-1-1</region-id> <source-id>user/${userid}/dashboard</source-id> <url>/components/dashlets/my-sites</url> </component> <component> <scope>page</scope> <region-id>component-1-2</region-id> <source-id>user/${userid}/dashboard</source-id> <url>/components/dashlets/my-tasks</url> </component> <component> <scope>page</scope> <region-id>component-2-1</region-id> <source-id>user/${userid}/dashboard</source-id> <url>/components/dashlets/my-activities</url> </component> <component> <scope>page</scope> <region-id>component-2-2</region-id> <source-id>user/${userid}/dashboard</source-id> <url>/components/dashlets/webview</url> </component> <component> <scope>page</scope> <region-id>component-2-3</region-id> <source-id>user/${userid}/dashboard</source-id> <url>/components/dashlets/my-documents</url> <properties> <height>240</height> </properties> </component> </components> <pages> <page id="user/${userid}/dashboard"> <title>User Dashboard</title> <title-id>page.userDashboard.title</title-id> <description>Users dashboard page</description> <description-id>page.userDashboard.description</description-id> <template-instance>dashboard-2-columns-wide-right</template-instance> <authentication>user</authentication> </page> </pages> </preset> </presets>Here we have included the WebView dashlet as
component-2-2, so it will be displayed in column 2 and row 2 in the Dashboard layout. If you do not know theurlfor the dashlet, then just add it manually to the Dashboard and use SurfBug to identify whaturlthat is used. -
Identify the web script that delivers the content that should be customized.
For this we use the SurfBug tool. Once the tool is activated (from
http://localhost:8080/share/page/surfBugStatus) we can identify the web script as follows: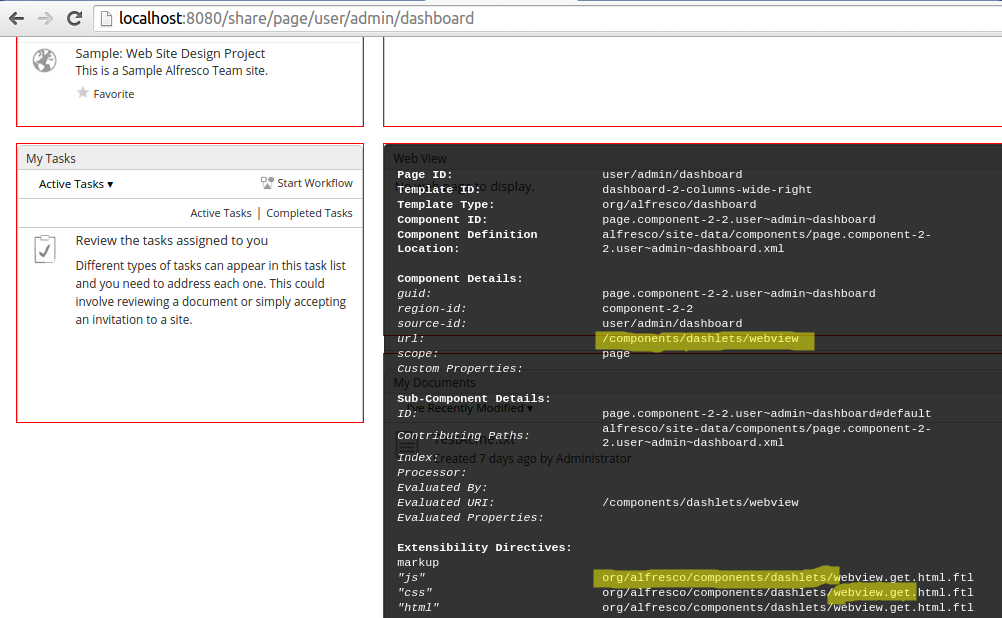
Here we have scrolled down a bit on the Dashboard page so we have the WebView dashlet in front of us. Then we have clicked on the WebView dashlet. This brings up the above black box that contains information about what web script that is delivering the content for the dashlet. In this case it is the
webview.get.*web script in packageorg.alfresco.components.dashletsthat we need to target. You can also identify the web script via the URL (that is,/components/dashlets/webview). -
In the Share JAR project create a new web script override package
org.alfresco.tutorials.customization.webview.controller.The directory path that needs to be created is:
aio/aio-share-jar/src/main/resources/alfresco/web-extension/site-webscripts/org/alfresco/tutorials/customization/webview/controller.We can choose any package path we want and then specify it in the Surf Extension Module, we will see this in a bit. However, it is important that we use a package path that will not clash with another Extension Module, deployed by some other JAR.
For example, if we just used
org.alfresco.tutorials.customization.webviewand then another JAR was deployed with some other customization to the WebView dashlet, using the same package path. Then if one extension module is undeployed its customizations will still be picked up if the other module is active. This is because both modules are using the same package path. -
Add our version of the web script controller file called
webview.get.jsto the/tutorials/customization/webview/controllerdirectory:if (model.isDefault == true) { model.widgets[0].options.webviewTitle = "Alfresco!"; model.widgets[0].options.webviewURI = "http://www.alfresco.com"; model.widgets[0].options.isDefault = false; }This controller will be processed after the out-of-the-box WebView controller. So what we are doing is just adding some stuff to the
modelwidgets to tell the dashlet to load the Alfresco home page by default.By inspecting the source of both the out-of-the-box controller and the template, you can work out what
modelproperties the template is using (seetomcat/webapps/share/WEB-INF/classes/alfresco/site-webscripts/org/alfresco/components/dashlets). This allows you to determine whether or not you can update themodelafter the base controller but before the template to create the required result. -
Add a new Surf Extension Modules file called
customize-webscript-controller-extension-modules.xmlto theaio/aio-share-jar/src/main/resources/alfresco/web-extension/site-data/extensionsdirectory (note. it is important to give this file a unique name when several Share JARs are installed, otherwise the last one wins):<extension> <modules> <module> <id>Customize Web Script Controller for Web View Dashlet</id> <version>1.0</version> <auto-deploy>true</auto-deploy> <customizations> <customization> <targetPackageRoot>org.alfresco.components.dashlets</targetPackageRoot> <sourcePackageRoot>org.alfresco.tutorials.customization.webview.controller</sourcePackageRoot> </customization> </customizations> </module> </modules> </extension>This extension module identifies the package with the web script that we want to override by setting the
targetPackageRootproperty. When we have set what web script to override we use thesourcePackageRootproperty to tell Alfresco where to pick up the customized web script files.This module will be deployed automatically when the application server is started as we have the
auto-deployproperty set totrue. -
The implementation of this sample is now done, build and start the application server as follows:
/all-in-one$ mvn clean install alfresco:runNote:. when defining presets for sites and users know that they are stored in the database after first time usage. In this tutorial we defined a new user preset to display a slightly different user dashboard. If a user, such as admin that we most likely use with the SDK, has been logging in before this customization was applied, then that user will already have a user dashboard preset in the database. So the customization will not appear to work. But wipe out
alf_data_dev, if you can, and restart and you will see that it works. -
Now, log in to Share (
http://localhost:8080/share) and you will see the WebView dashlet loaded with the home page:
Note: A Surf Extension module like this can be deployed and undeployed during runtime. And this means that an Administrator can control when different customizations should be visible or hidden. This is managed via the Module deployment page that can be found at:
http://localhost:8080/share/service/modules/deploy.
The custom JavaScript is executed after the original. The original JavaScript sets up an initial model object, which the default FreeMarker template can use to render content. Controller extensions then have the opportunity to change that model and thus change the rendered output. Using this approach is dependent upon the template making use of the changed model content - just adding content to the model will have no effect unless the template is also updated to make use of the additional model data.
It is not always possible to use this approach to customize existing components, as it depends on how the JavaScript controller and template are implemented, but the approach is worth exploring.
Customizing (web script template) the footer text for a Surf page
Extension Point: Surf Extension Modules
Description:
This tutorial demonstrates how to customize the page footer web script template to add some extra text to the footer. The tutorial walks through how to find the related component and web script.
Implementation Steps:
It is often necessary to customize different parts of a Surf web script. This tutorial shows you how to customize the template for a web script. The approach looks something like this:
- Find the page component that corresponds to the content that should be changed.
- Identify the web script that is used to deliver the content.
- Identify what part of the web script need changing to achieve the customization, in this case the template.
- Create your customized version of the
{web script id}.get.[html|json|..].ftlfile. - Use a Surf Extension module to define the web script override.
Related Information:
This tutorial assumes that you are familiar with the Spring Surf development framework. If you are new to it then read up on it here before starting this tutorial. If you have not already done so you should also review the Introducing SurfBug topic as this tool is used in this tutorial.
Source Code: Go to code
This tutorial assumes you have generated an SDK All-In-One project.
Tutorial implementation steps:
-
Identify the web script that delivers the content that should be customized.
For this we use the SurfBug tool. Once the tool is activated (from
http://localhost:8080/share/page/surfBugStatus) we can identify the web script as follows:Here we have scrolled to the bottom of the Dashboard page where the footer is located. Then we have clicked on the last component enclosed in red lines and representing the footer. This brings up the above black box that contains information about what web script that is delivering the content for the footer component (and then also the controller). In this case it is the
footer.get.*web script in packageorg.alfresco.components.footerthat we need to target. You can also identify the web script via the URL (that is,/components/footer). -
In the Share JAR project create a new web script override package
org.alfresco.tutorials.customization.footer.template.The directory path that needs to be created is:
aio/aio-share-jar/src/main/resources/alfresco/web-extension/site-webscripts/org/alfresco/tutorials/customization/footer/template.We can choose any package path we want and then specify it in the Surf Extension Module, we will see this in a bit. However, it is important that we use a package path that will not clash with another Extension Module, deployed by some other JAR.
For example, if we just used
org.alfresco.tutorials.customization.footerand then another JAR was deployed with some other customization to the footer, using the same package path. Then if one extension module is undeployed its customizations will still be picked up if the other module is active. This is because both modules are using the same package path. -
Add our customization of the web script template file in a file named
footer.get.html.ftllocated in the/tutorials/customization/footer/templatedirectory:<@markup id="additional-footer" target="html" action="before" scope="global"> <div id="additional-footer"> Additional Footer! </div> </@markup>This template will be processed after the out-of-the-box footer template. What we are doing here is just telling the template engine that we want to insert some extra footer content before the out-of-the-box footer content. The location of the new footer content is determined by the
actionattribute, which we set tobeforeto get our additional footer text displayed above the original footer text. Specifically it is displayed above the markup section tagged with thehtmlid, which we specify with thetargetattribute.You can find out the available markup sections by looking in the original template file, which in this case is
tomcat/webapps/share/WEB-INF/classes/alfresco/site-webscripts/org/alfresco/components/footer/footer.get.html.ftl:<@markup id="css" > <#-- CSS Dependencies --> <@link href="${url.context}/res/modules/about-share.css" group="footer"/> <@link href="${url.context}/res/components/footer/footer.css" group="footer"/> </@> <@markup id="js"> <@script src="${url.context}/res/modules/about-share.js" group="footer"/> </@> <@markup id="widgets"> <@createWidgets/> </@> <@markup id="html"> <@uniqueIdDiv> <#assign fc=config.scoped["Edition"]["footer"]> <div class="footer ${fc.getChildValue("css-class")!"footer-com"}"> <span class="copyright"> <a href="#" onclick="Alfresco.module.getAboutShareInstance().show(); return false;"><img src="${url.context}/res/components/images/${fc.getChildValue("logo")!"alfresco-share-logo.png"}" alt="${fc.getChildValue("alt-text")!"Alfresco Community"}" border="0"/></a> <#if licenseHolder != "" && licenseHolder != "UNKNOWN"> <span class="licenseHolder">${msg("label.licensedTo")} ${licenseHolder}</span><br> </#if> <span>${msg(fc.getChildValue("label")!"label.copyright")}</span> </span> </div> </@> </@>In most cases there is only one markup section for additional HTML and it is called
html. You can also see markup sections forcss,js, andwidgets, which can be used to inject for example additional JavaScript and Stylesheet files. -
Add a new Surf Extension Modules file called
customize-webscript-template-extension-modules.xmlto theaio/aio-share-jar/src/main/resources/alfresco/web-extension/site-data/extensionsdirectory (note. it is important to give this file a unique name when several Share JARs are installed, otherwise the last one wins):<extension> <modules> <module> <id>Customize Web Script Template for Footer</id> <version>1.0</version> <auto-deploy>true</auto-deploy> <customizations> <customization> <targetPackageRoot>org.alfresco.components.footer</targetPackageRoot> <sourcePackageRoot>org.alfresco.tutorials.customization.footer.template</sourcePackageRoot> </customization> </customizations> </module> </modules> </extension>This extension module identifies the package with the web script that we want to override by setting the
targetPackageRootproperty. When we have set what web script to override we use thesourcePackageRootproperty to tell Alfresco where to pick up the customized web script files.This module will be deployed automatically when the application server is started as we have the
auto-deployproperty set totrue. -
The implementation of this sample is now done, build and start the application server as follows:
/all-in-one$ mvn clean install alfresco:run -
Now, log in to Share (http://localhost:8080/share) and you will see the additional footer texts at the bottom of the Dashboard page:

Note: A Surf Extension module like this can be deployed and undeployed during runtime. And this means that an Administrator can control when different customizations should be visible or hidden. This is managed via the Module deployment page that can be found at:
http://localhost:8080/share/service/modules/deploy. -
If you want to test out the other FreeMarker extensibility operations, then you can update the
footer.get.html.ftlfile as follows:- To place the new footer content after the footer:
<@region id="additional-content" target="html" action="after" scope="global"/> - To replace the content of the footer with the new content:
<@region id= "additional-content" target="html" action="replace" scope="global"/> - To remove the footer region completely:
<@region id="additional-content" target="html" action="remove"/>
- To place the new footer content after the footer:
Adding a new Surf page to Share
This tutorial demonstrates how to add a new page to Alfresco Share.
In this tutorial you will see how to add a new page to Share. In the following tutorial you will see how to make this new page the default landing page. Source code for sample Surf page can be found here.
Adding a new page requires a minimum of three files:
- A Page definition file
- A Template-Instance definition file
- A FreeMarker template file
-
This tutorial assumes you have generated an SDK All-In-One project.
-
Create a new folder called
pagesinaio/aio-share-jar/src/main/resources/alfresco/web-extension/site-data. -
In the pages folder create a new file called
home-page.xmlwith the following contents:<page> <template-instance>home-page</template-instance> <authentication>user</authentication> </page>This is the page definition file. This defines the page name (which is the file name) and a mapping to a Template-Instance that contains the content. It also defines the level of authentication required to view the page.
-
In the
aio/aio-share-jar/src/main/resources/alfresco/web-extension/site-datafolder, create a subfolder calledtemplate-instances. -
In the newly created
template-instancesfolder, create a new file, also calledhome-page.xmlwith the following contents:<template-instance> <template-type>tutorials/home-page</template-type> </template-instance>This is the Template-Instance definition. This creates a mapping to the actual FreeMarker template that contains the content for the page.
-
Create a new file in
aio/aio-share-jar/src/main/resources/alfresco/web-extension/templates/tutorialscalledhome-page.ftlwith the following contents:<html> <head> <title>Tutorials Application</title> </head> <body> Welcome To Extreme Share Customization! </body> </html>This is the FreeMarker template file. This contains the actual page content. The example shown here is trivial but this could also contain regions for binding Surf components if required.
-
The implementation of this sample is now done, build and start the application server as follows:
/all-in-one$ mvn clean install alfresco:run -
In your web browser open the following location
http://localhost:8080/share/page/home-page.You will be prompted with the standard Share login screen.
You are asked to log in because in the page definition file you set the authentication level to be
user, that is the page is accessible to all logged in users. To create a page that can only be accessed by administrators using an authentication level ofadmin. To create a page that can be accessed by any user, including those who are not logged in, set the authentication level tonone. -
Log in using your credentials.
After logging in your new home page will be displayed.
Note that the FreeMarker template for the new page can contain any HTML/JavaScript/CSS code necessary. You are not restricted to using YUI2 code as is used in the implementation of Share. It is possible to implement the new page in JQuery, Dojo, pure HTML, or any other valid code.
As well as being able to re-use the standard Share authentication mechanism you are also able to access all the web scripts available on both the Web and Repository tiers. This means you can build your own UI around existing Content Services functionality.
Note: When using resources such as images, JavaScript and CSS files, it is important to remember that they should be located under the META-INF folder in your JAR file. Also, it is necessary to use the
/resprefix on subsequent requests to the resources. For example, to request the file META-INF/tutorials/example.css, the URL /share/res/tutorials/example.css would be used.
Override Share sign in page
This tutorial demonstrates how to override the default Alfresco Share sign in page.
Surf applications can define a sign in page by configuring the login page-type mapping to reference a specific Page
object. In Share this definition can be found in the surf.xml configuration file which sets the login page-type to
map to the slingshot-login page.
-
This tutorial assumes you have generated an SDK All-In-One project.
-
In the
aio/aio-share-jar/src/main/resources/META-INF/share-config-custom.xmlfile, add the following contents:<config evaluator="string-compare" condition="WebFramework"> <web-framework> <defaults> <page-type> <id>login</id> <page-instance-id>tutorials-login</page-instance-id> </page-type> </defaults> </web-framework> </config> -
In the folder
aio/aio-share-jar/src/main/resources/alfresco/web-extension/site-data/pages, create the referenced page astutorials-login.xmlwith the following contents:<page> <template-instance>tutorials-login</template-instance> <authentication>none</authentication> </page>Note: The page definition sets the authentication level to
none. This is necessary otherwise the user would be required to be authenticated, that is logged in, before the login page is displayed. -
In the folder
aio/aio-share-jar/src/main/resources/alfresco/web-extension/site-data/template-instancescreate another file also calledtutorials-login.xmlwith the following content:<template-instance> <template-type>tutorials/tutorials-login</template-type> </template-instance>This file creates the mapping between the Template-Instance object and the FreeMarker template that will actually render your new sign in page.
-
In the
aio/aio-share-jar/src/main/resources/alfresco/web-extension/templates/tutorialsfolder, create the new sign in page in the filetutorials-login.ftl, with the following content:<html> <head> <title>Tutorials Login</title> </head> <body> <h2>Tutorials Login</h2> <form id="loginform" accept-charset="UTF-8" method="post" action="${url.context}/page/dologin"> Username: <input type="text" id="username" name="username"/><br> Password: <input type="password" id="password" name="password"/><br> <input type="submit" id="btn-login" /> </form> </body> </html> -
The implementation of this sample is now done, build and start the application server as follows:
/all-in-one$ mvn clean install alfresco:run -
View the page
http://localhost:8080/share.Note: You might find that you are logged in automatically without being prompted for user name and password. This is because your validation might be cached in cookies. To resolve this simply remove cookies for your localhost and attempt to access
http://localhost:8080/shareagain. This time you will see your custom login page.The new sign in page will be displayed.
Making the new page the default
This tutorial demonstrates how to make the new page you created in the previous tutorial the default landing page.
In this tutorial you will see how to make a page the default landing page.
Surf supports the notion of a default page which is defined in the configuration for the entire website. By default the landing page is site-index.jsp, which redirects to the authenticated user’s dashboard page. The site default landing page will be rendered when a request is mapped to the Spring MVC RequestDispatcher (which by default is at /page and /p) but no page is included in the request, for example, /share/page. This is also configured as the welcome-file in the Share web.xml file.
To change the landing page for the application, you can override the default site configuration for Alfresco Share. The site configuration used is defined in surf.xml and is set to slingshot.site.configuration by default.
-
This tutorial assumes you have generated an SDK All-In-One project.
-
Create a folder called
configurationsinaio/aio-share-jar/src/main/resources/alfresco/web-extension/site-data -
In the configurations folder create a file called
slingshot.site.configuration.xml, with the following contents:<configuration> <source-id>site</source-id> <properties> <root-page>home-page</root-page> </properties> </configuration>Important: Note that the file is located on the web-extension path so that it is resolved before the Share default.
-
The implementation of this sample is now done, build and start the application server as follows:
/all-in-one$ mvn clean install alfresco:run -
Load the page
http://localhost:8080/share.After logging in your new landing page will be displayed.
Localizing Pages
Use this information to localize pages.
Introduction
You can provide i18n properties files with the same prefix that can then be accessed in the JavaScript controller by calling:
msg.get("<key>")
It is also possible to achieve this by calling from the FreeMarker template:
${msg(“<key>”)}
Traditionally, Share would pass all of the messages from a web script into the widgets that it instantiated by calling its .setMessages() function.
There are global properties files that can be used throughout Share. These are common.properties and slingshot.properties that can be found in /share/WEB-INF/classes/alfresco/messages.
The contents of all of these files will be active on the page by using the JavaScript global variable Alfresco.messages. This is a map with the attributes, global and scope:
globalcontains all the messages from the global properties filesscopeis a map of widget name to messages map
The .setMessages() function of Share widgets adds its own name as a key into the scope map and assigns all the supplied messages as an object against that key. For example, if the Alfresco.DocumentList widget is instantiated then Alfresco.messages.scope['Alfresco.DocumentList'] can be used to access its messages.
Changes for the updated UI framework
The updated development approach in 4.2 and above is consistent with the pattern found in previous versions of Content Services, and have intentionally not followed the standard Dojo pattern. The latest approach uses the same Alfresco.messages object (although this can be reconfigured if you want to use a different root variable) and still sets the global and scope attributes.
If you create a widget with an i18nScope attribute then this is the scope into which the widget’s encapsulated messages will be added. If no i18nScope attribute is defined then the messages will go into a scope called default (unless the widget extends another widget in which case it will inherit the parent’s i18nScope attribute).
The i18n properties from the web script that processes the JSON model will automatically be placed into a new attribute of Alfresco.messages called page.
Whenever the .message() function is called from Alfresco/core/Core all applicable scopes are searched and the most specific result will be applied. These scopes are listed here:
- Global
- Page
- Default scope
- All inherited scopes
- Widget scopes
When creating a custom widget there is a distinction to be drawn between:
- Labels that never change
- Variable labels that can be selected from
- Custom labels
For example, the label for a menu item cannot realistically be included as part of the widget, but an error message could be. When accepting configurable labels they should be passed through the .message() function in case a message key (rather than a localized message) has been provided, as if no match is found then the value supplied to the method is returned.
This means that when constructing the JSON model for a page you could provide:
config: {
   label: "message.key"
}
or
config: {
   label: msg.get("message.key")
}
At first glance these might appear identical, but if the widget defines a message with the key message.key then this will override any message that the web script might be able to resolve.
Language Variations
As the widgets process locale-specific properties files in exactly the same way as web scripts, it is possible to reference a web script’s properties file in the i18nRequirements attribute of a widget.
Summary
You have learned how i18n properties are handled in the updated UI framework approach to page and widget construction. It follows the Content Services approach rather than having adopted the standard Dojo approach. This has been done to achieve consistency with previous versions of Content Services.