Image Management allows you to view and manipulate your image files in the Digital Workspace.
Features provided with Image Management include enhanced image manipulation with image crop and rotate capabilities and IPTC metadata extraction.
Uploading images
Image Management provides information and features about image files that you upload in the Digital Workspace.
-
Select the folder in the File Library where you want to add your content.
-
You can drag and drop images, or select NEW > Upload File from the toolbar, as you would normally in the Digital Workspace.
You will see the image in the folder listing:

Click on the image file to see the preview rendition of the image:

A rendition is a version of the original image, for example, a copy of an image that is optimized for web viewing. By default, not all renditions are created after uploading. It is only when a user first views the image that a rendition is created.
Viewing IPTC and EXIF metadata
Image Management provides additional information and features in Digital Workspace when you view image files.
-
Select an image in the Document Library, as you would normally in Digital Workspace, by clicking the thumbnail or name, to view it in the file preview screen.
-
Click the information button in the top toolbar

-
Make sure the Properties tab is visible at the bottom. Scroll down until you see the More information button in the lower right corner
-
Click the More information button, which should display extra media properties sections as follows:

-
Click the IPTC section to see IPTC metadata:
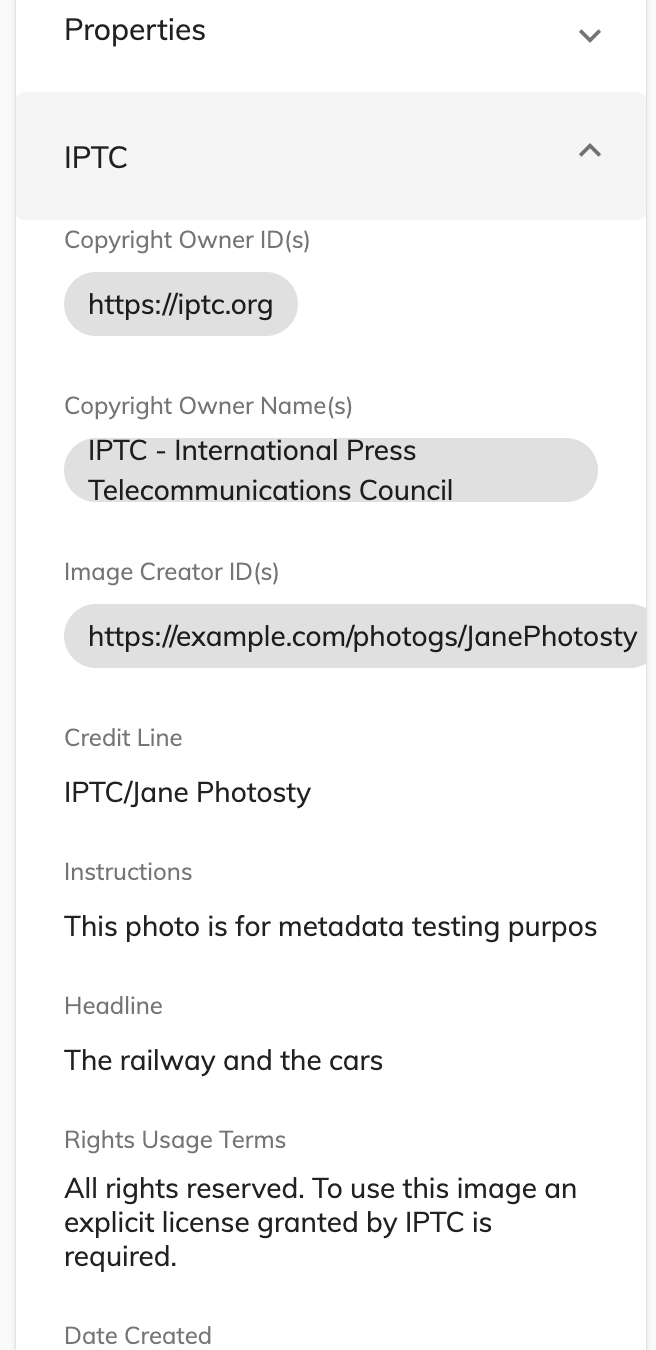
Note: IPTC metadata is also mapped to existing description (IPTC caption/description) and title (IPTC headline) properties, hover over the filename in the File library, and the IPTC property values are displayed.
Note: The IPTC Content Model needs to be bootstrapped into Alfresco Content Services for the IPTC metadata extraction to work.
Manipulating images
Image Management provides features to allow you to edit image files in Digital Workspace.
-
Select an image from the File Library, as you would normally in the Digital Workspace, by clicking the thumbnail or name, to view it in the file preview screen.
-
The
 panel is visible at the bottom of the preview screen, and it provides crop and rotate actions, and the possibility to save the manipulated image.
 -
To crop the image use the following icon:
-
 : click this icon to start crop manipulation of an image. A grid appears on top of the image. Hold down your left mouse button to select an area of the image using the grid:
You will now see two new actions in the panel under the image, one for saving (marked in blue), and a cross for canceling the crop.
-
Save or cancel the crop manipulation. If you Save the manipulated image a new minor file version is created (original image is file version 1.0). To cancel any crop action click Cancel (X).
-
-
To rotate the image use the following icon:
 : click this icon to start rotating the image.
You will now see two new actions in the panel under the image, one for saving rotation, and a cross for canceling the rotation manipulation.
- Save or cancel the rotation. If you Save the manipulated image a new minor file version is created (original image is file version 1.0). To cancel any rotation action click Cancel (X).
You can also use the scroll wheel to navigate large images.