Once your Federation Services environment has been successfully installed, you are ready to start making connections and executing jobs.
Quick Start User Guide
This guide will walk you through this process. For this example, we will be using Google Drive as our source (repository) location and Dropbox as our target location (output).
- Step 1. Login to your Federation Services environment once all the required components have been installed.
- Step 2. Create the repository connection for your source data that you want to transfer.
- Step 3. Create your output connection for your target location you want to move your data to.
- Step 4. Create a new integration job to sync your two new connections.
- Step 5. Create a task to filter your results before moving your data.
- Step 6. Map your fields to tell Federation Services where you want the data in each field moved to.
- Step 7. Run your new job to begin the data transfer process.
- Step 8. View your results to confirm the transfer was successful.
Step 1. Login to your Federation Services environment
- Install Federation Services - To begin using Federation Services, make sure you have all the required software components installed.
- Login to Federation Services Admin - Once Federation Services is installed, you are ready to log in and begin setting up jobs to transfer your data.
(Sub-Step 1)
- Create Authentication Connections - Before we begin, please note that some connections will require authentication before you can create an Integration Connection. The Authentication process can vary from connector to connector. For details on the specific authentication steps for your connectors, see the full Authentication Connection List.
(Sub-Step 2)
- Create Discovery Instance - Once Authenticated, you will set up your discovery instance to allow Federation Services to find the field properties in your connected repository for mapping in Step 6. For steps on setting up this instance, see Discovery Schema Instances.
NEXT STEP: Create your integration connections.
Step 2. Create your Integration Connections.
Your Integration connections will be the places you want to move your files to and from. First set up your Integration connection for your source repository that you are pulling your files from and then set up one for your output repository that you are moving your files to.
- Select Connections from the navigation section on the left
- Select Integration Connections
- Click the Create Integration Connection button
- Add the following:
- Connection Name
- Connection Description (Optional)
- Connection Type
- Click Save to continue editing your integration connector
- Edit your new Integration Connection
- Add the Authentication Connection you created for this connector.
NEXT STEP: Create your Output Connection.
Step 3. Create your Output Integration Connection:
Repeat Step 2 for your Output Integration Connection. This will be the location you want to move your files to.
- Select Connections from the navigation section on the left
- Select Integration Connections
- Click the Create Integration Connection button
- Add the following:
- Connection Name
- Connection Description (Optional)
- Connection Type
- Click Save to continue editing your integration connector
- Edit your new Integration Connection
- Add the Authentication Connection you created for this connector.
NEXT STEP: Create your Integration Job
Step 4. Create a new integration job to sync your two new connections.
This process will allow Federation Services to connect the two systems and move your data from one location to another.
- Click Integration in the navigation
- Select List Jobs
- Click the Create New Job button
- Add the following:
- Give your job a descriptive Job Name
- Select your Repository Connection
- Select your Output Connection
- Leave the Job type as Simple Migration
- Click Save
- View your new job edit page.
- Edit the start and end dates and times to filter for the documents in your repository connection that were created within that time period.
- Configure Repository Specifications: This tab will vary depending on the connector.
- Click on the Query Tab if there is one and add the Google Drive folder ID. This can be found after the last slash “/”in the url for the folder.
- Leave Query blank and leave process folders unchecked.
- Output Specifications: This tab will vary depending on the connector
- Click on the Output Specifications Tab and enter your Target Folder.
NEXT STEP: Add Tasks
Step 5. Create a task
Among other things, tasks will allow you to filter your documents, so you only bring over the data you need. You can also use tasks to check for duplicates among other useful filters.
- In your saved job edit page click the TASKS tab.
- Select the task you would like to add from the list drop-down.
- Click the green plus sign to add the task. Fill in the necessary configurations for that specific task.
- Click DONE to add the task to the job.
NEXT STEP: Job Mapping
Step 6. Map your fields
This will tell Federation Services which data property fields from one location match the property fields in the other location.
- From the edit job page click the mappings tab
- Select Manual in the Mapping Type drop-down and add the following.
- Select your Repository Discovery
- Select drive_file as the Repository Type
- Select your Output Discovery
- Select file as your output type Select the source field Select the target field Click on the blue plus button to add to the mapping
- Click Save at the top of the page
NEXT STEP: Run Job
Step 7. Run your new job
- From the navigation section on the left, click Integration to expand the section and select Run and Monitor Jobs
- Click the Play button to the left of your new job to begin transferring files.
- Click the REFRESH button to see the progress of your integration. You can also set the auto refresh time periods to 30 seconds, 1 minute, 5 minutes.
NEXT STEP: View your results
Step 8. View your Integration results
- Once the integration job is complete, you can view your results. This shows that all the files have been successfully integrated from one system to the other. If you log into your target repository you will see these files have been added successfully.
Congratulations! You have successfully created your first Integration Job.
Discovery and Analytics
Discovery is the 2nd step in the integration process. Create an instance, select a connector and a schema will be produced based on the connector’s configuration. Includes a list of all object types as well as attributes stored in each.
Discovery Schema Instances
Discovery connectors are responsible for discovering the schema, or the metadata about the repository. This will include content types and their associated properties.
A discovery schema can then be used to aid in creating Job Mappings or to simply find out what’s in the repository. Running a discovery instance will create a new version of the schema. Whatever version you select will be used when creating mappings.
Schema Instances
Viewing the schema instances will show you a table of all available Discovery Instances, this table can be sorted by Name, Type, and Available Versions.
Here you can view the most recently created schema instances as well as created new ones.
- Name: Unique Name for the Discovery Connection to identify it in the UI.
- Type: The Discovery Type refers to the type of the repository (i.e. CMIS, SharePoint, Documentum etc.).
- Version: Each Discovery Schema can have multiple versions. Selecting this version will set which is used in Job Mappings as well as which schema will be shown when examining a schema.
New Discovery Connection Instance
To create a new Discovery Connection, click the Create New Discovery Instance button at the bottom of the Schema Instances Page. Fill in the following fields.
- Name: Unique Name for the Discovery Connection to identify it in the UI.
- Discovery Type: The Discovery Type refers to the type of the repository
- Authentication Connection: A predefined connection for authentication.
- Ignore Types: Comma delimited list of types to ignore.
- Additional Fields: Some connections require additional information to search for types. Click on a link in the table below for more details on setting up the Discovery Connection for a particular software
Discovery Schema View
Once Discovery finishes running Federation Services will store the information. Discovery only needs to be run once, unless the schema of the source repository is changed.
To view the report, click the document icon to the left of the instance. You can click into each attribute section by category.
Data Collection
Data Collection is a scheduling system that allows the user to schedule job runs. It can be turned on and off in the Data Collection index page.
Data collection schedules can be run for a job group or individual job. For the purposes of data collection jobs it is suggested you use the Reporting Connector and do not have Include Binaries checked in the Details tab. Federation Services can create the necessary auditing data without the actual file content
How to use Data Collection
The Set Info Pane will show you basic information about the various collections in the data set, as well as allowing you to delete individual runs.
The data collection service runs in the background based on properties set either in simflofy-global.properties or in the Admin Properties page. It checks each data set (created once you hit Set Collection Schedule) to see if that job group needs to be run based on whether Collect Data is ‘on’.
- Collection Statuses: Sets can have one of three statuses
- Unsaved- The Collection hasn’t been saved yet
- Off- The service will not collect data for this group
- Waiting- The job group is between collections
- Running- The jobs in the job group are currently running
- Time until next run: As it reads. If this runs to zero, it will not refresh unless the schedule is closed and reopened. Will Display as NA if performing a run.
- Collect Date: If on, the collection will run based on the collection dates.
- Run jobs in parallel: Run all jobs in the set simultaneously. The default is to run them in prescribed order set on the job group.
- Collection dates: Dates over which data will be collected.
- If the “From” time is set to a value before the current date/time, the run will begin immediately.
- The “To” time and Interval are checked upon completion of a collection run to determine whether the set should run again.
- Interval: The interval between collections will dictate how often the jobs are going to run.
- It is suggested you determine the general length of the jobs you wish to run to avoid overlap. The Set Info pane provides an average run time for the data set.
- Setting the collection interval to Once will turn off collection after a single run.
- Interval below 3 minutes are not allowed, as they cause unpredictable behaviour.
- Choose between a job group or individual job
- If selecting a job group, you can choose the run order by dragging. The top job is run first.
Example Duplicate Checking
If you wish to collect information on duplicate data, use the Duplication Check Task. As of the inclusion of Data Collection, you do not need to include a binary for duplication checks. If you declare a field that is not the md5 field as your “hash”, you can set a field in the JavaScript Task using the rd.setMetaHash(Strings) method.
Discovery Report Views
A view which charts data from a Content Report generated through Data Collection
Once you have finished with your Data Collection, Federation Services allows users to visualize their data in a Discovery Report View in the Discovery UI
In this report view users will find:
- An interactive chart that adjusts to selected repositories
- Content Past Date
- Content Summary
- Storage Summary
- Total Numbers of files
Generate Reports
This tab initially only contains a drop-down of data sets that have job runs associated with them. It also displays their collection status.
Upon selecting a data set you should see the following:
- Included in the table are the date of the run, number of job runs included in the dataset, as well as some general stats on the document counts. The table is sortable on the various values.
- Clicking the eye icon next to the job run count will open a pop-over with the individual job run ids
- Clicking one of these ids will take you to a detailed view of the job run. For content reporting you are currently only allow to select one dataset.
- In the future a “Content Growth Report” option will be made available, allowing you to select multiple job runs to monitor increases in storage usage.
Filter Dataset
There are a number of filters that can be applied to the dataset during report generation. These include:
- Filters for Obsolete Date
- Checked against the Last Modified Date, or Created date if the former is unavailable
- Filters for certain file type extensions.
- Extracted from filename
- Filters for file size
- (New) Filters for type. Document types can also be filtered out.
These filters are processed in this order, upon selecting them you will have the option to reorder them.
Available Reports
Upon completion of report generation you should be taken to the Available Reports tab.
This tab shows the generated reports as well some additional information:
- Obsolete Data: The report contains data on content that was past the filter date
- Duplicate Data: The report has information on duplicates
- Content Type Data: The report contains a content type breakdown for all included repositories.
- Multiple repositories: The report contains data for each of the jobs run as part of the dataset, as well as a merged report containing the combined data.
- Actions:
- Download the raw report in JSON format
- Generate New Version of this Report
- Delete Report with the additional option to delete all versions of the report
Schedule Reports
The schedule reports tab allows you to automate the creation of reports after creating the initial one.
- Automatically Generate This Reports: Enables the scheduling of this report’s creation
- Generate Reports Every: The time interval to use for generating this report.
- Starting On and Ending On: How long the schedule lasts. If the Before time is set before the current time, generation will accrue immediately upon setting the schedule.
- Update Associated Report Views: Each Discovery Content View is associated with a single report series. If set to On, the view will be updated to use the most current version each run.
- Which views: A list of associated views to update.
- Use Data From the Following Set or Most Recent: If checked, the new report will always use the next data collection chronologically from the previous. Otherwise the most recent data set will be used. Useful if you wish to perform QA on the most recent runs before creating a new report.
- Send email Notifications: A simple yes/no. Email must be enabled for the application.
- Comma delimited list of emails: As the tooltip says.
Pii Scan
The Pii Scan feature allows the user to select a configured repository connector and job, then scan the repository for Personally Identifiable Information (Pii).
This can include phone numbers, social security numbers, proper names, and addresses.
A temporary job is created using the repository configuration of the selected job.
Appropriate tasks and mappings are added to the job, then the job is run.
Upon completion, the temporary job and records are deleted, leaving only Pii Data.
Federated Search
Federation Services allows you to manage data throughout multiple repositories without having to move the content from one location to another. With Federated Search users can view, organise, report on, update and maintain all of their documents, files and records in one easy to use highly customisable space.
Content Search
Content View Connectors are used by Content Views in Federation to query indexed documents and populate the results within a federated search view. Federation can then take action against the results such as preview, download, check in and out and edit the file’s properties.
Content Search Connection Configuration
Available Content View Connection Types
- Elasticsearch Connector
- MongoDB GridFS Search Connector
- MongoDB Search Connector
- SOLR Search Connector (End of Life)
Basic Configuration
Connector ID Connector ids are how Federation Services identifies the individual connector when receiving calls from other sources, such as Federation Service. This value must be usable as part of url. Use the description field if you need more than a few letters/numbers to describe the connection. The description shows up with its connectorId across the product.
- Connector ID: A unique identifier for this connection i.e.
simflofy_demo(alphanumeric, dashes and underscore characters only). - Description: The text that will be displayed on drop-downs etc. to identify this connection.
- Type: The type of Search Connection (Solr, Mongo, Elastic etc.)
- Keep Connection Alive: Federation Services will cache the connection for a given amount of time before discarding it.
- Keep Alive in Milliseconds: How long to keep the connection alive before discarding it (
300000is 5 minutes). - Security Mode: This is how to authenticate with the back-end search.
- Authentication Connection: The most common method is to use the appropriate authentication connection.
- User Pass-through Credentials: Users the authenticates with whatever authentication they used for Federation Services. Only supported in rare cases.
Result Links
Result Links are under the Search Configuration tab, but work universally.
If Download is selected, the file names in your view will call a document download, much like the Widget
If External is selected, you will need to add Result Links. When you click the Result Links button a modal should appear. It takes three arguments
- Content Service Connector: External link configurations are grouped by content service connector.
- This allows documents from different repositories to form different links.
- Link Field: The document field that contains relevant information for building the link.
- Link Url: The content of the link field will be appended to this url to create the link.
Link Field With Semicolons Due to how certain ids with versions are handled. The value of the link field will be cut off after the first instance of a semicolon(;)
Search Configuration
Refer to the documentation for each connector to see which fields are available.
Search Security
-
Filter:
The authenticated user’s group ids and login will be added to each search request. Requires content to be indexed using the Index User Group Task.
-
Restrict:
Only users from the selected groups will be able to use this search connection, regardless of role. If this connection in used as part of a Content View, users outside these groups will not be able to see it in their View List in Discovery.
Connection Configuration
Individuals connectors might have specific fields here that were not general enough to be in Search Configuration
Additionally, this is where you can use the “Add Custom Parameter” button to set any default query values for the connection.
A query_fq configuration parameter lets you define facet queries behind the scene. This is done to provide limited views or subsets of data in the search. Essentially you could create any number of views on the same date but each view would display different results. This can also be used in a role base system where you have views setup for specific user roles.Unless the fq is already encoded, you will need to wrap it in the encode() function where it will be URLEncoded UTF-8.
The syntax is:
query_fq for the first one
query_fq1 for the second
etc.
Content Services
Content Service Connections are used to interact with content in Federated Search views. Actions set up in the Content Services API or the Discovery UI web application will be performed against specified repositories and documents through these Content Service connectors.
Content Service Connections
Federation Services’s Content Service Connections offer public REST endpoints that allow for integration with external applications. Actions in the Content Services API or the Discovery web application perform actions against specific repositories through these connectors.
Commonly Supported Operations
Note: The capabilities of each Content Service Connector is limited to operations allowed by the repository. Additionally, not all methods are available for all connectors. View individual connector pages for a list of capabilities.
- Creating content
- Retrieving file content
- Showing content properties
- Listing folder items
- Listing file versions
- Updating file content and properties
- Deleting files and folder
- Showing repository capabilities
- Retrieving the Root Folder ID
- Managing Permissions
Basic Configuration
Tip: Connector ids are how Federation Services identifies the individual connector when receiving calls from other sources, such as Federation Service. This value must be usable as part of url. Use the description field if you need more than a few letters/numbers to describe the connection. The description shows up with its connector ID across the product.
- Connector ID: A unique identifier for this connection i.e.
simflofy_demo(alphanumeric, dashes and underscore characters only) - Description: The text that will be displayed on drop-downs etc. to identify this connection.
- Type: The type of Search Connection (Solr, Mongo, Elastic etc.)
- Keep Connection Alive: Federation Services will cache the connection for a given amount of time before discarding it.
- Keep Alive in Milliseconds: How long to keep the connection alive before discarding it (
300000is 5 minutes) - Security Mode: This is how to authenticate with the back-end search.
- Authentication Connection: The most common method is to use the appropriate authentication connection
- User Pass-through Credentials: Users the authenticates with whatever authentication they used for Federation Services. Only supported in rare cases.
- None: Only usable with the Filesystem Content Service Connector
Connection Configuration
Different connectors might require additional configuration. These values will populate after selecting a Type.
Content Service Mapping
You can also add mappings or mapping groups to your Content Service Connections which will allow you to map custom parameters to properties in the destination system.
Add Mappings to a Content Service Connector
- Create a mapping.
- (Optional) Add your mappings (and other mappings) to a Mapping Group.
- Click the edit icon for your Content Service connector.
- In the drop-down under Mapping Type select Single Mapping or Group Mapping
- In the drop-down under the mapping type you chose, select the Mapping or Mapping Group you want to add to this connection.
- Save the Content Service connector.
Creating Mappings for Content Services
Content Service mappings will use the source as the parameter name for the content service call. The target field should match a field name in the destination repository. For easier use, you can leverage the schema discovery for your connectors to populate the output field names when mapping.

In the above example, the parameter name can be populated to map data to the Title field in the connected repository.
Here is an example call using the mapping above:
http://localhost:8080/3sixty-admin/repo/spo2/update?
fileId=s5dba1525-44a6-45ed-a42e-4a155a3f0539&name=second_level_22
The above call will update the SharePoint document by setting the Title to ‘second_level_22’.
Creating A Content Service Connection
Following is an example of how to create a new content service connection.
Step 1: New Connection
To create a content service connector instance select the Content Service Connections under the Connections header. Click Create New Content Service Connection
You will be brought to the generic Content Connection page.
Step 2: Basic Configuration
- Connector ID: This uniquely identifies this instance of the connector. This must be unique and will be used when you index content and metadata.
- Description: Describe your connection. Be descriptive as you may not be the only one using this connection.
- Type: Select from a drop-down list of Content Service Connectors installed in your instance of Federation Services. Once you select a connector type you will be presented with further options which will be documented on the connector page for that type. Don’t see your connector listed here? Contact your Federation Services Administrator or Federation Services Support.
- Keep Connection Alive: If checked then we will cache the connection object so the user doesn’t have to re-connector for every action they want to perform. If unchecked each API action will result in a login to the third-party system.
- Keep Alive in Milliseconds: How long to keep the session in cache.
- Connection URL: The URL or Path to connect to.
- Security Mode: Authentication Connection: This uses an authentication connector. An example may be a Box OAuth Connector. These can be a little more complex than the first 3 options and provides customisations by allowing you to create your own auth connectors.
Step 3: Connection Configuration
Add Configuration Parameter (Button): Some connectors allow for optional parameters than can be passed via key/value pairs. Most of the time you’ll have a form to fill out, but for more advanced features that are situational adding a key/value pair makes sense as it won’t clutter up the user interface.
List of Repositories supported by Content Services
- Alfresco
- CMIS
- Amazon S3
- Azure Content Service Connector
- Box
- MongoDB (GridFS)
- Documentum (DFC)
- DocuShare
- Dropbox
- Elasticsearch
- File-system
- FTP
- Google Drive
- IBM FileNet
- iManage
- Microsoft Exchange
- Microsoft OneDrive
- Nuxeo
- Objective
- Salesforce
- ServiceNow
- SharePoint Online
- Webdav
- Zendesk
Content Service REST Endpoints
GET FILE
GET /api/repo/<connectorid>/file?id=<id>
Description:
- Returns an input stream that contains the document’s content.
Path Parameters:
- connectorid: The connector id of your content service connector
Query Parameters:
- id: Source repository id. Differs depending on repository.
With CURL
curl -u admin:admin -X GET "localhost:8081/3sixty-admin/api/repo/box/file?id=384896487495" | json_pp
GET OBJECT ID BY PATH
GET /api/repo/<connectorid>/idbypath?fileName=<fileName>&folderPath=<folderPath>
Description:
- Searches for a file and returns its unique id
Path Parameters:
- connectorid: The connector id of your content service connector
Query Parameters:
- fileName: Name of the file to find
- folderPath: Parent folder path of the file
Returns:
{
"results": {
"id": "38489648749"
},
"success": true
}
With CURL
curl -u admin:admin -X GET "localhost:8081/3sixty-admin/api/repo/box/idbypath?fileName=testFolder&folderPath=/TestFolder/ | json_pp
POST FILE
POST /api/repo/<connectorid>/file?fileName=<fileName>&folderId=<folderId>&type=<type>
Description:
- Uploads a file to the target repository. Must be a multipart /form-data request with the file as a body. Multipart form boundaries will need to be set. See the Postman tutorial for correct settings.
Body Parameters:
- file: Attach your multipart file as the file parameter
Path Parameters:
- connectorid: The connector id of your content service connector
Query Parameters:
- fileName: The name of the file.
- folderId: The repository id of the folder where the file with live.
- type: The document type. Varies greatly depending on repository. Use types endpoint.
Returns:
{
"results": {
"id": "629425696136"
},
"success": true
}
With CURL
curl -u admin:admin -Ffile=@/Users/simflofy/CaterpillarDEUAjax.pdf"
localhost:8081/3sixty-admin/api/repo/box/file?fileName=Caterpillar%20DEU%20Ajax.pdf&folderId=105965269305&type=document" | json_pp
UPDATE FILE
PUT /api/repo/<connectorid>/update?
fileId=<fileId>&folderId=<folderId>&fileName=<fileName>&type=<type>&property1=<value1>&property2=...
Description:
- Uploads a file’s content or properties to the target repository as an update.Content can be attached as a binary body to the request. If no content is supplied, Federation Services will try update properties instead.
Path Parameters:
- connectorid: The connector id of your content service connector
Query Parameters:
- fileId: The ID of the file you wish to update, from the repository.
- fileName: The name of the file. Use if supplying folder ID.
- folderId: The repository id of the folder where the file you are updating lives. Use if supplying fileName.
- type: The document type. Varies greatly depending on repository. Use types endpoint.
- property(n): Properties that you wish to update with this call can be appended to the query
Returns:
{
"results": {
"id": "629425696136"
},
"success": true
}
With CURL
curl -u admin:admin -Ffile=@/Users/simflofy/CaterpillarDEUAjax.pdf"
localhost:8081/3sixty-admin/api/repo/box/update?fileName=Caterpillar%20DEU%20Ajax.pdf&folderId=105965269305&type=document"
| json_pp
UPDATE FILE CONTENT
PUT /api/repo/<connectorid>/updateContent?fileId=<fileId>
Description:
- Will update the content of the file using the supplied request body
Path Parameters:
- connectorid: The connector id of your content service connector
Query Parameters:
- fileId: The ID of the file you wish to update, from the repository. Returns:
{
"results": {
"id": "804939960448"
},
"success": true
}
With CURL
curl -X PUT -u admin:admin --data-binary '@/Users/simflofy/CaterpillarDEUAjax-newversion.pdf'
'localhost:8081/3sixty-admin/api/repo/box/updateContent?fileId=804939960448'
| json_pp
UPDATE FILE PROPERTIES
PUT /api/repo/<connectorid>/updateProperties?fileId=<fileId>&<param1>=<value1>&<param2>=<value2>
Description:
- Will update the properties of the file using the supplied parameters
Path Parameters:
- connectorid: The connector id of your content service connector
Query Parameters:
- fileId: The ID of the file you wish to update, from the repository.
- paramX: Name of the parameter to update
- valueX: New value of the parameter
Returns:
{
"results": {
"id": "804939960448"
},
"success": true
}
With CURL
curl -X PUT -u admin:admin
'localhost:8081/3sixty-admin/api/repo/box/updateProperties?fileId=804939960448&textfield=newvalue'
| json_pp
CHECKIN FILE
POST /api/repo/<connectorid>/checkin?id=<id>&comment=<comment>
Description:
- Checks in the target file with the specified comment
Path Parameters:
- connectorid: The connector id of your content service connector
Query Parameters:
- id: Source repository id of the file
- comment: Optional: The check-in message.
POST /api/repo/cmis/checkin?id=5dba1525-44a6-45ed-a42e-4a155a3f0539&comment=Spacing%20Fix
Returns:
{
"results": {
"id": "5dba1525-44a6-45ed-a42e-4a155a3f0539"
},
"success": true
}
With CURL
curl -u admin:admin -X POST "localhost:8081/3sixty-admin/api/repo/cmis/checkin?
id=5dba1525-44a6-45ed-a42e-4a155a3f0539&comment=Spacing%20Fix" | json_pp
CHECK OUT FILE
POST /api/repo/<connectorid>/checkout?id=<id>
Description:
- Checks out the target file
Path Parameters:
- connectorid: The connector id of your content service connector
Query Parameters:
- id: Source repository id of the file
POST /api/repo/cmis/checkout?id=5dba1525-44a6-45ed-a42e-4a155a3f0539
Returns:
{
"results": {
"id": "5dba1525-44a6-45ed-a42e-4a155a3f0539"
},
"success": true
}
With CURL
curl -u admin:admin -X POST "localhost:8081/3sixty-admin/api/repo/cmis/checkout?
id=5dba1525-44a6-45ed-a42e-4a155a3f0539" | json_pp
GET FILE BATCH (3.1.1 and older)
GET /api/repo/__BATCH__/file?id[x]=<idx>&conn[x]=<connx>&fname[x]=<fnamex>
Description:
- Retrieves the requested files and returns them as a zip file.
Query Parameters:
Note: [X] EQUALS AN INTEGER
- idx: ID of the file to retrieve
- connx: Connector id of the file
- fname: The name to give the file when zipped.
GET /api/repo/__BATCH__/file?
id0=/home/user/simflofy/test.txt&conn0=localFS&fname0=test.txt&id1=629425696136&conn1=box&fname1=Caterpillar%20DEU%20Ajax.pdf
With CURL
curl -u admin:admin -X "localhost:8081/3sixty-admin/api/repo/__BATCH__/file?
id0=/home/user/simflofy/test.txt&conn0=localFS&fname0=test.txt&id1=629425696136&conn1=box&fname1=Caterpillar%20DEU%20Ajax.pdf"
GET FILE BATCH (3.1.2+)
POST /api/repo/batch
Description:
- Batches files into a zip file and returns a download link item, whose id can be used with the File Service. Any errors will be reported in the file errors.txt, included with the export.
Body Parameters:
A JSON Object in the following format:
{
"batch":[
{
"fileName": "myfile.txt"
connId: "fs"
"id": "/Users/user/Documents/myfiles.txt"
},
{
"fileName": "boxfile.txt"
connId: "box"
"id": "635846060210"
}
]
}
Returns:
{
"success": true,
"results": {
"internal": true,
"expires": 1646759571044,
"fileName": "BATCH_1646757913.zip",
"createdBy": "admin",
"connectorId": "3Sixty Admin",
"docId": "6213e0f0f7558f0cc7458e5e",
"created": 0,
"id": "$2a$04$3vXhjvIAX7lQZY4OSUa8L.tY6263QBw61eye9OYaEiAGp9enNX.lW",
"used": 0
}
}
GET FILE VERSIONS
GET /api/repo/<connectorid>/listversions?id=<id>
Description:
- Returns a JSON Object listing the versions of an object.
Path Parameters:
- connectorid: The connector id of your content service connector
Query Parameters:
- id: Source repository id. Differs depending on repository.
GET /api/repo/cmis/listversions?id=5dba1525-44a6-45ed-a42e-4a155a3f0539
Returns:
{
"results": [
{
"docId": "5dba1525-44a6-45ed-a42e-4a155a3f0539;1.0",
"lastModified": 1583870808000,
"name": null,
"versionLabel": "1.0",
"versionLength": 409303,
"versionSeriesId": "512"
},
{
"docId": "5dba1525-44a6-45ed-a42e-4a155a3f0539;2.0",
"lastModified": 1583870809000,
"name": null,
"versionLabel": "2.0",
"versionLength": 409303,
"versionSeriesId": "1024"
}
],
"success": true
}
With CURL
curl -u admin:admin -X GET "localhost:8081/3sixty-admin/api/repo/spo/listversions?
id=5dba1525-44a6-45ed-a42e-4a155a3f0539" | json_pp
DELETE FILE OR FOLDER
Delete Requests:
Description: Deletes a file based on source id.
DELETE /api/repo/<connectorid>/delete?id=<id>&allversions=<allversions>
Description: Deletes a folder based on path.
DELETE /api/repo/<connectorid>/delete?path=<path> //Only for Filesystem
Path Parameters:
- connectorid: The connector id of your content service connector
Query Parameters:
- id: The source repository id of the file.
- allversions: Delete all versions of the file, if any exist. Defaults is true
- path: The path of the folder to delete.
DELETE /api/repo/box/delete?id=629425696136&allversions=false
Returns:
{
"results": {
"id": "629425696136"
},
"success": true
}
With CURL (remember to encode spaces and quotes)
curl -u admin:admin -X DELETE "localhost:8081/3sixty-admin/api/repo/box/delete?
id=629425696136&allversions=false" | json_pp
GET FOLDER ITEMS
Request:
GET /api/repo/<connectorid>/folderitems?id=<id>
Description:
- Returns a JSON Object listing the folders content.
Path Parameters:
- connectorid: The connector id of your content service connector
Query Parameters:
- id: Source repository id. Differs depending on repository.
GET /api/repo/box/folderitems?id=384896487495
Returns:
{
"results": {
"/All Files/3Sixty/credentials.csv": {
"BaseType": "document",
"CheckedOut": "false",
"CheckinComment": null,
"ContentLength": "201",
"CreatedBy": "",
"CreatedDate": "1573473832000",
"Description": "",
"Id": "556063296648",
"ItemPath": "/All Files/3Sixty/credentials.csv",
"MimeType": "text/csv",
"ModifiedBy": "",
"ModifiedDate": "1573473832000",
"Name": "credentials.csv",
"3SixtyType": "document",
"SitePath": "",
"Type": "file",
"VersionCount": "-1",
"VersionLabel": null,
"VersionSeriesId": ""
},
"/All Files/3Sixty/test copy 24.txt": {
"BaseType": "document",
"CheckedOut": "false",
"CheckinComment": null,
"ContentLength": "40",
"CreatedBy": "",
"CreatedDate": "1573473831000",
"Description": "",
"Id": "556069315644",
"ItemPath": "/All Files/3Sixty/test copy 24.txt",
"MimeType": "text/plain",
"ModifiedBy": "",
"ModifiedDate": "1573473831000",
"Name": "test copy 24.txt",
"3SixtyType": "document",
"SitePath": "",
"Type": "file",
"VersionCount": "-1",
"VersionLabel": null,
"VersionSeriesId": ""
},
"/All Files/3Sixty/test copy.txt": {
"BaseType": "document",
"CheckedOut": "false",
"CheckinComment": null,
"ContentLength": "40",
"CreatedBy": "",
"CreatedDate": "1573473831000",
"Description": "",
"Id": "556069266751",
"ItemPath": "/All Files/3Sixty/test copy.txt",
"MimeType": "text/plain",
"ModifiedBy": "",
"ModifiedDate": "1573473831000",
"Name": "test copy.txt",
"3SixtyType": "document",
"SitePath": "",
"Type": "file",
"VersionCount": "-1",
"VersionLabel": null,
"VersionSeriesId": ""
}
},
"success": true
}
With CURL
curl -u admin:admin -X GET "localhost:8081/3sixty-admin/api/repo/box/folderitems?id=384896487495" | json_pp
CREATE FOLDER
POST /api/repo/(connectorid)/folder?path=<path>
Description:
- Creates a folder at the specified location.
Path Parameters:
- connectorid: The connector id of your content service connector
Query Parameters:
- path: Absolute path of the folder to create.
POST /api/repo/box/folder?path=/3Sixty/testfolder
Returns:
{
"results": {
"id": "109374560508"
},
"success": true
}
With CURL
curl -u admin:admin -X POST"localhost:8081/3sixty-admin/api/repo/box/folder?path=3Sixty/testfolder" | json_pp
GET ITEM PROPERTIES
GET /api/repo/<connectorid>/properties?id=<id>
Description:
- Returns a JSON Object listing the objects properties
Path Parameters:
- connectorid: The connector id of your content service connector
Query Parameters:
- id: Source repository id. Differs depending on repository.
- GET /api/repo/box/properties?id=384896487495
Returns:
{
"results": {
"simflofy_created": {
"DisplayName": "[2019-11-11T07:03:46]",
"QueryName": "Created"
},
"simflofy_last_modified": {
"DisplayName": "[2019-11-15T18:46:31]",
"QueryName": "Last Modified"
},
"simflofy_filename": {
"DisplayName": "[3Sixty]",
"QueryName": "File Name"
},
"simflofy_content_type": {
"DisplayName": "[application/octet-stream]",
"QueryName": "Mime Type"
},
"simflofy_length": {
"DisplayName": "[16249882]",
"QueryName": "Content Length"
}
},
"success": true
}
With CURL
curl -u admin:admin -X GET "localhost:8081/3sixty-admin/api/repo/box/properties?id=384896487495" | json_pp
Discovery
Discovery is Federation Services’s user interface for Federation services. It is a highly configurable platform which uses Views and Widgets to organise, view, and manage your data in the most effective ways possible.
Federation Configuration
- tsearch.simflofy.services.url= The full url of the Federation Services-admin webapp.
- tsearch.security.allow.expired= Allows for expired ssl certificates when connecting to simflofy admin
- tsearch.simflofy.services.auth.strategy= Represents how to authenticate when performing queries. Note that this has no effect on how users log in. Options are service or passthrough.
- passthrough - The currently logged-in user is used to perform queries. This is the default, recommended setting.
- service - Queries will be performed as a single service user. This is not recommended, as many security features required the querying users username to filter results
- tsearch.simflofy.admin.username= service user username
- tsearch.simflofy.admin.password= service user password
- tsearch.logo.file= The location of the logo to use for certain views. Default is tsearch/resources/styles/images/logo-simflofy-search.png
- tsearch.favicon.file= Location of the favicon file. Favicon is the symbol that appears in tabs. Default is /resources/styles/images/favicon.ico
Many of these can be accessed by Discovery Admins at tsearch/config. It is available via the user navigation (top right corner) menu under Configuration
Widgets
Widget Instances
Widget Instance is an instance of a Widget Definition that can now be placed in a Content View. Many instances of the same definition can exist in a content view. Each instance has a unique id. Federation Services comes preloaded with a number of common widget instances. If you don’t find the type you need in your list, found under Federation > Widget Instances, you will need to create one.
In the Widget Instance list you can search and sort by name, widget ID, label and field.
Widget Instance List
Following is a the list of widgets you will see upon installing Discovery with Federation Services depending on the template used when building a content view.
Top Menu All (Templates)
- My Views
- Create New View
- Bulk Download
- Upload Documents
- Saved Searches
- User Management
Left Navigation (Search and Dashboard Templates)
- Source Repository
- File Name Search
- Content Search
- Content Type
- Date Search
- File Size
- Has Pii
- Declared as Record
Content Action (Search Template)
- Edit Properties
- Edit Metadata
- View Metadata
- Version Information
- Preview
- Download File
- Check In File
- Check Out File
Customisation
To the left of each widget instance there are edit and delete buttons.
To make changes to a widget instance click the edit button. Make any necessary updates and click save. You will need to republish any templates that have the widget in use in order to see any changes reflected in your Discovery environment.
You cannot delete a widget instance that is being used by any content view template. To delete a widget instance you must first remove it from any templates it’s being used on. Once this is done, you can click the delete button and click ok to confirm that you want to delete the instance. This action cannot be reversed.
Create a New Widget Instance
- In Federation Services Admin go to Federation > Widget Instances
- Click the Plus button.
- Select the Widget Definition for the new Widget Instance and click the Continue button
Name: The name of the Widget Instance that will be display in Federation Services Admin when creating Federation Services Views Field: The facet field associated with this Widget Instance. You can put na if this Widget does not require a field but there must be a value. Label: The label that will be displayed in the Federation Services View when this Widget is displayed (only if the Widget shows a label).
Options is a custom field. See below
Info: Custom Fields are also defined are part of the Widget Definition and act as additional configuration for the widget. Common examples include sort order, chart size, and whether to allow the widget to perform bulk actions. In the above case, the user is defining what facts to search on, and how to label them in a drop-down. When developing a widget, all custom fields should have a default value.
Click Save to finish creating your new Widget Instance.
Content Views
Content Views are how users can interact with indexed content in Discovery. They also allow for administrators to control who can access the view, as well as who can use specific widgets within the view. Content views can be found under the Federation menu in Federation Services Admin.
Creating a View
Views can be created under Federation > Content Views. The following information is needed to create a new view.
- Short Name: The key for the view. Only accepts alphanumeric characters, underscored and dashes (URL legal characters). This will be used as part of the url.
Tip: For example: if the shortname is ‘test’ and the template is ‘search’, the url will be
/Federation Services-discovery/view/search/test
- Template: Which view template to use. Federated Search or Reporting Dashboard Templates.
- Display Name (Optional): Enter the name you want displayed for this view in the views drop-down and in the views list in the left navigation menu. If no display name has been entered Discovery will use the short name.
- Select a Search Connection: Select the Content Search Connection the view will use to perform searches. This connector should be set up prior to creating a Content View as not having one will prevent you from being able to save the view.
Configuring Views
View Builder
Sections: The sections of the view, as defined by the template. The default SearchTemplate has three sections. Left Sidebar, Body, and Top Menu. Available Widgets: The widget instances of types allowed for the section. Section Widgets: The widgets in the section
Controls
- +: Add the widget to the section
- x: Remove the widget from the section
- i: Widget information panel. It allows you to update the properties of the instance..
- Double arrow: Widgets can be reordered by dragging up and down. This changes the order in which the widgets are loaded
Configuration
- Short Name: The short name of the view.
- Display Name: Display name of the view.
- Connector: Search connector the view will use
- Search on page load: The view will perform its base query (as configured on the search connection) when the page is first loaded.
- Add Records Management: Only available with the Records Management module. Will be grouped with Records Management views on the federation dashboard.
Security
View Users: Users and groups who can access this view. Leave blank to allow all users to see this view.
This list applies to both the Admin and Discovery apps. The SIMFLOFY_ADMIN role will not bypass this list.
Content View Examples
Discovery can be customised in various ways using the content view builder. Following are some examples of the types of views you can build for different result sets.
Basic Search View: Will give you the search results of the files in the indexed repositories. This will allow users to filter these results in various ways. By Filename, file content, connector, and content type. It also gives users the option to perform actions on the files selected. Such as checking files in and out, editing and exporting file properties, preview and download content, upload files, save searches and create new views based on search results.
Simple Dashboard View: Lets users create a visual representation of their data by adding charts based on indexed file properties. For example, you can create charts for the number of files by connector, file size, or file type. You can filter the results using the panels on the left-hand sidebar. Users can also remove and add counts from the charts by selecting the value labels in the chart legend.
Connector Report Dashboard: Provides a report on the search connector in use. The report gives you a line graph of searches per day as well as search terms over the previous 4 days.
Clustering: Provides a visual representation of the data using clusters that the user can drill into by content tags.
Integrations
Federation Services has a standard process for performing integrations or indexing, as demonstrated by the steps below.
- Create connector instances - This is part of the installation and requires the Admin to create Integrations and Discovery connections for use with the source and target systems. If setting up Federation Content Service and View connections will also be required.
- Discovery - Discovery is the 2nd step in the integration process. Here you will create a discovery schema instance, based on the connector’s configuration. It includes a list of all object types as well as attributes stored in each. Run discovery to get the schema/content type information from both the source and destination systems.
- Create and run jobs - This involves mapping metadata, configuring tasks for any kind of processing that is required (pre-requisite), and any targeted configuration for the source and destination. There are several ways to run jobs and depending on the amount of data the Federation Services Admin will set these up accordingly.
Job Setup and Configurations
The final step in the integration process includes mapping fields from each repository, creating and running the final job.
Event Configuration
Event Rules let you trigger jobs from content service calls. For example, if a file is updated in a source system, an event can be set up to trigger an index.
Event Job Configurations
Event Rules let you trigger jobs from content service calls. For example, if a file is updated in a source system, an event can be set up to trigger an index.
Event jobs, in abstract are meant to be triggered by some external action. For a basic event job, we use the push event endpoint, which tells Federation Services which document to get and which job to run it with.
Event Configurations enhance Event Jobs and require:
simflofy.event.queue=true(which is the default setting)
It allows them to be triggered through content service actions. So, if we want to add to that tutorial we would need to add a scenario in which we:
- Set up an event configuration
- Add it to an Event Job
- Trigger that job through a call to a content service endpoint.
Field Options
- Name: The name of the document.
- Content Length: The size of the document.
- Content Type: The content type (mimetype) of the document.
Important: The previous three field options will currently only work for the following endpoints. This may change in future releases.
/file/properties/contentStream
- Content Connector: The
connectorIdwhich was used. Can trigger on any endpoint. - Event Type: The type of action. See the table below for the action for each end point.
Creating and Event Job
This tutorial will walk you through setting up an event job that will process one or more documents. After we create the event job, we will push a document to the event queue using an API call. The API call will also start the event job and copy our document from a source folder to a target folder. To get started we will need to create a source folder, target folder and a test document.
Getting Started
- Create a source folder for your document. For example,
C:\SourceDocuments. - Place a test document into this folder.
- Create a target folder. For example,
C:\TargetFolder.
Creating a Federation Services Event Job
Step 1. Create a File System Connection
You will need a connection to your source and target repositories. Because our source and target repositories are the same, we only need to create one connection.
- Log into the Federation Services Admin tool (
http://(your server)/Federation-Services-admin). - On the left-hand side expand Connections and choose Integration.
- At the top left corner of the screen, click the button Create Integration Connection. Fill out the popup screen and click Save. This creates a connection to the File System that you can use as both a source and a target connection.
After you click Save, another screen shows the connection, click Save again.
Step 2. Create an Event Job
A Federation Services Job is the process of moving or syncing content (including versions, ACL’s, metadata) from one CMS (content management system) to another. Since Federation Services Jobs are specifically engineered for content management systems, moving content and metadata is just point and click. There are many Job Types as well as Job Tasks that can handle anything from data validation and cleansing to duplication detection.
In the Federation Services Admin tool:
- Expand Integration on the left-hand menu and choose List Jobs.
- On the right-hand side, click the button Create New Job.
- Enter the data into the popup screen and click Save. The Repository Connection is the source system and the Output Connection is the target system.
- For Job Type, select Event
- Click Save on the popup, and you are presented with the edit screen for your job.
-
The source file path should be set to include the location of the files you want to push. In our case we will set it to
C:\SourceDocuments. Any files inSourceDocumentsor its subfolders will be able to be pushed.Info: It is possible to set the File Path to a root drive such as
C:\\. We do not recommend doing this as it would allow any file on that drive to be pushed. - Next we need to enter the target folder. Click on FileSystem Connection-Output tab and enter the target folder where the file(s) will be copied (migrated) to:
C:\TargetFolder. - We will leave the default values for everything else and click Save.
This saves our event job, and we are ready to execute it.
Step 3. Execute the Event Job (Using an API call)
We have to tell the event job which document we want to process. This requires making an API call and passing two parameters, jobId and documentId.
- Find the job ID: To get the jobId, open the job and on the Details page look for the ID field. Edit or view the job we just created to see the job id.
- Find the document ID:
To get the documentId, use the full path of the document, i.e.
C:/SourceDocuments/sampledoc.pdf. In the SourceDocuments folder we will be copying sampledoc.pdf. Therefore, the documentId will be the full path:C:/SourceDocuments/sampledoc.pdf. Note the forward slashes. - Construct an API url and call it.
Construct the API URL:
We will now call the API to push the document into the queue for processing.
URL format:
http://{HOST}:{PORT}/3sixty-admin/api/event/service/pushevent?jobId=1631569493226&documentId=C:/SourceDocuments/sampledoc.pdf
Example curl command:
curl -u username:password "http://localhost:8080/3sixty-admin/api/event/service/pushevent?jobId=1631569493226&documentId=C:/SourceDocuments/sampledoc.pdf"
Once the API is called, the document will be placed in a queue and the event job we created above will be started.
The Source file will be copied to the destination folder TargetFolder. (note the full path of the source document is copied to the target folder.)
You can continue to call the API with different document IDs, and they will be processed as soon as they are inserted into the queue.
Also, note that the event job will continue running until you kill the job.
To kill a job, on the left-hand menu under Admin, select Active Jobs - Select the trash can icon to kill the job.
Event Types and Endpoints
| Event Type | Endpoint | Method |
|---|---|---|
| FILE_DOWNLOAD | /file | GET |
| FILE_DOWNLOAD | /inlinefile | GET |
| CREATE_DOCUMENT | /file | POST |
| UPDATE_DOCUMENT | /update | PUT |
| UPDATE_CONTENT | /updateContent | PUT |
| UPDATE_PROPERTIES | /updateProperties | PUT |
| CREATE_FOLDER | /folder | POST |
| DELETE_OBJECT | /delete | DELETE |
| STREAM_CONTENT | /contentStream | HEAD |
| STREAM_CONTENT | /contentStream | GET |
| FIND_PROPERTES | /properties | GET |
| DELETE_ACL | /acls | DELETE |
| GET_ACL | /acls | GET |
| EDIT_ACL | /acls | POST |
| VERSION_DOWNLOAD | /version/content | GET |
| FIND_VERSION_PROPERTIES | /version/properties | GET |
| CREATE_VERSION | /version | PUT |
| REVERT_VERSION | /version/revert | POST |
| DELETE_VERSION | /version | DELETE |
| LIST_VERSIONS | /listversions | GET |
Job Mappings
Federation Services Mapping gives you the ability to map your content types and metadata from one system to another. Before you start, be sure you are familiar with creating jobs and discovery. Both are integral to mapping.
Overview
In this tutorial we will explain how mapping works in Federation Services. Where you can create your map types, aspects, fields and calculated fields. How to update mappings in mass using Mapping Templates. How to export and import mappings. And complex scenarios such as mapping type hierarchies.
Creating Mappings
Federation Services Mapping gives you the ability to map your content types and metadata from one system to another. There are two places in Federation Services where you can set up mappings:
Reusable Mappings
From the Integration menu on the left-hand side of the Admin Page select Job Mappings. The Job Mappings menu item lets you create reusable mappings that you can then add to a job. This is especially useful when you have a lot of jobs with the same mappings. This way, you can edit one Job Mapping, and it will then be updated for all jobs that use that mapping. You can also download the JSON representation of the mapping to use for mappings import on another system.
Mappings Tab
The Mappings tab in a job is great when you need a one-off mapping that other jobs won’t use or if your mapping only applies to one job.
Mapping Types
There are several things you can map as seen below:
- Field Mappings allow you to map metadata fields from the source to the target. The names and data types can change from the source to the target by setting the Target type.
- Aspect Mappings allow you to map aspects for output systems that support them. Some systems, like OpenText Content Management System call these Categories. Aspects represent a collection of metadata field. You can typically have more than one aspect on a document.
- Type Mappings allow you to map the source type to a target type. These do not have to be the same name.
- Calculated Fields allow you to set constant values by surrounding them in single quotes (‘) or using the Federation Services Expressions Language.
Info: Calculated fields are processed before tasks and field/aspect mappings. If you wish to further use the product of a calculated field for you will need to create a separate mapping using the calculated fields output as the source.
Discovery Within Mappings
Mappings make heavy use of discovery information. Discovery allows you to pick your types and fields from drop-down lists instead of typing them out. It also knows the data types of each field. This allows for a much faster and less error-prone method of mapping types, aspects, and fields.
Audit Mappings
Audit mappings allow you to add field names and values to the Federation Services audit. These can later be used to create reports for analytics and/or validation. By default, Federation Services selects normal file system attributes to audit. These include file id, file name, created/modified dates, and author. A red eye is not being audited. Green is being audited. Simply clicking on the eye will change it to being audited or not.
Calculated Fields
Calculated fields allow you to hard code values or use functions. If you find the function calls getting too complex, we strongly suggest using a Job Task instead. Calculated fields are designed to be simple. Complex examples that have multiple levels of function calls are prone to error and tasks are designed for complex logic, unlike calculated fields.
Importing and Exporting Mappings
To export a mapping, go to the Job Mapping page, and select the export icon with the down arrow on it. Click Export Mappings to save the mappings as a json file. To import mappings go to the Mappings tab in the integration job and click on the green Import button.
You can import multiple mappings into the same job. Just click on the Import button and cut and paste the JSON from the export into the text area provided.
Example of a JSON format for import mapping under the mappings tab in the job config.
{"mappings":[
{"sourceType":"TEXT","watch":false,"mappingType":"TYPE_MAPPING","targetType":"TEXT","source":"Email","position":0,"target":"duotAF9"}
,
{"sourceType":"TEXT","watch":false,"mappingType":"ASPECT_MAPPING","targetType":"TEXT","source":"Email","position":1,"target":"cAF739"}
,
{"sourceType":"TEXT","watch":false,"mappingType":"FIELD_MAPPING","targetType":"TEXT","source":"Email.Subject","position":2,"target":"tAF723"}
,
{"sourceType":"TEXT","watch":false,"mappingType":"FIELD_MAPPING","targetType":"TEXT","source":"Email.To","position":3,"target":"tAF722"}
,
{"sourceType":"TEXT","watch":false,"mappingType":"FIELD_MAPPING","targetType":"CHECKBOX","source":"hasPii","position":15,"target":"tAF701"}
]}
Mapping Groups
Mapping groups allow you to group integration job mappings into logical groups that you can then manage together.
Creating Mapping Groups
Creating a mapping group is easy. You just give it a name, click the Add Mapping Group button, and then select mappings from the list. You can use the search box to filter the list.
Using Mapping Groups
In the job’s Mappings tab your mapping groups will show up in the Select Additional Mappings drop-down. Read Only versions of the mappings will appear at the bottom of the page, so you won’t have to leave to confirm the content of each mapping in the group.
Properties File Discovery
If you ever have the situation where Discovery can’t automatically find your fields, but you know they will be there, then you can create your own mappings with a properties file.
In some systems, like email headers or iManage, fields can be dynamic and so Discovery can’t find them. To add your own fields, do the following:
-
Create a properties file that will contain your fields. An example can be found in your installation:
tomcat/webapps/3sixty-admin/WEB-INF/classes/propertiesFileDiscoverySample.properties -
Edit this file, or the one you created if it’s different:
# Fields Types # CHECKBOX,DATETIME,TEXT,TEXTAREA,INTEGER,LONG,DECIMAL,DOUBLE,URI,READONLY,BINARY,ANY # # Format # type.field=field type # If they key has a space in it, replace the space with the unicode value: # u0020 # Historicalu0020Documents.field=CHECKBOX document.name=TEXT document.description=TEXTAREA document.createddate=DATETIME folder.name=TEXT folder.isversion=CHECKBOX -
Create a properties file discovery instance and point it to your properties file. Run it and your types and fields should show up, and now you can use them in job mappings.
Federation Services Expression Language
Federation Services uses a version of the JEval project to handle expressions. Expressions can be used in many places in Federation Services. Specifically they are used for calculated fields on the mapping page, but tasks and connectors can use them in their configuration pages too. The filter task is another good example.
An expression allows you to create values based on some formula or set of function calls. This can be used in a host of use cases to solve many problems including:
- Formatting data
- Value based on result of a decision
- Setting default values
- Creating data from other data
Expression Basics
An expression is just a series of Strings, Numbers, Function Calls, and Operators put together by the administrator resulting in a value.
Strings or Numbers or Booleans
Strings are surrounded with ‘ ‘. If something is not surrounded with a ‘, then it’s treated as a number. This will result in an error if you try to convert a string to a number.
‘Mark’ is a string
Mark is a number, but will cause an error.
‘0’ is a String
0 Is the number 0.
Booleans result in 1.0 or 0.0 where 1.0 is true and 0.0 is false.
‘mark’ == ‘mark’ would result in 1.0, or true. Whereas
‘mark’ == ‘nathan’ would result in 0.0.
Variables
Variables are either part of the Repository Document, Version History, or Fields from a Repository. Info: You access a variable using the following format: ’#{rd.path}’
Tasks search for #{ when detecting calculated field. The first portion identifies where to find the data.
Repository Document== rd
Version History== version
Fields== field or nothing
Examples:
#{rd.mimetype}
#{version.label}
Where document is the type:
#{document.myfield}, which is exactly the same as #{field.document.myfield}
See below for a full reference of all rd and version variables available.
Function Calls
You call functions with no ‘ ‘ such as:
now()
Most functions are camel case. So first letter is lower case, start of each syllable after that is upper case:
toLower(), startsWith(), etc..
String Functions
Full list of String functions with example:
startsWith('test.pdf', 'test', 0)
substring('test.pdf', 3, length('test.pdf'))
toUpperCase('test.pdf')
indexOf('test.pdf', '.', 0)
length('test.pdf')
replace('test.pdf', 'p', 'x')
concat('test.pdf', 'test.xml')
equals('test.pdf', 'test.PDF')
equalsIgnoreCase('test.pdf', 'test.PDF')
compareToIgnoreCase('test.pdf', 'test.xml')
compareTo('test.pdf', 'test.xml')
charAt('test.pdf', 1)
endsWith('test.pdf', '.xml')
toLowerCase('Hello World!')
trim('abc ') + 'd'
lastIndexOf('abcabcabc', 'abc', 8)
eval(1 + 2)
Math Functions
Full list of math functions with example:
asin(1)
atan(2.2)
atan2(2.2, 2.3)
ceil(2.2)
cos(2.1)
exp(2.2)
floor(2.2)
IEEEremainder(2, 6)
log(2)
max(2.2, 3.5)
min(2.2, 6.6)
pow(2, 5)
random(6)
rint(2)
round(2)
sin(2)
sqrt(9)
tan(2)
toDegrees(45)
toRadians(44)
abs(-1)
Custom Functions
If the first argument is blank, use the second argument.
isblank('#{rd.path}', '/my/default/path')
Returns the date at the time the job is run
now()
If the first date string is not a valid date, it will use the second date string as the default. This can be now(), another hard coded String, or some other function or set of functions.
toDate('Date String', 'Default Date')
Creating your own custom functions
Operators
The normal Boolean, number, and string operators for Java work with Federation Services Expressions:
+
-
&&
!
||
/
==
)
(
)=
(=
%
*
!=
Repository Document Variables
All variables with Federation Services Variable Resolvers are case-insensitive.
Repository Document
CreatedDate
ModifiedDate
FileName
FileLength
ID
MimeType
ObjectType
Path
3SixtySourceRepositoryID
Version
totalVersions
label
seriesId
isLatest
isMajor
listId
Examples
#{rd.CreatedDate}
#{rd.ModifiedDate}
#{rd.FileName}
#{rd.FileLength}
#{rd.ID}
#{rd.MimeType}
#{rd.ObjectType}
#{rd.Path}
#{rd.3SixtySourceRepositoryID}
#{version.totalVersions}
#{version.label}
#{version.seriesId}
#{version.isLatest}
#{version.isMajor}
#{version.listId}
Custom Fields you need to prepend with field
#{field.myObject.myCustomField}
#{rd.filename} + _ + version.label
#{mytype.claimid} + _ + #{mypolicy.policynumber}
Filters expect a Boolean result, 1.0 or 0.0. So you can do things like:
#{rd.mimeType} == text/html
Nested Functions
You can also nest functions. A good example is toDate:
toDate('#{rd.createddate}', now())
This results in rd.created date being formatted into UTC format, but if for some reason Federation Services detects an invalid date it will use the result of now() instead.
Migration Manager Variables
Variable name: job.lastrundate Description: This variable is substituted by the last successful job run date. If the job is run for the first time, it substitutes with 1st January, 1990 Example: SELECT * FROM mydatabase.events where created_at > CONVERT(DATE_FORMAT(‘#{job.lastrundate}’, ‘%Y%m%d’), char);
Schedule Jobs
Federation Services allows users to schedule integration jobs and job groups to run at a time period that may be more effective for the servers running them. Jobs can be scheduled to run at set times as well as set intervals. By minutes, hours, days, weeks etc.
Creating a Scheduled Job
To create a scheduled job:
- Select Schedule Jobs from the navigation menu under the Integration section.
- Select the Create New Job Schedule button at the top of the page.
- Give your scheduled job a name.
- Fill out the Configuration Fields (descriptions below).
- Click the Update Configuration button once you are done configuring the scheduled job for it to start running at the set time and interval.
Note: If the schedule on a running job changes, that job will be aborted and the new schedule will take effect immediately.
Configuration Fields
- Schedule Name: Name of the schedule.
- Run Schedule: Sets the schedule to run.
- Run Jobs in Parallel: If using a Job Group, run all the jobs simultaneously.
- Schedule Begin Date: The date for this schedule to begin running. The date range still needs to be set on jobs.
- If the date is before the current date and time, the schedule will run immediately if Run Schedule is set to On.
- Schedule End Date: The date for this schedule to stop running. The date range still needs to be set on a jobs.
- If the date is before the current date and time, the schedule will inform you and set Run Schedule to Off.
- Interval Between Runs: How often the schedule will run. An interval of fewer than 3 minutes is not recommended.
- Job/JobGroup: Sets whether to run a Job or a Job Group. If Job Group is selected, you will be able to choose the run order for jobs in the group.
Job Status
At the top of the scheduled job you can see the current status.
- Current Status:
Unsaveduntil Update Configuration button is pressed. ThenOFF,WAITING, orRUNNING. - Time until next run: As it reads. If this runs to zero, it will not refresh unless the schedule is closed and reopened. Will Display as
NAif performing a single run (interval set to0) or the job is currently running.
List Jobs
A Federation Services Job is the process of moving or syncing content(including versions, ACL’s, metadata) from one CMS (content management system) to another. Since Federation Services Jobs are specifically engineered for content management systems, moving content and metadata is just point and click. There are many Job types as well as Job Tasks that can handle anything from data validation and cleansing to duplication detection.
The List jobs page shows the jobs created. The available Job Types are:
- Sync
- Simple Migration
- Incremental Migration
- Event
- Polling
Job Types
There are several Job Types available depending on the use case.
- Simple Migration: Unlike Sync Jobs, deletions are not processed and content state is not recorded locally other than normal Job Auditing. Simple Migration uses manually entered timestamps whereas Incremental Migration will increment timestamps for each job run.
- Incremental Migration: Same as Simple Migration except at the start of each job run the query timestamps will be incremental automatically to read documents that were added or modified since the last run started.
- Manage In Place: Creates a shortcut to the file allows users to access files in source repos from Alfresco or Objective ECM without having to move the files allowing users to manage all of their content in place. This type of migration is only available for the Objective ECM Connector and Alfresco Connector at this time.
- Polling: A simple migration that runs continuously, the job processes at a specified interval and then sleeps until the next processing time. While it sleeps, the status of this job will be
Waiting. - Event: This type of job acts as a listeners for certain Content Service events, in order to run individual documents through a job, without starting and stopping the job. They can be triggered through a push event or by an event configuration. While not running, these jobs will show the status
Ready.
Job Groups
To access Job Groups, go to the group section in the left sidebar and select Job Groups. From here you can view and create Job Groups. When creating a job, users are given an option to either create a new Job group or assign the job to an existing job group.
- To create a new job group check the Create a new job group for the job check box and enter a name for the new job group. If no name is entered Federation Services will default to the name of the job as the Job Group name
- To add the job to an existing group, Select the group from the Job Group drop down. This will add this job to that group once created.
Creating a Job Group
To access Job Groups, go to the group section in the left sidebar and select Job Groups. From here you can view and create Job Groups.
- Click Create New Job Group.
- Fill in the group’s name.
- Select which jobs you want included in the group. You can use the search box to filter the available jobs list.
- Click Save.
Job Configuration Fields
Standard Options
- ID: The unique identity of this Job. If running jobs using the RESTful interface or command line, this is the Job ID to enter.
- Name: Descriptive Name of the Job that will be displayed throughout the UI.
- Content Service Connector: If using a Content Service Connector, set it here, and it will be appended to every record processed. This field is required for Federation Integration jobs.
- Repository Connection: The Repository Connection used for this Job.
- Output Connection: The Output Connection used for this Job.
- Type: The type of Federation Services Job.
- Job Tags: Another option for separating jobs into groups. If any jobs have tags, they will appear as a filtering option when listing jobs. Tags are case sensitive.
- Include documents modified after this date and time: Referred to as “Start Time”, this time will be used to check the last modified date of files before processing them.
- Include documents modified before this date and time: Referred to as “End Time”, this time will be used to check the last modified date of files before processing them.
START AND END TIME These values are only set by users for Simple Migrations. For Incremental Migrations, they are calculated based on when the job was last run. Event and Polling jobs don’t use them at all
Notifications
Notifications will only function is email is enabled. This allows the user to set conditions in which the listed email addresses will receive confirm status reports when a job completes.
Auditing
- Audit: Where to write audit data too. Note that Job Restart and Document Search will only work if Mongo is selected.
- Mongo: Audit to the Mongo Database or SQL Database if running in SQL mode.
- Log4j: Audit to the 3sixty-admin.log
- None: Auditing is turned off.
- Record Audit When: The audit level or what to audit.
- All (Read, Written, Skipped, Deleted and Failed): Full Auditing
- Failures Only: Audit only those records that fail during a job run.
- Failed and Deleted: Audit a record that failed during the job run or was deleted from a Sync Job.
- Failed and Skipped: Audit a record that failed during the job run or was skipped.
- Written, Failed and Deleted: Audit a record that failed during the Job run or was deleted from a Sync Job or written by the Output Connection.
- Written, Failed, Skipped and Deleted : Audit a record that failed during the Job run or was skipped or deleted from a sync job or written by the Output Connection.
Advanced Options
- Repository Connection Thread Count: The number of individual workers which will process and queue documents. Implementation may vary in certain systems.
- Output Connection Thread Count: The number of individual workers which will process and post documents. Implementation may vary in certain systems.
- Batch Size: If greater than 0, Documents will be assigned a batch ID. Batch Ids are a combination of the job id and the job run id (the timestamp of when the job was started), plus the batch number. The batchId will also be set as the highest parent folder for the document. (For example,
/home/simflofywill become{batchId}/home/simflofy). Some connectors have their own batch configuration, which is compatible with this field. - Max Queue Size: Limits the number of documents that can be queued at once, making repository workers wait. This can slow down output speeds, which may be useful if your output repository can be throttled.
- Max Errors Allowed: Maximum errors before the job stops. Leave 0 for unlimited errors.
- Process Relationships : Check this to tell Target Connector to process Document Relationships. This feature only works for the CMIS Connector.
- Include Hash : Check to tell Repository Connector to create hash of content if possible.
- Repository and Output Time Zone: These values will be used to adjust date fields (Created, Modified, and Mapped) to the appropriate timezone for their destination.
- Chain Job: Select a job to run after this one completes.
- Chain Job Wait Interval: Amount of time to wait after job completes before starting next job in format: 5s 5m 5h 5d
- History Retention: How long to keep the Job Run History for this job before the Job History Clean up Service clears the content.
Job Tasks
Job tasks provide a processing pipeline for documents and metadata. This means doing things like:
- Filtering content out or in based on rules, such as metadata values.
- Cleaning up file names or file paths.
- Re-Parenting based on rules.
- Extracting metadata from paths.
- Adding metadata from third parties such as Databases, Rest APIs, OCR Engines, etc..
- Transforming documents from one mime type to another, such as Word to PDF.
- Transforming metadata.
- PII - Personally Identifiable Information - detection.
- De-Duplication.
Adding Tasks to Jobs
There are over 30 tasks available out of the box and Federation Services is adding more all the time. This is the most popular extension point in Federation Services.
You can choose and configure job tasks on a per-job basis from the Tasks tab in any given Job.
You can re-order the pipeline by dragging and dropping the tasks. You can delete tasks or add new tasks.
The default recommended thread count is 1.
These tasks run in order, meaning if something is changed with the documents or metadata in one task, then the following tasks will see those changes.
Task Groups
Users can create task groups for tasks they will use often so they do not have to constantly create them for every job. When you select “Yes” under use a task group, a second box will pop up.
Run Group Task Options:
Select before or after to let Federation Services know when to run the tasks in the group. Selecting before will run the group tasks prior to any addition tasks listed in the job, while selecting after will run the tasks after the others.
In the drop down provided, select the Task group you would like to run with this job. Once selected you will see a list of all the tasks in the group. Click on the eye icon to view the details of each task.
Run and Monitor Jobs
The Run and Monitor Jobs page is where you can monitor the progress of your integration jobs. From this page you can see the status of your jobs. How many files have been migrated. When the job was last ran and any errors that might have occurred during the integration.
Note: When migrating documents with multiple versions, if a version in that series fails for any reason, the subsequent versions will not be processed. They will instead be ‘Skipped’ and previously uploaded versions will be cleaned up/deleted.
How to Run and Monitor Jobs
Under the Integration section in the navigation menu click Run and Monitor Jobs. On this screen, jobs can be stopped, started, and errors run.
Jobs can be filtered by Job Groups if you wish to focus on a specific set of integration jobs. See the following article for instructions on how to set the Job Groups up and use the drop-down to filter the job list by the group selected.
Set Refresh times for job runs. The page will refresh in the time period selected to show the updated job status.
Use the Search field to filter the job list for specific jobs.
Use the Show entries drop-down to select how many jobs get listed on each page.
The list of jobs displayed will tell the user the job status, how long the job took to run, how many files have been read, written, have errors, removed and skipped.
Reviewing Job Errors
If any errors occurred during the job run, you can click on the error count to get to the error report page. From the error report you will be able to see the cause of the errors and download them as a csv if needed. For additional debugging instructions see the following article: Federation Services Logging Instructions.
Resuming and Restarting Jobs
Resuming a job: Usable when a job is aborted. Reruns the job, but a special task is added that will skip documents which had errors in the previous run. Run Errors: Available when a job fails or is aborted. Only the errored documents will be processed.
Advanced Configurations
PII Detection and Reporting
While doing a document migration or synchronisation it may be prudent to check the document, or it’s metadata for PII. You can also crawl you content simply for PII by using our reporting output connector with any repository connector that we support.
The PII Scan feature allows the user to select a configured repository connector and job, then scan the repository for Personally Identifiable Information (Pii).
This can include phone numbers, social security numbers, proper names, and addresses.
A temporary job is created using the repository configuration of the selected job.
Important: File size limit is 95MB
Running the PII Scan
Under Analytics select PII Scan and complete the PII Scan page:
- Select the repository connection you want to scan
- Select the Job to scan for PII
- Optional
- Start Date: Select a date to start searching for PII. If left blank the Job start time will be used
- Exclude Binaries
- Define list of properties. The default is all properties.
- Notify of completion by email.
- Select the Scan for PII button
Viewing PII Data
Once the PII scan runs, users can view the PII report in the Discovery UI by either:
- Clicking on the link provided in the Scan complete notification box.
- Selecting PII Data Viewer in the left navigation pane on the home page of the Discovery UI.
Document Duplication Detection and Reporting
There may be a need to identify duplicate documents in your enterprise and Federation Services allows you to identify these duplicate documents in a variety of ways.
One way to identify duplicate documents is by using the Duplication Check Job Task which allows you to log, skip or fail documents that are duplicates. This works well for large scale integrations when combining a number of legacy source systems into one new enterprise content management system.
Another way to identify duplicate documents would be by leveraging Federation Services’s Reporting Output Connector. Using the reporting output connector you can read content in from any source system Federation Services supports and report on the content that is found. One of these reports is a hash of each document seen. Using this hash plus MongoDB’s aggregation framework we can generate a CSV or JSON reports of all duplicate records. You can obtain the hash of a document by including the Hash Generator Job Task in your Job Tasks.
After crawling your source system and outputting to the Federation Services Reporting Connector you can now run the following commands against MongoDB. Start my typing mongo in your terminal:
Depending on how many documents you found during the crawl > 100,000, you may need to add docHash index.
db.tsRecordProcessed.createIndex( { docHash: 1 } )
Next we group by docHash and output to a new collection named duplicates (you can name the new output collection anything you like):
db.tsRecordProcessed.aggregate([{$group:{_id:"$docHash",docs:{$push:"$doc_id"},doc_names:{$push:"$doc_name"}}},{$project:{docs:1,doc_names:1,numDocs:{$size:"$docs"}}},{$match:{numDocs:{$gt:1}}},{$out:"duplicates"}])
You can now export de-dupes collection to CSV or JSON using mongoexport:
mongoexport --db simflofy --collection duplicates --fields _id,docs,doc_names
--username user --password "pass" --type=csv --out duplicates.csv
Stuck Jobs
If a job is running and the Abort does not stop the job in an appropriate amount of time, the job can be killed manually through an Admin page. See Active Jobs for more information.
Federation Services Job Flow
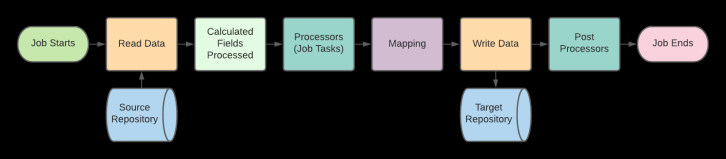
Task List
Tasks are run for each document that has been read. A number of tasks can be set to remove documents from the queue if they don’t fit certain criteria. Documents removed this way will not be processed by any following tasks. It should be noted that Calculated Fields are calculated before tasks, while Fields Mappings are handled after tasks.
Commonly Used
Duplication Detection
This task checks the chosen field to find duplicate documents during the job run. It takes the selected actions against the document if a duplicate one exists. To see how each repository handles duplicates and versioning check the individual connector page.
When the duplication check is run multiple times, the original file will not be marked as duplicate.
Configuration
Field to Compare: The field whose value will be used to check for duplicates. If this value is found in any other document it will be considered a duplicate. The default is the File Content Hash.
- File Content Hash
- Document Type
- Document Source Id
- Document URI
- Version ID
- Version Series Id
If you wish to compare file hashes (a sort of fingerprint for a document), you will need to precede this task with a Hash Value Generator Task.
Duplication Check Scope:
- Run Job: Check the documents associated with this job run only
- Job: Check all documents ever ran for that job
- Enterprise: Check all documents ever processed through 3Sixty
Action: What to do if a document is found.
- Audit and continue
- Skip the document
- Fail the job
Tagging Duplicate Documents
Metadata can be added through mapping to tag documents discovered as duplicates when the Action field is set to Audit and Continue.
The fields that can be added are:
- isDuplicate: true (if duplicate found) or false (if not) Important: When using the Duplication Detection task in a job the user must make sure that if they are mapping the “isDuplicate” field that they set the Target type to String and not Boolean or they will receive an error that they cannot change text to boolean. If this error is received the user has to drop the index and run the job again.
- baseParentID: doc ID of the original document
- duplicationParentID: comma separated list of doc IDs of the documents that it found duplicates against - blank if no duplicate detected
- duplicationScope: blank if no duplicate detected, and
- duplicationCriteria: which fields the duplicate was considered against; depends on what was selected below - blank if no duplicate detected
Filename Cleanse
This task uses regex (Regular Expressions) to alter filenames.
Common use cases are clearing unwanted characters, such as whitespace, or non-alphanumeric characters.
- Regex to Match: The regex pattern to search for in the filename.
The default value matches any character that isn’t a letter, number, space or period an unlimited number of times.
- Replacement: Replacement for matches.
EXAMPLE - ALPHANUMERICS
The pattern for alphanumeric characters is [a-zA-Z0-9], or if you wish to include underscores \w.
To select for non-alphanumeric characters we add the carat (^) before the pattern, so ^[a-zA-Z0-9].
The carat character simply translates to “Not”, so it negates whatever is after it.
EXAMPLE - CLEARING UNWANTED SPACES
The pattern \s is regex shorthand for “spaces”. If you’re worried about tabs, line breaks etc. add an asterisk (*) after the pattern for what is called “greedy” selection.
Adding this as your regex and setting the replacement as ''.
Filename Extraction
Extracts the file name from another field using regex (Regular Expressions). It will set the file name to the value that matches the regex.
- Regex to match: The regex to match and convert to and set as the file name.
- Data Field: The repository document field to match the regex on.
EXAMPLE - ALPHANUMERICS
The pattern for alphanumeric characters is [a-zA-Z0-9], or if you wish to include underscores \w.
To select for non-alphanumeric characters we add the carat (^) before the pattern, so ^[a-zA-Z0-9].
The carat character simply translates to “Not”, so it negates whatever is after it.
EXAMPLE - CLEARING UNWANTED SPACES
The pattern \s is regex shorthand for “spaces”. If you’re worried about tabs, line breaks etc. add an asterisk (*) after the pattern for what is called “greedy” selection.
Adding this as your regex and setting the replacement as ''.
Folder Path Cleanse
This task uses Regular Expressions (regex) to alter Folder Names. Functionally identical to Filename Cleanse Task, except that is changes the document parent path.
Regex to Match: The regex pattern to search for in the Folder Name.
The default value matches any character that isn’t a letter, number, space or period an unlimited number of times.
Replacement: Replacement for matches.
Obsolete Detection
The obsolete task can be used to identify obsolete documents when reading them from the source repository. This can be used either in the federation view for identifying documents that are obsolete based on the definition set in the task for the job by adding metadata or skipping/processing the documents which are obsolete. You can define what obsolete means for your organisation - you can define it based on the date created or updated and the content before what timeframe is considered as obsolete.
Note: The Obsolete Detection tasks uses the system time of the 3Sixty server when calculating date/time scenarios.
Fields
- Before when will the files be considered obsolete
- Before
- Custom Date
- Action
Metadata
- isObsolete - Yes/No
- obsoleteField - Date Created or Date Updated
- obsoleteBefore - date after which the content is considered obsolete
Override Filename
The task uses the 3Sixty Expression Language to override the file name of each document. The functionally of this task is identical to the Override Folder Path task.
Configuration
- Pattern: List the fields you want to use to rename the file
- Deep Change: If the file has versions, update their names as well.
Override Folder Path
Add the Override Folder Path task from the drop-down on your job.
A sample pattern has been provided for you by default. You can also leverage the 3Sixty expression language when modifying your path. More information on the Expression Language can be found here. Click the Done button when you have finished modifying your job task.
The example pattern is:
'/' + '#{rd.filename}' + '/simflofy'
Using the Expression Language you can see that rd. are internal 3Sixty Fields.
However, you may want to use metadata from the source system to generate your path.
Use field in place of rd to accomplish this or leave off the prefix entirely.
The best way to put your path together is to know what fields are available and what the field values look like. We suggest running the BFS output with no mappings and Include Un-Mapped Properties set to True. This will generate a xml file such as:
<properties>
<entry key="document.name">Alfresco Ingestion.pptx</entry>
<entry key="type">document</entry>
<entry key="folderpath">test3Sixty_Partners</entry>
<entry key="separator">,</entry>
<entry key="document.Culture">en-US</entry>
<entry key="document.CustomerId">123</entry>
<entry key="document.Category">legal</entry>
<entry key="document.lastindex">23</entry>
</properties>
Now let’s say we want the actual folder path to be a combination of folderpath + Culture + Category + Customer ID. To do that we just reference each field like:
'/' + '#{rd.path}' + '/' + '#{document.Culture}'+'/' +
'#{document.Category}'+'/' + '#{document.CustomerId}'
PII Detection
The PII Detection Job Task is uses regex expressions to detect PII in any document or metadata passing through 3Sixty. The regex expressions are stored in the form of a .properties file.
Caution: File size limit is 95MB.
PII FLAG
This task will always add the boolean field hasPii for the purposes of mapping and analysis.
DEFAULT FILE LOCATION
The default file is located at 3sixty-admin/WEB-INF/classes/simflofy-pii- detection.properties:
- Field To Mark: The output metadata property to store PII detected. The value of this field will be a map
{
"PhoneNumber": 20,
"Names": 200
}
- Break up PII data into individuals fields: Instead of adding the PII as a map, 3Sixty will break it up as individual fields for easier mapping/processing.
- Prefix for PII fields: If breaking up PII data, the prefix to use for each field. If left blank ‘pii’ will be used.
- Fields To Check: Source properties and/or document to check for PII. Use ALL_PROPS to check all properties, BINARY to check the document (extracted via Tika) or individual property names.
In this case, the above fields will come across as
pii.phonenumber and pii.names
Rename File On Duplicate File Path
Functions similarly to the Duplication Check task, except if it finds a duplicate, it will rename the file using the supplied pattern.
Tika Text Extractor
Apache Tika is an open-source tool used to extract text from documents. 3Sixty most commonly uses it to extract text during indexing for federated search.
For this feature to work on larger files, memory pool settings of 4GB is required, 8GB recommended. This can be updated in the Java tab of your Apache Tomcat Properties window.
Caution: File size limit is 95MB.
- Tika Content Field: The field where the task will put the extracted content.
- Max Content Length (B): Set the max content length which is checked before processing. The job will not process documents over this size. Set to 0 to process documents of any length.
- File Extensions to Extract: Comma delimited list of file extensions to process or leave blank to process all. The extensions are checked at the same time as content length. Fail Document on Extraction Error: Fail the Document if there is an Extraction Error during processing.
- Remove Content After Extraction: Remove the content from the documents. This will happen even if the document exceeds the maximum length.
- Stage on Filesystem: Stage content on the filesystem for extracting text or set to false to use in memory.
Trivial Detection
The trivial task can be used to identify content that is trivial in nature (as it holds no importance from a corporate knowledge perspective). The definition of trivial depends on your organisation. You can set whether you want to filter on documents of certain sizes or if you want to filter out files with certain extensions or document types. For example, dmg, and exe are installers and may hold no corporate importance so you may want to skip such content from being registered as a record, you can now do so by adding them to the filtered list of extensions.
Configuration
You can add several filters to include documents that meet all the stated criteria.
- Filter on document’ below a specific size
- Filter files below size (bytes)
- Filter on document’s above a specified size
- Filter files above size (bytes)
- Filter on file extension
- Filter on document type
Once the filters are selected you can then determine what action should be taken with the files that meet the selected criteria.
- Audit and Continue
- Skip the files
- Fail the job
Metadata
The trivial detection task also includes the following default set of metadata:
- isTrivial - Yes/No
- ignoreSizeBelow - content ignored below size in bytes
- ignoreSizeAbove - content ignored above size in bytes
- ignoreExtensions - comma separated list of extensions that were listed in the criteria
- ignoreDocTypes - comma separated list of doc types that were listed in the criteria
General
Basic JDBC
This task is for a scenario where if you have extra metadata that points to an external source repository like a JDBC Database 3Sixty will merge that data into your documents as they are being read.
Configuration
- User Name: JDBC User Name
- Password: JDBC Password
-
Driver Class: The driver for the JDBC database. A number of possible drivers are listed here.
The Database Driver Class supports:
- com.microsoft.sqlserver.jdbc.SQLServerDriver
- oracle.jdbc.driver.OracleDriver
Caution: Ensure that your driver jar file is in the
3sixty-admin/WEB-INF/libfolder at start-up.
-
JDBC Url: Url to connect to the database. Each type of database uses a different format. Refer to the linked table for formats.
JDBC Url examples:
- jdbc:sqlserver://localhost:1433;encrypt=false;databaseName=Objdemo
- jdbc:oracle:thin:@dos1029ecm01.eng12.ocl:1521:ora
- ID Field: The field (without table name) which will be used to name binaries queried from the database.
- Query: The query to execute. All results will be added to the document in the format [tableName].[fieldName]
Note: The query can insert expresions. And the query will only return one document.
Buffer Binaries to File System
This task will buffer files to temporary directory. In this case the value of the System Property java.io.tmpdir. The task takes a timeout which will fail the document if it does not complete staging in the given amount of time. The default is 10 seconds, but for larger files (100+ MB), we recommend 60 seconds.
Convert Array Value To String
Converts a property on a repository document from an array to a String.
Configuration
- Delimiter: The delimiter to place in between values of the Array. If left empty will default to space
- Property Name: The array repository document property to convert into a String. The new String property will have the same name. This field cannot be an expression.
Convert String to Boolean
The String to Boolean Task is designed to check the value of a string and return true of it matches the expected value. This is a quick way to convert a string field into a Boolean and is used to manipulate data as it is being processed. You also have the option to specify whether the match should be case-sensitive or not.
Here’s an example:
In the above example, we are going to check the field dc:availability. If the string value of that field equals available (Expected Value) the dc:availability field will be updated to a true (boolean). As we elected not to use case sensitivity, the string AvailAble would also return true. Otherwise, a boolean false value will be stored.
Convert To UTC
This task will convert date fields to the given format, with the given offset.
Configuration
- Date Fields to Convert: A comma delimited list of repository fields or the output of calculated field.
- If you do not supply field names, the task will attempt to process all the Job’s Date/Time mappings. Note: only calculated field mappings are available to job processors.
- Offset: Timezone offset.
- Date Time Format: Final format for the field you’re converting.
- Define Date Time Format Check box: Check to define an output format, uncheck to return default format (i.e. 2019-11-05T16:00:00Z)
Date Based Folder Path
This task takes ones of the date fields on the Repository Document and uses it to generate the parent folder path for the document. This mimics how Alfresco stores its data in the filesystem
Configuration
- Repository Document Field: the field to use for the path - can be any date field
- Pattern: The pattern used to break down the date into a folder path
The default is /yyyy/M/dd/kk/mm/ss/
In this case, kk is used for hours.
Example
For the document file.txt, if you set the field to use the modified date '#{rd.modifieddate}' and the date is 1999-04-20T12:01:23, then your path with the default pattern will be:
/1999/4/20/12/01/23/file.txt
Field Lookup
This task is intended to allow users the ability to perform a look-up operation and update the matching fields of the repository documents. This task was originally created for integrations in which certain field values could only be obtained by importing them from an external source.
- Task Name: Name of the Lookup Job Task
- Delimiter: Denotes the delimiter character if values are not in list format.
- Property Field: Path Uses preset configurations to evaluate values against the path
- File Name Uses preset configurations to evaluate values against the file name
- Other Property Evaluates a property entered by the user against the given values
- Property Name: A specific property entered by the user. This property will be used only if Other Property is selected from the property field drop-down list.
- Values: Key=Value listing to be used as the source data for the lookup operation.
- Look for an exact match: If set to true, properties that have an exact (whole case) match will be updated. If set to false, properties that contain the entered value(s) will be updated. For instance, if set to true the value 123 will only have a match with 123. If false, a match will be identified if 123 is present in any part of the field and only that portion will be updated with the new value.
3Sixty can utilise any properties that are associated with a repository document. We recommend running a BFS output job with no mappings and Include Un-Mapped Properties set to True. This will generate a xml file similar to the example below and allow you to see what properties are available for your documents:
<properties>
<entry key="document.name">3Sixty Overview.doc</entry>
<entry key="type">document</entry>
<entry key="folderpath">test3Sixty_Setup</entry>
<entry key="document.Culture">en-US</entry>
<entry key="document.Customer">123456</entry>
<entry key="document.Category">training</entry>
</properties>
In the example above you will notice that the document.Customer field has a numerical value associated with it, but not the actual customer name. The task will allow you to import a list of customer IDs along with their associated customer names and update those values as desired.
The updated values will then be available in subsequent job tasks. For instance, you could then use override folder path task to build out a folder structure with the updated values. Using the scenario above, you could build out a folder for each customer by name instead of numerical value.
HTTP
The purpose of this task is to execute a GET or POST HTTP call for each repository document. If the status is any of the following, then processing will continue, if not, the document will be skipped.
200 OK 201 Created 202 Accepted 203 Non-Authoritative Information 204 No Content 205 Reset Content 206 Partial Content 207 Multi-Status (WebDAV) 208 Already Reported (WebDAV) 226 IM Used (HTTP Delta encoding)
Configuration
- Username/Password: Credentials to access the endpoint
- Action URL: The endpoint being contacted, without parameters
- POST or GET: Selects the HTTP Method
- Request parameters: In the form of
param1=value1&m2=value2- The ‘values’ can be dynamically created using the Expression Language
- Send body with request: The body can be raw text and can use the Expression language.
- If the text begins with the symbols
[or{, then the body will be need to be valid JSON
- If the text begins with the symbols
- Action to take if the call does not return 200 (OK): Continue, Skip or Fail are the options
- Timeout in milliseconds: How long to wait for the call to execute before attempting to continue.
- If the timeout is reached, the action selected will be used.
JavaScript Processing
This task is a custom operation that allows the user to ask 3Sixty to do things that are not already available in the software. 3Sixty’s JavaScript Task allows you to run JavaScript against a repository document during processing. The task uses the ECMA 5.1 specification to execute the JavaScript against the native Java API. Currently, only one root object is exposed called rd (repository document). Any method that can be called against the repository document can be called using JavaScript syntax.
Fields that are also available:
Variable Name : Variable The Job ID : jobId The Job Run ID : jobRunId
The variable result is automatically declared in each run of the JavaScript task, and its return value can be used to control which documents continue processing.
The task only supports single quotes for strings. Double quotes will cause errors due to how the content of the script is saved to the database.
Caution: When creating the database table name please note that it must be all lowercase.
Pause
This task can be useful when outputting to a repository with rate limits, such as Box or SharePoint.
- Pause in seconds: How long to pause for each document.
Remove Mappings
Removes mappings from a repository document if the field has no values.
- Source Fields: Comma delimited list of the mappings to remove if it has no values.
Two Way Sync
The Two Way Sync Job Task is to filter out any unnecessary documents when doing an incremental sync between two systems. Documents can be filtered by matching MD5 Hash or If the document was just seen in the last run by the other sync Job.
Configuration
For Two Way Sync you will need to set up two Incremental Migration jobs and chain one Job after the other. You will want to put the Job that should win on a collision as the first Job in the chain.
On each Job add the TWO Way Sync Job Task and, if using the MD5 Hash option, you will need to add the MD5 Hash Job Task before the Two Way Sync Job Task.
- Check Last Run: If this document was just moved by the other Job in the Sync to this Repository, then let’s skip it. If you want to sync it back (maybe after a rule/formula set to false).
- Compare MD5 Checksums: Check MD5 Hash of this Document and the Last Document moved by the synced Job. If set to true and MD5 Hashes match, then skip this Document.
- Job ID of Other Job: The Job ID of the other chained Job in this Two Way Sync
Metadata
Join Mongo Document Metadata
The purposes of this task is to retrieve metadata from an outside mongo database during a migration, adding it to the repository document before mappings are performed.
This task is called a “join” because it checks for a value on both the Repository Document and in the Mongo Document.
- The checked field on the Repository Document can be either a standard field mapping, or it can be calculated using the Expression Language.
- If either checked field is missing, the process will be skipped.
- If the values of the checked field matches, the comma delimited list of fields will be added from the Mongo Document, in lowercase.
- They can then be added as normal field mappings in a job mapping, as Field mappings take place after Tasks.
- This task supports multiple fields to check on the Mongo document and repository document
- Users can sort the order in which the fields are checked
Configuration
Fill in the following fields to configure this task. Some fields come with default configurations. Update them as necessary.
- Task Name
- The fields you’re checking for on the mongo document (comma separated)
- Default: doc_id,doc_name
- The fields you’re checking for on the repository document
- ’#{rd.id}’
- ’#{rd.filename}’ Each line contains one field. The number of fields must match the ones you are checking on in the Mongo document.
- Comma delimited list of fields to add to the repository documents, should the fields match
- Mongo field to be used for sorting followed by a comma and sort order
- docCreated:1 The Sort order can be +1 for ascending or -1 for descending.
- The MongoDB Url
- localhost
- The Mongo Port
- 27017
- The mongo database to query
- admin
- The mongo collection to query
- collection
- The mongo user, leave blank if no authentication is set
- The mongo password, leave blank if no authentication is set
Metadata Extraction - EML
An EML file is an email message saved by an email application, such as Microsoft Outlook or Apple Mail. It contains the content of the message, along with the subject, sender, recipient(s), and date of the message. EML files may also store one or more email attachments, which are files sent with the message.
This task extracts metadata from emails and adds as fields to the repository document. These extracted fields appear as:
- Email.Subject: The subject line of the email.
- Email.From: The ‘from’ line of the email.
- Email.To: The ‘to’ line of the email.
- Email.Body: The body of the email.
- Email.CC: The CC line of the email.
- Email.BCC: The BCC line of the email.
- Email.EmailList: Space separated list of To, From and CC addresses.
- Email.InternetMessageId: The message ID of the email.
- Email.Size: The size of the email.
- Email.HasAttachments: Whether the email has attachments or not.
- Email.Attachments: Comma delimited list of email attachments by name. Blank if none.
- Email.AttachmentCount: The number of attachments in this email.
- Email.DateTimeSent: The date time the email was sent.
- Email.DateTimeCreated: The date time the email was created.
- Email.LastModifiedTime: The modified date time of the email.
- Email.DateTimeReceived: The date and time the email was received.
Metadata Extraction - Path
This task will extract the metadata from the file and add it as fields to the repository document.
Configuration
- Path Field: Which field to use to extract metadata. Options are:
- Repository ID (for repos that use the entire path as an ID, such as Filesystem, or Amazon S3)
- Parent Path, for repos that don’t use paths as ID.
- Path Rules: Comma delimited list of rules to extract. The format is
[New Field Name]=#{Location}:- Location takes the form of an integer, starting at 0 for the root folder.
- Additionally,
'filename','parent',and'grandparent'with **quotes included can be used.
Output Metadata As JSON
This task fully converts each document to a json object and exports to it to the configured path on the local filesystem where 3Sixty is running.
- Output Path: Folder where the json files will be written. Path will be created if it does not exist.
File name pattern = [filename].document.metadata.json
Folder name pattern = [foldername].folder.metadata.json
Replace Metadata
This task will perform a Regex search on the configured metadata field and replaces it with supplied text.
- Source Metadata Field: The field to check.
- Regex to Match: A regular expression to use as the first argument of a Java String.replaceAll() method.
- Replacement Text: The text to use as the second argument of the replaceAll() method.
Metadata from Properties File - Filesystem
If there is a separate properties file then 3Sixty will get the metadata from that file. This only works for a File Systems connector. Configure this task by completing the following fields.
- Properties filename
- Skip files with no property file found in hierarchy
File
Attach Content Binaries
This task is designed to grab a binary from the filesystem given a path set in the form field. The task will look for a file of the same name.
- Expressions should be used to set the path dynamically. ie
/path/to/+#{rd.FileName} - If there is no file at the specified path, the documents will be skipped.
- If there is an error reading the file, an error will be noted in the tasks/job run.
- If the task does not detect the use of an expression through the characters
'${', it will search the document metadata for a field which contains the absolute path to the file.
Attach Content - External Repo
This task is for a scenario in which the source contains document metadata and also contains the file path to it’s content.
This allows the user to read metadata and attach the file to it that matches the metadata field given.
Configuration
- Enter the field that references the Object Id for the file content.
- If you include metadata 3Sixty will combine the properties between the two files
Note: The text input does not currently process expressions.
Attach Content - File System
This task is designed to grab a binary from the filesystem given a path set in the form field. The task will look for a file of the same name.
Configuration
- Expressions should be used to set the path dynamically. ie
/path/to/+#{rd.FileName} - If there is no file at the specified path, the documents will be skipped.
- If there is an error reading the file, an error will be noted in the tasks/job run.
- If the task does not detect the use of an expression through the characters
'${', it will search the document metadata for a field which contains the absolute path to the file.
Attach Content - FTP
Sets the binary of a document to a binary found on an FTP server at the location found using the Path Expression.
- Username: The username needed to log in to your FTP server
- Password: The password needed to log in to your FTP server
- Host URL: The URL of the FTP server
- Encrypt Data: Sets whether to encrypt the data connection to the FTP server with TLS. Note that Use FTPS must be checked if you use this.
- Use FTPS: Sets whether to use FTP with SSL protocol.
- Is Implicit: Sets whether to use FTP implicit SSL or FTP explicit SSL
- EPSV With IPV4: Sets whether to use EPSV with IPV4.
- Server Port: The port your FTP server is listening on
- Thread Count: Number of FTP poster threads
Attach Content - S3
Attaches a binary to the repository document from an S3 bucket.
- S3 Access Key: The access key for your S3 connection
- Client Secret: The client secret for your S3 Connection
- Base Folder Path: A base path to be prepended to your key
- S3 Bucket: The bucket to search for the binary. Also, list items either all have periods or none of them do.
- Key Field: The field on the repo document that contains the key for S3 bucket lookup.
- S3 Region: The region of your S3 bucket
Filter Expression
The filter expression task allows you to remove files based on the expression used. The task has two fields, the task name and the filter expression. The task name is arbitrary but should identify the type of filter you’re creating.
Filter Expression
The filter expression can use any of the 3Sixty Expression Language components to form simple or more complex expressions for evaluation by 3Sixty.
Note: If the expression evaluates to
true, the document will continue to be processed.
For example: If you want to exclude the OS level file Thumbs.db in your job, you can filter those files out using the following statement: !equalsIgnoreCase('#{rd.filename}', 'Thumbs.db')
The above example will find all the files that have the name Thumbs.db and set the expression to false for the documents. Therefore, all files with the name Thumbs.db will be skipped.
Generate Thumbnail
Generates a thumbnail for a repository document and adds it as a rendition.
Note: This task currently only supports jpg, png, bmp, wbmp, and gif.
- Resize Width: The width of the thumbnail image in pixels
- Action: The integration action to take following thumbnail generation
- Types of Thumb Nails: List of comma delimited file extensions to support
Hash Value Generator
Creates a hash of the document content and sets it on the repository document. Can be used in tandem with the Duplication Check task to find duplicates.
- Staging: Where to stage the data locally, while creating the MD5 Hash.
- Algorithm: The type of hash to use. MD5 is the default hash, but SHA hashes are available
Federation Services can generate Hash for any File Size. But users are provided with the option to add File Size limit while generating Hash. If the user does not want to generate a Hash for a file of a particular size, then they can put it in megabytes.
HTML to PDF
This task takes a single argument, which is a file path to an XHTML stylesheet ( *.xsl).
The binary stream is taken from each repository document and converts it to a pdf using the template.
Property XML Parser Job
This task will take an XML file and use the content to create metadata fields.
- Field to Parse: If the content of the file is the xml to parse, use BINARY. If the xml appears in a field, use the field name. This is a required feild.
The xml is expected in the following form:
<rootElement>
<comment>Comment Text Here</comment>
<entry key="fieldName1">fieldValue1</entry>
<entry key="fieldName2">fieldValue2</entry>
</rootElement>
- The root element is named as such for the example. The task searches for “entry” children.
- Comment is an optional field and will be added as comment to the document properties.
Remove Renditions Matching Binary MimeType
This task takes no arguments. It will remove all renditions that have the same MimeType as the Original Document Binary.
Skip Blank Filename
Skips a file during migration if its file name is blank.
No additional Task Configurations needed.
Skip on Empty Field
This task will skip a document if the supplied fields are all blank.
Text to PDF
This task takes no arguments, and simply converts text binaries from a Repository Document into a PDF file on output. If the mimetype of the document is not ‘text/plain’, it will be skipped.
Text/HTML to EML
This task takes the content of an document and converts it into email.
Unzip
This task will unzip any compressed files during the migration process and send the documents directly to the output connector. Documents that are queued this way will not increment Read, but will increment processed.
Configuration Fields
- File staging location: The location unzipped files are stored temporarily while processing
- Skip the zip file after unzip: Check this box to skip the zip file during processing. If the box is unchecked the zip file will be included in the document transfer
Caution: When unzipping files to an ECM output location, if the zip file has the same file name as another document in the folder, the file will not unzip to that location as ECM doesn’t allow folders to be created with the same name as a file. It will result in a duplication error.
Text Extraction
AWS Textract
This task will extract text from PNGs, JPGs, and PDFs and stores the text on the repository document in the simflofy_ai_text field.
Configuration
- Authentication Connection: An Amazon authentication connection with your Amazon AWS credentials
Google Vision Text Extraction
Extracts text from .tiff, .pdf and .gif files and stores it on the repository document in the simflofy_ai_texts field.
- Authentication Connector: Your authentication connection for Google You can find it in the url while edit or view page for the connection
Tesseract Text Extraction
PREREQUISITE This task requires Tesseract to be installed on the system that Federation Services is running on.
This task uses Tesseract OCR to scan for text from images and PDF files, saving that text to a field in the repository documented called simflofy_ai_texts. Supported formats are .png, .jpg, .pdf, .tiff, .gif, and .bmp. PDFs are saved on a per-page basis to simflofy_ai_texts.
Note: Tesseract OCR will be an optional dependency of Federation Services.
Configuration
- Tessdata Directory: The path to your Tessdata folder. This folder should have the trained data of the language you plan to OCR.
- Tesseract Library: The path to your Tesseract library folder containing the proper library files for your OS.
- Engine Mode: Select which engine Tesseract should use, legacy or LTSM. Ensure that ensure is installed before selecting it, or leave it on the default config for it to detect your engine.
- Page Segmentation Mode: By default Tesseract expects a page of text. You can change the way it segments a page if your images differ from this.
- Tesseract Language Code: The language code for the installed trained data in your Tessdata directory. This is in ISO 639-1/T format and is the letters before the .trained data extension for the trained data file.
- Use HOCR: Whether to use HOCR. When enabled, text will be output in HTML format rather than as raw text.
Image Analysis
AWS Image Recognition
Detects real world objects in images and adds these labels to the repository document on the field simflofy_ai_labels using the AWS Rekognition system.
For your reference, these are ‘MinConfidence’ and ‘MaxLabels’ here. This page is what this task uses.
Configuration
- Minimum Threshold: The minimum confidence threshold for labels to return following label detection. Labels with a confidence level lower than this will not be returned.
- Max Number of labels: The maximum number of recognised labels to be returned, by highest confidence.
- Auth conn: Your Amazon AWS credentials
- Max number of labels: The number of labels you want to return
Google Vision Image Labels
Detects real world objects in images and adds these labels to the repository document on the field simflofy_ai_labels using Google Vision.
- Max Number of labels: The maximum number of recognised labels to be returned
- Authentication connection: Your authentication connection for Google. You can find it in the url while edit or view page for the connection
Watson Image Analysis
Uses IBM Watson Image Analysis to analyse an image, adding its response to a specified field.
- The IAM API: Key for IBM Cloud. See instructions here on how to get it.
- Collection ID: If left blank, 3Sixty will create one
- Collection Name: Name of the collection to create. If left blank, will be new-training-collection with the date appended.
- Training Mode: Images will be used in conjunction with the training json to train your analysable. In this mode, no analysis will be performed.
- The training json: Required for training mode. The format is {“dog”:[25,35,105,215]}. Array order is top, left, width, height with object type as the key.
- Field that contains the image urls: If left blank the file content will be used.
Alfresco
Alfresco Job Run History Nodes
The purpose of this task is to get the Alfresco Node Reference from the Current Job Run History, in order to update an existing document from a previous Job run in Alfresco, rather than creating a new one.
It’s used in Incremental or jobs where the Alfresco connector is being used. This task uses the Source Repository ID from the Repository the document is pulled from, in order to find the document in the Job Run History.
Configuration
Set up: There are no configuration options for this task. It uses the Document’s Source Repository ID in order to find the node Reference in Alfresco. Exception/Requirements: Since the Source Repository ID is used, any source repositories that use a Path Based Source ID will not work if the path of the document changes.
Alfresco Property Mapping Nodes
This task is for getting existing node references in an Alfresco instance, in order to update them, rather than create a new one if the existing file has moved from its original ingestion location. It’s used in jobs where the Alfresco Output connector is used. Typically, in incremental or sync jobs, where changes to a file from a source system need to make it to the node it previously integrated to.
Configuration
How to set up: Provide the query JSON object, which is then sent to Alfresco which will return the matching Alfresco Node Reference, which we’ll use to update the document.
Exceptions / requirements: If the query is too vague, and matches more than one node/document, then none of the documents will be updated. The query has to uniquely find a single node/document in Alfresco.
ACL
CMIS ACL modification
This task is meant to be used with a CMIS Repository connection. It will use the Repository Document id, and gather the current ACL for the document. It will then generate a new ACL based on the parameters. This task establishes a session upon initialisation, and keeps it open until the job run is complete.
The principal lists are pipe (|) delimited, to account for LDAP style principals. You will need to know the exact principal ids of the ACEs (Access Control Entries). The task works by cycling through the current ACEs and a series of if-then logic to construct a new ACL.
Configuration
- User name: CMIS server user name
- Password: CMIS server password
- Connection URL: CMIS server url
- Repository ID: CMIS repository ID
- Pipe (
|) delimited list of principals to ignore from each document: A list of principals to ignore and not add modifications to. The ‘ignore’ list will bypass any modification to a matching ACE and add it directly back to the new ACL. - Pipe (
|) delimited list of principals to remove from each document: A list of principals to be removed from the ACL. The remove list will skip over a matching ACE, leaving it out. - Comma delimited list of principals to add to each document: A list of principals to be added to the ACL. The add list is checked separately and will generate a new ACE will the selected permissions.
- Permission to add to the principals: Not ignored ACEs and added ACEs will have this permission added to them in the ACL.
- Read
- Write
- All
FileNet ACL Modification
The purpose of this task is change the permission lists of integrated documents in the IBM FileNet Repository.
- Authentication Connector ID: The ID of your P8 Authentication connection is available in the Authentications Connection under the Integration menu. You can find it the url of the edit or view page for the connection
- Change List: Pipe (
|) delimited list of principals to change from each document. - Permissions to Change: Access level for the changed permissions.
- Add List: Pipe (
|) delimited list of principals to add to each document - Permissions to Add: The access level to add to the new permissions.
- Removal List: Pipe (
|) delimited list of principals to remove from each document.
Note that any permission not added to these lists will be ignored.
File System ACL Extraction
Extracts ACLs from the Windows or Linux filesystem document and adds them to the repository document.
- File System Operating System: The operating system that these files are being read from.
- Append _DENY to Deny ACL Type permissions: Appends _DENY to the end of an extracted permission if it’s of the type DENY, in case you want to track this later on.
This task will have some different behaviour depending on your operating system. In a POSIX environment (macOS or Linux) permissions may be added as the field document.permissions with the permissions in a semicolon(;) delimited list, if any exist.
If the filesystem supplies an owner, it will be added as simflofy.owner.
Additionally, simflofy will create a permission map of the principals and their permissions. It will set is as the originalPermissions field:
Map<String, Set<String>> permissions = new Map<>();
//process acls
rd.setOriginalPermissions(permissions);
Finally, if any User Defined File Attributes (extended attributes), they will be added as a semicolon delimited list in the field simflofy.userattributes.
Generic ACL Mapper
The generic ACL mapper job task allows you to create simple rules for matching principles and permissions from one system to another. ACLs will need to be extracted from each document. This task reads the originalPermissions field of the document and sets the transformedPermissions field.
LIMITED USAGE Only the Azure Blob, CMIS, and Alfresco Connectors can use this task. For all other acl mapping, a JavaScript task is required.
- Process Files and Process Folders tells the task what to process.
- Mapping Rules: These rules will map the role/permissions on the left with the ones you want to match on the right.
- Permissions on the right will be from the source and those on the left will be for the target.
- Both side of a rule can be a comma delimited list.
- Each rule must end with a semicolon (;)
- Authority Clean up: A comma delimited list of principals to remove as part of the task.
- Enabling parsing: Enable parsing for multiple permissions to be assigned to an authority after mapping?
- For example, [Write]=WRITE_DATA with this box checked will allow ‘Write’ to be added on as an extra permission to an authority’s newly mapped permissions.
Classifier
IBM Watson Natural Language Classification
Uses IBM Watson Natural Language classifier to analyse and label text into categories. This uses Watson’s Natural Language Classifier APIs.
- The IAM API Key for IBM Cloud: See instructions here on how to get it.
- The Classifier ID: The ID of you classifier, created in Watson.
- Field to process If left blank: the task will search for the field ‘content’.
- Field to store the Watson response: If left blank, the field name will be ‘nlc’.
- Comma delimited list of file extensions: Which content types to process or leave blank to process all.
Others
Index User Groups
Used for Search Security to index user and group information onto each document. This task adds two metadata fields to each document in order to restrict or allow access to documents indexed through this task.
- Select User Groups To Index: The selected user groups will be added to the field simflofyUserGroups as well as adding a mapping.
- Select Users to Index: The selected users will be to the field simflofyUsers as well as adding a mapping.
Lookup Destination Id From Job Run History
Purpose: Getting the rd destination Id from the Current Job Run History, in order to update an existing document from a previous Job run, rather than creating a new one. Use Case: It’s used in Incremental or Sync jobs. This task uses the Source Repository ID from the Repository the document is pulled from, in order to find the document in the Job Run History. Set up: There are no configuration options for this task. It uses the Document’s Source Repository ID in order to find the rd destination Id. Exception/Requirements: Since the Source Repository ID is used, any source repositories that use a Path Based Source ID will not work if the path of the document changes.
Remove Empty Fields
This task will remove any empty fields from the metadata of the document if there is no set value in those fields.
Audit Reports
Federation Services Reports can provide documentation and results from each time a job has been run. In this section you will find overviews, set up instructions, and use cases of the various reports you can use to see what’s going on with your data. These reports can be found under the Auditing section in the left sidebar.
Job Run History
The Job Run History page allows you to search collections of audits based on the job, depending on what types of audits were selected in the Job Configuration(link). A Job Run History contains, at least, the Name, Size, Mimetype, and source ID of each audited document.
Downloading the audit report will include more fields such as the path of the document’s parent, as well as its new id and any audited mappings. If the audits are for errors or skips, the reasons will be included.
This list can be filtered by selecting a job from the Jobs drop-down as well as entering start and/or end dates for the time period you want to search for. You can also search for a specific job run id.
Click on the eye icon next to the job to view the full details of the job run. This page will give you more information on the particular job. Including a list of records, details on the run, and general statistics on the data.
Tip: Tip: Users can access a specific sets of audits for a job by clicking on the processed/read/error numbers in the Run and Monitor Jobs page.
Records
The Records tab will give you a list of all of the documents that have been processed through this job run. This list can be filtered by record type. Allowing the user to view records that have been: processed, read, deleted, errors, error summary, skipped, and duplicates. You can use the search field to filter the list by record content such as document name and content type.
Details
The Details tab will give you all of the details about the job run.
Job Details: Job ID, Job Name, Job Status, Status Message, Job start and end time, Total time, Query From and to time, Records processed per sec, number of records read, written, in error and skipped, and the Federation Services server port number.
Stats
Clicking on Stats tab will provide a basic performance report.
In the figure, the input is tracked as the blue line, the output as yellow. This can help determine the “bottleneck” if the job performance is not as expected. It also shows the bytes per second allowing for the debugging of network throughput issues.
Deleting Job Run History
To delete individual job run histories, you can simply delete them while viewing them, or, in 3.1.1+ a button will be available in the Job Run History table.
Automatically Deleting Job Run History
Federation Services has a background service that will check for job run histories of a certain age, and remove them. This service can be configured through the Federation Services Global Properties.
History retention is on a per-job basis and can be configured under the Advanced Options section in the job’s Details tab.
Document Search
Search job run history for specific documents. Results will contain a link to the document’s details page, containing a full history for that document across all job runs.
Filter by Record Type
AUDITING:
Auditing of record types is set in the Auditing menu in a job’s Details tab
- Processed: Documents that completed processing
- Read: Documents added to the queue for processing. Not Audited By default
- Errors: Documents that had errors
- Skipped: Documents that were skipped due to falling outside the time range, or by a processor
- Duplicate: Detected duplicates. Requires a Duplicate Detection Task.
Filter by Job
Choose the job you want to filter by or search all jobs
Filter by Field Value
- No field: Selecting this option will perform an open search for all documents in the selected job
- Job Run ID
- Output Document URI: Similar to document ID, but for file paths, backslashes may be converted to forward slashes
- Source Document ID: The document ID, as it appeared when read.
- Document Name
- Document Type: Not the same as Content Type, this refers to a document’s type in the repository
- Batch ID: Only applicable if batching was enabled
- Version ID: Only applicable if versions were retrieved
- Document Hash: Only applicable if a hash value was generated using the Hash Value Generator Task
- Size Greater Than (B)
- Size Less Than (B)
- New ID: Only applicable for Processed records.
TABLE SEARCH
The results table also has a search field to further narrow down the results
Exporting
You have the option of exporting the current page or entire result set as a CSV file, using the buttons at the top of the page. Will only activate if there are search results.
Mapping Audits
Mapping audits are a way to track the values of individual mappings on a per job run basis
Enabling Mapping Audits
There are two ways to enable mapping audits.
- In the Mappings tab of your job. Click the eyeball next to any mapping. A green eye means the mapping is being “watched”, and its values will be track
- In the Details tab of your job, under the Auditing section, check Audit all Mappings. This will collect the audit data for every mapping on the job, including additional mappings from Job Mappings and Mapping Groups
Viewing audit data
Under the Audit Reports menu in the sidebar, click Mapping Audits. If there are no jobs with audited mappings, you should see a message saying so. Otherwise, you will be presented with a drop-down of jobs with mapping audits.
- Once you select the job, a drop-down with all job runs with audits will appear.
- Once you select your job run, a drop-down containing the audited mappings will appear.
- When you select an audited mapping, a table will appear showing you a count of the final values for that mapping.
These audits can be exported using the Export as CSV button.
Example: Content Type Breakdown
If you add a calculated field with the source ’#{rd.mimetype}’ (see the Federation Services Expression Language) and audit it, you will be able to see a breakdown of all content types (pdf, docx) for documents in the job.
Example: Auditing a PII Job
If you add a PII Detection Task to a job, the field hasPii is automatically added to each document. You can add this as the source of a field mapping and audit it.
When viewing the mapping in the Mapping Audits page, you will get a breakdown of how many documents in the job contained PII.
Search Audit
Search audits are collected by all search API endpoints. This includes searches performed through Discovery. In this page you can view the audits for the last week. For a broader view, these reports can be retrieved through the Audit Report Service REST API.
Event Audit
All API actions in Federation Services are audited. This page allows you to see those audits using search criteria.
Types of Event Audits
- BATCH_DOWNLOAD
- CREATE_DOCUMENT
- UPDATE_DOCUMENT
- UPDATE_PROPERTIES
- UPDATE_CONTENT
- CREATE_FOLDER
- CREATE_VERSION
- DELETE_VERSION
- REVERT_VERSION
- FOLDER_ITEMS
- FILE_DOWNLOAD
- FILE_HEADER
- VERSION_DOWNLOAD
- FIND_VERSION_PROPERTIES
- FIND_PROPERTIES
- STREAM_CONTENT
- EDIT_PROPERTIES
- DELETE_OBJECT
- TYPE_DEFINITION
- GET_ACL
- DELETE_ACL
- EDIT_ACL
- FILE_ITEM
- ROOT_FOLDER
- REPOSITORY_INFO
- CHECKOUT
- CHECKIN
- GET_TYPES
- ID_BY_PATH
- LIST_CONNECTIONS
- DROP_COLLECTION
- LIST_VERSIONS