The Alfresco Outlook Client is part of the Outlook Integration and allows you to use email and repository management without having to leave Microsoft Outlook.
Features of Outlook Integration include the ability to archive content (i.e. emails, meetings, appointments, and files) into Alfresco, full metadata support, full search, tagging and workflow capabilities, and the ability to attach files and view archived emails in your inbox. In addition, you can create new versions of existing documents, review the version history of a versioned document, and revert back to previous versions.
Important: In this documentation, the term ‘email’ is used to refer to emails, meetings, and appointments for the sake of readability.
For information about installing and configuring the Outlook Integration, see Installing and configuring the Outlook Integration.
Archiving emails in Outlook
You can archive emails to a site or folder by dragging and dropping the email into a folder in your chosen site in the Alfresco sidebar.
When you drag and drop the email with a subject that already exists in a specific location, you’ll be asked to rename it.
Note: If you drag and drop to a folder, you’re not prompted for a location for the email.
-
Archive an email manually by dragging and dropping it into a folder in your chosen site.
-
You might see a Metadata dialog, if this has been configured by your IT team. Enter the information needed for archiving the email.
For example, you may be able to select different metadata settings, if configured by your IT team. Select the Numeric Metadata content type to see the fields you can apply to the uploaded content. If you’re filing a number of emails, you can check Remember metadata for next object to retain your settings for the next time you archive an email.
Here is an example Metadata dialog:

- The first line indicates the number of emails that you are archiving (in this case, 1 / 1 is 1 of 1 emails), and the title of the current email. If you’re archiving more than one email, the Next and Previous options are enabled so that you can page between the emails.
Note: By default, Alfresco Outlook Integration displays the subject line of the email document as the title. See Configuring alternative naming of emails in Outlook if you want to change this behavior.
- If you have email attachments, the Apply to all attachments option is enabled and you can apply any metadata you enter to all attachments related to that email.
- If you’re archiving more than one email, the Apply to all emails option is enabled and you can apply the same metadata to all emails that are being archived.
Note: You can only try to archive one type of Outlook item at a time, either emails, meetings or appointments.
- If your IT team has configured multiple metadata options for a specific upload location, the Content type field shows a list of options and you can pick the most appropriate metadata depending on the content you’re archiving.
- Select Save to save your changes.
- If you copy a single file to a folder in Alfresco Share, and then choose the Cancel option to stop the transfer, the file will still transfer into Share. The Cancel action works best when transferring multiple files. The last transferred file remains in Share, however the other files are not transferred.
-
If you select Send to background during the transfer, the window is hidden and you can view the progress in a Transfer tab in the Alfresco sidebar.
During the file transfer, you can cancel the file transfer from this tab, or bring the window back to the foreground.
After the file transfer is complete, you can open the target folder in the Alfresco sidebar, or click Close to close the tab:
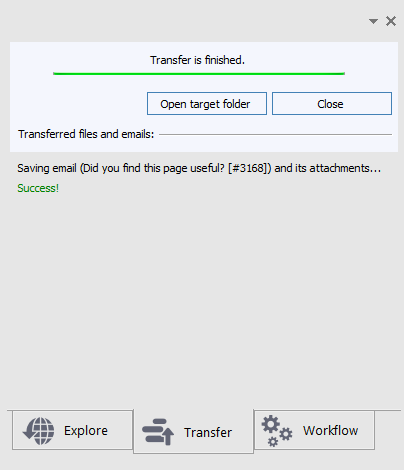
The Transfer tab color is green if the transfer progresses successfully, or red if there are issues. For file transfer issues, a link to the log is displayed in the tab content.
Note: It is not possible to start another upload while the background transfer is in progress. Also, the Workflow tab is disabled by default.
A check is made for duplicates during email archiving. The ID of each email is checked to see if it has already been saved in the repository or on the same site. If the email has already been saved, a message is displayed saying that the message already exists in the repository, giving details of who archived the file, when it was archived, and the path of the archived file. You can open the previously archived email, save a new version of the email with a different subject, or cancel the archive operation.
Here is a summary of how the combined version detection and email duplication detection works:
- The Alfresco Outlook Client checks if the email to be uploaded already exists in the upload location.
- If it does exist, the version detection dialog is shown, and offers you an alternative name.
- Next, there’s a check to see if the email exists in another folder, either at site-level or repository-level (depending what your IT team has configured). See Configuring Outlook email settings in Alfresco Share for guidance on customizing Integration Settings.
- If a match is found, the Alfresco Outlook Client shows the duplication dialog, presenting a reference to the duplicate email in the other folder.
When an email is archived, it is usually identified with an Alfresco icon in the Outlook inbox:

An email that is archived as an attachment can be opened directly by double-clicking the email in Outlook. The email opens in a new window and can be read normally. An email that is archived as a link can be loaded into Outlook by clicking the link in the email.
See Outlook metadata settings for metadata configuration guidance.
- The first line indicates the number of emails that you are archiving (in this case, 1 / 1 is 1 of 1 emails), and the title of the current email. If you’re archiving more than one email, the Next and Previous options are enabled so that you can page between the emails.
Archiving folders in Outlook
You can create folders in the Alfresco Outlook Client and assign metadata to these folders, similar to when archiving emails.
You can create different types of folders within a particular location and assign different sets of metadata depending on the type of content the folder contains. You may be able to select different metadata settings, if configured by your IT team. This allows you to select the best metadata fields from a list in the metadata dialog.
-
Click the Explore tab from the Alfresco sidebar, or navigate through the list view.
If there is no Explore tab displayed, continue to the next step.
-
Select a site and folder from the directory tree, right-click the context menu then select Create folder.
The system displays a folder metadata dialog. The default folder metadata scheme and associated properties are shown.
-
In the New Folder dialog, enter the information needed to create the folder.
For example, you may be able to select different folder metadata settings, if configured by your IT team. Select Payload Target in the Folder type list to see the fields you can apply to the new folder.
Here is an example folder metadata dialog:
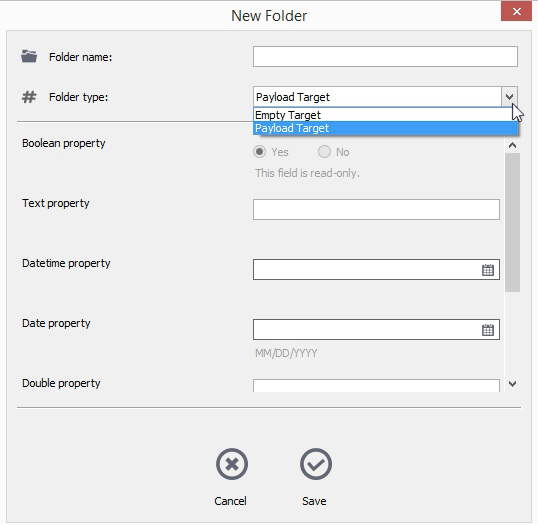
- In the Folder name field, enter a name for the new folder.
- If your IT team has configured multiple folder metadata options for a specific upload location, the Folder type field shows a list of options and you can pick the most appropriate metadata depending on the content you’re archiving. Note that some fields may be read-only, such as the Boolean property field, and you can’t change them.
- Select Save to create the new folder with defined folder type and properties.
The system updates the navigation panel and shows the new folder.
See Outlook metadata settings for metadata configuration guidance.
Managing files using the Alfresco sidebar
In Outlook, use the sidebar to browse and work with your connected repository.
-
In the Alfresco Client tab on the Outlook toolbar and click Show Sidebar.
This option displays a new window on the right side of the screen, called Alfresco Outlook Client.
Note: If the sidebar is already displayed, clicking Show Sidebar hides the sidebar.
-
There are two tabs available: Explore and Workflow.
Note: In Alfresco Outlook Integration 2.4, the Workflow tab is disabled by default.
-
Use the following tasks to learn about these tabs.
Explore options in the Alfresco sidebar
Work with your files and folders using the Alfresco sidebar.
-
Click the Explore tab from the Alfresco Outlook Client sidebar, or navigate through the list view.

Explore is the default view and allows you to work with your files and folders in Alfresco Share.
Note: In Alfresco Outlook Integration 2.4, the Workflow tab is disabled by default.
-
Repo location selector: choose which sites and content you wish to see. You can see the full repository in this view, or limit the view to certain sites only (All Sites, My Sites or Favorite Sites).
-
Content filter: choose to view all content, or only your favorite files or folders.
-
View selector: choose whether to see your content in a tree view or a list view.
-
Search selector: choose between a simple or complex search (if this is configured).
-
Search mode selector: choose whether to search text and metadata, or just metadata, or search at a site level.
-
Enter your search criteria.
Type directly in the search box, where it says Enter your search.
You can choose favorite folders or sites to filter the search.
-
The content that matches your criteria is displayed below the search box.
Once you select a folder in the search results, use Back to search results to return to the search results in the original search location. You can clear the search results by clicking X next to the search box starting a new search.
-
Context menu: there are a number of actions to apply for each search result. These include:
 Send an email, with this result attached (applicable to files only)
 Send an email, with this result embedded as a link
 Mark as a favorite
 Add metadata for the file or folder. This opens the metadata dialog that was displayed when the file was filed in Share.
- View the version history of a document. See Working with file versions for more.
- Check out a document for editing offline.
-
-
Drag and drop files into the repository. A number of options are available, depending on your configuration settings.
The options available to you are shown in the right-click context menu. For example, if you have selected a Microsoft Office file, you can edit this online in addition to other standard options. See Configuring extended settings in Outlook for more information on configuration settings.
If your IT team has enabled email duplication prevention, the Alfresco Outlook Client will receive information from the server that a particular email document already exists (either in the repository or the site). The following message is presented:

Select one of the following options:
- Open: Opens the details page of the email in a browser. This is similar to using the Details action on an email from the Explore tab context menu.
- Continue: Archives the email.
- Cancel: Keeps the original email.
- If a single email is selected, this cancels the process and closes the dialog.
- If multiple emails are selected, this cancels the processing of the current email, and starts to process for the next email.
-
Open folders and view files from the Explore tab. Depending on your configuration settings and the number of files in your repository, you have the option to see additional files by clicking

-
Use Configure > Extended from the Alfresco Client toolbar to dynamically change the way that the files and folders are displayed.
For example, this format is displayed when Folder sort order is set to date modified (ascending), with Date sort display options set to date/time and subject:

Note: Right click a folder and select Sort by and your chosen option to dynamically sort the contents of a folder.
Workflow options in the Alfresco sidebar
Start workflows using the Alfresco sidebar.
-
Go to the Alfresco Client tab on the Outlook toolbar and click Show Sidebar.
This option displays a new window on the right side of the screen, called Alfresco Outlook Client.
-
Click the Workflow tab:
-
Use the option list to filter by My initiated workflows or My tasks.
You can start and view workflows from the Alfresco sidebar, following rules that are set in Alfresco Share.
Upcoming appointments and tasks are shown in the left panel.
Note: If your IT team has configured SAML authentication without single-sign on (SSO), when you select the Workflow dialog, you’ll be prompted to enter your login credentials even though you’ve already logged in successfully.
-
Managing file versions in Outlook
You can create new versions of files that already exist in Alfresco Outlook Client. There are two ways to trigger versioning for one or more files: implicit and explicit versioning.
-
Implicit versioning
Drag and drop one or more files into a site or folder in the Alfresco sidebar, and it will determine if files of the same name already exist.
-
Explicit versioning
Drag a file into the Alfresco sidebar and explicitly drop it on an existing file.
In both cases, the Alfresco Outlook Client lets you decide if you’d like to create a new version, rename it on upload, or ignore it.
Note: Versioning only applies to files, so emails can’t be versioned. If you add an email with a subject that already exists, in a specific location, you’ll be asked to rename it.
Working with file versions
Create new versions of files by dragging & dropping them into the Alfresco sidebar. You can also review the version history of a versioned file, and revert to a previous version.
-
Click the Explore tab from the Alfresco Outlook Client sidebar.
-
For implicit versioning: drag and drop one or more files into a site or folder in the Alfresco sidebar. You will see the Versioning dialog.
If one or more files with the same name as the dropped file(s) already exist in that location, only those with the same name and extension are versioned.
Here is an example Versioning dialog:

- The first line indicates the number of files that are available for versioning (in this case, 1 / 3 is 1 of 3 files), and the name of the current file. If you’re versioning more than one file, the Next and Previous options are enabled so that you can page between the files.
- If you have more than one file, the Apply to all items option is enabled and you can apply the information you enter to all items related to that file.
- Select Save to save your changes and begin the upload.
- If you copy a single file to a folder in Alfresco Share, and then choose the Cancel option to stop the transfer, the file will still transfer into Share. The Cancel action works best when transferring multiple files. The last transferred file remains in Share, however the other files are not transferred.
-
Select New version to create a new version of a file.
Choose to save either a Major or Minor version.
Add a Version comment (optional).
-
Select New document to create a new file.

The existing file won’t be versioned. An index number is automatically added to the file name to avoid naming conflicts, but you can change this before saving.
For example, if the original file is
1.pptx, the suggested file name for versioning is given as1-0001.pptx. -
Select Skip to prevent the file from being uploaded to Share.
Select an action for each file listed in the Versioning dialog.
Note: You might see a Metadata dialog if this has been configured by your IT team. Enter the information needed for archiving. See Archiving emails in Outlook for more details.
See Outlook metadata settings for metadata configuration guidance.
-
For explicit versioning: drag and drop a single file onto an existing file in the Alfresco sidebar. You will see the Versioning dialog.
Note: Both files must have the same extension.
-
Hover your mouse over the file that you’d like to version for a few seconds.

The file is highlighted with a blue bar. In this example,
1.txtwill be versioned.Note: You can only version one file at a time using explicit versioning. Use implicit versioning to version multiple files.
-
In the Versioning dialog, follow the same steps as described earlier for implicit versioning.
You can review the version history of a versioned file by using the context menu.
-
-
Right click on a versioned file and select Version history.
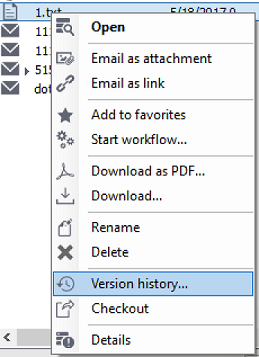
This open the Version History dialog with several options:

- Download - allows you to download any version of a file
- Revert… - allows you to revert to a previous version
-
More - displays the properties (or metadata) for a file
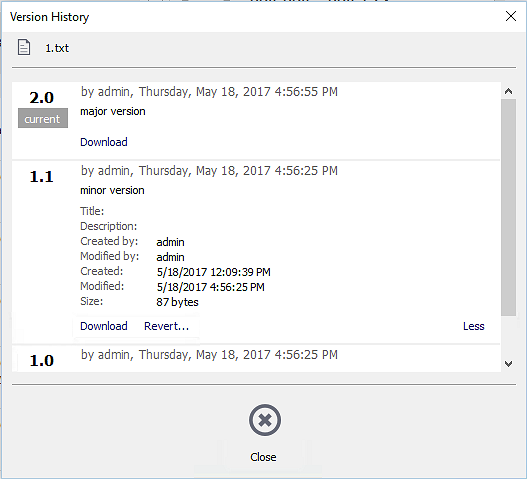
To revert a file to a previous version, follow these steps.
-
Click Revert….
A Revert Version dialog opens.

-
Click Major or Minor to revert your file to a previous major or minor version.
-
Enter a Version comment or keep the pre-filled content.
-
Click Revert.
This replaces the content and metadata from the current version with the previous version.
You can also check out a file by using the context menu.
-
Right click on a file and select Checkout.
A working copy of your file is created that you can download and work offline. The original file is locked, so you can work on the content, while other users can’t edit it until you check it back in. When you’ve finished working on the file and saved the changes, check in the file to create a new version. Alternatively, you can cancel the check out to abandon any changes to the file, and restore the original.
If you add an email with a subject that already exists in a specific location, you’ll be asked to rename it.
-
Drag and drop an email into a site or folder in the Alfresco sidebar.
The Versioning dialog is displayed if an email with the same name already exists in the upload location.
Note: The New version tab is greyed out, and a warning message is displayed as you can’t version emails.
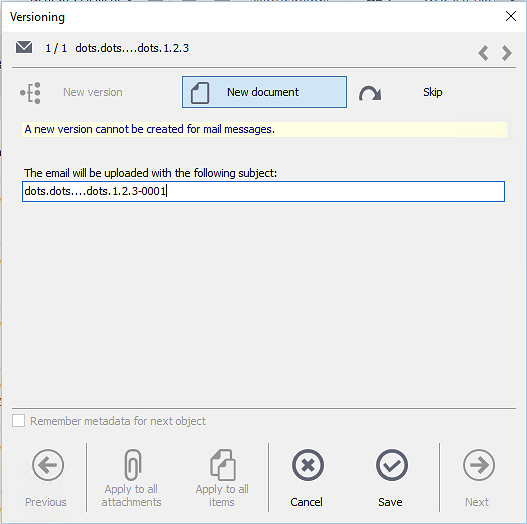
-
In the New document tab, an index number is automatically added to the email subject (or name) to avoid naming conflicts, but you can change this before saving.
-
Select Save to save your changes and begin the upload.
Select Skip or Cancel to prevent the email upload.
The original email remains in the selected location.
-
Managing archived files in Alfresco Share
View your archived emails in Alfresco Share, just like any other files in Alfresco. Email filters allow you to search for the archived emails in a site or across Alfresco Repository.
In the simple Alfresco view, view the properties of each archived email. In the detailed Alfresco view, HTML and rich text emails, and attachments are displayed as a color preview.
In Document Actions, send a link to the email in Alfresco by selecting the Email as link option. Also, if a MSG file is saved, open it using the MSG file button in the preview. All other options remain available.
Use the advanced Alfresco search to find archived emails by using the option Look for: Emails from the Advanced Search toolbar.
Troubleshooting the Outlook Integration
Use this information to help troubleshoot Alfresco Outlook.
Error when using a hybrid workflow in Alfresco Outlook
There’s a known issue when using hybrid workflows in Alfresco Outlook (hybridworkflow.enabled=true). This function is currently not available in Alfresco Outlook Integration, and you will receive an error message when you attempt to start a new workflow in the Outlook Client:
An error has occurred in this dialog.
Message: 66
Unspecified error.
File transfer is not cancelled when instructed
In the Alfresco Outlook Client, if you copy a single file to a folder in Alfresco Share, and then decide to cancel the transfer, the file will still transfer into Share. This is because unless the client-server connection is very slow or the file is very big, the file transfers too quickly to be cancelled. The Cancel action works best when transferring multiple files - the last transferred file will remain in Share, however the other files will not be transferred.
Unable to connect to Alfresco Share message
In the Alfresco Outlook Client, you might see a message indicating that you can’t connect to Share. This is either because your repository is not running, or you have issues with your setup. From the toolbar, check that your sign in details are correct in Configure > Connection and click Check connection. You can also enable debugging in Configure > Extended to get more information on the issue. You will need to provide this log if you need Alfresco Support to resolve your issue.
Error on write access from Alfresco Outlook Client to Records Management site
The Alfresco Outlook Client no longer permits direct write access to a Records Management site. All create and edit related actions in the context menu aren’t visible for content in this site. However, the Alfresco Outlook Client still supports read access in the following cases:
- Search content in the Records Management site from the Alfresco Outlook Client
- Attach links or binaries from the Records Management site to email
- Download content from the Records Management site
Error when declaring a record from within Alfresco Outlook Client
In the Alfresco Outlook Client, you might see a message stating that you can’t declare a record from within the client. This action is no longer supported. However, you can declare content in a collaboration site as a record (i.e. create an inline record).
Drag and drop as a PDF link doesn’t work with SAML authentication
There’s a known issue when using drag and drop from Alfresco to convert an Office file to PDF format, and adding it to an email as a link, where there’s an option to automatically link to a PDF version of that document. This feature doesn’t currently work with SAML authentication. However, there’s a workaround to achieve the same functionality:
- Convert the document you want to link to as a PDF first, using the available context menu action
- Drag and drop the PDF version as a link to the email