Use this information to upgrade from Search Services 2.x to Search Enterprise 4.x.
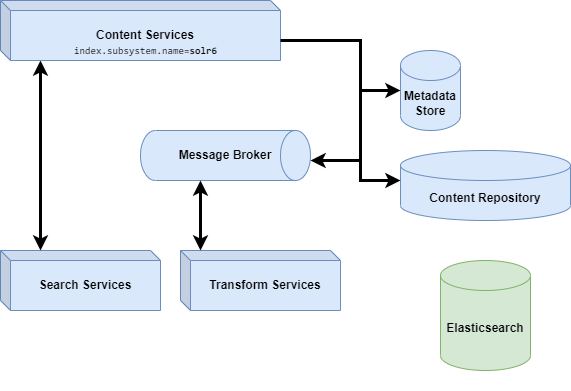
Note: A full re-index is required when you upgrade from Search Services 2.x to Search Enterprise 4.x because the search engine is switching from Solr to Elasticsearch. If it is necessary for you to have a backup of the old SOLR index, then it must be copied elsewhere before you re-index.
Before upgrading, please check that you have the supported Alfresco Content Services version installed (see Supported platforms).
Configure Subsystem in Repository
Before upgrading you must activate and configure the Search Services subsystem in Content Services, for more see Subsystem.
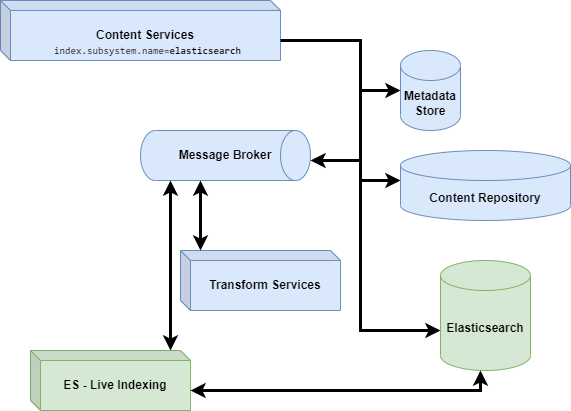
Install Elasticsearch connector
The Elasticsearch connector can be installed using JAR files, Docker compose, or Helm, for more see Install.
Once everything is up and running, use the Elasticsearch connector Re-indexing application to populate the Elasticsearch index. This operation may take a while, depending on the number of documents in your repository and on the indexing options selected (metadata, content and path). While the re-indexing process is progressing, the documents will gradually be available for searching.
When the Re-indexing application has finished, the new and updated documents will be uploaded to the Elasticsearch index by the Elasticsearch connector service using ActiveMQ messages.
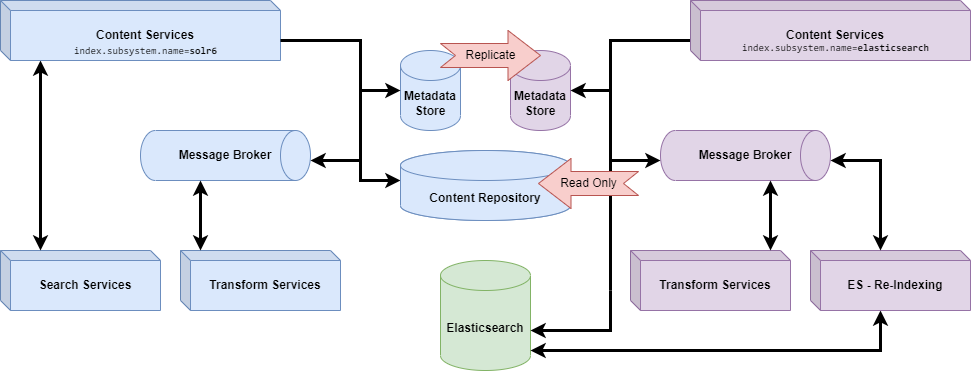
Replicate an existing Content Services 7.1 (and above) deployment
Your current Content Services stack can continue to run while you are indexing the repository to Elasticsearch. This means you can continue to use the ‘old’ service until the process completes. It’s recommended you create a read replica of the database so the indexing process won’t affect service performance.

-
Create a read-only Replica for your database.
-
Configure Alfresco Repository Search Subsystem to use
elasticsearchand switch database configuration to the read-only replica database. -
Install the Elasticsearch server.
-
Install Elasticsearch connector.
-
Once everything is up and running, use the Elasticsearch connector Re-indexing application to populate the Elasticsearch index. This operation may take a while, depending on the number of documents in your Repository and on the indexing options selected (metadata, content and path).
-
Test the replicated environment is working as expected in terms of searching and indexing operations.
-
Switch the existing production environment to the replicated environment by using the original database and removing the previous Search Services components based on SOLR.

Note: You may need to use the Elasticsearch Re-indexing application to update to the latest changes. After that, new and updated documents will be uploaded to the Elasticsearch index by the Elasticsearch connector service using ActiveMQ messages.
Zero downtime upgrade
You can upgrade from Search Services 2.x without experiencing any downtime, to Search Enterprise 4.x when you are using Content Services 7.2 and above.
-
Start an Elasticsearch 4.x instance, for more see Overview.
Currently your installation is using Solr.

-
Start a mirrored environment by replicating the content repository and Content Services.
You create a mirrored environment because the upgrade will not impact the primary environment. Use the Elasticsearch instance you created as the content repository for the mirrored environment. Once you have mirrored the environment do not change the content repository and only use it in read-only mode. If you do not need to preserve the content repository then you only need to mirror Content Services.

-
Create an Elasticsearch index by executing a search query on the mirrored environment.
Verify the index is created and its metadata correctly reflects your data model.
Note: The index is not created when you mirrored the content repository and Content Services.
-
Populate the index with existing data.
The index is populated and is based on the replicated database and is achieved by starting re-indexing on the mirrored environment. For more see re-indexing.
Note: A window displays that states the primary database does not reflect the up to date index.
-
Shutdown the mirrored environment.
You are left with an Elasticsearch server with a populated index.
Note: The index is not yet in sync with the primary environment.
-
Keep your index up to date with changes made through Content Services.
To do this start live indexing on the primary environment. For more see live-indexing.
Note: Even after starting live indexing there is still a gap from when you took a snapshot to when you started live indexing.

-
Start re-indexing on the Solr environment.
To close the gap in the Elasticsearch index start re-indexing on the Solr environment.
Note: Live indexing keeps the Elasticsearch environment index up to date.

-
Switch to Elasticsearch.
To switch to Elasticsearch access the Admin Console at runtime. Once you have done this you still have both Search Services and Search Enterprise running but Content Services is using Elasticsearch.
Note: If you experience any issues you can still revert back to using Solr.

-
Shutdown Search Services.
Confirm your new environment is working as expected and remove all the Solr based search services.
Upgrade from legacy Content Services
You can upgrade from the legacy versions of Content Services 5.2.x and 6.2.x with Search Services (Solr) to Content Services 7.x with Search Enterprise. You can do this with minimal performance impact on your production environment, and you do not need to reindex Solr.
-
Start an Elasticsearch 4.x instance, for more see Overview.
Currently your installation is using Solr.

-
Start a mirrored environment by replicating the content repository and Content Services.
You create a mirrored environment because the upgrade will not impact the primary environment. Use the Elasticsearch instance you created as the content repository for the mirrored environment. Once you have mirrored the environment do not change the content repository and only use it in read-only mode. If you do not need to preserve the content repository then you only need to mirror Content Services.

The goal of this step is to have a similar environment as you would have after doing a regular upgrade. If any custom upgrade procedure is required you can also apply it to the mirrored environment.The mirrored environment uses the same content store as the production one. During the metadata upgrade on the mirrored environment some content could be created. This should not affect the live environment because it won’t be referenced by the live metadata Store. This is a compromise between replicating the whole content store which can be time consuming and expensive, and having a small amount of unreferenced data. If it’s not possible to share the content store then a replicated content store can be used.
Important: The mirrored environment is used just to populate the Elasticsearch index. It’s important that this environment is isolated from the live environment i.e. do not join it to the production cluster or access the live metadata store.
-
Create an Elasticsearch index by executing a search query on the mirrored environment.
Verify the index is created and its metadata correctly reflects your data model.
Note: The index is not created when you mirrored the content repository and Content Services.

-
Populate the index with existing data.
The index is populated and is based on the replicated database and is achieved by starting re-indexing on the mirrored environment. For more see re-indexing.
Note: A window displays that states the primary database does not reflect the up to date index.

-
Shutdown the mirrored environment.
You are left with an Elasticsearch server with a populated index.
Note: The index is not yet in sync with the primary environment.

-
Upgrade the initial environment.
You now have a legacy version of Content Services using Solr and an Elasticsearch server that has an almost complete version of the index. Upgrade the legacy environment and then switch the search engine from Solr to Elasticsearch.
-
Close the gap in the Elasticsearch index.
You do this by starting the Elasticsearch re-indexing component, and only for the data modified after taking the snapshot you created for the mirrored environment.

-
Wait for re-indexing to complete.
Once re-indexing is complete you have upgraded Content Services to have an up to date Elasticsearch index.

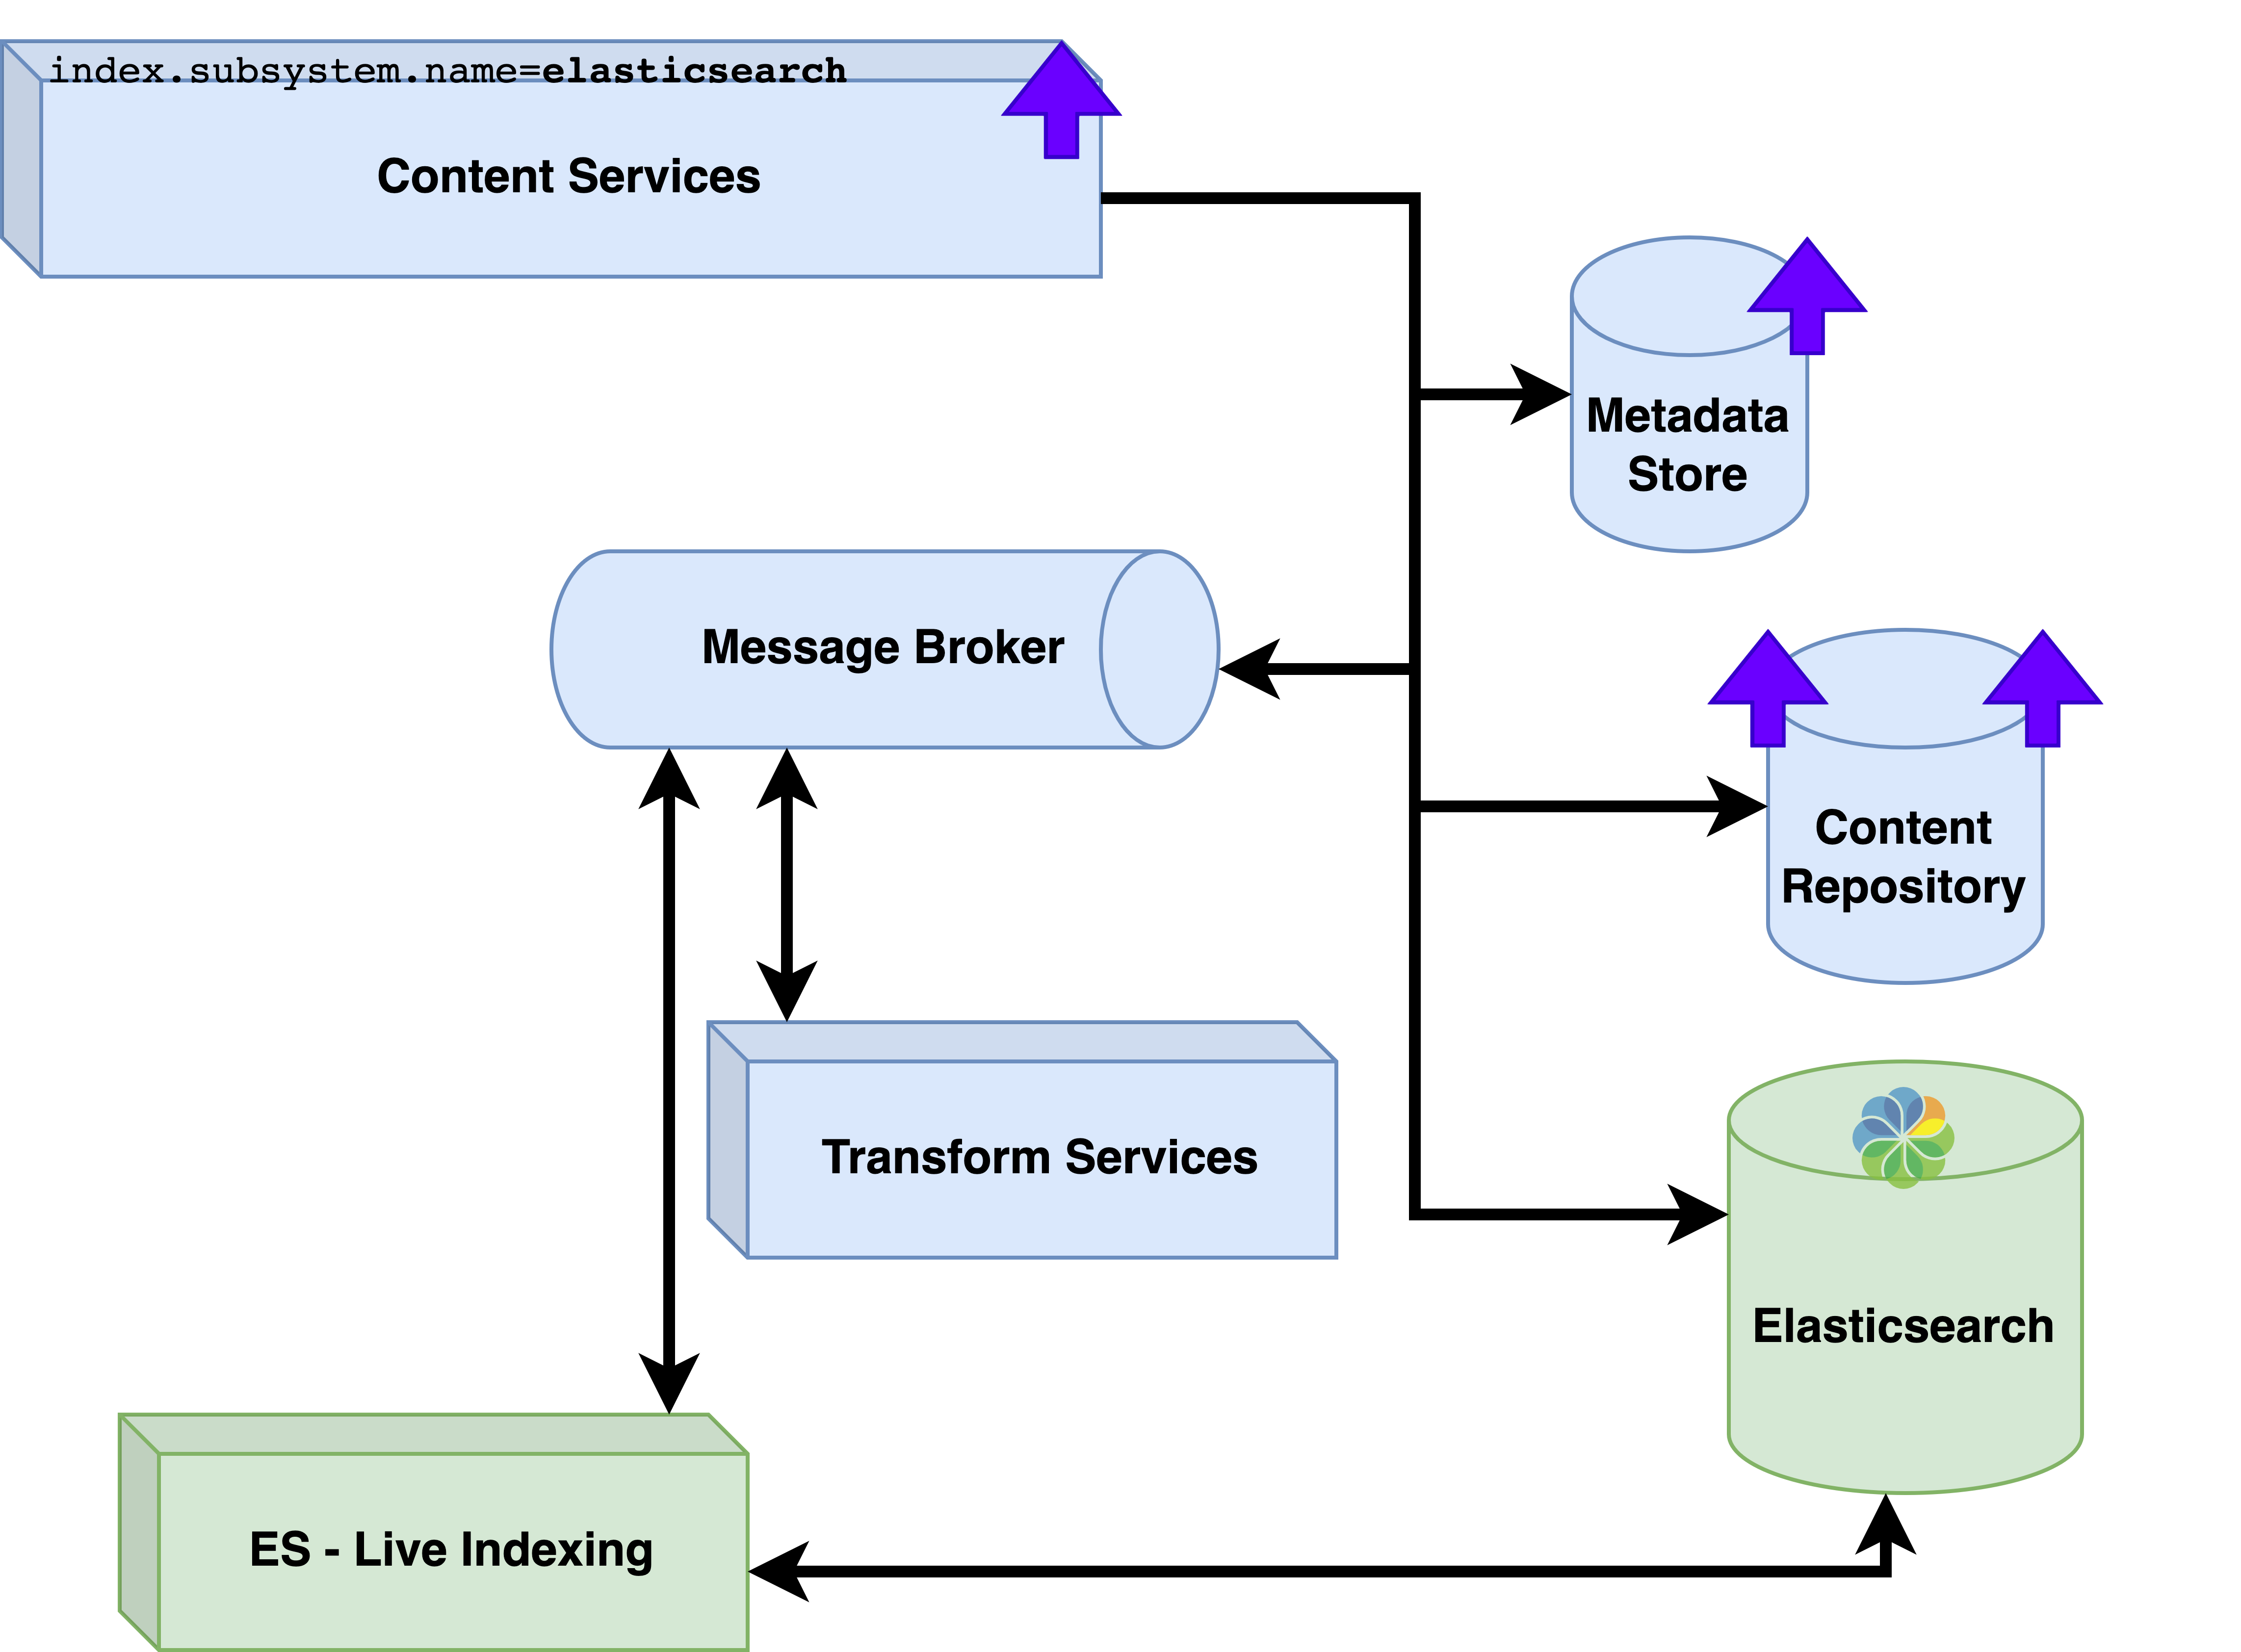
Once this has completed the work can be summarized with the diagram below.
