Alfresco Content Services SDK 3 is a Maven based development kit that provides an easy to use approach to developing applications and extensions for Alfresco. With this SDK you can develop, package, test, run, document and release your extension project.
For earlier releases of the Alfresco SDK, see the Developer Guide in the archived Content Services documentation (example).
This Software Development Kit (SDK) is a fundamental tool provided by Alfresco to developers to build customizations and extensions for the Alfresco Digital Business Platform. It is based on Apache Maven and is compatible with major IDEs. This enables Rapid Application Development (RAD) and Test Driven Development (TDD).
Alfresco Content Services SDK 3 is released under Apache License version 2.0 and supports Alfresco Content Services both in Community Edition and Enterprise Edition. If you’re an Enterprise customer, check the Support status for the version you’re using. If your version is in Limited or Full Support and you need help, contact our Support team.
Alfresco Content Services SDK 3 is a major update to the SDK and provides several improvements on the previous releases.
This release takes advantage of Semantic Versioning (SEMVER), which means that it is not directly compatible with the previous releases of the SDK.
Note: If you have existing projects that you wish to upgrade to SDK 3.0.x, the recommended approach is to generate a new project from our archetypes and move your code into place.
- What’s new?
Alfresco Content Services SDK 3 brings a lot of new changes into the way your customizations are built, packaged, run, and tested. Below a list of the major improvements and enhancements. - Getting started with Alfresco Content Services SDK 3
Use these instructions to get started with using Alfresco SDK 3. - Introduction to Maven archetypes
The Alfresco SDK 3 comes with a number of Maven archetypes that can be used to generate Alfresco extension projects. - Introduction to project structures
After generating your project, using one of the Maven archetypes, review the project structure. The directory structure and content of each folder and file can help you to understand how to start developing with the Alfresco SDK 3. - Setting up your development environment
The Maven Alfresco SDK is designed to work well with Eclipse and IntelliJ IDEA. - Advanced topics
This information provides more advanced topics that you might come in contact with when you have been working with an SDK project for a while. We will have a look at how you can add more custom modules to an All-in-One project, and more.
What’s new?
Alfresco Content Services SDK 3 brings a lot of new changes into the way your customizations are built, packaged, run, and tested. Below a list of the major improvements and enhancements.

JAR packaging
Since the early days of the SDK, AMPs have been the way customizations were packaged. In SDK 3 everything is now packaged as a JAR by default, while the AMPs are still available as an optional assembly. This gives developers much more control over packaging and simple modules can easily be deployed as JARs.
Compatibility
One of the main motivators behind the improved Alfresco Content Services SDK 3 was to centralize run and integration testing logic in a plugin. This provides much more flexibility in the supported versions.
Alfresco Content Services SDK 3 is compatible with Alfresco One 4.2.7*, 5.0.4, 5.1.2, 5.1.3, and Alfresco Content Services 5.2.x.
To change the version you want to test your customization against, change <alfresco.platform.version /> and <alfresco.share.version /> along with <maven.alfresco.edition />.
See Switching Alfresco Content Services and Share versions for more.
*A small one line change is required in module.properties for 4.2.x support.
Easy upgrades
SDK 3.0 strives to follow SEMVER closely. This means that no breaking changes within a major version.
We will continue to add new functionality and extra configuration options, but in a backwards compatible way.
Upgrading within a major version of the Alfresco SDK 3.0 should be as easy as changing the <version /> in the plugin configuration, or for convenience, all the archetypes have a property defined as <alfresco.sdk.version />.
Alfresco Maven Plugin
All logic to run Alfresco Platform and Share has been moved out of the profiles and parent pom. The plugin now has a single goal alfresco:run which can be invoked directly.
The Alfresco Maven Plugin has a lot of configuration options to cover many different use cases. It’s easy to configure it to use an external database like MySQL, PostgreSQL, or enterprise databases. It’s also easy to control exactly which webapps should be run, for example, alfresco-platform-jar-archetype comes with the plugin configured to use the H2 database and to start the Alfresco Platform, Solr 4, and Alfresco REST API Explorer.
The plugin also reads properties, like <alfresco.platform.version /> and <alfresco.share.version /> to control which version you want to run with your customization.
Adding third party dependencies (whether AMPs or JARs) is easier than ever, a simple configuration enables you to define which dependencies to install.
See Configuring the Alfresco Maven plugin for more.
Integration testing
The Alfresco Maven Plugin handles integration tests that are executed in the full context of the application, including Solr. Executing mvn integration-test detects if an Alfresco Platform is already running and executes the tests against it, giving developers instant feedback on their tests. If an Alfresco Platform is not currently running, one will be started to execute the tests.
See Integration testing for more.
Simplified archetypes
As we have moved to JAR packaging, the previous alfresco-amp-archetype and share-amp-archetype have now been replaced with alfresco-platform-jar-archetype and alfresco-share-jar-archetype. Also, alfresco-allinone-archetype is provided. The JAR packaging renders a standard Maven JAR structure.
The pom.xml files are simplified as all the previous profiles are now embedded inside the Alfresco Maven Plugin. This provides developers a pretty standard pom.xml, which defines dependencies, properties, and configuration of the Alfresco Maven Plugin.
The All-In-One archetype is much smaller than before. It no longer has the runner or the WAR overlay modules. It contains three modules: platform-jar, share-jar, and integration-tests.
See Introduction to Maven archetypes for more.
Support for different versioning of Content Services and Share UI
The Alfresco product is no longer released under one common version. Alfresco Content Services (i.e. alfresco.war) and the Share UI (share.war) are now released with individual version numbers, such as Content Services 5.2.a-EA and Share 5.1.g. Alfresco SDK 3.0 supports specifying different versions for these artifacts.
See Switching Alfresco Content Services and Share versions for more.
Maven profiles
Profiles are no longer used for running the project or for enabling Enterprise editions. The runner logic is now built into the Alfresco Maven Plugin. To use an Enterprise version specify its version in the properties section, and bring in relevant specific Enterprise dependencies. This means that the artifacts that are produced are always the same and not affected by the activated profile(s).
Hot reloading
Alfresco SDK 3.0 no longer uses Spring Loaded for hot reloading. Instead JRebel (commercial) is used or the open source alternative HotSwap, which works a lot better and gives hot reloading of Spring context (only JRebel), classes, web resources, property files etc. Hot reloading works for both the alfresco.war and the share.war. Note that in SDK release 2.2.0 you can no longer use Spring Loaded for hot reloading in alfresco.war.
See Hot reloading for more.
All-In-One (AIO) Project change
The All-In-One (AIO) project has been simplified as a result of build logic, run logic, and project configuration being moved into the Alfresco Maven Plugin.
See Introduction to project structures for more.
No forced parent pom
SDK 3.0 no longer requires a parent pom in your project. All you need is a standard JAR project and the Alfresco Maven Plugin.
Getting started with Alfresco Content Services SDK 3
Use these instructions to get started with using Alfresco SDK 3.
Prerequisites
There are a number of software requirements for using Alfresco Content Services SDK 3.
- Java Development Kit (JDK) - Version 8
- Maven - Version 3.3
- JRebel (optional) for hot reloading of web resources, configuration, and classes
- HotSwap Agent (optional) for hot reloading of web resources, configuration, and classes
You’ll find more details about JRebel and HotSwap Agent in Hot reloading.
Java
- Download JDK 8 and install by running the installer.
-
Verify the installation for both JDK and JRE.
$ javac -version javac 1.8.0_112 $ java -version java version "1.8.0_112" Java(TM) SE Runtime Environment (build 1.8.0_112-b16) Java HotSpot(TM) 64-Bit Server VM (build 25.112-b16, mixed mode) -
Make sure
JAVA_HOMEis setup correctly, so other tools like Maven will use the correct version.$ env|grep JAVA_HOME JAVA_HOME=/Library/Java/JavaVirtualMachines/jdk1.8.0_112.jdk/Contents/Home/jre
Maven
Alfresco recommends that you keep up-to-date with all the Maven releases. Linux distributions and package managers tend to bundle older releases and this is the most common pitfall.
Alfresco SDK 3 requires Maven 3.3.0+, but you are recommended to download the latest version.
- Download and install Apache Maven and make sure it is configured correctly on your path.
-
Verify the installation.
$ mvn -v Apache Maven 3.3.3 (7994120775791599e205a5524ec3e0dfe41d4a06; 2015-04-22T12:57:37+ 01:00) Maven home: /Users/Alfresco/apache-maven-3.3.3 Java version: 1.8.0_112, vendor: Oracle Corporation Java home: /Library/Java/JavaVirtualMachines/jdk1.8.0_112.jdk/Contents/Home/jre Default locale: en_GB, platform encoding: UTF-8 OS name: "mac os x", version: "10.12.3", arch: "x86_64", family: "mac"
Generate your project from the archetypes
-
After you’ve successfully configured Java and Maven, it’s time to generate your project.
mvn archetype:generate -Dfilter=org.alfresco:Note: You’ll be prompted to select the archetype you want. The previously available archetypes,
alfresco-amp-archetypeandshare-amp-archetypewill still show up as an option, however these archetypes are not part of Alfresco SDK 3.Attention: You’ll need double quotes around the filter part if you are using Windows Powershell:
mvn archetype:generate "-Dfilter=org.alfresco:"andThe output looks something like this:
1: remote -> org.alfresco.maven.archetype:activiti-jar-archetype (DEPRECATED - UNSUPPORTED - EXPERIMENTAL) 2: remote -> org.alfresco.maven.archetype:alfresco-allinone-archetype (Sample multi-module project for All-in-One development on the Alfresco platform. Includes modules for Platform/Repository JAR and Share JAR) 3: remote -> org.alfresco.maven.archetype:alfresco-amp-archetype (Sample project with full support for lifecycle and rapid development of Repository AMPs (Alfresco Module Packages)) 4: remote -> org.alfresco.maven.archetype:alfresco-platform-jar-archetype (Sample project with full support for lifecycle and rapid development of Platform/Repository JARs and AMPs (Alfresco Module Packages)) 5: remote -> org.alfresco.maven.archetype:alfresco-share-jar-archetype (Share project with full support for lifecycle and rapid development of JARs and AMPs (Alfresco Module Packages)) 6: remote -> org.alfresco.maven.archetype:share-amp-archetype (Share project with full support for lifecycle and rapid development of AMPs (Alfresco Module Packages)) Choose a number or apply filter (format: [groupId:]artifactId, case sensitive contains): : -
Select one of the following archetype:
org.alfresco.maven.archetype:alfresco-allinone-archetypeorg.alfresco.maven.archetype:alfresco-platform-jar-archetypeorg.alfresco.maven.archetype:alfresco-share-jar-archetypeNote: The numbers may vary from the output shown above due to the way Maven reads and filters the archetypes.
-
Choose the latest
3.xversion.Choose org.alfresco.maven.archetype:alfresco-allinone-archetype version: 1: 2.0.0-beta-1 2: 2.0.0-beta-2 3: 2.0.0-beta-3 4: 2.0.0-beta-4 5: 2.0.0 6: 2.1.0 7: 2.1.1 8: 2.2.0 9: 3.0.0 10: 3.0.1 11: 3.1.0 12: 4.0.0-beta-1 13: 4.0.0 14: 4.1.0 15: 4.2.0 Choose a number: 15: 11 -
Next you will be prompted for additional values, like
groupId,artifactId, andpackage, as shown below:Define value for property 'groupId': Define value for property 'artifactId': [INFO] Using property: version = 1.0-SNAPSHOT Define value for property 'package': -
After you have specified the information according to your project, a final confirmation will appear.
Confirm properties configuration: groupId: com.acme artifactId: my-all-in-one version: 1.0-SNAPSHOT package: com.acme Y: : -
Press Y and then press Enter.
If everything has been configured correctly, you should see something similar to this:
[INFO] --------------------------------------------------------------------------- - [INFO] Using following parameters for creating project from Archetype: alfresco-al linone-archetype:3.0.0-SNAPSHOT [INFO] --------------------------------------------------------------------------- - [INFO] Parameter: groupId, Value: com.acme [INFO] Parameter: artifactId, Value: my-all-in-one [INFO] Parameter: version, Value: 1.0-SNAPSHOT [INFO] Parameter: package, Value: com.acme [INFO] Parameter: packageInPathFormat, Value: com/acme [INFO] Parameter: package, Value: com.acme [INFO] Parameter: version, Value: 1.0-SNAPSHOT [INFO] Parameter: groupId, Value: com.acme [INFO] Parameter: artifactId, Value: my-all-in-one [INFO] Parent element not overwritten in /Users/Alfresco/my-all-in-one/my-all-in-o ne-platform-jar/pom.xml [INFO] Parent element not overwritten in /Users/Alfresco/my-all-in-one/my-all-in-o ne-share-jar/pom.xml [INFO] Parent element not overwritten in /Users/Alfresco/my-all-in-one/integration -tests/pom.xml [INFO] project created from Archetype in dir: /Users/Alfresco/my-all-in-one [INFO] ------------------------------------------------------------------------ [INFO] BUILD SUCCESS [INFO] ------------------------------------------------------------------------ [INFO] Total time: 02:29 min [INFO] Finished at: 2017-03-28T15:44:17+01:00 [INFO] Final Memory: 19M/316M [INFO] ------------------------------------------------------------------------ -
You have successfully generated your first SDK 3 project.
Inside the project, you will find the run.bat and run.sh scripts. These are convenience scripts for you to quickly run your project.
In the terminal window, use:
sh run.shfor Mac OS X or Linuxrun.batfor WindowsNote: If this is the first time you are doing this, it will take a while for Maven to download all the required dependencies.
Introduction to Maven archetypes
The Alfresco SDK 3 comes with a number of Maven archetypes that can be used to generate Alfresco extension projects.
For more details, see Getting started with Alfresco Content Services SDK 3.
These archetypes are available during the creation of a brand new project. In short, a Maven archetype is a project templating toolkit. It’s defined as an original pattern or model from which all other things of the same kind are made. Using archetypes provides a great way to enable developers to quickly follow best practice in a consistent way. This is valid for every project built with Apache Maven and it’s valid in particular when using Alfresco SDK 3.
In this section we are going to introduce all the available archetypes in Alfresco SDK 3, with a brief description of their purpose and main use. After reading this information, you should be able to understand the various possibilities that Alfresco SDK 3 can offer to developers, in terms of projects.
When generating your project, you’ll be prompted to select the Maven archetype you want to use through an interactive menu, similar to what you can see below.
[INFO] Generating project in Interactive mode
[INFO] No archetype defined. Using maven-archetype-quickstart (org.apache.maven.ar
chetypes:maven-archetype-quickstart:1.0)
Choose archetype:
1: remote -> org.alfresco.maven.archetype:activiti-jar-archetype (Sample project w
ith full support for lifecycle and rapid development of Activiti JARs)
2: remote -> org.alfresco.maven.archetype:alfresco-allinone-archetype (Sample mult
i-module project for All-in-One development on the Alfresco platform. Includes mod
ules for Platform/Repository JAR and Share JAR)
3: remote -> org.alfresco.maven.archetype:alfresco-amp-archetype (Sample project w
ith full support for lifecycle and rapid development of Repository AMPs (Alfresco
Module Packages))
4: remote -> org.alfresco.maven.archetype:alfresco-platform-jar-archetype (Sample
project with full support for lifecycle and rapid development of Platform/Reposit
ory JARs and AMPs (Alfresco Module Packages))
5: remote -> org.alfresco.maven.archetype:alfresco-share-jar-archetype (Share pro
ject with full support for lifecycle and rapid development of JARs and AMPs (Alfr
esco Module
Packages))
6: remote -> org.alfresco.maven.archetype:share-amp-archetype (Share project with
full support for lifecycle and rapid development of AMPs (Alfresco Module
Packages))
Choose a number or apply filter (format: [groupId:]artifactId, case sensitive con
tains): :
The menu shows 6 possible options, where each option corresponds to a different Maven archetype that you can select by using the listed numbers. Please note that the numbering is not sequential and some numbers may be skipped.
- Selecting an archetype
Review the brief description of each archetype, what the archetype implements, and suggestions of when the archetype should be used. - All-in-One (AIO) archetype command reference
This describes the scripts and Maven commands that can be used on an Alfresco All-in-One (AIO) extension project based on the AIO archetype.
Selecting an archetype
Review the brief description of each archetype, what the archetype implements, and suggestions of when the archetype should be used.
org.alfresco.maven.archetype:alfresco-allinone-archetype
This archetype allows a developer to implement the All-In-One project on Alfresco Content Services. The All-In-One project (also called AIO) is provided in this and previous versions of Alfresco SDK, but in SDK 3 it has been reorganized and enhanced.
The All-In-One archetype allows a developer to create a multi-module project on Alfresco Content Services. The All-In-One project mainly includes a module for the core repository in Alfresco Content Services and a module for the Share client. This includes:
- ACS Repository WAR overlay (and AMP)
- Alfresco Share WAR overlay (and AMP)
- Apache Solr configuration
- An embedded Apache Tomcat runner
An optional AMP module is maintained, as the previous unique way to deploy custom source code and resources into Alfresco. If you are not confident with AMPs, you can use the WAR overlays using JARs. From Alfresco SDK 3, JAR is the recommended artifact type and the default.
The project created using the All-In-One Maven archetype includes some sample code (by default) to show you how to develop with the Alfresco Content Services Repository and the Alfresco Share client. The samples included in the project are basic and straightforward, and can help you to take the first steps into Alfresco development.
The All-In-One project is recommended to be used if you have to develop a customization of the Alfresco Content Services Repository together with customizations on Alfresco Share client. If your plan to develop a project on the Alfresco Content Services Repository only, use the Platform JAR Maven archetype. If you plan to develop a project on the Alfresco Share client only, use the Share JAR Maven archetype.
For more information about the All-In-One project, see All-In-One project structure.
org.alfresco.maven.archetype:alfresco-platform-jar-archetype
This archetype allows a developer to implement the Platform JAR project on Alfresco Content Services. The Platform JAR project is new to SDK 3, and has been introduced to solve some problems related to the using Alfresco Module Packages (AMPs). Before SDK 3, AMPs were considered as the unique way to deploy custom source code and resources into Alfresco.
The Platform JAR Maven archetype allows a developer to create a module on Alfresco Content Services, in particular on the Repository side, and includes:
- ACS Repository WAR overlay (and AMP)
- Apache Solr configuration
- An embedded Apache Tomcat runner
An optional AMP module is maintained. If you are not confident with AMPs, you can use the WAR overlays using JARs. From Alfresco SDK 3, JAR is the recommended artifact type and the default.
The project created using the Platform JAR Maven archetype includes some sample code (by default) to show you how to develop with the Alfresco Content Services Repository. The samples included in the project are basic and straightforward, and can help you to take the first steps into Alfresco development.
The Platform JAR project is recommended to be used if you have to develop a customization of the Alfresco Content Services Repository. If you also plan to develop a customization of the Alfresco Share client, use the All-In-One Maven archetype instead.
For more information about the Platform JAR project, see Platform JAR project structure.
org.alfresco.maven.archetype:alfresco-share-jar-archetype
This archetype allows a developer to implement the Share JAR project on an Alfresco Share client. The Share JAR project is new to SDK 3, and has been introduced to solve some problems related to using Alfresco Module Packages (AMPs). Before SDK 3, AMPs were considered as the unique way to deploy custom source code and resources into Alfresco.
The Share JAR Maven archetype allows a developer to create a module on an Alfresco Share client, and includes:
- Alfresco Share WAR overlay (and AMP)
- An embedded Apache Tomcat runner
An optional AMP module is maintained. If you are not confident with AMPs, you can use the WAR overlays using JARs. From Alfresco SDK 3, JAR is the recommended artifact type and the default.
The project created using the Share JAR Maven archetype includes some sample code (by default) to show you how to develop with the Alfresco Share client. The samples included in the project are basic and straightforward, and can help you to take the first steps into Alfresco development.
The Share JAR project is recommended to be used if you have to develop a customization of the Alfresco Share client. If you also plan to develop a customization of the Alfresco Content Services Repository, use the All-In-One Maven archetype instead.
For more information about the Share JAR project, see Share JAR project structure.
org.alfresco.maven.archetype:activiti-jar-archetype (for use with SDK 2.2 only)
This Maven archetype is related to an older version of the Alfresco SDK and should not be used. For technical reasons this archetype can’t be hidden and is still listed.
org.alfresco.maven.archetype:alfresco-amp-archetype (for use with SDK 2.2 only)
This Maven archetype is related to an older version of the Alfresco SDK and should not be used. For technical reasons this archetype can’t be hidden and is still listed.
org.alfresco.maven.archetype:share-amp-archetype (for use with SDK 2.2 only)
This Maven archetype is related to an older version of the Alfresco SDK and should not be used. For technical reasons this archetype can’t be hidden and is still listed.
All-in-One (AIO) archetype command reference
This describes the scripts and Maven commands that can be used on an Alfresco All-in-One (AIO) extension project based on the AIO archetype.
The All-in-One Alfresco project contains the following modules:
platform-jar: A Repository JAR project, demonstrating sample project structure and demo component loading.share-jar: A Share JAR project, demonstrating sample project structure and demo Aikau pageintegration-tests: Sample integration tests
Note. in SDK 3.0 the running of Tomcat and the creation of alfresco.war and share.war with applied extensions are all handled by the Alfresco Maven Plugin. Previously there were separate maven projects for this.
Scripts and commands:
| Command | Description |
|---|---|
./run.sh and run.bat |
Linux/Mac and Windows scripts for running an embedded Tomcat with the customized alfresco.war (platform-jar applied), custom share.war (share-jar applied), and solr4.war. Access to Alfresco Share UI is via http://localhost:8080/share. Username/pwd is admin/admin. This script will also configure JVM memory (it basically sets up MAVEN_OPTS for you). See inside script for further details. Note. Spring loaded is no longer used.> Important: This script assumes that you are developing for the Alfresco Community Edition. If you use an Alfresco Enterprise version, then you need to update the maven POM with enterprise versions and configure Alfresco Maven plugin to use entreprise mode. Note you need to set up access to the private repository containing the Alfresco Enterprise artifacts. |
platform-jar/mvn compile alfresco:refresh-repo |
Compiles the source code for the Repository JAR and puts the class files and resources under platform-jar/target. Then makes a POST call to the Alfresco Repository web application (alfresco.war) to refresh the web script container. So any changes that was made to Web scripts should be visible after a page refresh. > Note: This command is typically used together with the run.sh/bat script for Rapid Application Development (RAD). The RAD process can be described like this: |
- Start Tomcat with current alfresco.war customization (that is, run.sh/bat) in console window one.
- From an editor change some files (classes, web scripts, and so on) for the Repository JAR.
- Execute this cmd (that is,
mvn platform-jar/compile alfresco:refresh-repo) from console window two. - Refresh the page / web script you are working on.
- Done? No -> Go back to step 2 and start over.
- Finished with implementation.
share-jar/mvn compile alfresco:refresh-share |
Compiles the source code for the Share JAR and puts the class files and resources under share-jar/target. Then makes POST calls to the Alfresco Share web application (share.war) to refresh the Spring Surf web script container and clear dependency caches. So any changes that was made to web scripts, Aikau pages, Aikau widgets, dashlets, and so on, should be visible after a page refresh. > Note: This command is typically used together with the run.sh/bat script for Rapid Application Development (RAD). The RAD process can be described like this: |
- Start Tomcat with current share.war customization (that is, run.sh/bat) in console window one.
- From an editor change some files (classes, pages, widgets, and so on) for the Share JAR.
- Execute this cmd (that is,
share-jar/mvn compile alfresco:refresh-share) from console window two. - Refresh the page / web script you are working on.
- Done? No -> Go back to step 2 and start over.
- Finished with implementation.
| |mvn package|Packages modules in their respective target directories, for example: - aio/aio-platform-jar/target/aio-platform-jar-1.0-SNAPSHOT.jar
- aio/aio-share-jar/target/aio-share-jar-1.0-SNAPSHOT.jar
Note: This does not apply these newly packaged JARs to their respective WARs, use
mvn installfor that.
| |mvn install|Runs integration tests, package JARs, and installs artifacts in local Maven repository, for example: - .m2/repository/org/alfresco/tutorial/aio-platform-jar/1.0-SNAPSHOT/aio-platform-jar-1.0-SNAPSHOT.jar
- .m2/repository/org/alfresco/tutorial/aio-share-jar/1.0-SNAPSHOT/aio-share-jar-1.0-SNAPSHOT.jar
- .m2/repository/org/alfresco/tutorial/integration-tests-platform/1.0-SNAPSHOT/integration-tests-platform-1.0-SNAPSHOT.war, contains the aio-platform-jar-1.0-SNAPSHOT.jar
- .m2/repository/org/alfresco/tutorial/integration-tests-share/1.0-SNAPSHOT/integration-tests-share-1.0-SNAPSHOT.war, contains the aio-share-jar-1.0-SNAPSHOT.jar
| Where these artifacts can be accessed by other local projects that depend on them. | ||
| mvn install -DskipTests=true | Like mvn install but skips tests. |
|
| mvn install alfresco:run | Like run.sh or run.bat but does not configure JVM memory if you have not configured it in MAVEN_OPTS, see set up MAVEN_OPTS. If you use Alfresco One, see the next command. |
Introduction to project structures
After generating your project, using one of the Maven archetypes, review the project structure. The directory structure and content of each folder and file can help you to understand how to start developing with the Alfresco SDK 3.
Before continuing, make sure that have read and completed the tasks in the Getting started tutorial.
The structure of the project and the purpose of the files it contains vary according to the Maven archetype used to generate the project itself. The following links provide detailed descriptions of the different project types.
- All-In-One project structure
The following pages provide a detailed description of the All-In-One (AIO) project, including the project structure and folder contents. - Platform JAR project structure
The following pages provide a detailed description of the Platform JAR project, including the project structure and folder content. - Share JAR project structure
The following pages provide a detailed description of the Share client JAR project, including the project structure and folder content.
All-In-One project structure
The following pages provide a detailed description of the All-In-One (AIO) project, including the project structure and folder contents.
Now that you know what an All-In-One project is, let’s introduce the structure of the project, once it is created using the org.alfresco.maven.archetype:alfresco-allinone-archetype.
Below is an example directory structure of an All-In-One project created with com.example as groupId and my-all-in-one-project as artifactId.
my-all-in-one-project
├── debug.bat
├── debug.sh
├── pom.xml
├── README.md
├── integration-tests
│ ├── pom.xml
│ └── src
│ ├── main
│ │ └── java
│ │ └── com
│ │ └── example
│ └── test
│ ├── java
│ │ └── com
│ │ └── example
│ │ └── platformsample
│ │ ├── CustomContentModelIT.java
│ │ ├── DemoComponentIT.java
│ │ └── HelloWorldWebScriptIT.java
│ ├── properties
│ │ └── local
│ │ ├── alfresco-global-enterprise.properties
│ │ ├── alfresco-global-h2.properties
│ │ ├── alfresco-global-mysql.properties
│ │ └── alfresco-global-postgresql.properties
│ └── resources
│ ├── alfresco
│ │ └── extension
│ │ ├── dev-log4j.properties
│ │ └── disable-webscript-caching-context.xml
│ ├── share
│ │ └── log4j.properties
│ └── tomcat
│ └── context-solr.xml
├── my-all-in-one-project-platform-jar
│ ├── pom.xml
│ └── src
│ ├── main
│ │ ├── assembly
│ │ │ ├── amp.xml
│ │ │ ├── file-mapping.properties
│ │ │ └── web
│ │ │ └── README.md
│ │ ├── java
│ │ │ └── com
│ │ │ └── example
│ │ │ └── platformsample
│ │ │ ├── DemoComponent.java
│ │ │ ├── Demo.java
│ │ │ └── HelloWorldWebScript.java
│ │ └── resources
│ │ ├── alfresco
│ │ │ ├── extension
│ │ │ │ └── templates
│ │ │ │ └── webscripts
│ │ │ │ └── alfresco
│ │ │ │ └── tutorials
│ │ │ │ ├── helloworld.get.desc.xml
│ │ │ │ ├── helloworld.get.html.ftl
│ │ │ │ └── helloworld.get.js
│ │ │ └── module
│ │ │ └── my-all-in-one-project-platform-jar
│ │ │ ├── alfresco-global.properties
│ │ │ ├── context
│ │ │ │ ├── bootstrap-context.xml
│ │ │ │ ├── service-context.xml
│ │ │ │ └── webscript-context.xml
│ │ │ ├── messages
│ │ │ │ └── content-model.properties
│ │ │ ├── model
│ │ │ │ ├── content-model.xml
│ │ │ │ └── workflow-model.xml
│ │ │ ├── module-context.xml
│ │ │ ├── module.properties
│ │ │ └── workflow
│ │ │ └── sample-process.bpmn20.xml
│ │ └── META-INF
│ │ └── resources
│ │ └── test.html
│ └── test
│ └── java
│ └── com
│ └── example
│ └── platformsample
│ └── HelloWorldWebScriptControllerTest.java
├── my-all-in-one-project-share-jar
│ ├── pom.xml
│ └── src
│ ├── main
│ │ ├── assembly
│ │ │ ├── amp.xml
│ │ │ ├── file-mapping.properties
│ │ │ └── web
│ │ │ └── README.md
│ │ ├── java
│ │ │ └── com
│ │ │ └── example
│ │ └── resources
│ │ ├── alfresco
│ │ │ ├── module
│ │ │ │ └── my-all-in-one-project-share-jar
│ │ │ │ └── module.properties
│ │ │ └── web-extension
│ │ │ ├── messages
│ │ │ │ └── my-all-in-one-project-share-jar.properties
│ │ │ ├── my-all-in-one-project-share-jar-slingshot-application-context.xml
│ │ │ ├── site-data
│ │ │ │ └── extensions
│ │ │ │ └── my-all-in-one-project-share-jar-example-widgets.xml
│ │ │ └── site-webscripts
│ │ │ ├── com
│ │ │ │ └── example
│ │ │ │ └── pages
│ │ │ │ ├── simple-page.get.desc.xml
│ │ │ │ ├── simple-page.get.html.ftl
│ │ │ │ └── simple-page.get.js
│ │ │ └── org
│ │ │ └── alfresco
│ │ │ └── README.md
│ │ └── META-INF
│ │ ├── resources
│ │ │ └── my-all-in-one-project-share-jar
│ │ │ └── js
│ │ │ └── tutorials
│ │ │ └── widgets
│ │ │ ├── css
│ │ │ │ └── TemplateWidget.css
│ │ │ ├── i18n
│ │ │ │ └── TemplateWidget.properties
│ │ │ ├── templates
│ │ │ │ └── TemplateWidget.html
│ │ │ └── TemplateWidget.js
│ │ └── share-config-custom.xml
│ └── test
│ └── java
│ └── com
│ └── example
├── pom.xml
├── README.md
├── run.bat
├── run.sh
└── src
└── test
├── license
│ └── README.md
├── properties
│ └── local
│ ├── alfresco-global-enterprise.properties
│ ├── alfresco-global-h2.properties
│ ├── alfresco-global-mysql.properties
│ └── alfresco-global-postgresql.properties
└── resources
├── alfresco
│ └── extension
│ ├── dev-log4j.properties
│ └── disable-webscript-caching-context.xml
├── platform-hotswap-agent.properties
├── share
│ ├── log4j.properties
│ └── share-config-custom.xml
├── share-hotswap-agent.properties
└── tomcat
└── context-solr.xml
From a high level standpoint, we can describe the content of the project as follows:
my-all-in-one-project(the root of the project) contains the whole project. It can easily be pushed into a version control repository and/or an internet hosting service like GitHub, SVN, CVS, etc.- The files stored into the root of the project are mainly related to actions and commands (running, debugging, etc.), technical configuration (
pom.xml), and documentation (README.md). integration-testscontains a sub-project entirely dedicated to integration tests.my-all-in-one-project-platform-jar(typically named<artefactId-platform-jar>) contains a sub-project entirely dedicated to the customization of the Alfresco Content Services Repository.my-all-in-one-project-share-jar(typically named<artefactId-share-jar>) contains a sub-project entirely dedicated to the customization of the Alfresco Share clientsrccontains the licenses, properties, and resources used during the testing of the project.
After this brief introduction of the All-In-One project, let’s focus on the content of the folders. Below a description of the files in the root of the project (in this case, my-all-in-one-project).
| File | Description |
|---|---|
debug (sh and bat) |
Script to run the project in debug mode. The sh file is for Unix/Linux based operating systems, and the bat file is for Windows based operating systems. |
pom.xml |
This XML file contains information about the project and configuration details used by Apache Maven to build the project. You can define all the configurations, parameters, and settings in this file for projects as well as for sub-projects. |
README.md |
File in Markdown format containing the documentation for the project. |
run (sh and bat) |
Script to run the project. The sh file is for Unix/Linux based operating systems, and the bat file is for Windows based operating systems. |
Below is a description of the content in the my-all-in-one-project-platform-jar (typically named <artefactId-platform-jar>) sub-project. This sub-project contains the source code entirely dedicated to the customizing the Alfresco Content Services Repository.
| Content | Description |
|---|---|
pom.xml |
This XML file contains information about the project and configuration details used by Apache Maven to build the project. You can define all the configurations, parameters, and settings in this file even if it depends on the parent pom in the root folder. For the majority of use cases, settings and configurations can be read(?) directly from the parent pom, and this file can work in its default version. |
src/main/assembly |
In this folder you can find everything that’s needed to fully control creating the AMP artifact in the platform project. The main file to check is amp.xml. |
src/main/java/<groupId>... |
This folder contains the same content you can find in a regular Java project, i.e. the Java source code. Here you should put all the custom classes, interfaces, and Java source code in general. |
src/main/resources/alfresco/ extension/templates/webscripts |
In this folder you can find the extensions to the REST API related to Web Scripts . Repository Web Scripts are defined in XML, JavaScript, and FreeMarker files. These are referred to as Data Web Scripts as they usually return JSON or XML. The default project contains a Hello World example. |
src/main/resources/alfresco/ module/<artifactId> |
This folder contains all the configuration files and settings for the Alfresco platform module. Here you can find context files, the alfresco-global.properties file, Content Model examples, and Activiti workflow examples. |
src/main/resources/META-INF |
This folder hosts the content that will be placed in the META-INF folder of a standard Java web application. |
src/test/java/<groupId>... |
This folder contains the same content you can find in a regular Java project, i.e. the Java source code for tests. Here you should put all the custom classes, interfaces, and Java source code related to tests. This folder is empty by default. |
Below is a description of the content in the my-all-in-one-project-share-jar (typically named <artefactId-share-jar>) sub-project. This sub-project contains the source code entirely dedicated to the customizing the Alfresco Share client.
|Content|Description|
|——-|———–|
|pom.xml|This XML file contains information about the project and configuration details used by Apache Maven to build the project. You can define all the configurations, parameters, and settings in this file even if it depends on the parent pom in the root folder. For the majority of use cases, settings and configurations can be read(?) directly from the parent pom, and this file can work in its default version.|
|src/main/assembly|In this folder you can find everything that’s needed to fully control the creation of the AMP artifact in the platform project. The main file to check is amp.xml.|
|src/main/java/<groupId>...|This folder contains the same content you can find in a regular Java project, i.e. the Java source code. Here you should put all the custom classes, interfaces, and Java source code in general.|
|src/main/resources/alfresco/ module/<artifactId>|This folder contains all the configuration files and settings for the Alfresco Share module. Here you can find the property file for the module.|
|src/main/resources/alfresco/ web-extension|In this folder you can find the extensions to the web client (Alfresco Share) and it’s where you store Spring configurations that extend and override the system Share configuration. There are two important sub-directories here: site-data and site-webscripts. - site-data contains Alfresco Surf configuration XML files, such as page definitions, template-instances and components.
- The
site-webscriptsdirectory contains your presentation tier web scripts, consisting of description files, JavaScript controllers and FreeMarker template files.
src/main/resources/alfresco/ META-INF/resources |
This folder hosts the content that will be placed in the META-INF folder of a standard Java web application. It is best practice to use a further subdirectory based on the module name. This allows you to manage multiple modules, so that their web resources don’t conflict with each other. |
src/main/resources/alfresco/ META-INF/share-config-custom.xml |
This file is a relevant Alfresco Share file used to configure the sub-project with the correct settings, depending on your environment. For more details, see Share configuration. |
src/test/java/<groupId>... |
This folder contains the same content you can find in a regular Java project, i.e. the Java source code for tests. Here you should put all the custom classes, interfaces, and Java source code related to tests. |
Below is a description of the content in the integration-tests sub-project. This sub-project contains all the source code and resources needed to run the integration tests.
| Content | Description |
|---|---|
pom.xml |
This XML file contains information about the project and configuration details used by Apache Maven to build the project. You can define all the configurations, parameters, and settings in this file even if it depends on the parent pom in the root folder. For the majority of use cases, settings and configurations can be read(?) directly from the parent pom, and this file can work in its default version. |
src/main/java/<groupId>... |
This folder contains the same content you can find in a regular Java project, i.e. the Java source code. Here you should put all the custom classes, interfaces, and Java source code in general. The folder is empty by default. |
src/test/java/<groupId>... |
This folder contains the same content you can find in a regular Java project, i.e. the Java source code for tests. Here you should put all the custom classes, interfaces, and Java source code in general related to tests. By default you can find three different tests related to content modelling, custom components, and web scripts. |
src/test/properties |
This folder contains the properties used by the integration tests. It specifically contains the alfresco-global.properties file. By default you can find four different versions of the property file depending on the database used. |
src/test/resources |
This folder contains the resources used by the web application for the integration tests. It specifically contains all the configuration files and settings for the Alfresco platform (Log4J, etc.), Share client (Log4J), and Apache Tomcat (Apache Solr context). |
Below is a description of the content in the src folder. This folder contains the licenses, properties, and resources used during the testing of the project.
| Content | Description |
|---|---|
src/test/java/license |
This folder contains the licenses required for running an Enterprise project. |
src/test/java/properties |
This folder contains various versions of the alfresco-global.properties file to support different databases and enterprise versions. |
src/test/java/resources |
This folder hosts all the resources related to property files and configurations for logging, caching, Apache Solr, and hot-reloading. |
Platform JAR project structure
The following pages provide a detailed description of the Platform JAR project, including the project structure and folder content.
Now that you know what a Platform JAR project is, let’s introduce the structure of the project, once it is created using the org.alfresco.maven.archetype:alfresco-platform-jar-archetype.
Below is an example directory structure of a Platform JAR created with com.example as groupId and my-platform-jar-project as artifactId.
my-platform-jar-project
├── debug.bat
├── debug.sh
├── pom.xml
├── README.md
├── run.bat
├── run.sh
└── src
├── main
│ ├── assembly
│ │ ├── amp.xml
│ │ ├── file-mapping.properties
│ │ └── web
│ │ └── README.md
│ ├── java
│ │ └── com
│ │ └── example
│ │ └── platformsample
│ │ ├── DemoComponent.java
│ │ ├── Demo.java
│ │ └── HelloWorldWebScript.java
│ └── resources
│ ├── alfresco
│ │ ├── extension
│ │ │ └── templates
│ │ │ └── webscripts
│ │ │ └── alfresco
│ │ │ └── tutorials
│ │ │ ├── helloworld.get.desc.xml
│ │ │ ├── helloworld.get.html.ftl
│ │ │ └── helloworld.get.js
│ │ └── module
│ │ └── my-platform-jar-project
│ │ ├── alfresco-global.properties
│ │ ├── context
│ │ │ ├── bootstrap-context.xml
│ │ │ ├── service-context.xml
│ │ │ └── webscript-context.xml
│ │ ├── messages
│ │ │ └── content-model.properties
│ │ ├── model
│ │ │ ├── content-model.xml
│ │ │ └── workflow-model.xml
│ │ ├── module-context.xml
│ │ ├── module.properties
│ │ └── workflow
│ │ └── sample-process.bpmn20.xml
│ └── META-INF
│ └── resources
│ └── test.html
└── test
├── java
│ └── com
│ └── example
├── license
│ └── README.md
├── properties
│ └── local
│ ├── alfresco-global-enterprise.properties
│ ├── alfresco-global-h2.properties
│ ├── alfresco-global-mysql.properties
│ └── alfresco-global-postgresql.properties
└── resources
├── alfresco
│ └── extension
│ ├── dev-log4j.properties
│ └── disable-webscript-caching-context.xml
├── platform-hotswap-agent.properties
└── tomcat
└── context-solr.xml
From a high level standpoint, we can describe the content of the project as follows:
my-platform-jar-project(the root of the project) contains the whole project. It can easily be pushed into a version control repository and/or an internet hosting service like GitHub, SVN, CVS, etc.- The files stored into the root of the project are mainly related to actions and commands (running, debugging, etc.), technical configurations (
pom.xml) and documentation (README.md). srccontains the source code, tests, configurations, settings and resources that are entirely dedicated to the customization of the Alfresco Content Services Repository.
After this brief introduction of the Platform JAR project, let’s focus on the content of the folders. Below a description of the files in the root of the project (in this case, my-platform-jar-project).
| File | Description |
|---|---|
debug (sh and bat) |
Script to run the project in debug mode. The sh file is for Unix/Linux based operating systems, and the bat file is for Windows based operating systems. |
pom.xml |
This XML file contains information about the project and configuration details used by Apache Maven to build the project. You can define all the configurations, parameters, and settings in this file for projects as well as for sub-projects. |
README.md |
File in Markdown format containing the documentation for the project. |
run (sh and bat) |
Script to run the project. The sh file is for Unix/Linux based operating systems, and the bat file is for Windows based operating systems. |
Below is a description of the content in the src folder. This folder contains the source code, tests, configuration, settings, and resources entirely dedicated to the customization of the Alfresco Content Services Repository.
| Content | Description |
|---|---|
src/main/assembly |
In this folder you can find everything that’s needed to fully control creating the AMP artifact in the platform project. The main file to check is amp.xml. |
src/main/java/<groupId>... |
This folder contains the same content you can find in a regular Java project, i.e. the Java source code. Here you should put all the custom classes, interfaces, and Java source code in general. |
src/main/resources/alfresco/ extension/templates/webscripts |
In this folder you can find the extensions to the REST API related to Web Scripts . Repository Web Scripts are defined in XML, JavaScript, and FreeMarker files. These are referred to as Data Web Scripts as they usually return JSON or XML. The default project contains a Hello World example. |
src/main/resources/alfresco/ module/<artifactId> |
This folder contains all the configuration files and settings for the Alfresco platform module. Here you can find context files, the alfresco-global.properties file, Content Model examples, and Activiti workflow examples. |
src/main/resources/META-INF |
This folder hosts the content that will be placed in the META-INF folder of a standard Java web application. |
src/test/java/<groupId>... |
This folder contains the same content you can find in a regular Java project, i.e. the Java source code for tests. Here you should put all the custom classes, interfaces, and Java source code related to tests. This folder is empty by default. |
src/test/java/license |
This folder contains the licenses required for running an Enterprise project. |
src/test/java/properties |
This folder contains various versions of the alfresco-global.properties file to support different databases and enterprise versions. |
src/test/java/resources |
This folder hosts all the resources related to property files and configurations for logging, caching, Apache Solr, and hot-reloading. |
Share JAR project structure
The following pages provide a detailed description of the Share client JAR project, including the project structure and folder content.
Now that you know what a Share JAR project is, let’s introduce the structure of the project, once it is created using the org.alfresco.maven.archetype:alfresco-share-jar-archetype.
Below is an example directory structure of a Share JAR created with com.example as groupId and my-share-jar-project as artifactId.
my-share-jar-project
├── debug.bat
├── debug.sh
├── pom.xml
├── README.md
├── run.bat
├── run.sh
└── src
├── main
│ ├── assembly
│ │ ├── amp.xml
│ │ ├── file-mapping.properties
│ │ └── web
│ │ └── README.md
│ ├── java
│ │ └── com
│ │ └── example
│ └── resources
│ ├── alfresco
│ │ ├── module
│ │ │ └── my-share-jar-project
│ │ │ └── module.properties
│ │ └── web-extension
│ │ ├── messages
│ │ │ └── my-share-jar-project.properties
│ │ ├── my-share-jar-project-slingshot-application-context.xml
│ │ ├── site-data
│ │ │ └── extensions
│ │ │ └── my-share-jar-project-example-widgets.xml
│ │ └── site-webscripts
│ │ ├── com
│ │ │ └── example
│ │ │ └── pages
│ │ │ ├── simple-page.get.desc.xml
│ │ │ ├── simple-page.get.html.ftl
│ │ │ └── simple-page.get.js
│ │ └── org
│ │ └── alfresco
│ │ └── README.md
│ └── META-INF
│ ├── resources
│ │ └── my-share-jar-project
│ │ └── js
│ │ └── tutorials
│ │ └── widgets
│ │ ├── css
│ │ │ └── TemplateWidget.css
│ │ ├── i18n
│ │ │ └── TemplateWidget.properties
│ │ ├── templates
│ │ │ └── TemplateWidget.html
│ │ └── TemplateWidget.js
│ └── share-config-custom.xml
└── test
├── java
│ └── com
│ └── example
└── resources
├── share
│ └── log4j.properties
└── share-hotswap-agent.properties
From a high level standpoint, we can describe the content of the project as follows:
my-share-jar-project(the root of the project) contains the whole project. It can easily be pushed into a version control repository and/or an internet hosting service like GitHub, SVN, CVS, etc.- The files stored into the root of the project are mainly related to actions and commands (running, debugging, etc.), technical configuration (
pom.xml), and documentation (README.md). srccontains the source code, tests, configuration, settings, and resources that are entirely dedicated to the customization of the Alfresco Share client.
After this brief introduction of the Share JAR project, let’s focus on the content of the folders. Below a description of the files in the root of the project (in this case, my-share-jar-project).
| File | Description |
|---|---|
debug (sh and bat) |
Script to run the project in debug mode. The sh file is for Unix/Linux based operating systems, and the bat file is for Windows based operating systems. |
pom.xml |
This XML file contains information about the project and configuration details used by Apache Maven to build the project. All the configurations, parameters, and settings can be defined in this file for projects as well as for sub-projects. |
README.md |
File in Markdown format containing the documentation for the project. |
run (sh and bat) |
Script to run the project. The sh file is for Unix/Linux based operating systems, and the bat file is for Windows based operating systems. |
Below is a description of the content in the src folder, which contains the source code, tests, configuration, settings, and resources entirely dedicated to the customization of the Alfresco Share client.
|Content|Description|
|——-|———–|
|src/main/assembly|In this folder you can find everything that’s needed to fully control the creation of the AMP artifact in the platform project. The main file to check is amp.xml.|
|src/main/java/<groupId>...|This folder contains the same content you can find in a regular Java project, i.e. the Java source code. Here you should put all the custom classes, interfaces, and Java source code in general.|
|src/main/resources/alfresco/ module/<artifactId>|This folder contains all the configuration files and settings for the Alfresco Share module. Here you can find the property file for the module.|
|src/main/resources/alfresco/ web-extension|In this folder you can find the extensions to the web client (Alfresco Share) and it’s where you store Spring configurations that extend and override the system Share configuration. There are two important sub-directories here: site-data and site-webscripts. - site-data contains Alfresco Surf configuration XML files, such as page definitions, template-instances and components.
- The
site-webscriptsdirectory contains your presentation tier web scripts, consisting of description files, JavaScript controllers and FreeMarker template files.
src/main/resources/META-INF |
This folder hosts the content that will be placed in the META-INF folder of a standard Java web application. It is best practice to use a further subdirectory based on the module name. This allows you to manage multiple modules, so that their web resources don’t conflict with each other. |
src/test/java/<groupId>... |
This folder contains the same content you can find in a regular Java project, i.e. the Java source code for tests. Here you should put all the custom classes, interfaces, and Java source code related to tests. This folder is empty by default. |
src/test/java/resources |
This folder hosts all the resources related to property files and configurations for logging and hot-reloading. |
Setting up your development environment
The Maven Alfresco SDK is designed to work well with Eclipse and IntelliJ IDEA.
- Setting up your development environment using Eclipse
The Maven Alfresco SDK is designed to work well with Eclipse. This support includes the ability to import existing Alfresco projects created using the Alfresco SDK. - Setting up your development environment using Intellij IDEA
The Maven Alfresco SDK is designed to work well with IntelliJ IDEA. This support includes the ability to import existing Alfresco projects created using the Alfresco SDK. - Configuring access to Alfresco Private Repository
In order to be able to utilize Enterprise artifacts, it is necessary to allow Maven access to the Alfresco Private Artifacts Repository, where the Enterprise artifacts are maintained. - Setting MAVEN_OPTS & M2_HOME
Before using the Alfresco SDK, you need to set yourMAVEN_OPTSandM2_HOMEenvironment variables to suitable values using the correct mechanism for your operating system.
Setting up your development environment using Eclipse
The Maven Alfresco SDK is designed to work well with Eclipse. This support includes the ability to import existing Alfresco projects created using the Alfresco SDK.
Here we assume you already have an Eclipse installation up and running, together with an available Alfresco project created using the Alfresco SDK. If you don’t have a project already, follow the steps in Getting started with Alfresco Content Services SDK 3 to learn how to quickly generate it in a few easy steps.
Importing the Alfresco project into Eclipse
-
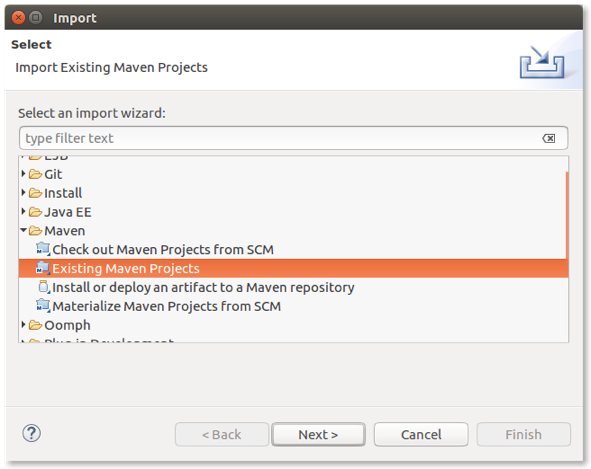
Starting from Eclipse, select File > Import > Maven > Existing Maven Projects from the main menu to import the Alfresco project.
-
Click Next then browse to the root of the Alfresco project.

-
Click Finish to start importing the project into Eclipse.
Before completing the import, Eclipse checks the completeness of the local Maven repository. If you already have a local repository that includes all the required dependencies, this task will finish relatively quickly. Otherwise, be patient and wait until the downloads are completed (it can take some time).
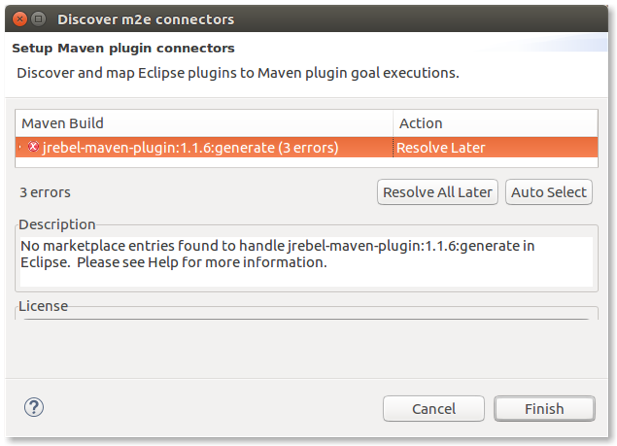
Once the import is complete, a warning message is displayed.
-
Click Resolve All Later to complete the import task.
-
Check the Markers tab in the bottom panel, where you may see some Maven problems. Expand the list and right click on a item with an error, then select Quick Fix and mark as shown.

-
Click Finish to confirm the fix.
You may be asked to confirm your selection.
-
Repeat the fix for all similar issues you have. Note that these issues really depend on the archetype you used to generate the project.
Once done, you may see an error with description:
Project configuration is not up-to-date with pom.xml. -
To fix this, right click one of the Alfresco projects and select Maven > Update Project, ensure all the Alfresco projects and sub-projects are selected, and then click OK.
Running the Alfresco project from Eclipse
To run the Alfresco project in Eclipse you need to correctly configure the environment.
-
Click Run > Run Configuration and then select Maven Build from the list.
-
Right click Maven Build and select New.
-
Give the project a name (for example, My Alfresco project).
-
Select the entire project using the Workspace button.
-
Select the Debug Output check box and click Apply.

Now it’s time to setup the Java Runtime Environment.
-
Click on the JRE tab and type
-Xms256m -Xmx2Gin the VM arguments field. -
Click Apply to confirm the settings.

The configuration is done now.
-
Click the green Run button to launch the project.
You will start seeing a lot of log messages in the Console tab in the bottom panel. This is the log tail where you can check for errors, debug messages and everything that’s relevant for you to understand what is happening to the project execution.
Starting from now, you can use your project as usual, for example, by opening a browser and accessing the services nad clients.
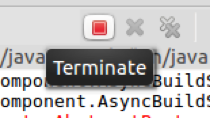
-
To stop the project, click the red Terminate button in the Console tab in the bottom panel.
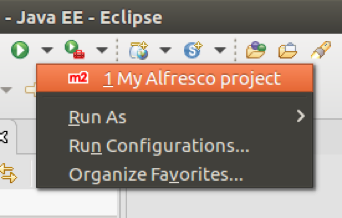
-
After the first run, the configuration is added to the toolbar for a faster access to launch.
Setting up your development environment using Intellij IDEA
The Maven Alfresco SDK is designed to work well with IntelliJ IDEA. This support includes the ability to import existing Alfresco projects created using the Alfresco SDK.
Here we assume you already have an IntelliJ IDEA installation up and running, together with an available Alfresco project created using the Alfresco SDK. If you don’t have a project already, follow the steps in Getting started with Alfresco Content Services SDK 3 to learn how to quickly generate it in a few easy steps.
Importing the Alfresco project into Intellij IDEA
-
Starting from IntelliJ IDEA, select File > Open from the main menu to open the Alfresco project.
Note: Alternatively, select Import Project if you’re running IntelliJ IDEA for the first time in your development environment.

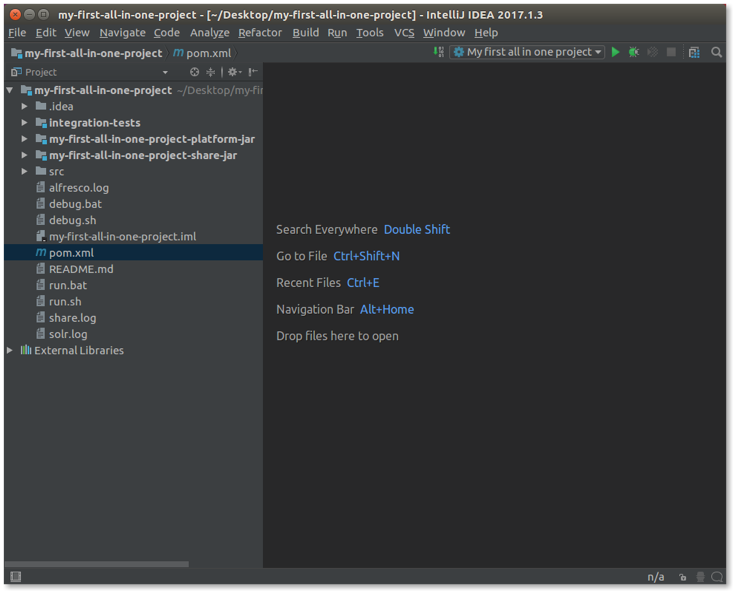
-
After the project is imported, you will see a window similar to the following:

Running the Alfresco project from IntelliJ IDEA
To run the Alfresco project in IntelliJ IDEA you need to correctly configure the environment.
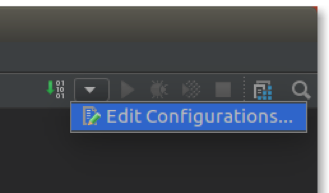
-
Click Run Configurations in the top right as shown:
-
Click on the green plus (in top left) and select Maven to add a new Maven configuration.
-
Enter your preferred name for the configuration. For example, My first all in one project.
-
In the Working directory field, enter your project path.
-
Enter the Command line, for example clean install alfresco:run.

-
In the Runner tab, deselect the Use project settings checkbox.
-
Enter the VM Options and JRE:
- VM Options:
-Xms256m -Xmx2G - JRE: select ‘Use JAVA_Home’ (for example,
/usr/lib/jvm/java-8-oracle)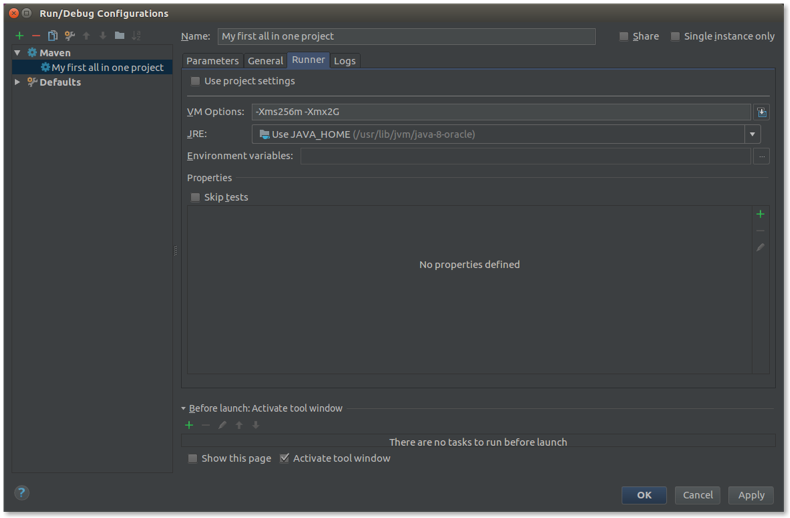
- VM Options:
-
Click OK.
The project is reorganized to represent the correct Maven structure as shown in your IDE.
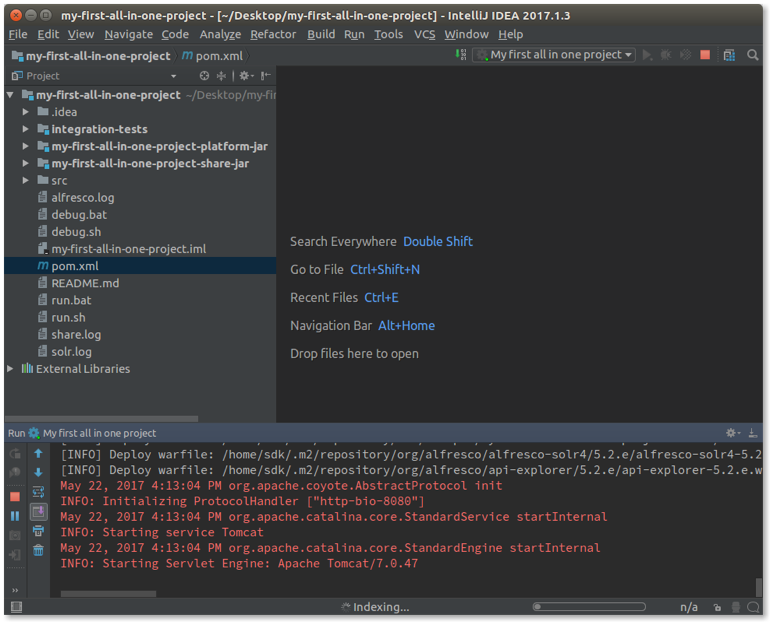
-
To run your project, click on the green arrow on the top right of the window.
A new panel appears at the bottom of the window. In this panel you can check the log messages describing the Alfresco launch, as shown in your IDE.
-
To stop the execution, click on the red button on the top right of the window.
Configuring access to Alfresco Private Repository
In order to be able to utilize Enterprise artifacts, it is necessary to allow Maven access to the Alfresco Private Artifacts Repository, where the Enterprise artifacts are maintained.
You need to have permission to access the Alfresco private repository. Enterprise customers can obtain access credentials from Alfresco.
In order to allow Maven access to the Alfresco Private Repository, you must add your credentials to the Maven configuration. This is usually done by adding an entry to the settings.xml file, located in your .m2 directory.
-
Obtain access credentials for the Alfresco Private Repository from Alfresco. This is only available for Enterprise-level customers.
-
Change into your Maven configuration directory. For Linux and Mac OS X that will most likely be ~/.m2 for a configuration on a per-user basis, or for global configuration in
/conf/. On Windows this would be located in %USER_HOME%/.m2/ for a per-user configuration, and %M2_HOME%/conf for a global configuration. -
Load settings.xml into your editor. Add the following new server configuration in the
<servers>section:<server> <id>alfresco-private-repository</id> <username>username</username> <password>password</password> </server>Important: You will need to replace the placeholder text with your real username and password as allocated by Alfresco. The
idvalue should not be changed as it is used in the Alfresco SDK project build files to specify the Enterprise artifacts Maven repository.Attention: It is possible to use encrypted passwords here. See the official Maven documentation for details on how to do this.
At this point you have configured Maven to have access to the Alfresco Private Repository.
Setting MAVEN_OPTS & M2_HOME
Before using the Alfresco SDK, you need to set your MAVEN_OPTS and M2_HOME environment variables to suitable values using the correct mechanism for your operating system.
Setting M2_HOME specifies the home of Maven and is used by the script mvn (or mvn.bat on Windows). MAVEN_OPTS is used to configure a bit of extra memory for Maven as it will run an embedded Apache Tomcat application server with Alfresco Repo, Share, and Solr web applications deployed. It also sets the Spring Loaded Java Agent so it is available during Rapid Application Development (RAD).
- Setting Variables.
-
On Mac OS X you can edit your .bash_profile file and add the following:
export M2_HOME=/home/martin/apps/apache-maven-3.3.3 export MAVEN_OPTS="-Xms1024m -Xmx1G -noverify"Important: Refer to previous installation sections for in what directory Maven was installed and in what directory Spring Loaded was installed.
Restart the terminal session or run
source .bash_profileto activate the environment variables. -
On Linux you can edit your .bashrc file and add the following:
See step 1 for Mac OS, do the same thing for Linux.
Restart the terminal session or run
source .bashrcto activate the environment variable. -
On Windows, the exact procedure for setting environment variables varies depending on the version of Windows you are running. For example, the procedure for Windows XP can be found in the Microsoft Knowledgebase.
set M2_HOME=C:\Tools\apache-maven-3.3.1 set MAVEN_OPTS=-Xms256m -Xmx1G -XX:PermSize=1024m -noverifyImportant: Spring Loaded ONLY works with the Share AMP archetype at the moment. If you are configuring
MAVEN_OPTSto run a Share AMP project setMAVEN_OPTS=-Xms256m -Xmx1G -XX:PermSize=1024m -javaagent:C:\Tools\spring-loaded\springloaded-1.2.5.RELEASE.jar -noverifyImportant: Remove
-XX:PermSize=1024m.Important: If the path to the Spring Loaded JAR contains spaces, then you might need to double quote it like
-javaagent:"C:\My Tools\spring-loaded\springloaded-1.2.5.RELEASE.jar". Refer to previous installation sections for in what directory Maven was installed and in what directory Spring Loaded was installed.Restart the Windows terminal/console session.
- Verifying Variables.
-
Ensure that the
MAVEN_OPTSandM2_HOMEenvironment variables are set correctly, using a method suitable for your system. For example, on Mac OS X and Linux you can enter the following command:$ env|egrep "M2|MAV" MAVEN_OPTS=-Xms256m -Xmx1G -XX:PermSize=1024m -noverify M2_HOME=/home/martin/apps/apache-maven-3.3.3Ensure that the result matches the value you specified in your shell configuration file (such as
.bashrc).If you are on Windows you can use a command such as
set Mto display environment variables starting with ‘M’.C:\Users\mbergljung>set M M2_HOME=C:\Tools\apache-maven-3.3.1 MAVEN_OPTS=-Xms256m -Xmx1G -XX:PermSize=1024m -noverify
Your MAVEN_OPTS and M2_HOME environment variables are now set. Feel free to increase the specified memory settings if required, for example, if you get “out of memory” errors when running your projects.
Advanced topics
This information provides more advanced topics that you might come in contact with when you have been working with an SDK project for a while. We will have a look at how you can add more custom modules to an All-in-One project, and more.
- Configuring the Alfresco Maven plugin
One of the most important changes of the Alfresco SDK 3 is that all the logic to run Alfresco Content Services and Share has been moved out of the profiles and Maven parent pom. The Maven plugin now has a single goalalfresco:run, which can be invoked directly. - Switching Alfresco Content Services and Share versions
The latest version of the Alfresco SDK supports different versions for Alfresco Content Services and Alfresco Share. Since each product is no longer released under one common version number, ACS (that is,alfresco.war) and the Share UI (share.war) are now released with individual version numbers. - Working with Enterprise
By default the Alfresco SDK will use Community Edition releases but it can be configured to use Enterprise Edition releases. Here you will learn how to set up a project to work with an Enterprise Edition release, highlighting the changes required to make it work. - Working with AMPs
Since the early days of the Alfresco SDK, the Alfresco Module Packages (AMP) have been the way customizations were packaged. In Alfresco SDK 3.0 everything is now packaged as a JAR by default, while the AMPs are still available as an optional assembly. This gives you much more control over packaging, and simple modules can easily be deployed as JARs. - Debugging
When developing add-ins, fixing bugs, or changing Alfresco from the source code, it is helpful to debug an instance of Alfresco running on a standard application server. This section outlines the steps needed to configure Alfresco and Eclipse (or IntelliJ IDEA) to provide a real-time view of the server and to troubleshoot issues by stepping through the code line by line. - Integration testing
“Integration testing is the phase in software testing where individual software modules are combined and tested as a group. It occurs after unit testing and before validation testing. Integration testing takes as its input modules that have been unit tested, groups them in larger aggregates, applies tests defined in an integration test plan to those aggregates, and delivers as its output the integrated system ready for system testing. [Wikipedia].” - Hot reloading
Hot reloading in a Java project is the ability to avoid the infamous change > restart and wait > check development lifecycle. This allows you to modify your application’s code, and view the changes without having to restart Alfresco Tomcat. You can potentially gain significant savings in development time that would otherwise be wasted restarting Tomcat.
Configuring the Alfresco Maven plugin
One of the most important changes of the Alfresco SDK 3 is that all the logic to run Alfresco Content Services and Share has been moved out of the profiles and Maven parent pom. The Maven plugin now has a single goal alfresco:run, which can be invoked directly.
The Alfresco Maven Plugin has a lot of configuration options to cover different use cases. It’s easy to configure it to use an external database like MySQL, PostgreSQL, or enterprise databases. It’s also easy to control exactly which webapps should be run. For example, the plugin used in alfresco-platform-jar-archetype is already configured to use the H2 database, and to start Alfresco Content Services, Solr 4, and Alfresco REST API Explorer.
The plugin also reads properties, like <alfresco.platform.version /> and <alfresco.share.version /> to control which version you want to run with your customization. Adding third party dependencies (either AMPs or JARs) is easier than ever - a simple configuration enables you to define which dependencies to install.
We’ll summarize all the parameters available in the Alfresco Maven Plugin later in this page. Further details about the plugin are in the public Alfresco GitHub repository.
Where the Alfresco Maven Plugin acts
The Alfresco Maven Plugin can be controlled directly into the pom.xml file of your project created with Alfresco SDK 3. Below is an example configuration for the plugin, based on an All-In-One project.
<!--
The Alfresco Maven Plugin contains all the logic to run the extension in an embedded Tomcat with the H2 database.
-->
<plugin>
<groupId>org.alfresco.maven.plugin</groupId>
<artifactId>alfresco-maven-plugin</artifactId>
<version>${alfresco.sdk.version}</version>
<configuration>
<!-- We need the flat file H2 database to run the Repo -->
<enableH2>true</enableH2>
<!-- We always need the Platform/Repo webapp - alfresco.war -->
<enablePlatform>true</enablePlatform>
<!-- Enable Solr webapp so we can use search -->
<enableSolr>true</enableSolr>
<!-- We need Share webapp, so we got a UI for working with the Repo -->
<enableShare>true</enableShare>
<!-- Enable the REST API Explorer -->
<enableApiExplorer>true</enableApiExplorer>
<!--
JARs and AMPs that should be overlayed/applied to the Platform/Repository WAR (i.e. alfresco.war)
-->
<platformModules>
<!-- Share Services will be ignored if you are on Platform earlier than 5.1 -->
<moduleDependency>
<groupId>${alfresco.groupId}</groupId>
<artifactId>alfresco-share-services</artifactId>
<version>${alfresco.share.version}</version>
<type>amp</type>
</moduleDependency>
<!-- Bring in custom Modules -->
<moduleDependency>
<groupId>${project.groupId}</groupId>
<artifactId>my-all-in-one-project-platform-jar</artifactId>
<version>${project.version}</version>
</moduleDependency>
<!-- Bring in the integration tests -->
<moduleDependency>
<groupId>${project.groupId}</groupId>
<artifactId>integration-tests</artifactId>
<version>${project.version}</version>
<classifier>tests</classifier>
</moduleDependency>
</platformModules>
<!--
JARs and AMPs that should be overlayed/applied to the Share WAR (i.e. share.war)
-->
<shareModules>
<!-- Bring in custom Modules -->
<moduleDependency>
<groupId>${project.groupId}</groupId>
<artifactId>my-all-in-one-project-share-jar</artifactId>
<version>${project.version}</version>
</moduleDependency>
</shareModules>
</configuration>
</plugin>
Alfresco Maven Plugin properties
Here is a reference to all the possible properties available and a brief description of their use.
| Property | Default | Description |
|---|---|---|
enableSolr |
true |
Switch to enable/disable the Apache Solr 4 web application when running embedded Tomcat. |
enableH2 |
false |
Switch to enable/disable the H2 database when running embedded Tomcat. This also brings in the needed H2 database scripts. |
enableMySQL |
false |
Switch to enable/disable the MySQL database when running embedded Tomcat. |
enablePostgreSQL |
false |
Switch to enable/disable the PostgreSQL database when running embedded Tomcat. |
enableEnterpriseDb |
false |
Switch to enable/disable the Enterprise database (such as Oracle or MS SQL Server) when running embedded Tomcat. |
enablePlatform |
true |
Switch to enable/disable the Platform/Repository (alfresco.war) when running embedded Tomcat. |
copyHotswapAgentConfig |
true |
Enable or disable generation of Hotswap Agent configuration. |
enableShare |
true |
Switch to enable/disable the Share (share.war) when running embedded Tomcat. |
shareContextPath |
/share |
Enables the use of custom context path for the Share webapp. Some solution integrators uses a custom context path for Share in their projects. This property enables them to continue to do that in SDK 3 without having to completely override the Maven Tomcat plugin configuration, or not use it at all and go back the good old runner project again. |
useCustomShareLog4jConfig |
true |
Share Log4j properties configuration cannot be customized via extension put on the classpath, like on the platform side. So we need to override the log4j.properties in share/WEB-INF/classes to be able to log from custom code. This property can be used to turn off this overriding, to produce a WAR with the standard Share log4j.properties file. |
enableApiExplorer |
false |
Switch to enable/disable the Alfresco REST API Explorer (api-explorer.war) when running embedded Tomcat. |
enableTestProperties |
true |
Switch to enable/disable test properties when running embedded Tomcat. |
startTomcat |
true |
Control if Tomcat 7 Plugin should be kicked off and start Apache Tomcat. |
testFolder |
src/test/properties/${env} |
Directory containing test files that should be used when running embedded Tomcat. |
testInclude |
** |
Test files in testFolder that should be included when running embedded Tomcat. |
platformModules |
`` | JARs and AMPs that should be overlayed/applied to the Platform/Repository WAR (i.e. alfresco.war). This is a list of ModuleDependency. |
shareModules |
`` | JARs and AMPs that should be overlayed/applied to the Share WAR (i.e. share.war). This is a list of ModuleDependency. |
alfrescoEdition |
community |
Community Edition or Enterprise Edition? (i.e community or enterprise). |
tomcatDependencies |
`` | Tomcat dependencies that should be added to the Embedded Tomcat configuration before start up. Normally there wouldn’t be any extra dependencies, but could be if you run an Enterprise database such as Oracle, for which there’s no quick configuration, such as enableH2, enableMySQL, or enablePostgreSQL. This is a list of TomcatDependency. |
tomcatSystemProperties |
`` | System properties to feed the Tomcat plugin before start up. Normally there wouldn’t be any extra dependencies, but you could run a custom webapp that needed a custom system property set. This is a list of properties with values. |
tomcatCustomWebapps |
`` | Custom webapps that should be deployed to the embedded Tomcat engine. Normally there wouldn’t be any extra webapps, but we could run a bigger project that uses some custom webapp. This is a list of TomcatWebapp. |
tomcatPort |
`` | Port to run Tomcat on. |
mavenTomcatPort |
8080 |
Legacy to be compatible with maven.tomcat.port. |
alfrescoGroupId |
org.alfresco |
Maven GAV (groupId, artifactId, version) properties. |
alfrescoPlatformWarArtifactId |
alfresco-platform |
Maven GAV (groupId, artifactId, version) properties. |
alfrescoShareWarArtifactId |
share |
Maven GAV (groupId, artifactId, version) properties. |
alfrescoSolrArtifactId |
alfresco-solr4 |
Maven GAV (groupId, artifactId, version) properties. |
alfrescoApiExplorerArtifactId |
api-explorer |
Maven GAV (groupId, artifactId, version) properties. |
alfrescoPlatformVersion |
5.2.f |
Maven GAV (groupId, artifactId, version) properties. |
alfrescoShareVersion |
5.2.e |
Maven GAV (groupId, artifactId, version) properties. |
alfrescoApiExplorerVersion |
5.2.e |
Maven GAV (groupId, artifactId, version) properties. |
solrHome |
${project.basedir}/ ${alfresco.data.location}/ solr |
Directory that contains the Solr 4 configuration. |
Switching Alfresco Content Services and Share versions
The latest version of the Alfresco SDK supports different versions for Alfresco Content Services and Alfresco Share. Since each product is no longer released under one common version number, ACS (that is, alfresco.war) and the Share UI (share.war) are now released with individual version numbers.
By default, SDK 3 is configured to generate projects using the most recent version of ACS and Share. You can easily change one (or both) versions by simply updating the pom.xml file in your project. The compatibility of these versions is up to you, however you should check in advance the right versions to use.
When editing pom.xml you will see a number of properties that define the Alfresco Content Services platform version and the Alfresco Share version, such as:
<alfresco.platform.version>5.2.e</alfresco.platform.version>
<alfresco.share.version>5.2.d</alfresco.share.version>
Note that if you used the Share JAR archetype you will only see the alfresco.share.version property. Otherwise, for the All-In-One and Platform JAR archetypes you will see both properties. So if you need to generate projects using different versions then these are the properties to modify.
Important: Before continuing, always remember to start from a newly generated SDK project before changing the version numbers. We do not recommend changing the versions using developed customizations or source code.
Use the links below to see more information on how to use the different supported versions.
Switch to using Alfresco version 5.1.x
Starting from a newly created Alfresco SDK 3.0 project (All-In-One, Platform JAR, or Share JAR), let’s replace the two properties with the following ones.
-
Open the
pom.xmlin your generated project. -
Replace the properties with the following:
<alfresco.platform.version>5.1.e</alfresco.platform.version> <alfresco.share.version>5.1.e</alfresco.share.version> <alfresco.surf.version>6.3</alfresco.surf.version>Note: If you’re using the Alfresco Share JAR archetype, don’t specify the
alfresco.platform.versionproperty.In this example we have shown the switch to version
5.1.e. Feel free to use the correct version for your project, paying attention to the compatible versions of Alfresco Content Services and Alfresco Share. -
If you are unclear about which Alfresco Surf version should be used, you can search for it in your installed Alfresco folder.
-
Search for
spring-surf-api-*.jarandspring-surf-*.jarfiles in the WEB-INF/lib folder. -
Find the correct version number to replace the asterisks (i.e.
spring-surf-api-6.3.jar).
-
-
After changing the versions, delete the
alf_data_devfolder (if it exists). -
Restart the project using the
run.shscript.Note: For All-In-One projects only: If you used this archetype to generate your project, you may see a warning message when you start Share and access the initial Dashboard. The message informs you that the Share services are not installed. This is a known bug and you can continue to use the project regularly.
Switch to using Alfresco version 5.0.x
Starting from a newly created Alfresco SDK 3.0 project (All-In-One, Platform JAR, or Share JAR), let’s replace the two properties with the following ones.
-
Open the
pom.xmlin your generated project. -
Replace the properties with the following:
<alfresco.platform.war.artifactId>alfresco</alfresco.platform.war.artifactId> <alfresco.platform.version>5.0.d</alfresco.platform.version> <alfresco.share.version>5.0.d</alfresco.share.version> <alfresco.surf.version>5.0.d</alfresco.surf.version>Note: If you’re using the Platform JAR archetype, don’t specify the
alfresco.surf.versionproperty.Note: If you’re using the Share JAR archetype, don’t specify the
alfresco.platform.war.artifactIdandalfresco.platform.versionproperties.In this example we have shown the switch to version
5.0.d. Feel free to use the correct version for your project, paying attention to the compatible versions of Alfresco Content Services and Alfresco Share.Considering that the Alfresco Share Services AMP applied to the Platform WAR (i.e.
alfresco.war) was introduced in version 5.1, you may need to take an additional step. -
Remove or comment out the module dependency from the Alfresco Maven Plugin configuration in the
pom.xmlfile. This is valid if and only if you used the All-In-One archetype or Platform JAR archetype to generate the project, and not if you used the Share JAR archetype.<!-- Comment out or remove the dependency below. <moduleDependency> <groupId>${alfresco.groupId}</groupId> <artifactId>alfresco-share-services</artifactId> <version>${alfresco.share.version}</version> <type>amp</type> </moduleDependency> -->Note: The Alfresco Maven Plugin is smart enough to know that you are not running a 5.1 version or newer, and won’t apply the
alfresco-share-servicesAMP from the above configuration even if you leave it in. It is clearer if you comment it out. However, if you are going to switch back and forth between versions you can leave the AMP configuration in, the plugin knows when to apply it and when not to. -
If you are unclear about which Alfresco Surf version should be used, you can search for it in your installed Alfresco folder.
-
Search for
spring-surf-api-*.jarandspring-surf-*.jarfiles in the WEB-INF/lib folder. -
Find the correct version number to replace the asterisks (i.e.
spring-surf-api-6.3.jar).
The Spring Surf project at this time, was part of the Spring Framework extensions (now it is an Alfresco project), so we need to update a few dependencies.
-
-
If you used the All-In-One JAR archetype to generate the project, edit the
pom.xmlfile to comment out the Spring Surf related dependencies:<!-- Comment out or remove the dependency below. <dependency> <groupId>org.alfresco.surf</groupId> <artifactId>spring-surf</artifactId> <version>${alfresco.surf.version}</version> <scope>provided</scope> </dependency> <dependency> <groupId>org.alfresco.surf</groupId> <artifactId>spring-surf-api</artifactId> <version>${alfresco.surf.version}</version> <scope>provided> </dependency> --> -
If you used the All-In-One JAR archetype or the Share JAR archetype to generate the project, edit the relevant
pom.xmlfile: in the sub-project for Share JAR (for All-In-One) or in the root (for Share JAR), to update the Spring Surf API dependency on the Spring Framework group ID:<dependency> <!-- Update the property below. --> <groupId>org.springframework.extensions.surf</groupId> <artifactId>spring-surf-api</artifactId> ... </dependency>If you used the Platform JAR archetype to generate the project, nothing has to be done to make the project run on Alfresco version 5.0.
-
After changing the versions, delete the
alf_data_devfolder (if it exists). -
Restart the project using the
run.shscript.
Switch to using Alfresco version 4.2.x
Starting from a newly created Alfresco SDK 3.0 project (All-In-One, Platform JAR, or Share JAR), let’s replace the two properties with the following ones.
-
Open the
pom.xmlin your generated project. -
Replace the properties with the following:
<alfresco.platform.war.artifactId>alfresco</alfresco.platform.war.artifactId> <alfresco.platform.version>4.2.f</alfresco.platform.version> <alfresco.share.version>4.2.f</alfresco.share.version>Note: If you’re using the Share JAR archetype, don’t specify the
alfresco.platform.war.artifactIdandalfresco.platform.versionproperties. If you’re using the All-In-One or Platform JAR archetype, use all three properties.In this example we have shown the switch to version
4.2.f. Feel free to use the correct version for your project, paying specific attention since in version 4.2 thealfresco.warandshare.warartifacts have the same version number.Considering that the Alfresco Share Services AMP applied to the Platform WAR (i.e.
alfresco.war) was introduced in version 5.1, you may need to take an additional step. -
Remove or comment out the module dependency from the Alfresco Maven Plugin configuration in the
pom.xmlfile. This is valid if and only if you used the All-In-One archetype or Platform JAR archetype to generate the project, and not if you used the Share JAR archetype.<!-- Comment out or remove the dependency below. <moduleDependency> <groupId>${alfresco.groupId}</groupId> <artifactId>alfresco-share-services</artifactId> <version>${alfresco.share.version}</version> <type>amp</type> </moduleDependency> -->Note: The Alfresco Maven Plugin is smart enough to know that you are not running a 5.1 version or newer, and won’t apply the
alfresco-share-servicesAMP from the above configuration even if you leave it in. It is clearer if you comment it out. However, if you are going to switch back and forth between versions you can leave the AMP configuration in, the plugin knows when to apply it and when not to.If you used the All-In-One archetype or the Share JAR archetype to generate the project, you need to add to the Share related
pom.xmlfile. The dependence on Share classes and files from the Share AMP is different in version 4.2.f. -
For these archetype, edit the relevant
pom.xmlfile: in the sub-project for Share JAR (for All-In-One) or in the root (for Share JAR), and update the dependencies as shown in the following example.<!-- Include libs that the Share JAR extension will use. They are mostly provided by Alfresco during runtime so scope should be set as provided (if in doubt then check for the lib in tomcat/webapps/share/WEB-INF/lib, if it's there then it's provided). --> <dependencies> <!-- Include JAR that has classes such as BaseEvaluator --> <dependency> <groupId>${alfresco.groupId}</groupId> <artifactId>alfresco-share</artifactId> <version>${alfresco.share.version}</version> <scope>provided</scope> <exclusions> <!-- Exclude org.alfresco:alfresco-web-framework-commons:jar:classes:4.2.f dependency --> <exclusion> <groupId>org.alfresco</groupId> <artifactId>alfresco-web-framework-commons</artifactId> </exclusion> </exclusions> </dependency> <!-- Bring in the correct version of alfresco-web-framework-commons --> <dependency> <groupId>org.alfresco</groupId> <artifactId>alfresco-web-framework-commons</artifactId> <version>${alfresco.share.version}</version> <scope>provided</scope> </dependency> </dependencies> -
If you used the All-In-One archetype or the Platform JAR archetype, update the indexing subsystem to Apache Solr1, in the four files found under the following path:
src/test/properties/local/alfresco-global.*.properties.Here you will update the property:
index.subsystem.name=solr -
Set the database configuration parameters, adding a new configuration setting to the
pom.xmlfile:<alfresco.db.params>**MODE=PostgreSQL;**AUTO_SERVER=TRUE;DB_CLOSE_ON_EXI T=FALSE;LOCK_TIMEOUT=10000;MVCC=TRUE</alfresco.db.params>Finally, if you used all three archetypes, change the Alfresco module not use
SNAPSHOTversions as these aren’t supported in version 4.2. -
Update all the
module.propertiesfiles stored in thesrc/main/resources/alfresco/modulepath to usemodule.version=1.0There are two for an All-In-One project, and one for Platform JAR and Share JAR.
-
After changing the versions, delete the
alf_data_devfolder (if it exists). -
Restart the project using the
run.shscript.
Working with Enterprise
By default the Alfresco SDK will use Community Edition releases but it can be configured to use Enterprise Edition releases. Here you will learn how to set up a project to work with an Enterprise Edition release, highlighting the changes required to make it work.
If you would like to work with the Alfresco Enterprise Edition, then this requires just a few property changes and a license installation. You also need to have access to the private Alfresco Nexus repository. To configure access to the Alfresco private repository see Using Alfresco One (Enterprise).
Installing the license
The very first task to complete is about installing an enterprise license, otherwise the server will remain in read-only mode. This task is required if and only if you used the All-In-One archetype or the Platform JAR archetype to generate your project. If you used the Share JAR archetype to generate your project, feel free to ignore this task and move on the next one.
If you are an Alfresco Partner or Customer, you can request an enterprise license by you opening a ticket in Hyland Community. The Enterprise license is nothing more and nothing less than a file with lic extension. The Enterprise license file goes into src/test/license folder. The license will be injected into the platform WAR before it is deployed to Apache Tomcat. The license file name doesn’t matter, but make sure that you keep it simple and maintain the lic extension.
Configuring the Enterprise release
The configuration of the enterprise release is straightforward when using the pom.xml configuration file, stored in the root folder of your project. You’ll need to update the following settings in the pom.xml file:
<maven.alfresco.edition>enterprise</maven.alfresco.edition>
Changing this parameter to enterprise helps the Alfresco Maven plugin to pick up the correct database.
Note: If you used previous versions of the Alfresco SDK, you’ll notice that there is no longer a need to update any of the
run.*scripts to use an Enterprise edition. Previously, this was necessary when the Enterprise edition was enabled via a profile.
Configuring the Enterprise version
The configuration of the Enterprise version is straightforward when using the pom.xml configuration file stored in the root folder of your project. You’ll need to update the following settings in the pom.xml file:
<alfresco.platform.war.artifactId>alfresco-enterprise</alfresco.platform.war.artifactId>
<alfresco.platform.version>5.2.0</alfresco.platform.version>
<alfresco.share.version>5.2.0</alfresco.share.version>
<alfresco.surf.version>6.3</alfresco.surf.version>
Note: If you used the Platform JAR archetype, don’t specify the
alfresco.surf.versionproperty. If you used the Share JAR archetype, don’t write thealfresco.platform.war.artifactIdandalfresco.platform.versionproperties.
If you are unclear which Alfresco Surf version should be used, you can search for it in your installed Alfresco folder. Search for spring-surf-api-*.jar and spring-surf-*.jar files in the WEB-INF/lib folder. Find the correct version number in place of the asterisks (i.e. spring-surf-api-6.3.jar).
Removing the alf_data_dev folder and running the project
Now it’s time to delete the alf_data_dev directory (if it exists) and restart the project using the run.sh script.
Working with AMPs
Since the early days of the Alfresco SDK, the Alfresco Module Packages (AMP) have been the way customizations were packaged. In Alfresco SDK 3.0 everything is now packaged as a JAR by default, while the AMPs are still available as an optional assembly. This gives you much more control over packaging, and simple modules can easily be deployed as JARs.
The Maven Assembly Plugin allows you to control the final artifacts that Maven builds. You add the plugin configuration and point it to an XML file that contains the full configuration on the artifact we want to produce.
Building AMPs with Alfresco SDK 3
To build AMPs the SDK ships a default assembly XML file that will tell the assembly plugin how to produce an AMP file. You will find this file in src/main/assembly/amp.xml. The plugin configuration is already present in your pom.xml file, as shown:
<plugin>
<artifactId>maven-assembly-plugin</artifactId>
<version>2.6</version>
<executions>
<execution>
<id>build-amp-file</id>
<phase>package</phase>
<goals>
<goal>single</goal>
</goals>
<configuration>
<appendAssemblyId>false</appendAssemblyId>
<descriptor>src/main/assembly/amp.xml</descriptor>
</configuration>
</execution>
</executions>
<dependencies>
<dependency>
<groupId>org.alfresco.maven.plugin</groupId>
<artifactId>alfresco-maven-plugin</artifactId>
<version>${alfresco.sdk.version}</version>
</dependency>
</dependencies>
</plugin>
This section is commented out by default.
-
To produce both a JAR file and an AMP, remove the comments and run the
mvn packagecommand.Now you have full control over how your AMPs are built. If you want to change the content of the AMP, you can change the assembly
amp.xmland tailor it to your needs.Installing AMPs with the SDK
When you run your project using the Alfresco SDK, the Alfresco Maven Plugin always defaults to load the JAR version of your module into your project. Now that you’ve also built an AMP, what if you want to tell the Alfresco Maven Plugin to install that AMP using the Alfresco Module Management Tool.
Well, luckily this is easy. Let’s review the Alfresco Maven Plugin configuration in your
pom.xml. Starting from the default one (for an All-In-One project), let’s assume that we want to use the AMP version of our platform module. In order to do so, we have to look at the<platformModules/>section. By default, it will install the Alfresco Share Services. Note that this dependency has<type>amp</type>. Ourplatform-jardoes not have a type specified so the SDK will assume a JAR by default.Since we have the assembly plugin enabled now, we know there is an AMP version of this artifact available.
-
Add
<type>amp</type>to the module, as shown:<moduleDependency> <groupId>${project.groupId}</groupId> <artifactId>aio-amp-example-platform-jar</artifactId> <version>${project.version}</version> <type>amp</type> </moduleDependency> -
When you run the project you see the following in the output:
[INFO] Configured Artifact: org.alfresco:alfresco-share-services:5.2.d:amp [INFO] Configured Artifact: dk.ohej.tutorial:aio-amp-example-platform-jar:1.0-SNAPSHOT:amp [INFO] Copying alfresco-share-services-5.2.d.amp to /Users/ohejlskov/work/sdk/tutorials/aio-amp-example/target/modules/platform/amps/alfresco-share-services-5.2.d.amp [INFO] Copying aio-amp-example-platform-jar-1.0-SNAPSHOT.amp to /Users/ohejlskov/work/sdk/tutorials/aio-amp-example/target/modules/platform/amps/aio-amp-example-platform-jar-1.0-SNAPSHOT.amp [info] Installing all AMPs from directory /Users/ohejlskov/work/sdk/tutorials/aio-amp-example/target/modules/platform/amps into WAR/exploded webapp at /Users/ohejlskov/work/sdk/tutorials/aio-amp-example/target/platform-warThis means that the Alfresco Maven Plugin successfully grabbed the
alfresco-share-services.amp, the platform AMP module, and installed them using the Module Management Tool (MMT).Installing 3rd party AMPs
Looking at the previous example, we already have the recipe to install 3rd party AMPs; Alfresco Share Services is an AMP that is downloaded and installed by Maven. Here is an example of how to install Florian Maul’s Javascript Console.
<plugin> <groupId>org.alfresco.maven.plugin</groupId> <artifactId>alfresco-maven-plugin</artifactId> <version>${alfresco.sdk.version}</version> <configuration> <!-- We need the flat file H2 database to run the Repo --> <enableH2>true</enableH2> <!-- We always need the Platform/Repo webapp - alfresco.war --> <enablePlatform>true</enablePlatform> <!-- Enable Solr webapp so we can use search --> <enableSolr>true</enableSolr> <!-- We need Share webapp, so we got a UI for working with the Repo --> <enableShare>true</enableShare> <!-- Enable the REST API Explorer --> <enableApiExplorer>true</enableApiExplorer> <!-- JARs and AMPs that should be overlayed/applied to the Platform/Repository WAR (i.e. alfresco.war) --> <platformModules> <!-- Share Services will be ignored if you are on Platform earlier than 5.1 --> <moduleDependency> <groupId>${alfresco.groupId}</groupId> <artifactId>alfresco-share-services</artifactId> <version>${alfresco.share.version}</version> <type>amp</type> </moduleDependency> <!-- Bring in custom Modules --> <moduleDependency> <groupId>${project.groupId}</groupId> <artifactId>aio-amp-example-platform-jar</artifactId> <version>${project.version}</version> <type>amp</type> </moduleDependency> <!-- Install Javascript Console --> <moduleDependency> <groupId>de.fmaul</groupId> <artifactId>javascript-console-repo</artifactId> <version>0.6</version> <type>amp</type> </moduleDependency> <!-- Bring in the integration tests --> <moduleDependency> <groupId>${project.groupId}</groupId> <artifactId>integration-tests</artifactId> <version>${project.version}</version> <classifier>tests</classifier> </moduleDependency> </platformModules> <!-- JARs and AMPs that should be overlayed/applied to the Share WAR (i.e. share.war) --> <shareModules> <!-- Bring in custom Modules --> <moduleDependency> <groupId>${project.groupId}</groupId> <artifactId>aio-amp-example-share-jar</artifactId> <version>${project.version}</version> </moduleDependency> <!-- Install Javascript Console --> <moduleDependency> <groupId>de.fmaul</groupId> <artifactId>javascript-console-share</artifactId> <version>0.6</version> <type>amp</type> </moduleDependency> </shareModules> </configuration> </plugin> -
Launch the app using
run.shormvn install alfresco:run.Here is the output:
[INFO] Configured Artifact: org.alfresco:alfresco-share-services:5.2.d:amp [INFO] Configured Artifact: dk.ohej.tutorial:aio-amp-example-platform-jar:1.0-SNAPSHOT:amp [INFO] Configured Artifact: de.fmaul:javascript-console-repo:0.6:amp [INFO] Copying alfresco-share-services-5.2.d.amp to /Users/ohejlskov/work/sdk/tutorials/aio-amp-example/target/modules/platform/amps/alfresco-share-services-5.2.d.amp [INFO] Copying aio-amp-example-platform-jar-1.0-SNAPSHOT.amp to /Users/ohejlskov/work/sdk/tutorials/aio-amp-example/target/modules/platform/amps/aio-amp-example-platform-jar-1.0-SNAPSHOT.amp [INFO] Copying javascript-console-repo-0.6.amp to /Users/ohejlskov/work/sdk/tutorials/aio-amp-example/target/modules/platform/amps/javascript-console-repo-0.6.amp [info] Installing all AMPs from directory /Users/ohejlskov/work/sdk/tutorials/aio-amp-example/target/modules/platform/amps into WAR/exploded webapp at /Users/ohejlskov/work/sdk/tutorials/aio-amp-example/target/platform-war [INFO] Copying javascript-console-share-0.6.amp to /Users/ohejlskov/work/sdk/tutorials/aio-amp-example/target/modules/share/amps/javascript-console-share-0.6.amp [info] Installing all AMPs from directory /Users/ohejlskov/work/sdk/tutorials/aio-amp-example/target/modules/share/amps into WAR/exploded webapp at /Users/ohejlskov/work/sdk/tutorials/aio-amp-example/target/share-warFor further details and examples, you can check the public repository on GitHub.
External references
Blog post about Working with Alfresco SDK 3: AMPs
Debugging
When developing add-ins, fixing bugs, or changing Alfresco from the source code, it is helpful to debug an instance of Alfresco running on a standard application server. This section outlines the steps needed to configure Alfresco and Eclipse (or IntelliJ IDEA) to provide a real-time view of the server and to troubleshoot issues by stepping through the code line by line.
Here we assume you have already generated an Alfresco project using the Alfresco SDK. If you don’t have a project already, follow the steps in Getting started with Alfresco Content Services SDK 3 to learn how to generate it in a few easy steps.
- Running the project in debug mode
The first step is to run your project in debug mode irrespective of the IDE used. The commandmvnDebugstarts the application in remote debugging mode, where it listens on port8000, ready for a remote debugger to attach. - Remote debugging using Eclipse
Here you’ll see how to create and manage a configuration to remotely debug your launched Alfresco project that’s waiting for a connection. This assumes you have an Eclipse IDE up and running, and have already imported the same project you are going to debug. - Remote debugging using IntelliJ
Here you’ll see how to create and manage a configuration to remotely debug your launched Alfresco project that’s waiting for a connection. This assumes you have an IntelliJ IDEA IDE up and running, and have already imported the same project you are going to debug.
Running the project in debug mode
The first step is to run your project in debug mode irrespective of the IDE used. The command mvnDebug starts the application in remote debugging mode, where it listens on port 8000, ready for a remote debugger to attach.
-
To run your project in debug mode, launch the
debugscript in the root of the project from a terminal.Here is the result:
The environment variable 'MAVEN_OPTS' is not set, setting it for you MAVEN_OPTS is set to '-Xms256m -Xmx2G' Preparing to Execute Maven in Debug Mode Listening for transport dt_socket at address: 8000The execution is locked until a remote connection is attached from an external service (in this case, your preferred IDE).
-
Leave the instance locked and move to work on your preferred IDE, using a remote debugging configuration.
Remote debugging using Eclipse
Here you’ll see how to create and manage a configuration to remotely debug your launched Alfresco project that’s waiting for a connection. This assumes you have an Eclipse IDE up and running, and have already imported the same project you are going to debug.
For more details on how import an Alfresco project into your Eclipse IDE, see Setting up your development environment using Eclipse.
-
Open the Eclipse IDE and click on Run Configurations (top right).
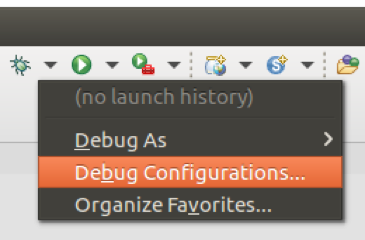
-
Click on the green plus (top left) and select
Remote Java Applicationto add a new configuration for a remote app. -
Enter a name for your configuration, for example, My first debug all in one project.

-
Click Browse then locate the platform project JAR.
-
Check that your settings match the screenshot.
-
Click Apply.
You will be taken back to the project source code.
-
Click on the bug icon and select the new configuration to run it.
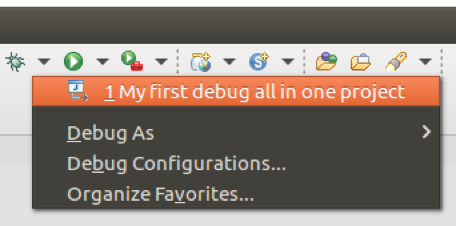
The project starts running and generating all the log messages of a regular launch in the terminal window. Once it’s started, you can open a browser and start using your application. In our case, we are going to test the behaviour of debugging by running the sample webscript.
-
Open your browser and type
http://localhost:8080/alfresco/s/sample/helloworld.This is a sample webscript generated in every project created using SDK 3.0 and the platform artifact.
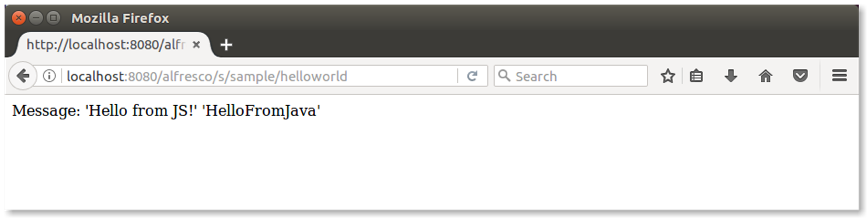
Now let’s find the
HelloWorldWebScript.javafile in thesrc/main/java/.../platformsamplefolder of your project. If you’re using an All-In-One project, the folder is located in the platform sub-project. -
Edit the file using Eclipse IDE and set a breakpoint (by clicking to the left of the line number) at line:
model.put(“fromJava”,”HelloFromMe”); -
Refresh the browser. Eclipse will intercept the execution at the breakpoint:
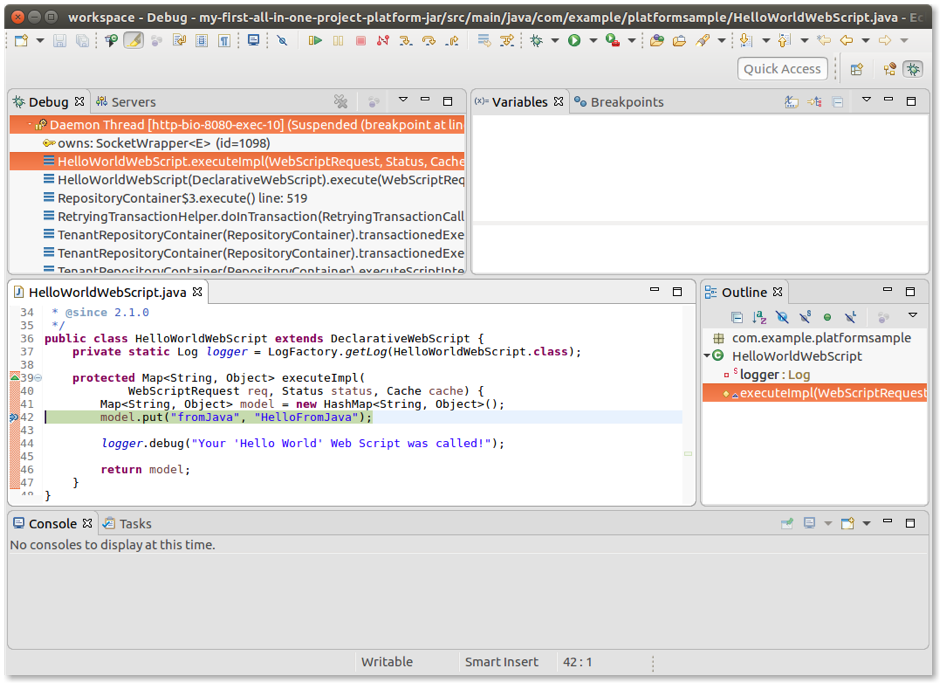
From here the management is the same as for a regular Java application using your preferred IDE. Please note that the whole Alfresco source code is available at debug time, thanks to the local maven repository.
Remote debugging using IntelliJ
Here you’ll see how to create and manage a configuration to remotely debug your launched Alfresco project that’s waiting for a connection. This assumes you have an IntelliJ IDEA IDE up and running, and have already imported the same project you are going to debug.
For more details on how import an Alfresco project into your IntelliJ IDEA IDE, see Setting up your development environment using Intellij IDEA
-
Open the IntelliJ IDEA IDE and click on Run Configurations (top right).
-
Click on the green plus (top left) and select
Remoteto add a new configuration for a remote app. -
Enter a name for your configuration, for example, My first debug all in one project.
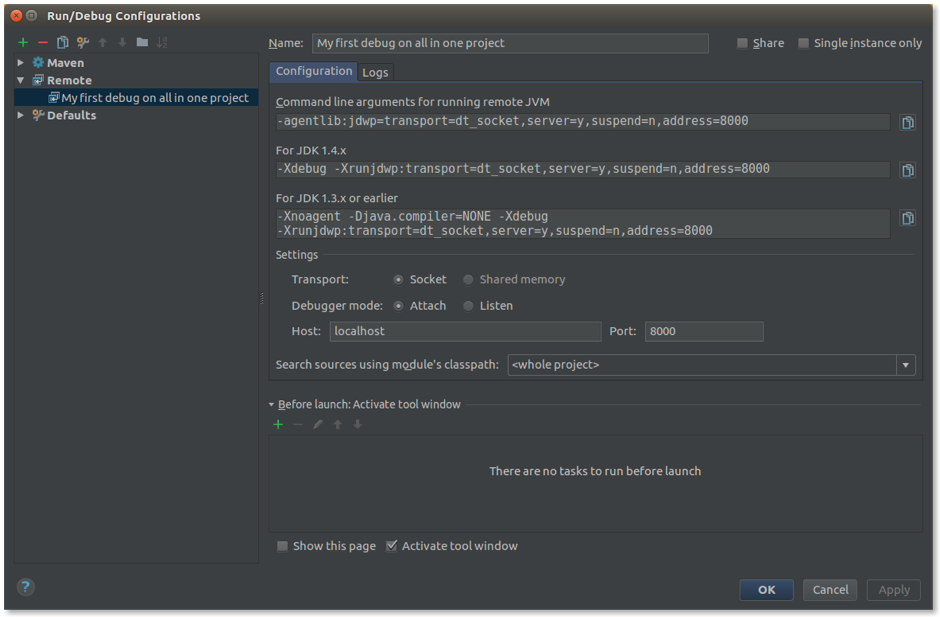
-
Change the port number to
8000. -
Check that your settings match the screenshot.
-
Click OK.
You will be taken back to the project source code.
-
Click on the bug icon and select the new configuration to run it.

The project starts running and generating all the log messages of a regular launch in the terminal window. Once it’s started, you can open a browser and start using your application. In our case, we are going to test the behaviour of debugging by running the sample webscript.
-
Open your browser and type
http://localhost:8080/alfresco/s/sample/helloworld.This is a sample webscript generated in every project created using SDK 3.0 and the platform artifact.
Now let’s find the
HelloWorldWebScript.javafile in thesrc/main/java/.../platformsamplefolder of your project. If you’re using an All-In-One project, the folder is located in the platform sub-project. -
Edit the file using IntelliJ IDEA IDE and set a breakpoint (by clicking to the left of the line number) at line:
model.put(“fromJava”,”HelloFromMe”); -
Refresh the browser. IntelliJ IDEA will intercept the execution at the breakpoint:

From here the management is the same as for a regular Java application using your preferred IDE. Please note that the whole Alfresco source code is available at debug time, thanks to the local maven repository.
Integration testing
“Integration testing is the phase in software testing where individual software modules are combined and tested as a group. It occurs after unit testing and before validation testing. Integration testing takes as its input modules that have been unit tested, groups them in larger aggregates, applies tests defined in an integration test plan to those aggregates, and delivers as its output the integrated system ready for system testing. [Wikipedia].”
Even if the definition of integration testing is a general description, the concept is also valid for Alfresco projects. The good news is that Alfresco SDK 3 provides a predefined set of classes, profiles, and configurations to easily develop and launch integration testing.
Here are the basics to understanding and using integration testing in the context of projects created with the SDK, from a technical perspective:
- SDK 3 develops integration tests for the platform only. Currently, the integration tests that the SDK is able to manage by default is related to Alfresco Content Services (ACS) only.
- Integration tests require an ACS instance to be up and running. You will see that all the scripts and commands are designed to easily manage this requirement, but the prerequisite for the SDK is that an ACS instance is available.
-
If you’re running a project created with a Platform JAR archetype, integration tests are not provided by default. However, you can copy them from your All-In-One project.
- Integration test bundles
The All-In-One (AIO) project created with the Alfresco SDK 3 includes anintegration-testssub-project. The sub-project hosts all the source code and the required resources to run the integration tests. - Running integration tests using an existing Alfresco Content Services instance (and hot reloading)
Alfresco SDK is able to recognize if an Alfresco Content Services (ACS) instance is already running, and use it (or launch it) accordingly. This feature is very powerful for a couple of reasons. First of all, it allows you to focus on the integration tests, without worrying if the platform instance running, and also because you can use an existing ACS instance that’s up running during the integration tests development. The second reason gives a relevant speed up to the development task, as described in the following content. - Running integration tests from your IDE
If your project is available in Eclipse or IntelliJ, you can easily run one or more of the integration tests directly from your IDE. - Adding integration tests to a Platform JAR project
By default, an Alfresco project created with the All-In-One archetype includes anintegration-testssub-project that contains three bundled examples. Here we describe how to add integration tests to an Alfresco project created with the Platform JAR archetype, which is not provided by default.
Integration test bundles
The All-In-One (AIO) project created with the Alfresco SDK 3 includes an integration-tests sub-project. The sub-project hosts all the source code and the required resources to run the integration tests.
Let’s look in more detail into the All-In-One project structure. The src/test/java folder contains the custom classes, interfaces and Java code in general regarding tests. The src/main/java instead, contains the same content you can find in a regular Java project: the Java source code. Here you should put all the custom classes, interfaces and Java source code in general (by default, the folder is empty).
By default, in an Alfresco All-In-One project, you can find three different tests about content modelling, custom components, and web scripts. The test classes are dynamically created in an <artifadctId>.platformsample package. As a consequence, a folder structure is automatically created to host the Java classes. Below is a brief description of the bundled classes, where each one represents a single integration test.
CustomContentModelIT: Checking the correct existence and setup of a custom model
This integration test verifies the existence of the {http://www.acme.org/model/content/1.0}contentModel in the Alfresco Content Services instance. It also creates a new node in the repository with the following features:
- The node is named
AcmeFile.txt. - The node type is set to
{http://www.acme.org/model/content/1.0}document. - The node property
securityClassificationis set toCompany Confidential. - The aspect
cm:titledis added to the new node.
Once created, some Java assertions are raised to check the correct definition of the node. As a last task, the node is deleted from the repository to clean the environment.
Looking at the source code, there are two main things to bring to your attention. The first is that the CustomContentModelIT class extends the abstract class AbstractAlfrescoIT, giving access to the Alfresco Spring Application context and the ServiceRegistry that should be used when accessing Alfresco Content Services.
The second is about the use of the @RunWith(value = AlfrescoTestRunner.class) Java annotation. The Alfresco Test Runner (i.e. AlfrescoTestRunner.class) will check if it is running in an Alfresco Content Services instance and if so, it will execute normally locally. On the other hand, if it detects no Alfresco Spring context, then it will make a call to a custom Web Script that will execute this test in the running container remotely. The remote location is determined by the @Remote configuration.
DemoComponentIT: Checking the Alfresco Content Services DemoComponent component
This integration test verifies the existence of the DemoComponent component deployed in the Alfresco Content Services instance. You can find the definition of the DemoComponent as a custom component of a project created with the All-In-One archetype. For more details, see the class definition in:
<artifactId>-platform-jar/src/main/java/com/example/platformsample/DemoComponent.java
The integration test retrieves the DemoComponent bean from the Alfresco Content Services instance (see testGetCompanyHome()), and requests the Company Home component. In addition, some Java assertions check if Company Home is identified correctly and has seven children stored in it.
As described for the CustomContentModelIT integration test, the DemoComponentIT class extends the abstract class AbstractAlfrescoIT and the @RunWith with @Remote Java annotations are used.
HelloWorldWebScriptIT: Checking the Alfresco Content Services helloworld webscript
This integration test is the simplest one, and verifies the existence and the response of the helloworld web script in the Alfresco Content Services instance. The test invokes the web script at the URL http://localhost:8080/alfresco/service/sample/helloworld and checks the response using some Java assertions.
How to add or change the integration tests
Adding (or changing) the integration tests is really straightforward. All changes are to be made in the same folder as the existing integration tests (i.e. integration-tests/src/test/java/<groupId>/platformsample). To add new tests, simply add new classes similar to the existing ones in this folder. From a developer’s perspective, you can take the existing classes as an example and develop your own classes based on the existing ones.
Remember to extend the abstract class AbstractAlfrescoIT, if you want to have access to Alfresco Spring Application context and ServiceRegistry, and use the @RunWith, @Remote Java annotations to ensure that the SDK manages the existence of an Alfresco Content Services instance running for you.
Running the integration tests
-
To run the integration tests, type the following command:
MAVEN_OPTS="-Xms256m -Xmx2G" mvn integration-testAfter compiling the source code, the SDK also launches Alfresco Content Services (ACS), recognizing that there’s no active instance of the platform. After some time (and a lot of log messages), you should see the following:
------------------------------------------------------- T E S T S ------------------------------------------------------- Running com.example.platformsample.DemoComponentIT RunTestWebScript: Start executing ... RunTestWebScript: clazzAndMethod = com.example.platformsample.DemoComponentIT#testChildNodesCount RunTestWebScript: [clazz=com.example.platformsample.DemoComponentIT][method=testChildNodesCount] Running com.example.platformsample.DemoComponentIT Integration Test: testChildNodesCount() RunTestWebScript: model = {result=SUCCESS, throwables=[], failures=[], test=com.example.platformsample.DemoComponentIT#testChildNodesCount#testChildNodesCount, ignoreCount=0, wasSuccessful=true, runTime=9, runCount=1, resultObject=org.junit.runner.Result@1a855e8c, failureCount=0} RunTestWebScript: Stopped executing RunTestWebScript: Start executing ... RunTestWebScript: clazzAndMethod = com.example.platformsample.DemoComponentIT#testGetCompanyHome RunTestWebScript: [clazz=com.example.platformsample.DemoComponentIT][method=testGetCompanyHome] Running com.example.platformsample.DemoComponentIT Integration Test: testGetCompanyHome() RunTestWebScript: model = {result=SUCCESS, throwables=[], failures=[], test=com.example.platformsample.DemoComponentIT#testGetCompanyHome#testGetCompanyHome, ignoreCount=0, wasSuccessful=true, runTime=1, runCount=1, resultObject=org.junit.runner.Result@15a00ef8, failureCount=0} RunTestWebScript: Stopped executing Tests run: 2, Failures: 0, Errors: 0, Skipped: 0, Time elapsed: 1.449 sec - in com.example.platformsample.DemoComponentIT Running com.example.platformsample.CustomContentModelIT RunTestWebScript: Start executing ... RunTestWebScript: clazzAndMethod = com.example.platformsample.CustomContentModelIT#testCustomContentModelPresence RunTestWebScript: [clazz=com.example.platformsample.CustomContentModelIT][method=testCustomContentModelPresence] Running com.example.platformsample.CustomContentModelIT Integration Test: testCustomContentModelPresence() RunTestWebScript: model = {result=SUCCESS, throwables=[], failures=[], test=com.example.platformsample.CustomContentModelIT#testCustomContentModelPresence#testCustomContentModelPresence, ignoreCount=0, wasSuccessful=true, runTime=0, runCount=1, resultObject=org.junit.runner.Result@67254e7, failureCount=0} RunTestWebScript: Stopped executing RunTestWebScript: Start executing ... RunTestWebScript: clazzAndMethod = com.example.platformsample.CustomContentModelIT#testCreateAcmeDocument RunTestWebScript: [clazz=com.example.platformsample.CustomContentModelIT][method=testCreateAcmeDocument] Running com.example.platformsample.CustomContentModelIT Integration Test: testCreateAcmeDocument() RunTestWebScript: model = {result=SUCCESS, throwables=[], failures=[], test=com.example.platformsample.CustomContentModelIT#testCreateAcmeDocument#testCreateAcmeDocument, ignoreCount=0, wasSuccessful=true, runTime=150, runCount=1, resultObject=org.junit.runner.Result@4ae99f9c, failureCount=0} RunTestWebScript: Stopped executing Tests run: 2, Failures: 0, Errors: 0, Skipped: 0, Time elapsed: 0.264 sec - in com.example.platformsample.CustomContentModelIT Running com.example.platformsample.HelloWorldWebScriptIT Tests run: 1, Failures: 0, Errors: 0, Skipped: 0, Time elapsed: 0.204 sec - in com.example.platformsample.HelloWorldWebScriptIT Results : Tests run: 5, Failures: 0, Errors: 0, Skipped: 0 [WARNING] File encoding has not been set, using platform encoding UTF-8, i.e. build is platform dependent! The file encoding for reports output files should be provided by the POM property ${project.reporting.outputEncoding}. [INFO] ------------------------------------------------------------------------ [INFO] Reactor Summary: [INFO] [INFO] AIO - SDK 3.0 Beta ................................. SUCCESS [ 0.413 s] [INFO] Alfresco Platform/Repository JAR Module ............ SUCCESS [ 2.684 s] [INFO] Alfresco Share JAR Module .......................... SUCCESS [ 0.222 s] [INFO] Integration Tests Module ........................... SUCCESS [01:40 min] [INFO] ------------------------------------------------------------------------ [INFO] BUILD SUCCESS [INFO] ------------------------------------------------------------------------ [INFO] Total time: 01:43 min [INFO] Finished at: 2017-05-12T14:08:00+02:00 [INFO] Final Memory: 375M/1098M [INFO] ------------------------------------------------------------------------Note: After the last info message, a number of exceptions are thrown, but you can ignore them. This is a known issue. It doesn’t affect the execution or success of the integration tests.
As you can see, there is a lot of useful information from the result of each integration test.
-
Check for the
BUILD SUCCESSmessage and the following results:Tests run: 5, Failures: 0, Errors: 0, Skipped: 0If you see this result in your environment, congratulations, the integration tests have certified the state of your Alfresco project.
Note: If you made any version changes in your project based on Switching Alfresco Content Services and Share versions, you can easily repeat your integration tests for all the supported versions of the platform. This ensures that your source code is correct and supported for all the supported versions of ACS.
Running integration tests using an existing Alfresco Content Services instance (and hot reloading)
Alfresco SDK is able to recognize if an Alfresco Content Services (ACS) instance is already running, and use it (or launch it) accordingly. This feature is very powerful for a couple of reasons. First of all, it allows you to focus on the integration tests, without worrying if the platform instance running, and also because you can use an existing ACS instance that’s up running during the integration tests development. The second reason gives a relevant speed up to the development task, as described in the following content.
Look back at the integration tests example, you’ll notice that it took 01:40 min for them to complete. It’s not bad if we need to launch the integration tests just once (or few times). So what can we do if we need to launch the integration tests multiple times (for example, during the development phase)?
To significantly reduce the duration of the intergration tests, let’s use an existing ACS instance, and run the tests in another session/process.
To test this in your environment follow these steps.
-
Launch the
runscript, and wait for ACS to be fully available. -
Open another terminal and run
mvn integration-test.You will see the following log messages:
Results : Tests run: 5, Failures: 0, Errors: 0, Skipped: 0 [INFO] ------------------------------------------------------------------------ [INFO] Reactor Summary: [INFO] [INFO] AIO - SDK 3.0 Beta ................................. SUCCESS [ 0.394 s] [INFO] Alfresco Platform/Repository JAR Module ............ SUCCESS [ 1.797 s] [INFO] Alfresco Share JAR Module .......................... SUCCESS [ 0.121 s] [INFO] Integration Tests Module ........................... SUCCESS [ 3.533 s] [INFO] ------------------------------------------------------------------------ [INFO] BUILD SUCCESS [INFO] ------------------------------------------------------------------------ [INFO] Total time: 6.144 s [INFO] Finished at: 2017-05-12T14:59:28+02:00 [INFO] Final Memory: 36M/448M [INFO] ------------------------------------------------------------------------Note how the integration tests only took 3.5 seconds. This is a huge improvement and time reduction.
Important: Even if the improvement is great, there is a technical topic to mention that has a relevant impact on the development lifecycle. The SDK uses the source code related to the integration tests deployed directly on the platform side. This means that an update in the code for the Java classes will be included when you run the integration tests if and only if they are deployed in the platform. To avoid stopping/starting ACS with every change, use hot reloading as the only way to deploy the new version of the Java classes. For more details, see Hot reloading.
Running integration tests from your IDE
If your project is available in Eclipse or IntelliJ, you can easily run one or more of the integration tests directly from your IDE.
To run the integration tests:
-
Open the project using the IDE.
-
Select the classes for the integration tests (either one, some, or the whole package).
-
Right click and select Run As …, then click JUnit Test.
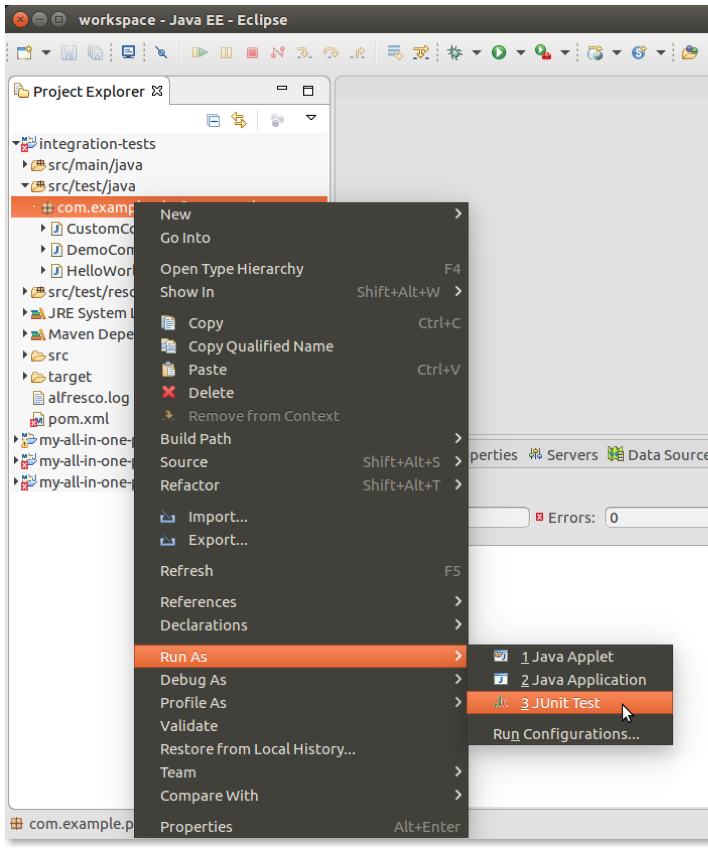
Once the tests have completed (typically, after a few seconds), the results are presented.

Important: When using an IDE, the source code related to the integration tests is the one deployed directly on the platform side. This means that an update in the code for the Java classes will be included when you run the integration tests if and only if they are deployed in the platform. To avoid stopping/starting Alfresco Content Services with every change, use hot reloading as the only way to deploy the new version of the Java classes. For more details, see Hot reloading.
Adding integration tests to a Platform JAR project
By default, an Alfresco project created with the All-In-One archetype includes an integration-tests sub-project that contains three bundled examples. Here we describe how to add integration tests to an Alfresco project created with the Platform JAR archetype, which is not provided by default.
This tutorial assumes you already have an existing Alfresco project created with the Platform JAR archetype. If you don’t have a project already, follow the steps in Getting started with Alfresco Content Services SDK 3 to learn how to quickly generate it in a few easy steps.
Before continuing, you may recall that the integration tests are supported only for Alfresco Content Services (ACS) used with Alfresco SDK 3.0. If you haven’t reviewed the details about the integration tests created with the All-In-One archetype, we suggest you read Integration test bundles.
To add the integration tests to an Alfresco project created with the Platform JAR archetype, you need to copy what the All-In-One archetype provides into your project.
-
Create a brand new All-In-One project in your development environment.
-
Copy the
integration-tests/src/test/java/<groupId>/platformsample folder into src/test/java/<groupId>/platformsampleof your Platform JAR projectReplace
<groupId>in the target path with the<groupId>used in your Platform JAR project. -
To run the integration tests, type the following command:
MAVEN_OPTS="-Xms256m -Xmx2G" mvn integration-testAfter compiling the source code, the SDK also launches ACS, recognizing that there’s no active instance of the platform. After some time (and a lot of log messages), you should see the following:
------------------------------------------------------- T E S T S ------------------------------------------------------- Running com.example.platformsample.CustomContentModelIT RunTestWebScript: Start executing ... RunTestWebScript: clazzAndMethod = com.example.platformsample.CustomContentModelIT#testCustomContentModelPresence RunTestWebScript: [clazz=com.example.platformsample.CustomContentModelIT][method=testCustomContentModelPresence] Running com.example.platformsample.CustomContentModelIT Integration Test: testCustomContentModelPresence() RunTestWebScript: model = {result=SUCCESS, throwables=[], failures=[], test=com.example.platformsample.CustomContentModelIT#testCustomContentModelPresence#testCustomContentModelPresence, ignoreCount=0, wasSuccessful=true, runTime=6, runCount=1, resultObject=org.junit.runner.Result@4756a585, failureCount=0} RunTestWebScript: Stopped executing RunTestWebScript: Start executing ... RunTestWebScript: clazzAndMethod = com.example.platformsample.CustomContentModelIT#testCreateAcmeDocument RunTestWebScript: [clazz=com.example.platformsample.CustomContentModelIT][method=testCreateAcmeDocument] Running com.example.platformsample.CustomContentModelIT Integration Test: testCreateAcmeDocument() RunTestWebScript: model = {result=SUCCESS, throwables=[], failures=[], test=com.example.platformsample.CustomContentModelIT#testCreateAcmeDocument#testCreateAcmeDocument, ignoreCount=0, wasSuccessful=true, runTime=191, runCount=1, resultObject=org.junit.runner.Result@3932838b, failureCount=0} RunTestWebScript: Stopped executing Tests run: 2, Failures: 0, Errors: 0, Skipped: 0, Time elapsed: 1.412 sec - in com.example.platformsample.CustomContentModelIT Running com.example.platformsample.HelloWorldWebScriptIT 2017-05-19 09:21:49,560 DEBUG [example.platformsample.HelloWorldWebScript] [http-bio-8080-exec-8] Your 'Hello World' Web Script was called! Tests run: 1, Failures: 0, Errors: 0, Skipped: 0, Time elapsed: 0.181 sec - in com.example.platformsample.HelloWorldWebScriptIT Running com.example.platformsample.DemoComponentIT RunTestWebScript: Start executing ... RunTestWebScript: clazzAndMethod = com.example.platformsample.DemoComponentIT#testChildNodesCount RunTestWebScript: [clazz=com.example.platformsample.DemoComponentIT][method=testChildNodesCount] Running com.example.platformsample.DemoComponentIT Integration Test: testChildNodesCount() RunTestWebScript: model = {result=SUCCESS, throwables=[], failures=[], test=com.example.platformsample.DemoComponentIT#testChildNodesCount#testChildNodesCount, ignoreCount=0, wasSuccessful=true, runTime=2, runCount=1, resultObject=org.junit.runner.Result@4802dc75, failureCount=0} RunTestWebScript: Stopped executing RunTestWebScript: Start executing ... RunTestWebScript: clazzAndMethod = com.example.platformsample.DemoComponentIT#testGetCompanyHome RunTestWebScript: [clazz=com.example.platformsample.DemoComponentIT][method=testGetCompanyHome] Running com.example.platformsample.DemoComponentIT Integration Test: testGetCompanyHome() RunTestWebScript: model = {result=SUCCESS, throwables=[], failures=[], test=com.example.platformsample.DemoComponentIT#testGetCompanyHome#testGetCompanyHome, ignoreCount=0, wasSuccessful=true, runTime=0, runCount=1, resultObject=org.junit.runner.Result@7813d6, failureCount=0} RunTestWebScript: Stopped executing Tests run: 2, Failures: 0, Errors: 0, Skipped: 0, Time elapsed: 0.088 sec - in com.example.platformsample.DemoComponentIT Results : Tests run: 5, Failures: 0, Errors: 0, Skipped: 0 [WARNING] File encoding has not been set, using platform encoding UTF-8, i.e. build is platform dependent! The file encoding for reports output files should be provided by the POM property ${project.reporting.outputEncoding}. [INFO] ------------------------------------------------------------------------ [INFO] BUILD SUCCESS [INFO] ------------------------------------------------------------------------ [INFO] Total time: 01:06 min [INFO] Finished at: 2017-05-19T09:21:50+02:00 [INFO] Final Memory: 324M/993M [INFO] ------------------------------------------------------------------------Note: After the last info message, a number of exceptions are thrown, but you can ignore them. This is a known issue. It doesn’t affect the execution or success of the integration tests.
As you can see, there is a lot of useful information from the result of each integration test.
-
Check for the
BUILD SUCCESSmessage and the following results:Tests run: 5, Failures: 0, Errors: 0, Skipped: 0If you see this result in your environment, congratulations, the integration tests have certified the state of your Alfresco project.
Note: If you made any version changes in your project based on Switching Alfresco Content Services and Share versions, you can easily repeat your integration tests for all the supported versions of the platform. This ensures that your source code is correct and supported for all the supported versions of ACS.
Hot reloading
Hot reloading in a Java project is the ability to avoid the infamous change > restart and wait > check development lifecycle. This allows you to modify your application’s code, and view the changes without having to restart Alfresco Tomcat. You can potentially gain significant savings in development time that would otherwise be wasted restarting Tomcat.
Hot reloading is a well known behaviour in several other languages (C# for example), and the most practical and fast lifecycle like Save&Reload should be possible. Hot reloading is the key to enabling Rapid Application Development (RAD) and Test Driven Development (TDD).
Since the Java 1.4 JVM, the Debugger API allowed debuggers to update class bytecode in place, using the same class identity. This meant that all objects could refer to an updated class and execute new code when their methods were called, preventing the need to reload a container whenever class bytecode was changed. All modern IDEs support it, including Eclipse, IntelliJ IDEA, and NetBeans. Since Java 5, this functionality has also been available directly to Java applications through the Instrumentation API.
In the Alfresco development lifecycle hot reloading is possible as in every other Java project (and with the same limitations). You can manage a project created with the Alfresco SDK using hot reloading through two different tools:
Both have advantages and disadvantages, so it’s up to you to make the right choice for your needs. JRebel is a commercial product while HotSwapAgent is open source. Both products can reload classes and web resources. However, JRebel is more powerful than HotSwapAgent and can also reload changes to the Spring XML context files, for example.
- Using HotSwapAgent
HotSwapAgent is the agent that enables you to do hot reloading. This allows you to modify the application code, and view the changes without having to restart Alfresco Tomcat. - Using JRebel
JRebel is the agent that enables you to do hot reloading. This allows you to modify the application code, and view the changes without having to restart Alfresco Tomcat. - Using JRebel with Eclipse IDE
Before using this tutorial, you should have an existing project (All-In-One or Platform JAR) already set up and working in your Eclipse IDE instance.
Using HotSwapAgent
HotSwapAgent is the agent that enables you to do hot reloading. This allows you to modify the application code, and view the changes without having to restart Alfresco Tomcat.
A prerequisite for this tutorial is to have a project created with the Alfresco SDK 3.0, using the All-In-One archetype or the Platform JAR archetype. It’s worth noting that hot reloading is only supported on the platform, and not in Alfresco Share.
Note: As an alternative to the HotSwapAgent you can also try out JRebel. It has more features but isn’t free.
For more details and documentation, refer to the HotSwapAgent website and the IDE setup to enable it in your IDE.
Installing HotSwapAgent
-
Download the latest release of DCEVM Java patch. Make sure it matches your Java SDK version, check it as follows
$ javac -version javac 1.8.0_144 -
Launch the installer with administrator permissions:
$ sudo java -jar DCEVM-8u144-installer.jar -
From the user interface, select the correct Java installation and click the Install DCEVM as altjvm button (i.e. no need to replace the JVM). A JVM might not be automatically detected so navigate to the directory where it is installed and select it (e.g. on a Mac:
/Library/Java/JavaVirtualMachines/jdk1.8.0_144.jdk/Contents/Home)Java 1.7+ versions are supported but remember to use the right version depending on your Alfresco version.
-
Download the latest release of Hotswap agent jar and put it anywhere on your computer.
Important: If you experience any issues during startup of the Alfresco project using HotswapAgent JAR v1.1.0, use v1.0 instead.
This is all you need to get HotSwapAgent up and running in your environment.
-
Check the installation is running correctly by executing:
java -version -XXaltjvm=dcevmYou should see the following log (paying attention to the last line shown):
$ java -version -XXaltjvm=dcevm java version "1.8.0_144" Java(TM) SE Runtime Environment (build 1.8.0_144-b01) Dynamic Code Evolution 64-Bit Server VM (build 25.71-b01-dcevmlight-2, mixed mode) -
Run
java -versionto see the standard result when using the default JVM without the HotSwapAgent. -
Locate the just downloaded
hotswap-agent-1.**.jarfile and copy it to a permanent location and change the name tohotswap-agent.jar. -
Modify the
MAVEN_OPTSvariable contained in therun.shorrun.batscript that are part of your SDK project. Set it as follows (Windows platform users may require a slightly different format).MAVEN_OPTS='-Xms256m -Xmx2G -javaagent:/<path>/hotswap-agent.jar -XXaltjvm=dcevm'If you don’t have an Alfresco SDK project, follow the steps in Getting started with Alfresco Content Services SDK 3.
-
Create a
hotswap-agent.propertiesfile in the platform-jar projectSDK 3 projects already contains these property files. Copy the
src/test/resources/platform-hotswap-agent.propertiesfile intosrc/main/resources/hotswap-agent.properties(note that file has been renamed) -
This is all you need to make HotSwapAgent work in your development environment. Now it’s time to run the Alfresco SDK project. Launch the
runscript stored in the root of the project.You’ll recognize HotSwap Agent is working when you see log messages such as these:
$ sh run.sh The environment variable 'MAVEN_OPTS' is not set, setting it for you MAVEN_OPTS is set to '-Xms256m -Xmx2G -javaagent:/Users/mbergljung/Downloads/hotswap-agent.jar -XXaltjvm=dcevm' HOTSWAP AGENT: 11:46:33.288 INFO (org.hotswap.agent.HotswapAgent) - Loading Hotswap agent {1.1.0-SNAPSHOT} - unlimited runtime class redefinition. HOTSWAP AGENT: 11:46:33.862 INFO (org.hotswap.agent.config.PluginRegistry) - Discovered plugins: [Hotswapper, WatchResources, AnonymousClassPatch, ClassInitPlugin, Hibernate, Hibernate3JPA, Hibernate3, Spring, Jersey1, Jersey2, Jetty, Tomcat, ZK, Logback, Log4j2, MyFaces, Mojarra, Seam, ELResolver, WildFlyELResolver, OsgiEquinox, Owb, Proxy, WebObjects, Weld, JBossModules, ResteasyRegistry, Deltaspike, JavaBeans, GlassFish] [INFO] Scanning for projects...Once the Alfresco SDK project is launched, it’s time to start changing the content and see how hot reloading works. We will walk through a few examples. To see all the features of hot reloading, take a look to the HotSwapAgent documentation.
-
We will start by updating an example Web Script that comes with the project template. However, before making any changes, let’s run the Web Script and see what the response is, use the
http://localhost:8080/alfresco/s/sample/helloworldURL:This is a sample webscript generated in every project created using SDK 3.0 and the platform artifact.

-
Locate
HelloWorldWebScript.javain the src/main/java/…/platformsample folder of your project.If you are using an All-In-One project, the folder is located in the …platform-jar sub-project.
-
Edit it using your preferred editor and change the code so that
HelloFromJavabecomesHelloFromMe):model.put(“fromJava”,”HelloFromMe”);
-
Save your file and open a new terminal.
If you’re using an All-In-One project, remember to change directory to the
<artifadctId>-platform-jarfolder first. -
Run
mvn compile.A number of log messages appear in the Alfresco project terminal, for example:
HOTSWAP AGENT: 13:31:15.635 RELOAD (org.hotswap.agent.config.PluginManager) - Reloading classes [org.alfresco.training.platformsample.DemoComponent, org.alfresco.training.platformsample.Demo, org.alfresco.training.platformsample.HelloWorldWebScript] (autoHotswap) -
Refresh the browser to see the updated message:

By changing the code and compiling it again, the changes have been dynamically swapped in, i.e. class
HelloWorldWebScriptreloaded.
Using JRebel
JRebel is the agent that enables you to do hot reloading. This allows you to modify the application code, and view the changes without having to restart Alfresco Tomcat.
A prerequisite to this tutorial is having an Alfresco project created with Alfresco SDK 3.0, using the All-In-One archetype, or the Platform JAR archetype. It’s worth noting that hot reloading is only supported on the platform, and not in Alfresco Share.
Note: An open source and free of charge alternative to JRebel is HotSwapAgent. For more details, see the HotSwapAgent website.
JRebel can be installed in several ways: for example, using an IDE or in “standalone” mode. Various IDEs are supported, including Eclipse and IntelliJ. The standalone installation is useful if you want to use hot reloading from the command line.
For more details on installing using an IDE, see Using JRebel with Eclipse IDE.
Installing JRebel standalone (from the command line)
-
Download JRebel in standalone mode and unpack it in your preferred location.
-
Run the
activate-gui.shscript to activate your installation.Note that a license is required. In this step you will be able to request a trial license.
Now that JRebel is correctly installed, it’s time to update the environment to use the agent for hot reloading.
-
Run the following command (modify the command slightly for Windows):
export MAVEN_OPTS="-Xms256m -Xmx2G -agentpath:/path/to/jrebel/lib/libjrebel64.so"We suggest that you add the
exportcommand to the environment shell script (.bashrcor similar depending on your operating system).This is all you need to make JRebel work in your development environment. Now it’s time to run the Alfresco project.
-
Launch the
runscript stored in the root of the project.If you don’t have an Alfresco project, follow the steps in Getting started with Alfresco Content Services SDK 3.
You’ll recognize JRebel is working when you see similar log messages:
2017-05-16 15:28:12 JRebel: Starting logging to file: /home/alfresco/.jrebel/jrebel.log 2017-05-16 15:28:12 JRebel: 2017-05-16 15:28:12 JRebel: ############################################################# 2017-05-16 15:28:12 JRebel: 2017-05-16 15:28:12 JRebel: JRebel Agent 7.0.8 (999999999999) 2017-05-16 15:28:12 JRebel: (c) Copyright ZeroTurnaround AS, Estonia, Tartu. 2017-05-16 15:28:12 JRebel: 2017-05-16 15:28:12 JRebel: Over the last 2 days JRebel prevented 2017-05-16 15:28:12 JRebel: at least 1 redeploys/restarts saving you about 0 hours. 2017-05-16 15:28:12 JRebel: 2017-05-16 15:28:12 JRebel: Licensed to XXXX XXXX (XXXX) 2017-05-16 15:28:12 JRebel: 2017-05-16 15:28:12 JRebel: License type: evaluation 2017-05-16 15:28:12 JRebel: Valid from: XXX 99, 9999 2017-05-16 15:28:12 JRebel: Valid until: XXX 99, 9999 2017-05-16 15:28:12 JRebel: 2017-05-16 15:28:12 JRebel: You are using an EVALUATION license. 2017-05-16 15:28:12 JRebel: Days left until license expires: 99 2017-05-16 15:28:12 JRebel: 2017-05-16 15:28:12 JRebel: To extend your evaluation or purchase a license, 2017-05-16 15:28:12 JRebel: contact sales@zeroturnaround.com. 2017-05-16 15:28:12 JRebel: 2017-05-16 15:28:12 JRebel: If you think this is an error, contact support@zeroturnaround.com. 2017-05-16 15:28:12 JRebel: 2017-05-16 15:28:12 JRebel: 2017-05-16 15:28:12 JRebel: ############################################################# 2017-05-16 15:28:12 JRebel: [INFO] Scanning for projects...Once the Alfresco project is launched, it’s time to change the content and see how hot reloading works. Here, we will not see the details of what you might change in the project. To see all the features of hot reloading, take a look to the JRebel documentation. Instead, we would like to show the developer experience, showing a practical example.
-
Before making any changes, let’s run the sample webscript by opening your browser and typing
http://localhost:8080/alfresco/s/sample/helloworld.This is a sample webscript generated in every project created using SDK 3.0 and the platform artifact.
-
Locate
HelloWorldWebScript.javain thesrc/main/java/.../platformsamplefolder of your project.If you are using an All-In-One project, the folder is located in the platform sub-project.
-
Edit it using your preferred editor and change the code so that
HelloFromJavabecomesHelloFromMe:model.put(“fromJava”,”HelloFromMe”); -
Save your file and open a new terminal.
If you’re using an All-In-One project, remember to change directory to the
<artifadctId>-platform-jarfolder first. -
Run
mvn compile.A number of log messages appear in the Alfresco project terminal, for example:
... JRebel: Reloading class 'com.example.platformsample.HelloWorldWebScript'. ... JRebel: Reconfiguring bean 'webscript.alfresco.tutorials.helloworld.get' [com.example.platformsample.HelloWorldWebScript] -
Refresh the browser to see the updated message:
By changing the code and compiling it again, the changes have been dynamically received from Alfresco Content Services.
Using JRebel with Eclipse IDE
Before using this tutorial, you should have an existing project (All-In-One or Platform JAR) already set up and working in your Eclipse IDE instance.
For a detailed tutorial on the Eclipse IDE set up, see Setting up your development environment using Eclipse.
For further details about JRebel, refer to the JRebel documentation to enable it in your IDE.
To install JRebel using Eclipse IDE (or any other supported IDE), follow the steps below.
-
Open Eclipse and go to Help > Eclipse Marketplace….
-
Search for JRebel and select
Install. -
Restart Eclipse to complete the installation.
-
Select Help > JRebel > Activation to activate your installation.
Note that a license is required. In this step you will be able to request a trial license.
-
Select Help > JRebel > Configuration > Startup to configure your installation, and choose Run via IDE.
-
Select Help > JRebel > Configuration > Projects to configure the Alfresco project, and choose to use JRebel (locally) for all of your project and sub-projects.
This is all you need to make JRebel work in your Eclipse environment. Now it’s time to run the Alfresco project to use the JRebel agent. To update the project, edit the Eclipse configuration you use to launch the project, making sure that you select the JRebel agent:
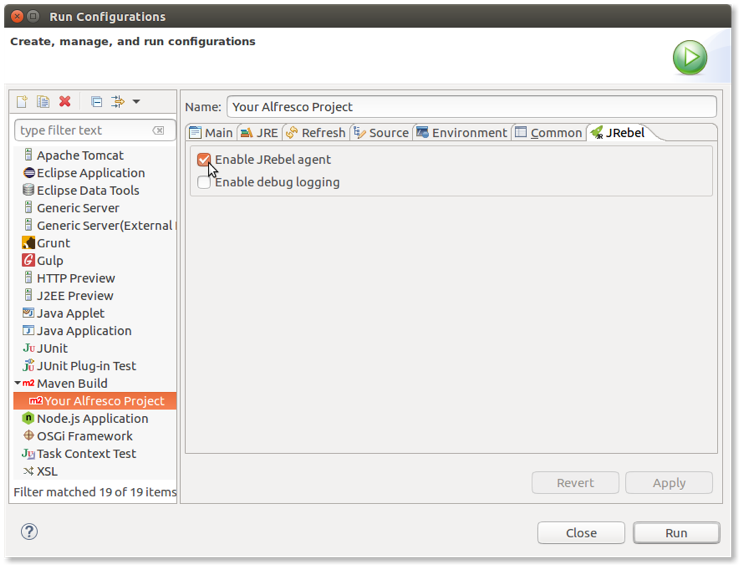
If you don’t have an Alfresco project, follow the steps in Getting started with Alfresco Content Services SDK 3.
-
Select Run to launch the project using the updated configuration.
You’ll recognize JRebel is working when you see similar log messages:
2017-05-16 15:28:12 JRebel: Starting logging to file: /home/alfresco/.jrebel/jrebel.log 2017-05-16 15:28:12 JRebel: 2017-05-16 15:28:12 JRebel: ############################################################# 2017-05-16 15:28:12 JRebel: 2017-05-16 15:28:12 JRebel: JRebel Agent 7.0.8 (999999999999) 2017-05-16 15:28:12 JRebel: (c) Copyright ZeroTurnaround AS, Estonia, Tartu. 2017-05-16 15:28:12 JRebel: 2017-05-16 15:28:12 JRebel: Over the last 2 days JRebel prevented 2017-05-16 15:28:12 JRebel: at least 1 redeploys/restarts saving you about 0 hours. 2017-05-16 15:28:12 JRebel: 2017-05-16 15:28:12 JRebel: Licensed to XXXX XXXX (XXXX) 2017-05-16 15:28:12 JRebel: 2017-05-16 15:28:12 JRebel: License type: evaluation 2017-05-16 15:28:12 JRebel: Valid from: XXX 99, 9999 2017-05-16 15:28:12 JRebel: Valid until: XXX 99, 9999 2017-05-16 15:28:12 JRebel: 2017-05-16 15:28:12 JRebel: You are using an EVALUATION license. 2017-05-16 15:28:12 JRebel: Days left until license expires: 99 2017-05-16 15:28:12 JRebel: 2017-05-16 15:28:12 JRebel: To extend your evaluation or purchase a license, 2017-05-16 15:28:12 JRebel: contact sales@zeroturnaround.com. 2017-05-16 15:28:12 JRebel: 2017-05-16 15:28:12 JRebel: If you think this is an error, contact support@zeroturnaround.com. 2017-05-16 15:28:12 JRebel: 2017-05-16 15:28:12 JRebel: 2017-05-16 15:28:12 JRebel: ############################################################# 2017-05-16 15:28:12 JRebel: [INFO] Scanning for projects...Once the Alfresco project is launched, it’s time to change the content and see how hot reloading works. Here, we will not see the details of what you might change in the project. To see all the features of hot reloading, take a look to the JRebel documentation. Instead, we would like to show the developer experience, by showing you a practical example.
-
Before making any changes, let’s run the sample webscript by opening your browser and typing
http://localhost:8080/alfresco/s/sample/helloworld.This is a sample webscript generated in every project created using SDK 3.0 and the platform artifact.
-
Locate
HelloWorldWebScript.javain thesrc/main/java/.../platformsamplefolder of your project.If you are using an All-In-One project, the folder is located in the platform sub-project.
-
Edit it using your preferred editor and change the code so that
HelloFromJavabecomesHelloFromMe:model.put(“fromJava”,”HelloFromMe”); -
Save your file then check your IDE Console for log messages:
... JRebel: Reloading class 'com.example.platformsample.HelloWorldWebScript'. ... JRebel: Reconfiguring bean 'webscript.alfresco.tutorials.helloworld.get' [com.example.platformsample.HelloWorldWebScript] -
Refresh the browser to see the updated message:
By changing the code and compiling it again, the changes have been dynamically received from Alfresco Content Services.