Use this information to configure and manage the search services for Alfresco Content Services 5.2.7.
- Configuring search with Solr 4
Solr 4 is the default search subsystem. Use this information for an overview on the Solr 4 search service and how to configure it. - Configuring Alfresco Search Services with Solr 6
Alfresco Content Services 5.2.7 provides search capabilities for searching content within the repository using Solr 6. - Alfresco Index Engine
You can host a separate instance of Alfresco Content Services 5.2.7 with Solr 6 for high scalability and for maximizing the throughput of your Alfresco services. This setup is termed as Alfresco Index Engine.
Configuring search with Solr 4
Solr 4 is the default search subsystem. Use this information for an overview on the Solr 4 search service and how to configure it.
Note: In this information, the Solr 4 search subsystem is referred to as Solr.
Important: The Lucene search subsystem is not supported in Alfresco Content Services 5.2.7.
- Solr overview
Alfresco Content Services supports use of the Solr search platform for searching within the repository. - Configure Solr search service
The way that you configure Alfresco Content Services to use Solr depends on how you have installed Alfresco Content Services. If you install using the setup wizard, Solr 4 is installed and enabled automatically. - Solr security
By default, communication between repository and Solr is protected by SSL with mutual authentication. Both the repository and Solr have their own standard public/private key pair. To secure the two-way communication between the repository and Solr, you must generate your own keys. - Solr monitoring and troubleshooting
Help for monitoring and resolving any Solr index issues that might arise as a result of a transaction. - Solr backup and restore
Use this information to backup and restore the Solr server. - Solr replication
Solr replication uses the master-slave model to distribute complete copies of a master index to one or more slave servers. - Solr sharding
Solr sharding involves splitting a single Solr index into multiple parts, which may be on different machines. When the data is too large for one node, you can break it up and store it in sections by creating one or more shards, each containing a unique slice of the index. - Full text search configuration properties for Solr index
The Solr index’s full text search properties influence the behaviour of Solr indexes. - Using Filtered search
Use this information for an overview of the filtered search capability in Alfresco Share along with its configuration details. It also describes how to define your own custom filters. - Setting Solr logging
You can set different debug logging levels for Solr components using the Solr log4j properties. - Transactional metadata query
Use this information for an overview on the transactional metadata query. It also describes the process of configuring the optional patch for upgrade. - Configuring OpenSearch
You can configure OpenSearch to use a search engine proxy.
Solr overview
Alfresco Content Services supports use of the Solr search platform for searching within the repository.
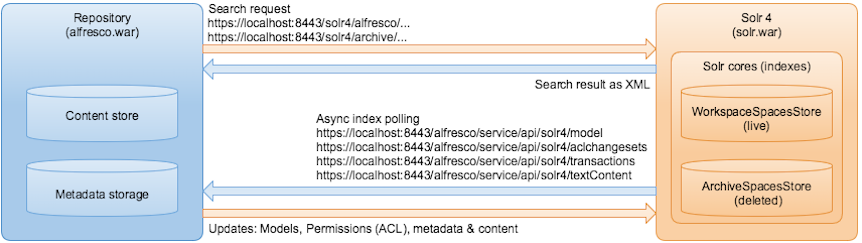
Solr is an open source enterprise search platform that uses lucene as indexing and search engine. Solr is written in Java and runs as a standalone search server. Alfresco Content Services sends HTTP and XML input to Solr and searches for content. Solr updates the cores or indexes and returns the result of the query in XML or JSON format.
Note: To confirm which application servers Alfresco supports for running the Solr application on, see the Supported Platforms matrix for your version of Alfresco Content Services.
There are two cores or indexes in Solr:
-
WorkspaceStore: used for searching all live content stored at alfresco/solr4 within the Solr search server.
-
ArchiveStore: used for searching content that has been marked as deleted at alfresco/solr4 within the Solr search server.
Note: Solr 4 is the default search mechanism for new installations installed with the Setup Wizard. Also, the Solr 4 server is supported only when running in a Tomcat application server. Therefore, if you are running Alfresco Content Services within a different application server and you wish to use Solr 4 search, you must install Tomcat.
Important: Every installation is supplied with a generic certificate and SSL keys. For security reasons, it is advised that you generate a new set of keys to secure your Solr communication and access to the Solr Admin Console. For more information, see Configuring Solr and Generating secure keys for Solr communication.
- Advantages of Solr 4 over Solr 1.4 search
Solr 4 search server brings improvements and new features over Solr 1.4 with respect to scalability, performance, and flexibility. - Eventual consistency
Alfresco Content Services 5.2.7 introduces the concept of eventual consistency to overcome the scalability limitations of in-transaction indexing.
Advantages of Solr 4 over Solr 1.4 search
Solr 4 search server brings improvements and new features over Solr 1.4 with respect to scalability, performance, and flexibility.
In particular, Solr 4 offers:
- More compact disc formats
- Faster index rebuilding
- Simpler and faster wildcard querying
- Use of doc values for faceting and ordering
- More accurate results and facet count
- Integrated Solr date math for
d:dateandd:datetimetypes - Use of primitive types
- Support for spell checking and suggestion
- Support for site shortnames using
SITEin queries and faceting usingTAG - Special tag support in queries and faceting
Eventual consistency
Alfresco Content Services 5.2.7 introduces the concept of eventual consistency to overcome the scalability limitations of in-transaction indexing.
Here’s some background information on the evolution of eventual consistency in Alfresco:
- Alfresco Enterprise 3.x supported a transactional index of metadata using Apache Lucene.
- Alfresco Enterprise 4.0 introduced an eventually consistent index based on Apache Solr 1.4.
- Alfresco One 5.0 moved to Solr 4 and also introduced transaction metadata query (TMDQ). TMDQ was added specifically to support the transactional use cases that used to be addressed by the Lucene index in the previous versions. TMDQ uses the database and adds a collection of required indexes as optional patches.
- Alfresco One 5.1 supports a later version of Solr 4 and made improvements to TMDQ.
- Alfresco Content Services 5.2.x supports Solr 4, Solr 6, and TMDQ.
When changes are made to the repository they are picked up by Solr via a polling mechanism. The required updates are made to the Index Engine to keep the two in sync. This takes some time. The Index Engine may well be in a state that reflects some previous version of the repository. It will eventually catch up and be consistent with the repository (assuming the repository is not constantly changing).
When a query is executed, it can happen in any one of the following ways:
- By default, if the query can be executed against the database, it will be.
- If not, the query goes to the Index Engine.
There are some minor differences between the results. For example, collation and how permission are applied. Some queries are not supported by TMDQ, for example, facets, full text, in tree, and structure. If a query is not supported by TMDQ, it can only go to the Index Engine.
What does eventual consistency mean?
If the Index Engine is up to date, a query against the database or the Index Engine will see the same state. The results may still be slightly different. If the index engine is behind the repository, the query may produce results that do not, as yet, reflect all the changes that have been made to the repository.
Why the database and Index Engine may not be in sync?
Nodes may have been deleted:
- Nodes are present in the index but deleted from the repository
- Deleted nodes are filtered from the results when they are returned from the query. So, you may see a short page of results even though there are more results.
- The result count may be lower than the facet counts.
- Faceting will include the to be deleted nodes in the counts.
Nodes may have been added:
- Nodes have been added to the repository but are not yet in the index at all. These new nodes will not be found in the results or included in faceting.
- Nodes have been added to the repository but only the metadata is present in the index. These nodes cannot be found by the content.
Nodes metadata has changed:
- The index reflects out of date metadata.
- Some out of date nodes may be in the results when they should not be.
- Some out of date nodes may be missing from the results when they should not be.
- Some nodes may be counted in the wrong facets due to out of date metadata.
- Some nodes may be ordered using out of date metadata.
Node Content has changed:
- The index reflects out of date content but the metadata is up to date.
- Some out of date nodes may be in the results when they should not be.
- Some out of date nodes may be missing from the results when they should not be.
Node Content and metadata has changed:
- The index reflects the out of date metadata and content.
- The index reflects out of date content (the metadata is updated first).
- Some out of date nodes may be in the results when they should not be.
- Some out of date nodes may be missing from the results when they should not be.
- Some nodes may be counted in facets due to out of date metadata.
An update has been made to an ACL (adding an access control entry to a node):
- The old ACL is reflected in queries
- Some out of date nodes may be in the results when they should not be.
- Some out of date nodes may be missing from the results when they should not be.
- The ACLs that are enforced may be out of date but are consistent with the repository state when the node was added to the index. The node and ACL may be out of date but permission for the content and metadata is consistent with this prior state. For nodes in the version index, they are assigned the ACL of the live node when the version was added to the index.
A node may be continually updated:
- It is possible that such a node may never appear in the index.
- By default, when the Index Engine tracks the repository, it only picks up changes that are older than one second. This is configurable. For example, if we are indexing node 27 in state 120, we only add information for node 27 if it is still in that state. If the node has moved on to state 236, we will skip node 27 until we have indexed state 236 (assuming it has not moved on again). This avoids pulling later information into the index which may have an updated ACE or present an overall view inconsistent with a repository state. An out-of-date state means we have older information in the index.
Dealing with eventual consistency
Handling eventual consistency varies from one situation to another. If you need a transactional answer, the default behaviour will give you one, if it can. For some queries, it is not possible to get a transactional answer. If you are using Solr 6, the response from the SearchService API will return some information to help. It will report the index state consistent with the query.
...
"context": {
    "consistency": {
        "lastTxId": 18
    }
},
....
This can then be compared with the last transaction on the repository. If they are equal, the query was consistent. The repository state for each node is known when it is added to the index.
If your query goes to the Index Server and it is not up to date, it could be any of the reasons described above.
Using the Index Engine based on Solr 6 gives better consistency for metadata updates. Some update operations that infrequently require many nodes to be updated are now done in the background. These are mostly move and rename operations that affect structure. So, a node is now renamed quickly. Any structural information that is consequently changed on all of its children is done afterwards.
Alfresco Search Services 1.0.0 also includes improved commit coordination and concurrency improvements. This reduces the time for the changes to be reflected in the index. Some of the delay also comes from the work that Solr does before an index goes live. This can be reduced by tuning. The cost is usually a query performance hit later.
For most use cases, eventual consistency is perfectly fine. For transactional use cases, TMDQ is the only solution unless the index and repository are in sync.
Configure Solr search service
The way that you configure Alfresco Content Services to use Solr depends on how you have installed Alfresco Content Services. If you install using the setup wizard, Solr 4 is installed and enabled automatically.
Solr 4 is installed in the same Tomcat container as Alfresco Content Services, and the connection URL is unchanged from the default. The Solr 4 home is within the Alfresco Content Services home directory.
Use this information to configure the Solr search subsystem, and to understand the Solr directory structure, configuration files, and properties.
- Installing and configuring Solr
The Solr 4 search subsystem is installed by default when you install Alfresco Content Services 5.2.7 using the setup wizards (installer), and therefore, you do not need to do these steps. If you install manually using the distribution zip, you will need to configure Solr 4 separately on the existing installation using Tomcat. - Generating secure keys for Solr communication
This task describes how to replace or update the keys used to secure communication between Alfresco Content Services and Solr, using secure keys specific to your installation. - Solr directory structure
After you have installed Alfresco Content Services, several directories and configuration files related to Solr will be available in the Alfresco Content Services home directory. - Solr configuration files
When you install Alfresco Content Services 5.2.7, several Solr configuration files are made available to you. The section lists the Solr configuration files, their location in the directory structure, and their description. - Solr subsystem
Search is contained in a subsystem and it has an implementation of Solr. - Activating Solr
Use this information to activate the Solr search mechanism in a manual Alfresco Content Services installation or when upgrading from a previous version.
Installing and configuring Solr
The Solr 4 search subsystem is installed by default when you install Alfresco Content Services 5.2.7 using the setup wizards (installer), and therefore, you do not need to do these steps. If you install manually using the distribution zip, you will need to configure Solr 4 separately on the existing installation using Tomcat.
Note: To confirm which application servers are supported for running the Solr application on, see the Supported Platforms matrix for your version of Alfresco Content Services.
The installation contains the following artifacts:
- a template SOLR home directory containing solr.xml, which is expected by Solr
- Solr WAR file
- an example context to wire up in Tomcat
- two Solr core configurations: one to track the live SpacesStore and one to track items archived from the SpacesStore
You can install Solr either to the same Tomcat application server as Alfresco Content Services or a separate Tomcat. The Solr server indexes data by periodically tracking the changes made to Alfresco Content Services. It does so by calling a RESTful API that describe the latest transactions to it. The Alfresco Content Services server performs searches through the Solr server by issuing queries through a special API. For this reason, there needs to be two-way communication between the Alfresco Content Services server and the Solr server. For security reasons, the communication channel between the Alfresco Content Services server and Solr server must be secured by means of https encryption and mutual client certificate authentication.
Important: To ensure a secure deployment of Alfresco Content Services and Solr when installed on the same Tomcat:
- Ensure the Alfresco admin user has a strong, non-guessable password.
- Other than for evaluation, don’t install Alfresco Content Services and Solr on the same server (which provides benefits for security, performance, and scalability).
- Read and understand the recommendations in the following blog post, specifically regarding securing access to the Solr Admin Console: Mutual TLS Authentication by Default. Further guidance is included in the steps below.
The following instructions use <ALFRESCO_TOMCAT_HOME> to refer to the Tomcat directory where Alfresco Content Services is installed and <SOLR4_TOMCAT_HOME> to the Tomcat directory where Solr is installed. These can be the same or different directories, depending on whether you have chosen to install Solr on a standalone server.
-
Extract the
alfresco-content-services-distribution-5.2.7.zipfile to a location. For example,<EXTRACTED-ARCHIVE>.The
<EXTRACTED-ARCHIVE>directory contains a solr4 directory. -
Copy the
solr4folder to the<ALFRESCO_HOME>directory, for example,<ALFRESCO_HOME>/solr4/.This directory now becomes
<SOLR4-ARCHIVE>, which is the Solr base directory. -
Copy the
<ALFRESCO_HOME>/solr4/context.xmlfile to<SOLR4_TOMCAT_HOME>\conf\Catalina\localhost\solr4.xml. -
Edit
solr/homein XML to point to the path for<SOLR4-ARCHIVE>, which is the Solr base directory mentioned in Step 2.For example:
<?xml version="1.0" encoding="utf-8"?>
<Context debug="0" crossContext="true">
  <Environment name="solr/home" type="java.lang.String" value="<SOLR4-ARCHIVE>" override="true"/>
  <Environment name="solr/model/dir" type="java.lang.String" value="@@ALFRESCO_SOLR4_MODEL_DIR@@" override="true"/>
  <Environment name="solr/content/dir" type="java.lang.String" value="@@ALFRESCO_SOLR4_CONTENT_DIR@@" override="true"/>
</Context>
where:
@@ALFRESCO_SOLR4_MODEL_DIR@@should point to the location of the Solr model directory. For example,<ALFRESCO_HOME>/alf_data/solr4/model.@@ALFRESCO_SOLR4_CONTENT_DIR@@should point to the location of the Solr content directory. For example,<ALFRESCO_HOME>/alf_data/solr4/content.
-
For each core, edit the
solrcore.propertiesfile:archive-SpacesStore/conf/solrcore.propertiesworkspace-SpacesStore/conf/solrcore.propertiesSet thedata.dir.rootproperty to the location where the Solr indexes will be stored. You can set the same value for the both cores, and the cores will create the sub-directories.
-
Ensure that Alfresco Content Services has already been started at least once and the
<ALFRESCO_TOMCAT_HOME>/webapps/alfresco/WEB-INFdirectory exists. -
Create and populate a
keystoredirectory for the Alfresco Content Services and Solr servers.By default, the
keystoredirectory is created in<ALFRESCO_HOME>/alf_data/keystore. Note that at this stage the keystore directory will just be a template, containing standard keys. To secure the installation, you must follow the steps to generate new keys as explained in the Generating secure keys for Solr communication section.For example:
For Unix:
mkdir -p <ALFRESCO_HOME>/alf_data/keystore

cp <ALFRESCO_TOMCAT_HOME>/webapps/alfresco/WEB-INF/classes/alfresco/keystore/* <ALFRESCO_HOME>/alf_data/keystore
For Windows:
mkdir <ALFRESCO_HOME>\alf_data\keystore copy <ALFRESCO_TOMCAT_HOME>\webapps\alfresco\WEB-INF\classes\alfresco\keystore* <ALFRESCO_HOME>\alf_data\keystore -
Configure the Alfresco Content Services and Solr tomcat application servers to use the keystore and truststore for https requests by editing the specification of the connector on port 8443 in
<ALFRESCO_TOMCAT_HOME>/conf/server.xmland<SOLR4_TOMCAT_HOME>/conf/server.xmlas shown:Note: Remember to replace
<ALFRESCO_HOME>/alf_data/keystorewith the full path to your keystore directory.Note: Make sure that you set the connector to
clientAuth=wantfor this version of Alfresco Content Services.For example:
<Connector port="8443" protocol="org.apache.coyote.http11.Http11Protocol" SSLEnabled="true" maxThreads="150" scheme="https" keystoreFile="<ALFRESCO_HOME>/alf_data/keystore/ssl.keystore" keystorePass="kT9X6oe68t" keystoreType="JCEKS" secure="true" connectionTimeout="240000" truststoreFile="<ALFRESCO_HOME>/alf_data/keystore/ssl.truststore" truststorePass="kT9X6oe68t" truststoreType="JCEKS" clientAuth="want" sslProtocol="TLS"/> -
Configure Alfresco Content Services to use the keystore and truststore for client requests to Solr by specifying
dir.keystorein<ALFRESCO_TOMCAT_HOME>/shared/classes/alfresco-global.properties.Note: Remember to replace
<ALFRESCO_HOME>/alf_data/keystorewith the full path to your keystore directory.For example:
dir.keystore=<ALFRESCO_HOME>/alf_data/keystore -
Configure an identity for the Alfresco Content Services server.
In
<SOLR4_TOMCAT_HOME>/conf/tomcat-users.xml, add the following:Note: Remember, you can choose a different user name, such as the host name of the Alfresco Content Services server, but it must match the
REPO_CERT_DNAMEthat you will later specify in the keystore in the Generating secure keys for Solr communication section.For example:
<user username="CN=Alfresco Repository, OU=Unknown, O=Alfresco Software Ltd., L=Maidenhead, ST=UK, C=GB" roles="repository" password="null"/> -
Configure an identity for the Solr server.
In
<ALFRESCO_TOMCAT_HOME>/conf/tomcat-users.xml, add the following:Note: Remember, you can choose a different user name but it must match the
SOLR_CLIENT_CERT_DNAMEthat you will later specify in the keystore in the Generating Secure Keys for Solr Communication section.For example:
<user username="CN=Alfresco Repository Client, OU=Unknown, O=Alfresco Software Ltd., L=Maidenhead, ST=UK, C=GB" roles="repoclient" password="null"/> -
To complete the installation, it is necessary to secure the two-way communication between Alfresco Content Services and Solr by generating your own keys. See the Generating Secure Keys for Solr Communication topic.
Generating secure keys for Solr communication
This task describes how to replace or update the keys used to secure communication between Alfresco Content Services and Solr, using secure keys specific to your installation.
The following instructions assume that Solr has been extracted and a keystore directory has already been created, either automatically by the Alfresco Content Services installer or manually by following the instructions in the Configuring Solr 4 section.
If you are applying these instructions to a clustered installation, the steps should be carried out on a single host, and then the generated .keystore and .truststore files must be replicated across all other hosts in the cluster.
-
Download the relevant script from the Customer Support website, or from the following location in the extracted distribution zip content:
<installLocation>/alf_data/keystore/generate_keystores.sh(for Linux and Solaris)<installLocation>/alf_data/keystore/generate_keystores.bat(for Windows) -
Check the following directories for your environment.
-
If you are updating an environment created by the installer, you only need to edit
ALFRESCO_HOMEandSOLR_HOMEto specify the correct installation directory. -
For manual installations, carefully review
ALFRESCO_KEYSTORE_HOME,SOLR_HOME,JAVA_HOME,REPO_CERT_DNAMEandSOLR_CLIENT_CERT_DNAMEand edit as appropriate.By default, for Solr
SOLR_HOMErefers to<ALFRESCO_HOME>/solr4.
-
-
Run the edited script to generate your certificates.
You should see the message Certificate update complete and another message reminding you what
dir.keystoreshould be set to in thealfresco-global.propertiesfile.
Solr directory structure
After you have installed Alfresco Content Services, several directories and configuration files related to Solr will be available in the Alfresco Content Services home directory.
-
alfresco\solr4
This is the Solr home directory. It contains the Solr cores:
archive-SpacesStore(for deleted content) andworkspace-SpacesStore(for live content). It also contains two configurations files:context.xmlandsolr.xml.The Solr directory contains the following sub-folders and files:
alfrescoModels: This directory contains all the content models that come out of the box. Any new custom content model added are synced to this directory so that Solr knows about it.archive-SpacesStore: This is the configuration directory for the archive core.workspace-SpacesStore: This is the configuration directory for the workspace core.templates: This directory contains the core templates that define the base configuration for a new Solr core with some configuration properties. This directory also contains the/rerank/conf/solrcore.propertiesfile.context.xml: This configuration file specifies the Solr web application context template to use when installing Solr in separate tomcat server.log4j-solr.properties: This is the configuration file for Solr-specific logging.solr.xml: This configuration file specifies the cores to be used by Solr.
-
*alfresco\alf_data\solr4*
The Solr directory contains the following sub-folders:
-
content: This directory contains a compressed copy of all the Solr documents added to the index. Typically, the content directory is 20%-30% of the repository content store size, but this varies considerably depending on how the transformation to text reduces the size of the original files. If the original files are all text documents, the two content stores may be of comparable size. As Solr content store also includes metadata information, for a repository that contains only text documents, it is possible that the Solr content store could be slightly larger than the repository content store.The content directory:
- Does not need to be backed up.
- Works more efficiently on fast and local drives.
- Besides being used for reindexing and future intended use for highlighting, the content directory saves transformations. If only the metadata is updated on a node, the cached content can be used to get the previous transformation results. If the content is updated on a node, it can be indexed with the new metadata and the old transformed content, until the new transformed content is available.
- index: This directory contains all the indexes of the archive and workspace cores.
- model: This directory contains all the models.
-
-
alfresco\alf_data\solr4Backup\This directory stores the Solr backup. It contains the alfresco and archive sub-directories.
Solr configuration files
When you install Alfresco Content Services 5.2.7, several Solr configuration files are made available to you. The section lists the Solr configuration files, their location in the directory structure, and their description.
| Configuration File | Location | Description |
|---|---|---|
| schema.xml | alfresco\solr4\<core>\conf\, where <core> is the location of core’s configuration directory. For example alfresco\solr4\workspace-SpacesStore\conf or alfresco\solr4\archive-SpacesStore\conf |
This file defines the schema for the index including field type definitions with associated analyzers. It contains details about the fields that you can include in your document and also describes how those fields can be used when adding documents to the index or when querying those fields. The properties of this file are managed by an expert user. |
| solr4.xml | alfresco\tomcat\conf\catalina\localhost |
This file defines the Solr web application context. It specifies the location of the Solr war file and sets up the Solr home directory. |
| solr.xml | alfresco\alf_data\solr4 |
This file specifies the cores to be used by Solr. |
| core.properties | <ALFRESCO_HOME>/solr4/archive-SpacesStore/core.properties or <ALFRESCO_HOME>/solr4/workspace-SpacesStore/core.properties |
This file specifies the cores to be used by Solr. |
| solrconfig.xml | alfresco\solr4\workspace-SpacesStore\conf or alfresco\solr4\archive-SpacesStore\conf |
This file specifies the parameters for configuring Solr. Also, the Solr search components are added to this file. The properties of this file are managed by an expert Administrator user. |
| solrcore.properties | alfresco\solr4\workspace-SpacesStore\conf or alfresco\solr4\archive-SpacesStore\conf |
This is the property configuration file for a core. Solr supports system property substitution, so properties that need substitution can be put in to this file. There is one solrcore.properties file in each core’s configuration directory. For details, see the Solr core configuration properties topic. The properties of this file are managed by an Administrator user. |
| context.xml | alfresco\solr4 |
This file specifies the Solr web application context template to use when installing Solr in separate tomcat server. |
| ssl.repo.client.keystore | alfresco\solr4\workspace-SpacesStore\conf or alfresco\solr4\archive-SpacesStore\conf |
This keystore contains the Solr public/private RSA key pair. |
| ssl-keystore-passwords.properties | alfresco\solr4\workspace-SpacesStore\conf or alfresco\solr4\archive-SpacesStore\conf |
This file contains the password information for ssl.repo.client.keystore. |
| ssl.repo.client.truststore | alfresco\solr4\workspace-SpacesStore\conf or alfresco\solr4\archive-SpacesStore\conf |
This keystore contains the trusted Alfresco Certificate Authority certificate (which has been used to sign both the repository and Solr certificates) |
| ssl-truststore-passwords.properties | alfresco\solr4\workspace-SpacesStore\conf or alfresco\solr4\archive-SpacesStore\conf |
This file contains the password information for ssl.repo.client.truststore. |
Solr core configuration properties
The solrcore.properties configuration file is the property configuration file for a Solr core. There is one solrcore.properties file in each core’s configuration directory. Use this information to understand the properties of this file, their description, and the default value.
| Property Name | Description | Default Value |
|---|---|---|
| data.dir.root | This property specifies the top level directory path for the indexes managed by Solr. | C:/Alfresco/alf_data/solr4/index |
| data.dir.store | This property specifies the directory relative to data.dir.root where the data for this core is stored. | workspace/SpacesStore |
| enable.alfresco.tracking | This property instructs Solr if it should index Alfresco Content Services content in the associated repository store or not. | true |
| max.field.length | This property specifies the maximum number of tokens to include for each field. By default, all tokens are added. | 2147483647 |
| alfresco.version | This property specifies the Alfresco Content Services version installed. | 5.2.7 |
| alfresco.host | This property specifies the host name for the instance that Solr should track and index. In a default installation, both Alfresco Content Services and Solr runs in the same Tomcat instance and on the same host, so host would be set to local host. | localhost |
| alfresco.port | This property specifies the HTTP port for the instance that Solr should track and index. | 8080 |
| alfresco.port.ssl | This property specifies the HTTPS port for the instance that Solr should track and index. | 8443 |
| alfresco.cron | This property specifies the cron expression that instructs Solr how often to track Alfresco Content Services and index new or updated content. The default value indicates that Solr tracks every 15 seconds. | 0/15 * * * * ? * |
| alfresco.stores | This property specifies the repository store that this core should index. | workspace://SpacesStore |
| alfresco.baseUrl | This property configures the base URL to Alfresco Content Services web project. If you need to change the baseUrl value, see Deploying with a different context path for configuring information. |
/alfresco |
| alfresco.lag | When Solr tracking starts, it aims to get up to date to the current time (in seconds), less this lag. | 1000 |
| alfresco.hole.retention | Each track will revisit all transactions from the timestamp of the last in the index, less this value, to fill in any transactions that might have been missed. | 3600000 |
| alfresco.batch.count | This property indicates the number of updates that should be made to this core before a commit is executed. | 1000 |
| alfresco.secureComms | This property instructs Solr if it should talk over HTTP or HTTPS. Set to none if a plain HTTP connection should be used. | https |
| alfresco.encryption.ssl.keystore.type | This property specifies the CLIENT keystore type. | JCEKS |
| alfresco.encryption.ssl.keystore.provider | This property specifies the Java provider that implements the type attribute (for example, JCEKS type). The provider can be left unspecified and the first provider that implements the keystore type specified is used. |
|
| alfresco.encryption.ssl.keystore.location | This property specifies the CLIENT keystore location reference. If the keystore is file-based, the location can reference any path in the file system of the node where the keystore is located. | ssl.repo.client.keystore |
| alfresco.encryption.ssl.keystore.passwordFileLocation | This property specifies the location of the file containing the password that is used to access the CLIENT keystore, also the default that is used to store keys within the keystore. | ssl-keystore-passwords.properties |
| alfresco.encryption.ssl.truststore.type | This property specifies the CLIENT truststore type. | JCEKS |
| alfresco.encryption.ssl.truststore.provider | This property specifies the Java provider that implements the type attribute (for example, JCEKS type). The provider can be left unspecified and the first provider that implements the truststore type specified is used. |
|
| alfresco.encryption.ssl.truststore.location | This property specifies the CLIENT truststore location reference. If the truststore is file-based, the location can reference any path in the file system of the node where the truststore is located. | ssl.repo.client.truststore |
| alfresco.encryption.ssl.truststore.passwordFileLocation | This property specifies the location of the file containing the password that is used to access the CLIENT truststore, also the default that is used to store keys within the truststore. | ssl-truststore-passwords.properties |
| alfresco.corePoolSize | This property specifies the pool size for multi-threaded tracking. It is used for indexing nodes. | 3 |
| alfresco.maximumPoolSize | This property specifies the maximum pool size for multi-threaded tracking. | -1 |
| alfresco.keepAliveTime | This property specifies the time (in seconds) to keep non-core idle threads in the pool. | 120 |
| alfresco.threadPriority | This property specifies the priority that all threads must have on the scale of 1 to 10, where 1 has the lowest priority and 10 has the highest priority. | 5 |
| alfresco.threadDaemon | This property sets whether the threads run as daemon threads or not. If set to false, shut down is blocked else it is left unblocked. |
true |
| alfresco.workQueueSize | This property specifies the maximum number of queued work instances to keep before blocking against further adds. | -1 |
| alfresco.maxTotalConnections | This property is used for HTTP client configuration. | 40 |
| alfresco.maxHostConnections | This property is used for HTTP client configuration. | 40 |
| alfresco.socketTimeout | This property specifies the amount of time Solr tracker will take to notice if the Alfresco Content Services web app shuts down first, if Alfresco Content Services and Solr are running on the same web application. | 60000 |
| solr.filterCache.size | This property specifies the maximum number of entries in the Solr filter cache. You may want to increase the value if you have many users, groups, and tenants. | 64 |
| solr.filterCache.initialSize | This property specifies the initial capacity (number of entries) of the Solr filter cache. You may want to increase the value if you have many users, groups, and tenants. | 64 |
| solr.queryResultCache.size | This property configures the number of query results. Increase the value to cache more query results. | 1024 |
| solr.queryResultCache.initialSize | Increase the value of this property to cache more query results. | 1024 |
| solr.documentCache.size | This property configures the Solr document cache. | 64 |
| solr.documentCache.initialSize | This property configures the Solr document cache. | 64 |
| solr.queryResultMaxDocsCached | Set this property to a higher value if you expect to page through most results. | 2000 |
| solr.authorityCache.size | This property configures the caches used in authority filter generation. | 64 |
| solr.authorityCache.initialSize | This property configures the caches used in authority filter generation. | 64 |
| solr.pathCache.size | This property configures the cache used for PATH query parts. |
64 |
| solr.pathCache.initialSize | This property configures the cache used for PATH query parts. |
64 |
| solr.ownerCache.size | This property configures the Solr result cache. | 4096 |
| solr.ownerCache.initialSize | This property configures the Solr result cache. | 1024 |
| solr.readerCache.size | This property configures the Solr result cache. | 4096 |
| solr.readerCache.initialSize | This property configures the Solr result cache. | 1024 |
| solr.deniedCache.size | This property configures the Solr result cache. | 4096 |
| solr.deniedCache.initialSize | This property configures the Solr result cache. | 1024 |
| solr.nodeBatchSize | This property configures the batch fetch. | 10 |
| solr.filterCache.autowarmCount | This property configures the number of entries to pre-populate from the old cache. | 128 |
| solr.authorityCache.autowarmCount | This property configures the Solr result cache. | 0 |
| solr.pathCache.autowarmCount | This property configures the Solr result cache. | 128 |
| solr.deniedCache.autowarmCount | This property configures the Solr result cache. | 0 |
| solr.readerCache.autowarmCount | This property configures the Solr result cache. | 0 |
| solr.ownerCache.autowarmCount | This property configures the Solr result cache. | 0 |
| solr.queryResultCache.autowarmCount | This property configures the number of search results to pre-populate from the old cache. | 0 |
| solr.documentCache.autowarmCount | This property configures the number of document objects to pre-populate from the old cache. | 0 |
| solr.queryResultWindowSize | This property rounds-up a request number to the nearest multiple of the setting, thereby storing a range or window of documents to be quickly available | 200 |
| alfresco.doPermissionChecks | This property allows users to see the document name or properties on a search result. | true |
| alfresco.metadata.skipDescendantDocsForSpecificTypes | This property reduces the overhead caused by reindexing sites. | false |
| alfresco.metadata.ignore.datatype.0 | This property configures the metadata pulling control. | cm:person |
| alfresco.metadata.ignore.datatype.1 | This property configures the metadata pulling control. | app:configurations |
| solr.maxBooleanClauses | This property specifies the number of Boolean clauses in a query. It can affect range or wildcard queries that expand to big Boolean queries. | 10000 |
| alfresco.transactionDocsBatchSize | This property is used for batch fetching updates during tracking. | 100 |
| alfresco.changeSetAclsBatchSize | This property is used for batch fetching updates during tracking. | 100 |
| alfresco.aclBatchSize | This property is used for batch fetching updates during tracking. | 10 |
| alfresco.index.transformContent | If this property is set to false, the index tracker will not transform any content and only the metadata will be indexed. | false |
Solr subsystem
Search is contained in a subsystem and it has an implementation of Solr.
The following properties in the alfresco-global.properties file are related to Solr and are setup as follows, by default:
### Solr indexing ###
index.subsystem.name=solr4
dir.keystore=${dir.root}/keystore
solr.port.ssl=8443
Solr 6 subsystem
Search is contained in a subsystem and it has an implementation of Solr 6.
Just like all previous versions of Solr, the activation and configuration of the Solr 6 subsystem can be done either by using the alfresco-global.properties file or the Admin Console.
Set the following Solr-related properties in the alfresco-global.properties file.
### Solr indexing ###
index.subsystem.name=solr6
solr.secureComms=none
solr.port=8983
solr.host=localhost
solr.baseUrl=/solr
These configuration properties are used by Alfresco to talk to Solr 6.
Activating Solr
Use this information to activate the Solr search mechanism in a manual Alfresco Content Services installation or when upgrading from a previous version.
- Working with the Search Service
Use Search Service in the Admin Console to manage and monitor the search service you want to use.
Global properties file
-
Open the
<classpathRoot>\alfresco-global.propertiesfile. -
Set the following properties:
Property Description index.subsystem.nameThe subsystem type value. The default value is solr4.solr.hostThe host name where the Solr instance is located. solr.portThe port number on which the Solr instance is running. solr.port.sslThe port number on which the Solr SSL support is running. For example, some example properties for activating Solr are:
index.subsystem.name=solr4 solr.host=localhost solr.port=8080 solr.port.ssl=8443 -
Save the global properties file and restart the Alfresco Content Services server.
Admin Console
-
Open the Admin Console.
-
Edit the following properties:
Property Description index.subsystem.nameSelect the subsystem type value as solr4.solr.hostThe host name where the Solr instance is located. solr.portThe port number on which the Solr instance is running. solr.port.sslThe port number on which the Solr SSL support is running. -
Click Save.
For more information, see Working with the Search Service.
JMX client
-
Navigate to MBeans > Alfresco > Configuration > Search.
-
Set the manager
sourceBeanNametosolr4.The subsystems have their own related properties. The
managed - solr4instance exposes thesolr.base.urlproperty. -
These can now be configured live and the subsystem redeployed.
Working with the Search Service (#working-with-the-search-service)
Use Search Service in the Admin Console to manage and monitor the search service you want to use.
The Admin Console enables you to configure the Solr 4 search service using configuration properties.
Important: The Solr 1 option should be used only for migration to Solr 4.
- Configuring the Solr 4 search service
The topic describes the properties for configuring the Solr 4 search service. - Configuring No Index search service
Use this information to configure the No Index search service.
Configuring the Solr 4 search service
The topic describes the properties for configuring the Solr 4 search service.
-
Open the Admin Console. For more information, see Launching the Admin Console
-
In the Repository Services section, click Search Service.
You see the Search Service page.
-
In the Search Service section, select Solr 4 from the Search Service In Use list.
Important: The Solr 1 option should be used only for migration to Solr 4.
-
Set the Solr 4 search service properties:
Solr search property Example setting What is it? Content Tracking Enabled Yes This specifies that Solr 4 can still track with the No Index search enabled. This setting can be used to disable Solr 4 tracking by separate Solr instance(s) configured to track this server. Solr Port (Non-SSL) 8080 This specifies the application server’s http port (non-secure) on which Solr 4 is running. This is only used if Solr 4 is configured to run without secure communications. Solr base URL /solr4 This specifies the base URL for the Solr 4 web application. Solr Hostname localhost This specifies the hostname on which the Solr 4 server is running. Use localhost if running on the same machine. Solr SSL Port 8443 This specifies the application server’s https port on which Solr 4 is running. Auto Suggest Enabled 0 This specifies that the Solr 4 auto-suggest feature is enabled. This feature presents suggestions of popular queries as a user types their query into the search box or text box. Indexing in Progress No This specifies if Solr 4 is currently indexing outstanding transactions. Last Indexed Transaction 17 This specifies the transaction ID most recently indexed by Solr 4. Approx Index Time Remaining 0 Seconds This specifies the estimated time that Solr 4 will take to complete indexing the current outstanding transactions. Disk Usage (GB) 0.001748 This specifies the disk space used by the latest version of the Solr 4 index. Allow at least double this value for background indexing management. Index Lag 0 s This specifies the time that indexing is currently behind the repository updates. Approx Transactions to Index 0 This specifies the estimated number of outstanding transactions that require indexing. Memory Usage (GB) 0 This specifies the current memory usage. The value may vary due to transient memory used by background processing. Indexing in Progress No This specifies if Solr 4 is currently indexing outstanding transactions. Last Indexed Transaction 17 This specifies the transaction ID most recently indexed by Solr 4. Approx Index Time Remaining 0 Seconds This specifies the estimated time that Solr 4 will take to complete indexing the current outstanding transactions. Disk Usage (GB) 0.000034 This specifies the disk space used by the latest version of the Solr 4 index. Allow at least double this value for background indexing management. Index Lag 0 s This specifies the time that indexing is currently behind the repository updates. Approx Transactions to Index 0 This specifies the estimated number of outstanding transactions that require indexing. Memory Usage (GB) 0 This specifies the current memory usage. The value may vary due to transient memory used by background processing. The value does not include Lucene related caches. Backup Location (Main Store) ${dir.root}/solr4Backup/alfresco This specifies the location where the index backup for the main WorkspaceStore is stored on the Solr 4 server. Backup Cron Expression (Main Store) 0 0 2 * * ? This specifies a unix-like expression, using the same syntax as the cron command, that defines when backups occur. The default value is 0 0 2 * * ? meaning the backup is performed daily at 02.00. Backups To Keep (Main Store) 3 This specifies the number of backups to keep (including the latest backup). Backup Location (Archive Store properties) ${dir.root}/solr4Backup/archive This specifies the location where the index backup for ArchiveStore is stored on the Solr 4 server. Backup Cron Expression (Archive Store properties) 0 0 4 * * ? This specifies a unix-like expression, using the same syntax as the cron command, that defines when backups occur. The default value is 0 0 4 * * ? meaning the backup is performed daily at 04.00. Backups To Keep (Archive Store properties) 3 This specifies the number of backups to keep (including the latest backup). CMIS Query Use database if possible This specifies the default mode which defines if and when the database should be used to support a subset of the CMIS Query Language. AlfrescoFull Text Search Use database if possible This specifies the default mode which defines if and when the database should be used to support a subset of the Alfresco Full Text Search. -
Click Save to apply the changes you have made to the properties.
If you do not want to save the changes, click Cancel.
Configuring No Index search service
Use this information to configure the No Index search service.
If you use the No Index service, you only have the transactional metadata query functionality available until you build your Solr 4 indexes. Full text search will not be available during this time.
-
Open the Admin Console. For more information, see Launching the Admin Console
-
In the Repository Services section, click Search Service.
You see the Search Service page.
-
In the Search Service section, select No Index from the Search Service In Use list.
-
Set the No Index search service properties:
No Index service property Example setting What is it? Content Tracking Enabled Yes This specifies that Solr can still track with No Index search enabled. This setting can be used to disable Solr tracking by separate Solr instance(s) configured to track this server. CMIS Query Use database if possible This specifies the default mode which defines if and when the database should be used to support a subset of the CMIS Query Language. AlfrescoFull Text Search Use database if possible This specifies the default mode which defines if and when the database should be used to support a subset of the Alfresco Full Text Search. -
Click Save to apply the changes you have made to the properties.
If you do not want to save the changes, click Cancel.
Solr security
By default, communication between repository and Solr is protected by SSL with mutual authentication. Both the repository and Solr have their own standard public/private key pair. To secure the two-way communication between the repository and Solr, you must generate your own keys.
Note: Every installation is supplied with a generic certificate and SSL keys. For security reasons, it is advised that you generate a new set of keys to secure you Solr communication and access to the Solr Admin Console. For more information, see Configuring Solr and Generating secure keys for Solr communication.
- Repository SSL keystores
Use this information to understand the keystores used by the repository for SSL. - Solr SSL keystores
Solr core has two keystores that it uses for SSL. - Connecting to the SSL-protected Solr web application
The Solr Admin Web interface allows you to view Solr configuration details, run queries, and analyze document fields. - Solr certificate authentication
Alfresco Content Services uses SSL and X509 certificate authentication to secure communication between the repository server and the Solr server. In this communication, SSL not only provides encryption, it is also used for authentication. Follow these steps to turn off SSL and deactivate authentication between the repository and the Solr server.
Repository SSL keystores
Use this information to understand the keystores used by the repository for SSL.
The repository has two keystores it uses for SSL:
ssl keystorecontains a public/private RSA key pair for the repositoryssl truststorecontains the trusted Alfresco Certificate Authority certificate (which has been used to sign both the repository and Solr certificates)
These keystores can be stored in any location.
Update the following keystore properties in the alfresco-global.properties file to specify the location of the key stores:
ssl keystore
| Property | Description |
|---|---|
encryption.ssl.keystore.location |
Specifies the keystore location. |
encryption.ssl.keystore.provider |
Specifies the keystore provider. |
encryption.ssl.keystore.type |
Specifies the keystore type. |
encryption.ssl.keystore.keyMetaData.location |
Specifies the keystore metadata file location. |
ssl truststore
| Property | Description |
|---|---|
encryption.ssl.truststore.location |
Specifies the trust store location. |
encryption.ssl.truststore.provider |
Specifies the trust store provider. |
encryption.ssl.truststore.type |
Specifies the trust store type. |
encryption.ssl.truststore.keyMetaData.location |
Specifies the trust store metadata file location. |
Solr SSL keystores
Solr core has two keystores that it uses for SSL.
These are:
ssl.repo.client.keystorecontains a Solr public/private RSA key pairssl.repo.client.truststorecontains the trusted Alfresco Certificate Authority certificate (which has been used to sign both the repository and Solr certificates)
Connecting to the SSL-protected Solr web application
The Solr Admin Web interface allows you to view Solr configuration details, run queries, and analyze document fields.
All Solr URLs, which are bundled within Alfresco Content Services, are protected by SSL. To use these URLs from a browser, you need to import a browser-compatible keystore to allow mutual authentication and decryption to work. The following steps describe how to import the keystore into your browser (these relate to Firefox, other browsers will have a similar mechanism):
-
Open the FireFox Certificate Manager by selecting Firefox > Preferences… > Advanced > Certificates > View Certificates > Your Certificates.
-
Import the browser keystore
browser.p12that is located in your<ALFRESCO_HOME>/alf_data/keystoredirectory. -
Enter the password
alfresco.A window displays showing that the keystore has been imported successfully. The Certificate Manager now contains the imported keystore with the repository certificate under the Your Certificates tab.
-
Close the Certificate Manager by clicking OK.
-
In the browser, navigate to a Solr URL, https://localhost:8443/solr4.
The browser displays an error message window to indicate that the connection is untrusted. This is due to the certificate not being tied to the server IP address. In this case, view the certificate and confirm that it is signed by the Alfresco Certificate Authority.
-
Expand I understand the risks.
-
Select Add Exception.
-
Click View.
This displays the certificate.
-
Confirm that the certificate was issued by Alfresco Certificate Authority, and then confirm the Security Exception.
Access to Solr is granted and the Solr Admin screen is displayed.
The Solr web interface makes it easy for administrators to view the Solr configuration details, run queries, and analyse document fields in order to calibrate a Solr configuration.
The main Solr Admin dashboard is divided into two parts.
Click on the left or the center of the Solr Admin UI below to learn more about it.

- Solr Admin UI - left panel
The left-side of the Solr Admin screen is a menu under the Solr logo that provides the navigation through the screens of the UI. The first set of links are for system-level information and configuration, and provide access to Logging, Core Admin and Java Properties, among other things. - Solr Admin UI - center panel
The center of the screen shows the detail of the Solr core selected, such as statistics, summary report, and so on.
Solr Admin UI - left panel
The left-side of the Solr Admin screen is a menu under the Solr logo that provides the navigation through the screens of the UI. The first set of links are for system-level information and configuration, and provide access to Logging, Core Admin and Java Properties, among other things.
After this information is a list of Solr cores configured for your Alfresco Content Services instance. Clicking on a core name shows a secondary menu of information and configuration options for that core specifically. Items in this list include the Schema, Config, Plugins, and an ability to perform queries on indexed data.
The different screens of the Solr Admin UI are described below:
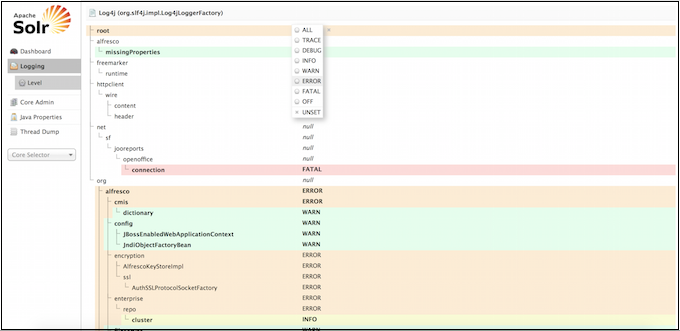
Logging
The Logging page shows messages from Solr’s log files.
Under Logging, when you select Level, you see the hierarchy of classpaths and classnames for your Level instance. A row highlighted in yellow indicates that the class has logging capabilities. Click on a highlighted row, and a menu will appear to allow you to change the log level for that class. Characters in bold indicate that the class will not be affected by level changes to root.
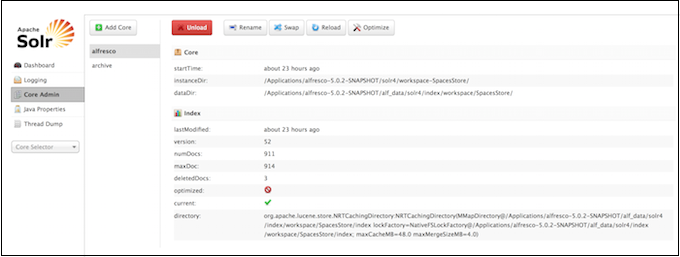
Core Admin
The Core Admin screen lets you manage your cores.
The buttons at the top of the screen enables you to add a new core, unload the core displayed, rename the currently displayed core, swap the existing core with one that you specify in a drop-down box, reload the current core, and optimize the current core.
The main display and available actions provide another way of working with your cores.
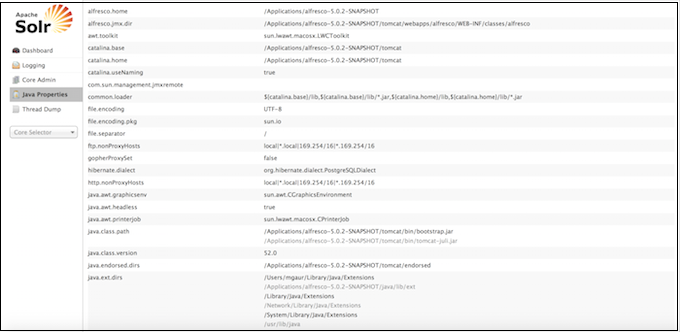
Java Properties
The Java Properties screen displays all the properties of the JVM running Solr, including the classpaths, file encodings, JVM memory settings, operating system, and more.
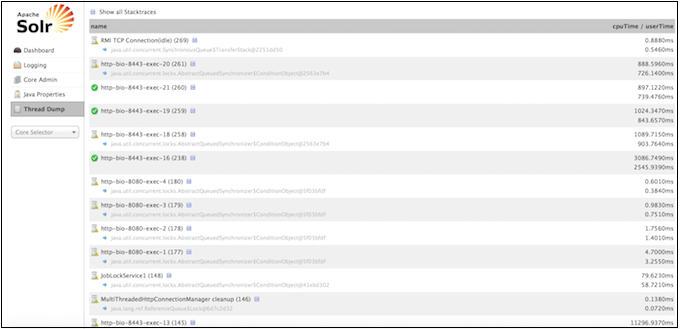
Thread Dump
The Thread Dump screen lets you inspect the currently active threads on your server.
Each thread is listed and access to the stacktraces is available where applicable. Icons to the left indicate the state of the thread. For example, threads with a green check-mark in a green circle are in a RUNNABLE state.
On the right of the thread name, click the down-arrow to see the stacktrace for that thread.
Core-Specific Tools
Click the Core Selector to display a list of Solr cores, with a search box that can be used to find a specific core.
When you select a core:
- the central part of the screen shows Statistics and other information about the selected core.
-
a secondary menu opens under the core name with the administration options available for that particular core. The core-specific options are:
|Options|Description| |——-|———–| |Overview|This dashboard displays full statistics of the indexes. It shows the index count for each of the cores. It also provides a summary report and an FTS status report. The summary report displays information about the number of nodes in index, transactions in index, approximate transactions remaining, and so on. The FTS status report displays information about the FTS status clean, FTS status dirty, and FTS status new.| |Analysis|Allows data analysis according to the field, field type and dynamic rule configurations found in schema.xml.| |Dataimport|Displays information about the current status of the Data Import Handler. It enables you to import commands as defined by the options selected on the screen and defined in the configuration file.| |Documents|Provides a simple form allowing execution of various Solr indexing commands directly from the browser. The screen allows you to: - Copy documents in JSON, CSV or XML and submit them to the index
- Upload documents (in JSON, CSV or XML)
- Construct documents by selecting fields and field values | |Files|Displays the current core configuration files such as solrconfig.xml and schema.xml. Configuration files cannot be edited with this screen, so a text editor must be used.| |Ping|Enables you to ping a named core and determine whether the core is active. The Ping option does not open a page, but the status of the request can be seen on the core overview page shown when clicking on a collection name. The length of time the request has taken is displayed next to the Ping option, in milliseconds.| |Plugins/Stats|Displays statistics for plugins and other installed components.| |Query|Enables you to submit a structured query about various elements of a core.| |Replication|Displays current replication status for the core and lets you enable/disable replication.| |Schema Browser|Displays schema data in a browser window.|
Solr Admin UI - center panel
The center of the screen shows the detail of the Solr core selected, such as statistics, summary report, and so on.
Core-specific details
On the left-side of the Sole Admin screen, you will see Core Selector. Clicking on the menu displays a list of Solr cores hosted on this Solr node, with a search box that can be used to find a specific core by name.
This includes a sub-navigation for the option or text or graphical representation of the requested data.
See Solr Admin UI - left panel to know more about each screen.
Solr certificate authentication
Alfresco Content Services uses SSL and X509 certificate authentication to secure communication between the repository server and the Solr server. In this communication, SSL not only provides encryption, it is also used for authentication. Follow these steps to turn off SSL and deactivate authentication between the repository and the Solr server.
When you install Alfresco Content Services, port 8443 is automatically configured for SSL communication between Solr and the repository. It is recommended that you configure the Tomcat connector to use SSL and a certificate in the
clientAuth="want"
For more information, see Secure Sockets Layer (SSL) and the repository.
The X509 client authentication allows users to authenticate with certificates rather than with a username and password.
To disable Solr <–> SSL communication, follow the steps below:
-
For Solr, set the
alfresco.secureCommsproperty in the solrcore.properties file.You can either set this property to
noneorhttps.- Setting the
alfresco.secureCommsproperty tononeor commenting it out will turn off the SSL and X509 authentication. - Setting the
alfresco.secureCommsproperty tohttpswill turn on the SSL and X509 authentication.Note: There are multiple solrcore.properties files. Make sure that each of these files must have the same value for
alfresco.secureCommsproperty.
- Setting the
-
For Alfresco Content Services, set the
solr.secureCommsproperty in thealfresco-global.propertiesfile.You can either set this property to
noneorhttps.- Setting the
solr.secureCommsproperty tononeor commenting it out will turn off the SSL and X509 authentication. - Setting the
solr.secureCommsproperty tohttpswill turn on the SSL and X509 authentication.
- Setting the
Changes from Alfresco Content Services 5.0
The web.xml file for both Alfresco Content Services and Solr 4 now has a new servlet filter, X509AuthFilter. This filter enforces SSL and X509 authentication. When the alfresco.secureComms and solr.secureComms properties are set to https, the X509AuthFilter does the following:
- Verifies that the X509 certificate is present in the request. If the cert is not present in the request, it may be due to one of the following reasons:
- Non-ssl port being used.
- Client did not send a certificate, or
- Server did not request the client certificate
- Validates that the certificate dates are valid at that time.
- The
X509AuthFilterfilter contains an optionalinitparameter calledcert-contains. If present, theX509AuthFilterverifies that the X509 Subject (distinguished name) of the certificate contains that string.- If any of these checks fail, the
X509AuthFilterfilter will respond with ahttp 403error message. - If the settings described Step1 and Step2 are set to
noneor commented out, theX509AuthFilterfilter will not enforce X509 authentication.
- If any of these checks fail, the
The X509AuthFilter has been mapped to specific paths. For Solr, all URLs will be protected by the X509AuthFilter. For Alfresco Content Services, only specific URLs in the web.xml file are protected.
The following URLs are mapped:
<web-app xmlns="http://java.sun.com/xml/ns/j2ee" xmlns:xsi="http://www.w3.org/2001/XMLSchema-instance"
 xsi:schemaLocation="http://java.sun.com/xml/ns/j2ee

http://java.sun.com/xml/ns/j2ee/web-app_2_4.xsd" version="2.4">

 <display-name>Alfresco</display-name>
 <description>Alfresco</description>
...

 <filter>
   <filter-name>X509AuthFilter</filter-name>
   <filter-class>...</filter-class>
 </filter>

...

 <filter-mapping>
   <filter-name>X509AuthFilter</filter-name>
   <url-pattern>/service/api/solr/*</url-pattern>
 </filter-mapping>

 <filter-mapping>
   <filter-name>X509AuthFilter</filter-name>
   <url-pattern>/s/api/solr/*</url-pattern>
 </filter-mapping>

 <filter-mapping>
   <filter-name>X509AuthFilter</filter-name>
   <url-pattern>/wcservice/api/solr/*</url-pattern>
 </filter-mapping>

 <filter-mapping>
   <filter-name>X509AuthFilter</filter-name>
   <url-pattern>/wcs/api/solr/*</url-pattern>
 </filter-mapping>

...

</web-app>
Note that the web.xml file no longer contain the <security-constraint> section.
The X509 authentication only takes place on a port that is configured for both SSL and user authentication. Different application servers will configure this port in different ways. Besides configuring SSL, user authentication must also be configured for the certificate to be made available to the X509AuthFilter.
If you decide to turn-off SSL and deactivate authentication between the repository and the Solr server, you need to protect your environment. For more information, see Configuring SSL for a production environment.
Solr monitoring and troubleshooting
Help for monitoring and resolving any Solr index issues that might arise as a result of a transaction.
- Performing a full reindex with Solr
This task describes how to perform a full Solr reindex. - Unindexed Solr Transactions
You can check the status of the Solr index to identify the nodes to a transaction that failed to index. - Troubleshooting Solr Index
Use this information to repair a transaction that failed to index. - Solr troubleshooting for SSL configurations
When you have an Alfresco Content Services installation that requires an SSL configuration, you might encounter connection issues.
Performing a full reindex with Solr
This task describes how to perform a full Solr reindex.
This task assumes you are using only one Solr instance for all nodes in the Alfresco Content Services cluster. If not, then you need to repeat process on each Solr instance used in the cluster.
-
Confirm the location of the Solr core directories for archive-SpacesStore and workspace-SpacesStore cores. This can be determined from the solrcore.properties file for both the cores. By default, the solrcore.propertiesfile can be found at
<ALFRESCO_HOME>/solr4/workspace-SpacesStore/confor<ALFRESCO_HOME>/solr4/archive-SpacesStore/conf. The Solr core location is defined in the solrcore.properties file as:For Solr, the default
data.dir.rootpath is:data.dir.root=<ALFRESCO_HOME>/alf_data/solr4/index/ -
Shut down Solr (if running on a separate application server).
-
Delete the contents of the index data directories for each Solr core at
${data.dir.root}/${data.dir.store}.<ALFRESCO_HOME>/alf_data/solr4/index/workspace/SpacesStore<ALFRESCO_HOME>/alf_data/solr4/index/archive/SpacesStore
-
Delete all the Alfresco Content Services models for each Solr core at
${data.dir.root}.<ALFRESCO_HOME>/alf_data/solr4/model -
Delete the contents of the
<ALFRESCO_HOME>/alf_data/solr4/contentdirectory. -
Start up the application server that runs Solr.
-
Monitor the application server logs for Solr at
<TOMCAT_HOME>/logs/solr.log. You will get the following warning messages on bootstrap:WARNING: [alfresco] Solr index directory '<ALFRESCO_HOME>/alf_data/solr/workspace/SpacesStore/index' doesn't exist. Creating new index... 09-May-2012 09:23:42 org.apache.solr.handler.component.SpellCheckComponent inform WARNING: No queryConverter defined, using default converter 09-May-2012 09:23:42 org.apache.solr.core.SolrCore initIndex WARNING: [archive] Solr index directory '<ALFRESCO_HOME>/alf_data/solr/archive/SpacesStore/index' doesn't exist. Creating new index... -
Use the Solr administration console to check the health of the Solr index.
Note: The process of building the Solr indexes can take some time depending on the size of the repository. To monitor reindexing progress, use the Solr administration console and check the logs for any issues during this activity.
While the reindex is taking place, some searches may not return the full set of results.
To copy the indexes from a recently re-indexed Solr node to another Solr node, follow these steps:
- Make sure both the Solr nodes have the same version of the index server.
- Stop node1 and copy the content store, index configuration, and index data to the new machine/node.
- (Optional) Copy the models from node1 to node2 and validate that they are compatible.
- Fix any configuration issues, for example, renaming the core, updating the configuration to point to the correct data, indexes, and Alfresco Content Services.
- Disable index tracking on node2 by setting the
enable.alfresco.trackingproperty tofalsein solrcore.properties. - Go to the Solr Admin Web interface to monitor information about each core.
- Stop node 2 and enable tracking by setting the
enable.alfresco.trackingproperty totruein solrcore.properties. - Restart the Solr server on node2.
The new index on node2 should start tracking and come up-to-date.
Unindexed Solr Transactions
You can check the status of the Solr index to identify the nodes to a transaction that failed to index.
Note: Running a Solr report on production systems is not recommended because the Solr report uses certain Java memory resources, spending hours to complete the job.
To generate a general report for Solr 4, including the last transaction indexed and the time, use:
https://localhost:8443/solr4/admin/cores?action=REPORT&wt=xml
To generate a general report for Solr 6, including the last transaction indexed and the time, use:
http://localhost:8080/solr/admin/cores?action=REPORT&wt=xml
The REPORT parameter compares the database with the index and generates an overall status report with the following details:
DB transaction count: indicates the transaction count on the databaseDB acl transaction count: indicates the ACL transaction count on the databaseCount of duplicated transactions in the index: indicates the number of transactions that appear more than once in the index. The value of this parameter should be zero. If not, there is an issue with the index.Count of duplicated acl transactions in the index: indicates the number of ACL transactions that appear more than once in the index. The value of this parameter should be zero. If not, there is an issue with the index.Count of transactions in the index but not the database: indicates the number of transactions in the index but not in the database. This count includes empty transactions that have been purged from the database. The value of this parameter should be zero. If not, there might be an issue with the index.Count of acl transactions in the index but not the DB: indicates the number of ACL transactions in the index but not in the database. The value of this parameter should be zero. If not, there is an issue with the index. Note that empty ACL transactions are not purged from the database.Count of missing transactions from the Index: indicates the number of transactions in the database but not in the index. The value of this index should be zero when the index is up-to-date.Count of missing acl transactions from the Index: indicates the number of ACL transactions in the database but not in the index. The value of this index should be zero when the index is up-to-date.Index transaction count: indicates the number of transactions in the index.Index acl transaction count: indicates the number of ACL transactions in the index.Index unique transaction count: indicates the number of unique transactions in the index.Index unique acl transaction count: indicates the number of unique ACL transactions in the index.Index leaf count: indicates the number of docs and folders in the index.Count of duplicate leaves in the index: indicates the number of duplicate docs or folders in the index. The value of this parameter should be zero. If not, there is an issue with the index.Last index commit time: indicates the time stamp for the last transaction added to the index. It also indicates that transactions after this time stamp have not yet been indexed.Last Index commit date: indicates the time stamp as date for the last transaction added to the index. It also indicates that transactions after this date have not yet been indexed.Last TX id before holes: indicates that transactions after this ID will be checked again to make sure they have not been missed. This is computed from the index at start up time. By default, it is set an hour after the last commit time found in the index. Solr tracking, by default, goes back an hour from the current time to check that no transactions have been missed .First duplicate: indicates if there are duplicate transactions in the index. It returns the ID of the first duplicate transaction.First duplicate acl tx: indicates if there are duplicate ACL transactions in the index. It returns the ID of the first duplicate ACL transaction.First transaction in the index but not the DB: if the related count is > 0, it returns the ID of the first offender.First acl transaction in the index but not the DB: if the related count is > 0, it retuns the ID of the first offender.First transaction missing from the Index: if the related count is > 0, it returns the ID of the first offender.First acl transaction missing from the Index: if the related count is > 0, it returns the ID of the first offender.First duplicate leaf in the index: if the related count is > 0, it returns the ID of the first offender.
To generate a summary report for Solr 4, use:
https://localhost:8443/solr4/admin/cores?action=SUMMARY&wt=xml
To generate a summary report for Solr 6, use:
https://localhost:8443/solr/admin/cores?action=SUMMARY&wt=xml
With multi-threaded tracking, you can specify additional tracking details and tracking statistics:
detail=true: provide statistics per tracking threadhist=true: provides a histogram of the times taken for tracking operations for each tracking threadreset=true: resests all tracking statisticsvalues=true: reports (by default) the last 50 values recorded for each tracking operation for each thread
The SUMMARY parameter provides the status of the tracking index and reports the progress of each tracking thread. It generates a report with the following details:
Active: indicates the tracker for the core active.Last Index Commit Time: indicates the time stamp for the last transaction that was indexed.Last Index Commit Date: indicates the time stamp as a date for the last transaction that was indexed. Changes made after this time are not yet in the index.Lag: indicates the difference in seconds between the last transaction time stamp on the server and the time stamp for the last transaction that was indexed.Duration: indicates the time lag as an XML duration.Approx transactions remaining: indicates the approximate number of transactions to index in order to bring the index up-to-date. It is calculated as the last transaction ID on the server minus the last transaction ID indexed. It includes all the missing and empty transactions.Approx transaction indexing time remaining: it is based on Approx transactions remaining, the average number of nodes per transaction and the average time to index a node (how long the index will take to be up-to-date). The estimate is in the most appropriate scale, for example, seconds, minutes, hours and days.Model sync times (ms): indicates summary statistics for model sync time. It supports additional information with &detail=true, &hist=true and &value=true.Acl index time (ms): indicates summary statistics for ACL index time. It supports additional information with &detail=true, &hist=true and &value=true.Node index time (ms): indicates summary statistics for node index time. It supports additional information with &detail=true, &hist=true and &value=true.Acl tx index time (ms): indicates the summary statistics for ACL transaction index time. It supports additional information with &detail=true, &hist=true and &value=true.Tx index time (ms): indicates summary statistics for transaction index time. It specifies the estimated time required to bring the index up-to-date.Docs/Tx: indicates summary statistics for the number of documents per transaction. It supports additional information with &detail=true, &hist=true and &value=true.Doc Transformation time (ms): indicates summary statistics for document transformation time. It supports additional information with &detail=true, &hist=true and &value=true.
Troubleshooting Solr Index
Use this information to repair a transaction that failed to index.
Note: The default URL for the Solr 4 index is http://localhost:8080/solr4/….
To repair an unindexed or failed transaction (as identified by the REPORT option in the Unindexed Solr Transactions section), run the following report:
[http://localhost:8080/solr4/admin/cores?action=FIX](http://localhost:8080/solr4/admin/cores?action=FIX)
The FIX parameter compares the database with the index and identifies any missing or duplicate transactions. It then updates the index by either adding or removing transactions.
Use the PURGE parameter to remove transactions, acl transactions, nodes and acls from the index. It can also be used for testing wrong transactions and then to fix them.
[http://localhost:8080/solr4/admin/cores?action=PURGE&txid=1&acltxid=2&nodeid=3&aclid=4](http://localhost:8080/solr4/admin/cores?action=PURGE&txid=1&acltxid=2&nodeid=3&aclid=4)
Use the REINDEX parameter to reindex a transaction, acl transactions, nodes and acls.
[http://localhost:8080/solr4/admin/cores?action=REINDEX&txid=1&acltxid=2&nodeid=3&aclid=4](http://localhost:8080/solr4/admin/cores?action=REINDEX&txid=1&acltxid=2&nodeid=3&aclid=4)
Use the INDEX parameter to create entries in the index. It can also be used to create duplicate index entries for testing.
[http://localhost:8080/solr4/admin/cores?action=INDEX&txid=1&acltxid=2&nodeid=3&aclid=4](http://localhost:8080/solr4/admin/cores?action=INDEX&txid=1&acltxid=2&nodeid=3&aclid=4)
Use the RETRY parameter to retry indexing any node that failed to index and was skipped. In other words, it enables the users to attempt to fix documents that failed to index in the past and appear in the solr report (http://localhost:8080/solr4/admin/cores?action=REPORT&wt=xml) with the field Index error count.
[http://localhost:8080/solr4/admin/cores?action=RETRY](http://localhost:8080/solr4/admin/cores?action=RETRY)
Use the following setting to specify an option core for the report. If it is absent, a report is produced for each core. For example:
&core=alfresco
&core=archive
You can also fix index issues, check the index cache and backup individual indexes by using JMX. The status of the index can be checked using the JMX client on the **JMX MBeans > Alfresco > solrIndexes >
Solr troubleshooting for SSL configurations
When you have an Alfresco Content Services installation that requires an SSL configuration, you might encounter connection issues.
If Solr search and/or the Solr tracking is not working properly, you might see this message on the Tomcat console:
Aug 22, 2011 8:19:21 PM org.apache.tomcat.util.net.jsse.JSSESupport handShake
WARNING: SSL server initiated renegotiation is disabled, closing connection
This message indicates that one side of the SSL connection is trying to renegotiate the SSL connection. This form of negotiation was found to be susceptible to man-in-the-middle attacks and it was disabled in the Java JSEE stack until a fix could be applied.
Refer to the following link for more information: http://www.oracle.com/technetwork/java/javase/documentation/tlsreadme2-176330.html.
Refer also to the following links: http://www.gremwell.com/enabling_ssl_tls_renegotiation_in_java and http://tomcat.apache.org/tomcat-6.0-doc/config/http.html.
If your version of Java does not have the fix, you need to re-enabled renegotiation by performing the following steps:
- Add the
-Dsun.security.ssl.allowUnsafeRenegotiation=trueoption to JAVA_OPTS. - Add the
allowUnsafeLegacyRenegotiation="true"option to the Tomcat SSL connector.
Solr backup and restore
Use this information to backup and restore the Solr server.
Your backup strategy must be tested end-to-end, including restoration of backups that were taken previously. Ensure that you have adequately tested your backup scripts prior to deploying Alfresco Content Services to production.
- Backing up Solr
There are a number of ways to back up the Solr indexes. - **Refreshing the backup Solr indexes (optional)
This is an optional step before initiating a hot backup. - Restoring Solr indexes
Follow these steps to restore the Solr indexes.
Backing up Solr
There are a number of ways to back up the Solr indexes.
You can set the Solr indexes backup properties either by using the Admin Console in Alfresco Share or by editing the alfresco-global.properties file or by using a JMX client, such as JConsole.
Note: The
\alf_data\solr4\contentdirectory is not backed up automatically during the back up process. If you want a back up of this directory, you will have to do it manually.
Set up Solr backup properties using the Share Admin Console
You can only see the Admin Console if you are an administrator user.
-
In the Repository Services section, click Search Service.
You see the Search Service page.
-
Scroll down to the Backup Settings section.
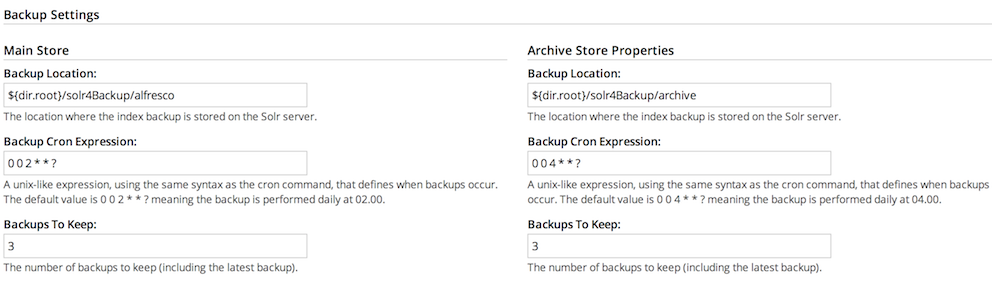
Here, you can specify the backup location and edit backup properties for each core of the Solr index: Main Store and Archive Store.
- Backup Cron Expression: Specifies a Quartz cron expression that defines when backups occur. Solr creates a timestamped sub-directory for each index back up you make.
- Backup Location: Specifies the full-path location for the backup to be stored.
- Backups To Keep: Specifies the maximum number of index backups that Solr should store.
-
Click Edit.
-
Specify the full location path on the Solr server file system to store the index backup in the Backup Location text box.
-
Click Save.
Specifying Solr backup directory by using alfresco-global.properties file
This task shows how to specify the Solr backup directory by using alfresco-global.properties file.
-
To set the Solr backup directory using the
alfresco-global.propertiesfile, set the value of the following properties to the full path where the backups should be kept:solr.backup.archive.remoteBackupLocation= solr.backup.alfresco.remoteBackupLocation=Note: The values set on a subsystem will mean that the property values from configuration files may be ignored. Use the Share Admin Console or JMX client to set the backup location.
Back up Solr indexes using JMX client
If you have installed the Oracle Java SE Development Kit (JDK), you can use the JMX client, JConsole, to backup Solr indexes, edit Solr backup properties and setup the backup directory.
-
You can set the backup of Solr indexes using the JMX client, such as JConsole on the JMX MBeans > Alfresco > Schedule > DEFAULT > MonitoredCronTrigger > search.alfrescoCoreBackupTrigger > Operations > executeNow tab. The default view is the Solr core summary. Alternatively, navigate to MBeans > Alfresco >SolrIndexes >coreName >Operations >backUpIndex tab. Type the directory name in the remoteLocation text box and click backUpIndex.
-
Solr backup properties can be edited using the JMX client on the JMX MBeans > Alfresco > Configuration > Search > managed > solr > Attributes tab. The default view is the Solr core summary.
-
To use JMX client to setup Solr backup directory, navigate to MBeans tab > Alfresco > Configuration > Search > managed > solr > Attributes and change the values for solr.backup.alfresco.remoteBackupLocation and solr.backup.archive.remoteBackupLocation properties.
Refreshing the backup Solr indexes (optional)
This is an optional step before initiating a hot backup.
-
Trigger a Solr index backup using a JMX client.
JConsole (MBeans tab -gt Alfresco/Schedule/DEFAULT/MonitoredCronTrigger/indexBackupTrigger/Operations - executeNow button)
-
After completing this operation, the solr4Backup directory contains an up-to-date cold copy of the Solr indexes, ready to be backed up.
Restoring Solr indexes
Follow these steps to restore the Solr indexes.
During the recovery process, Solr queries Alfresco Content Services to update the indexes restored from a backup. To restore the Solr indexes, use the following steps:
-
Stop the Solr server.
-
Copy a backup index to the data directory (${data.dir.root}/${data.dir.store}) for each core.
Remember to use a backup created from the same Alfresco Content Services instance.
-
Restart the Solr server.
Solr will start to track the indexes based on the state of the restored index.
Solr replication
Solr replication uses the master-slave model to distribute complete copies of a master index to one or more slave servers.
The master server receives all updates and all changes (such as inserts, updates, or deletes) are made against a single master server. Changes made on the master are distributed to all the slave servers which service all query requests from the clients. This division of labor enables Solr to scale to provide adequate responsiveness to queries against large search volumes.
The master server tracks the models, metadata, permissions, and content where as the slave server only tracks the models.
The figure below shows a Solr configuration using index replication. The master server’s index is replicated on the slaves.
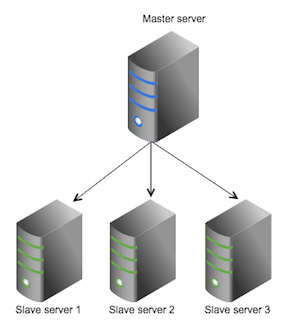
The master-slave replication requires non-SSL communication between the master server and the slave server.
- Solr replication: advantages and disadvantages
There are advantages and disadvantages of using a master-slave and master-master replication. - Solr replication configuration
The Solr replication feature is implemented as aRequestHandler. The simplest configuration involves one Alfresco Content Services node, one Solr master, and one Solr slave. - Solr master-slave reconfiguration
There are additional master-slave configuration requirements for Solr, such as adding a slave server and promoting a slave server. - Solr master-master reconfiguration
Use this information for setting up a master-master replication.
Solr replication: advantages and disadvantages
There are advantages and disadvantages of using a master-slave and master-master replication.
Advantages and disadvantages of a master-slave index replication
Advantages:
- Splits read and write load and operations
- Load distribution for search queries
- High availability for searching
- Any number of slave instances can be created to scale query performance
- Usually less frequent index updates on the slaves and better use of the cache
Disadvantages:
- Increased latency (sum of tracking and Solr replication latency)
- Occasional large IO load to replicate large merges
- Complicated load balance and management
- Reconfiguration if the master is lost
Difference between the master-master and master-slave replication:
|Master-master replication|Master-slave replication| |————————-|————————| |Requires all Solr nodes to do the leg-work of indexing.|Only the master server indexes or re-indexes. The slave servers only pull the completed indexes.| |It is simple to set up. Each Solr node may have the same setup if the queries from Solr to the repository go through a load balancer instead of to a specific repository node.|It is not as simple as the master-master replication.| |Achieves eventual consistency much more quickly than the master-slave replication.|Solr indexing is eventually consistent irrespective of the method used. It takes slightly longer in a master-slave replication because first the master index is updated and then that index change is replicated to the slave.| |In a master-master replication, the master nodes can’t be configured to perform differently in different situations.|In the master-slave replication, the master and slave nodes can be configured to perform better under different situations. For example, the master node can be configured for optimal indexing performance, while the slave node can be configured for optimal search performance.| |Neither the master-master replication nor the master-slave replication includes any inbuilt functionality to switch Solr targets, in case one node fails.|Neither the master-master replication nor the master-slave replication includes any inbuilt functionality to switch Solr targets, in case one node fails.| |If a master node went down, the load balancer will direct all the query requests to a Solr node that was still running.|If a slave node went down, the same load-balancer behaviour would be relied on. But if the master node went down, then intervention would be required to:- Designate a new master
- Point the slaves to that new master
- Point the new master to the repository
| Requires an additional master node, so has slightly higher pre-requisites. |
Solr replication configuration
The Solr replication feature is implemented as a RequestHandler. The simplest configuration involves one Alfresco Content Services node, one Solr master, and one Solr slave.
The Solr master is configured to track the Alfresco Content Services instance while the Solr slave is configured to track the Solr master. The Alfresco Content Services instance is configured to send all the queries to the SOLR slave.
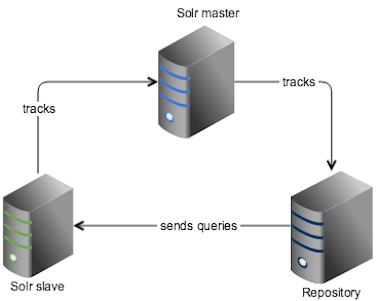
Configuring the Alfresco Content Services instance
As usual, no SSL and queries configured to go to the slave.
Configuring Solr master
The configuration affecting replication is controlled by a single file, solrconfig.xml. To configure the master server, follow the steps below:
-
Edit the solrconfig.xml file on the master server to change the default replication handler configuration. Remember to uncomment the
mastersection.<requestHandler name="/replication" class="solr.ReplicationHandler" > <!-- To enable simple master/slave replication, uncomment one of the sections below, depending on whether this solr instance should be the "master" or a "slave". If this instance is a "slave" you will also need to fill in the masterUrl to point to a real machine. --> <lst name="master"> <str name="replicateAfter">commit</str> <str name="replicateAfter">startup</str> <str name="confFiles">schema.xml,stopwords.txt</str> </lst> <!-- <lst name="slave"> <str name="masterUrl">http://your-master-hostname:8983/solr</str> <str name="pollInterval">00:00:60</str> </lst> --> </requestHandler>where:
|Parameter name|Description| |————–|———–| |
replicateAfter|String specifying action after which replication should occur. Valid values are: -commit: triggers replication whenever a commit is performed on the master index.optimize: triggers replication whenever the master index is optimized.startup: triggers replication whenever the master index starts up. There can be multiple values for this parameter. If you usestartup, you need to have acommitand/oroptimizeentry also if you want to trigger replication on future commits or optimizes.| |confFiles|Comma-separated list of configuration files to replicate.|
-
Make sure that the solrcore.properties file has the following settings:
enable.master=true enable.slave=false
Configuring Solr slave
Here again, the solrconfig.xml file controls the configuration affecting replication. To configure the slave server, follow the steps below:`
-
Uncomment the
slavesection.<requestHandler name="/replication" class="org.alfresco.solr.handler.AlfrescoReplicationHandler"> <!-- To enable simple master/slave replication, uncomment one of the sections below, depending on whether this solr instance should be the "master" or a "slave". If this instance is a "slave" you will also need to fill in the masterUrl to point to a real machine. --> <!-- <lst name="master"> <str name="replicateAfter">commit</str> <str name="replicateAfter">startup</str> <str name="confFiles">schema.xml,stopwords.txt</str> </lst> --> <lst name="slave"> <str name="masterUrl">http://your-master-hostname:8983/solr</str> <str name="pollInterval">00:00:60</str> </lst> </requestHandler>where:
Parameter name Description pollIntervalInterval in which the slave should poll master .Format is hh:mm:ss. If this is missing, the slave server does not poll automatically. masterUrlFully qualified URL for the replication handler of master. Make sure the masterUrlends with/solr4/alfresco. -
Set the master URL to point to the Solr master. Also, set how often the slave server should poll for changes.
<str name="masterUrl">http://your-master-hostname:8983/solr4</str> <str name="pollInterval">00:00:60</str> -
Set the following properties in the solrcore.properties file:
enable.master=false enable.slave=trueIn this configuration, the Solr instance will only track model changes from the Alfresco Content Services platform.
Additional Solr configuration
Any configuration changes related to the core schema and configuration, or any changes in
Solr master-slave reconfiguration
There are additional master-slave configuration requirements for Solr, such as adding a slave server and promoting a slave server.
Adding a slave server
To add another slave server to an existing replication configuration, see configuring Solr slave.
Promoting a slave
In the event of a downed master in a master-slave configuration, the slave servers can continue to service queries, but will no longer be able to index until a new master is instated. The process of promoting a slave to a master is manual. The state of slave servers may differ, so choose the most up-to-date slave to promote as the master server.
To promote a slave, follow the steps below:
-
Nominate the most up-to-date slave as the master.
To choose the most up-to-date slave, follow the steps below:
- Go to Solr Admin web interface using https://localhost:8443/solr4.
- Select the appropriate core from the Core Selector list.
-
Select Replication.
The Replication screen shows the current replication status for the core, and lets you enable/disable replication. It also displays the version of the master and slave servers.
- Identify for the slave whose index is closest to the master server or pick a slave that has the highest version.
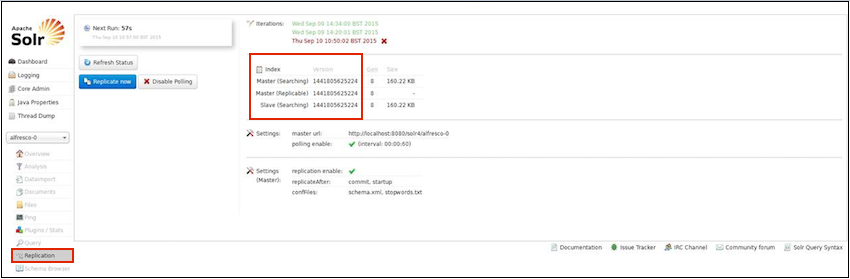
- Stop the Solr server on the new master.
-
In the solrconfig.xml file, replace the Solr configuration in the replication handler that defines the slave with the one that defines the master.
<requestHandler name="/replication" class="solr.ReplicationHandler" > <!-- To enable simple master/slave replication, uncomment one of the sections below, depending on whether this solr instance should be the "master" or a "slave". If this instance is a "slave" you will also need to fill in the masterUrl to point to a real machine. --> <lst name="master"> <str name="replicateAfter">commit</str> <str name="replicateAfter">startup</str> <str name="confFiles">schema.xml,stopwords.txt</str> </lst> <!-- <lst name="slave"> <str name="masterUrl">http://your-master-hostname:8983/solr</str> <str name="pollInterval">00:00:60</str> </lst> --> </requestHandler> -
Set the following properties in the solrcore.properties file:
enable.master=true enable.slave=false - Configure all other slave servers (if any) to point to the new master server. Make sure that the state of the slave indexes is either behind or equal to the state of the master server. For more information, see configuring Solr slave.
After the previously broken master server is fixed, it can either be discarded, run as a slave, or run as a second master. To run as a slave, make sure it is behind the new master. It can be restored from a back up of another slave or the current master server.
Solr master-master reconfiguration
Use this information for setting up a master-master replication.
-
Set up two separate Solr instances where neither of them know about each other.
-
If you have a clustered environment, both the Solr installations can be done on their own Alfresco nodes in the cluster. If you don’t have a clustered environment, both the Solr nodes can talk to their respective Alfresco node directly.
-
The Alfresco node can send queries to the load balancer and the load balancer can point them to either Solr node 1 (if it is up) or Solr node 2 (if Solr node 1 is down).
-
The load balancer will distribute the queries between the two Solr nodes, but then both the Solr nodes will be eventually consistent at different times.
Solr sharding
Solr sharding involves splitting a single Solr index into multiple parts, which may be on different machines. When the data is too large for one node, you can break it up and store it in sections by creating one or more shards, each containing a unique slice of the index.
Sharding is important for two primary reasons:
- It allows you to horizontally split or scale your content volume.
- It allows you to distribute operations, for example, index tracking, across shards (potentially on multiple nodes) therefore increasing performance/throughput.
Documents in the repository are distributed evenly across shards. You may have more than one shard, but a document will only be located in one shard and its instances. A conceptual shard can have any number of real instances. A shard tracks the appropriate subset of information from the repository.
Note: Alfresco Content Services does not support slave shards or slave replicas.
A shard can have zero or more shard instances. Multiple shard instances have the following advantages:
- It provides high availability in case a shard/node fails.
- It allows you to scale out your search throughput because searches can be executed on all the instances in parallel.
- It increases performance: search requests are handled by the multiple shard instances.
Note that if your Solr indexes are sharded, then index backup will be disabled.
- Basic Solr sharding concepts
There are a few basic concepts that are core to understanding Solr sharding. Understanding these concepts from the outset will help in learning more about sharding. - Setting up Solr sharding
After creating the shards manually, an Alfresco Content Services administrator has to instruct Alfresco Content Services about how to find the indexes. This can either be done manually by configuring the indexes, or by allowing Alfresco Content Services to discover shards dynamically. This section describes how to create and configure Solr sharding. - Backing up Solr shards
To avoid any data loss, you can make backups of one or all the sharded Solr indexes. - Best practices for setting up sharded Solr indexes
Use these best practices for setting up and using a sharded installation.
Basic Solr sharding concepts
There are a few basic concepts that are core to understanding Solr sharding. Understanding these concepts from the outset will help in learning more about sharding.
Useful terminology
| Term | Description |
|---|---|
| Node | A node represents an Alfresco Content Services instance. |
| Cluster | A cluster is composed of one or more Alfresco Content Services nodes. |
| Shard group | A shard group is a collection of documents. It is composed of one or more shards. |
| Shard | An index is split into chunks called shards. |
Basic concepts
A cluster is a collection of one or more nodes (servers) that provides indexing and search capabilities across all nodes. A node is a single server that is part of your cluster, stores your data, and participates in the cluster’s indexing and search capabilities.
An index is a collection of documents from the same store. An index can potentially store a large amount of data that can exceed the hardware limits of a single node. To solve this problem, Alfresco Content Services provides the ability to subdivide your index into multiple pieces called shards.
When you create an index, you define the number of shards that you want. Each shard is in itself a fully-functional and independent Solr index that can be hosted on any index server. Index server includes a node which must be in the cluster. It is recommended to have a fail over mechanism in case a shard/node fails or goes offline. As a solution, you can make one or more copies of your index’s shards into shard instances.
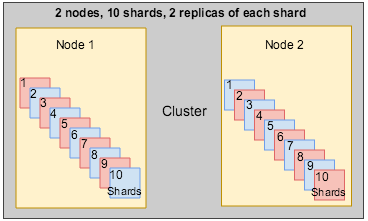
To summarize, each index can be split into multiple shards. An index can also be replicated zero (meaning no instance) or more times. A shard tracks the appropriate subset of information from the repository. The number of copies of the total index depends on the minimum number of instances for each shard.
Setting up Solr sharding
After creating the shards manually, an Alfresco Content Services administrator has to instruct Alfresco Content Services about how to find the indexes. This can either be done manually by configuring the indexes, or by allowing Alfresco Content Services to discover shards dynamically. This section describes how to create and configure Solr sharding.
As shown in the diagram below, the trackers communicate with the repository. When the user initiates a query, it can either be executed by manually mapping the stores (explicit configuration), or by shard registry via dynamic sharding. Dynamic sharding determines what best shards are available to answer a query. The shard registry stores all the information about that particular index, for example the status of the index, transactions in index, and so on.

The query is sent to Solr and then to the request handler. The request handler determines if the query is local or distributed. In case of distributed query, the query is sent to other parts of the index and then combined into an overall result.
The distributed query is done is two phases. Phase 1 involves query and an initial round of faceting, and Phase 2 involves pulling back information from each relevant document and facet refinement.
The following diagram shows the difference between manual and dynamic sharding. In this example, there are 4 shards (1, 2, 3, and 4) and 2 instances for each shard (A & E, B & F, C & G, and D & H). Instances A, B, C, D, and F are up-to-date, while the instances E and G are lagging behind and can’t be used. Shard instance H is silent and therefore, unavailable for querying.
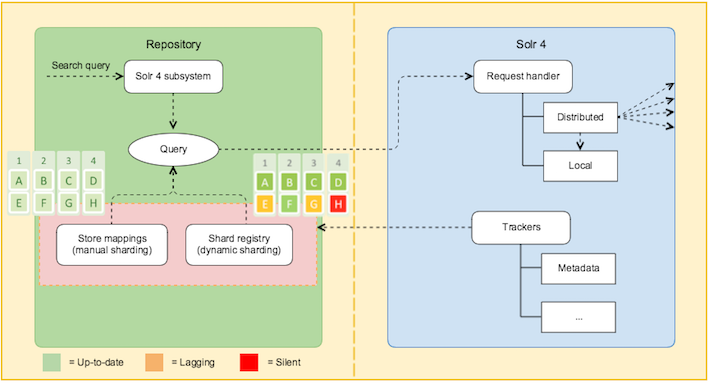
In manual sharding, the user is only aware of the existence of the shards and its instances but knows nothing about the status of each shard and its instance(s). So, the query can be sent to any instance. In dynamic sharding, Alfresco Content Services will use instance A, B, C, D, or F for querying.
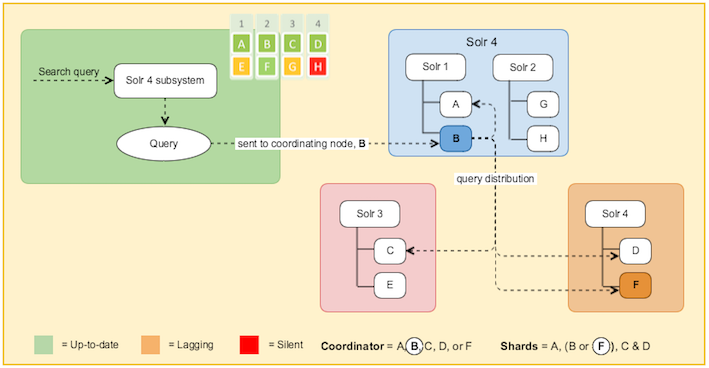
At query time, Solr is aware of all the available nodes and selects one node as the coordinator (one node from all the available green ones) and sends the request to it. Also, the shards (A, B, C, D or A, F, C, D) to be used for that request are selected dynamically. In this case, Solr selects F instead of B. So, if one node lags behind or stops responding, Solr stops using it.
Click each method to know more about creating shards.
- Manual Solr sharding
- Creating Solr shards manually
You can create, configure, and register shards explicitly using ACL based hash sharding. - Dynamic shard registration
In dynamic shard registration, shards register as a part of the tracking process to form indexes, thereby eliminating the need to follow the manual shard distribution pattern over Solr nodes. - Reindex documents by query
You can selectively reindex a small subset of the index based on a query. This enables a limited rebuild of the index.
Creating Solr shards manually
You can create, configure, and register shards explicitly using ACL based hash sharding.
How to setup sharding?
For archive and workspace stores, create shards and assign shards and instances to nodes. For example, if (numShards * replicationFactor) % numNodes == 0, the following query will create the appropriate shards on any given node from a specified node set:
http://<host1>:<port1>/solr4/admin/cores?action=newCore&storeRef=archive://SpacesStore&numShards=10
&numNodes=1&nodeInstance=1&replicationFactor=1
To put the index in a specified location set the properties as shown below:
http://<host1>:<port1>/solr4/admin/cores?action=newCore&storeRef=workspace://SpacesStore&numShards=10
&numNodes=1&nodeInstance=1&property.data.dir.root=<ALFRESCO_HOME>/solr4/workspace-SpacesStore
Example: Creating shards
Let’s consider an example for creating 12 shards, 2 instances of each shard, and 6 nodes. As shown below, each node will get 4 different shards.
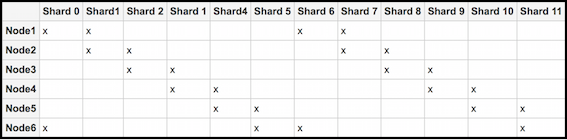
To achieve this sharding configuration, follow the steps below:
-
Setup and configure the Solr nodes.
-
Set up the six Solr nodes.
Delete the alfresco and archive cores using the following commands:
https://localhost:8443/solr4/admin/cores?action=removeCore&storeRef=workspace://SpacesStore&coreName=alfresco https://localhost:8443/solr4/admin/cores?action=removeCore&storeRef=workspace://SpacesStore&coreName=archive -
Configure each Solr node and start index tracking.
-
For node 1:
http://<host1>:<port1>/<base1>/admin/cores?action=newCore&storeRef=workspace://SpacesStore& numShards=12&nodeInstance=1&replicationFactor=2&numNodes=6&template=rerank -
For node 2:
http://<host2>:<port2>/<base3>/admin/cores?action=newCore&storeRef=workspace://SpacesStore& numShards=12&nodeInstance=2&replicationFactor=2&numNodes=6&template=rerank -
For node 3:
http://<host3>:<port3>/<base3>/admin/cores?action=newCore&storeRef=workspace://SpacesStore& numShards=12&nodeInstance=3&replicationFactor=2&numNodes=6&template=rerank -
For node 4:
http://<host4>:<port4>/<base4>/admin/cores?action=newCore&storeRef=workspace://SpacesStore& numShards=12&nodeInstance=4&replicationFactor=2&numNodes=6&template=rerank -
For node 5:
http://<host5>:<port5>/<base5>/admin/cores?action=newCore&storeRef=workspace://SpacesStore& numShards=12&nodeInstance=5&replicationFactor=2&numNodes=6&template=rerank -
For node 6:
http://<host6>:<port6>/<base6>/admin/cores?action=newCore&storeRef=workspace://SpacesStore& numShards=12&nodeInstance=6&replicationFactor=2&numNodes=6&template=rerank
-
-
For each core, the properties can be set at the creation time or updated later.
https://<host>:<port>/solr4/admin/cores?action=updateCore&storeRef=system://system& property.data.dir.store=<SOME VALUE>
You should now have six nodes with four cores, each actively tracking the repository. The following URL options are available for use:
URL option Description Example numShards Specifies the number of logical shards. 12storeRef Specifies reference to a node store. workspace://SpacesStoretemplate Defines the base configuration for a new Solr core with some configuration properties set using the URL as shown in Step 1(b).http:// : / /admin/cores?action=newCore&storeRef=workspace://SpacesStore& numShards=12&nodeInstance=6&replicationFactor=2&numNodes=6&**template=rerank** -
For more information, see Core templates.
template=rerank |
||
| replicationFactor | Specifies the number of copies of each document (or, the number of physical instances to be created for each logical shard.) A replicationFactor of 3 means that there will be 3 instances for each logical shard. |
2 |
| nodeInstance | Specifies the Solr node instance being configured. | 6 |
| numNodes | Returns the total number of nodes. | 6 |
| coreName | Specifies the name of the Solr core. | alfresco |
| property.<> | Specifies the property and its value. | property.data.dir.store= |
-
Configure Alfresco Content Services by setting the Solr subsystem properties.
Set the three Solr subsystem properties for both the
alfrescoandarchivecores in thealfresco-global.propertiesfile:solr4.store.mappings.value.solrMappingAlfresco.nodeString= solr4.store.mappings.value.solrMappingAlfresco.numShards= solr4.store.mappings.value.solrMappingAlfresco.replicationFactor= solr4.store.mappings.value.solrMappingArchive.nodeString= solr4.store.mappings.value.solrMappingArchive.numShards= solr4.store.mappings.value.solrMappingArchive.replicationFactor=For example, set the following properties as shown below:
solr4.store.mappings.value.solrMappingAlfresco.nodeString=<host1>:<port1>/<url1>,<host2>:<port2>/<url2> solr4.store.mappings.value.solrMappingAlfresco.numShards=12 solr4.store.mappings.value.solrMappingAlfresco.replicationFactor=2Note: These properties can also be configured via a JMX client or using the subsystem properties to reference the composite beans.
Some important things to know:
- If the host, port, or URL is missing, the subsystem default values (the ones set for a single index) will be used.
- Make sure that the hosts are in the correct order. This is because Solr assumes that the shards are located on node 1, etc as defined in the above list when generating queries.
- At query time, a Solr core is selected at random to do the distribution of all shards, again selected at random.
-
Set the configuration properties that applies to all the cores in a Solr instance in the shared.properties file.
For shard registration, Alfresco Content Services needs to know to which Solr port the requests should be sent. This can be configured, along with an explicit host name.
solr.host=localhost solr.port=8080These properties will be used when registering all cores found under the
<SOLR_HOME>directory. For more information, see About shared.properties file.
- Core templates
Core templates are used to define the base configuration for a new Solr core with some configuration properties. - About shared.properties file
The
<ALFRESCO_HOME>/solr4/conf/shared.propertiesfile is used to set configuration that applies to all the cores in a Solr instance.
Core templates
Core templates are used to define the base configuration for a new Solr core with some configuration properties.
The core templates are specified in the URL used for creating shards, as shown below:
http://<host1>:<port1>/<base1>/admin/cores?action=newCore&storeRef=workspace://SpacesStore&numShards=12
&nodeInstance=1&replicationFactor=2&numNodes=6&**template=<template>**
The <ALFRESCO_HOME>/solr4/templates directory contains the following structure:
| Templates | Description |
|---|---|
| rerank | This template is an enhanced core configuration for Alfresco Content Services 5.1. To use rerank, you need to reindex using this template, when creating a new core. It has more appropriate settings for sharding and supports indexes containing approximately 50-80M documents per shard. |
| noRerank | This template matches how the alfresco and archive cores were defined in Alfresco Content Services 5.0. In addition, it supports auto-phrasing and query re-ranking. |
The core templates include schema.xml and solrconfig.xml. The main purpose is to create multiple cores on multiple machines with the same configuration.
Comparison between the rerank and noRerank templates
| No. | Rerank template | noRerank template |
|---|---|---|
| 1 | The rerank template causes less duplication of the index, and therefore the index is more compact. | The noRerank template causes more duplication of the index, and therefore the index is large. |
| 2 | In the rerank template, stop words are included and indexed as common grams. By default, majority of the 100 most frequently used words in English language text are now treated as stop words. For more information, see <ALFRESCO_HOME>/solr4/templates/rerank/conf/lang/stopwords_en.txt. |
In the noRerank template, stop words are removed from the words that are tokenised in the English language.For more information, see <SOLR_HOME>/templates/norerank/conf/lang/stopwords_en.txt. |
| |3|The rerank template supports real rerank with automatic phrasing* (or auto-phrasing). Queries are run in two stages:1. Stage one treats phrases as conjunctions and ignores expensive positional information.
- Stage two reranks the top queries using a more expensive phrase.
- When a user provides individual search terms in a query, the automatic phrasing feature groups those individual terms into a search phrase and returns the query results for the phrase.
| The noRerank core performs auto-phrasing without re-ranking but the auto-phrase is added to the query. |
About shared.properties file
The <ALFRESCO_HOME>/solr4/conf/shared.properties file is used to set configuration that applies to all the cores in a Solr instance.
Most of these settings need to be replicated across all the Solr instances that are a part of the sharded index. However, there are some properties related to dynamic shard registration, such as host and port, which can be set for each machine.
These Solr instance specific settings can be omitted but you may have to define the correct host that the repository will use to communicate to Solr, for example, using an internal IP addresses in a cloud environment. By default, the host is detected by Java, the port will default to 8080, and the tomcat port is either determined by JMX or that explicitly defined in the shared.properties file.
The shared.properties file defines the:
- properties that are treated as identifiers
- properties that are used to generate suggestions
- data types that support cross locale/word splitting/token pattern
- properties that support cross locale/word splitting/token pattern
solr.hostpropertysolr.portproperty
Properties defined in the shared.properties file
You can define which properties are treated as identifiers, regardless of how they are defined in the model. These are properties must not be tokenised. If this list is changed, a reindex is required. You can also reindex by query. For more information, see Reindex documents by query.
If you rename the shared.properties.sample file to shared.properties, it will use the same set of identifier properties that are used in Alfresco Content Services 5.0.
# Properties treated as identifiers when indexed
alfresco.identifier.property.0={http://www.alfresco.org/model/content/1.0}creator
alfresco.identifier.property.1={http://www.alfresco.org/model/content/1.0}modifier
alfresco.identifier.property.2={http://www.alfresco.org/model/content/1.0}userName
alfresco.identifier.property.3={http://www.alfresco.org/model/content/1.0}authorityName
You can define which properties are used for suggestion.
# Suggestable Properties
#alfresco.suggestable.property.0={http://www.alfresco.org/model/content/1.0}name
#alfresco.suggestable.property.1={http://www.alfresco.org/model/content/1.0}title
#alfresco.suggestable.property.2={http://www.alfresco.org/model/content/1.0}description
#alfresco.suggestable.property.3={http://www.alfresco.org/model/content/1.0}content
Suggestion can also be configured for the search subsystem and for any SOLR core using properties. If the shared.properties file is missing in Alfresco Content Services 5.2.7, suggestion will be configured as it is in Alfresco Content Services 5.0.
You can define which properties are used for tokenisation with the Solr word delimiter factory.
# Data types that support cross locale/word splitting/token patterns if tokenised
alfresco.cross.locale.property.0={http://www.alfresco.org/model/content/1.0}name
You can define which property types are used for tokenisation with the Solr word delimiter factory.
# Data types that support cross locale/word splitting/token patterns if tokenised
# alfresco.cross.locale.datatype.0={http://www.alfresco.org/model/dictionary/1.0}text
# alfresco.cross.locale.datatype.1={http://www.alfresco.org/model/dictionary/1.0}content
# alfresco.cross.locale.datatype.2={http://www.alfresco.org/model/dictionary/1.0}mltext
Support for cross-language search
The cross core configuration options to use specific locales for cross-locale searches are set in the shared.properties file. Cross language search uses the appropriate stemmed tokens for all locales.
For backward compatibility, this file is absent in Alfresco Content Services 5.2.7 to provide options equivalent to Alfresco Content Services 5.0.
To configure cross-language search, follow the steps below:
- Open the
<ALFRESCO_HOME>/solr4/conf/shared.properties.samplefile. -
Set the following properties:
alfresco.cross.locale.property.0={http://www.alfresco.org/model/content/1.0}name alfresco.cross.locale.property.1=...This sets the properties that should be dual tokenised.
The cross-language search in Alfresco Content Services 5.0 is now only used to provide support to split tokens (based on case and numbers) to generate
in wordtokens. Thein wordtokenisation is mainly used for name. For example, findRedDog12byRed,Dog, or12,Dog12, and so on. This property must be indexed and tokenised. -
To specify the same behaviour based on the data type, set the following properties:
alfresco.cross.locale.datatype.0={http://www.alfresco.org/model/dictionary/1.0}text alfresco.cross.locale.datatype.1=...
Query time expansion of locales
Query time expansion of locales can be defined in the solrconfig.xml file as part of the query language definition.
| Locale parameter | What is it? |
|---|---|
autoDetectQueryLocale |
If true, this uses the query typed in by the user to detect the locale. |
autoDetectQueryLocales |
This specifies a set of locales. One of these may be used in executing the query if autoDetectQueryLocale=true. |
fixedQueryLocales |
This specifies a fixed set of locales always used by the query. |
What locales are used?
- The locale for the current session is always used.
- If the
autoDetectQueryLocaleparameter is used, then the best match fromautoDetectQueryLocalesis used. If no parameter is set, then all the possible locales are used. - All
fixedQueryLocalesare used.
Here are some example entries in the solrconfig.xml file:
<queryParser name="afts" class="org.alfresco.solr.query.AlfrescoFTSQParserPlugin">
<str name="rerankPhase">QUERY_PHASE</str>
<str name="autoDetectQueryLocale ">true</str>
<str name="autoDetectQueryLocales ">en,fr,de</str>
</queryParser>
<queryParser name="afts" class="org.alfresco.solr.query.AlfrescoFTSQParserPlugin">
<str name="rerankPhase">QUERY_PHASE</str>
<str name="fixedQueryLocales">en,fr,de</str>
</queryParser>
These are query time options and do not require a reindex. Currently, these values cannot be set in the solrcore.properties file.
Dynamic shard registration
In dynamic shard registration, shards register as a part of the tracking process to form indexes, thereby eliminating the need to follow the manual shard distribution pattern over Solr nodes.
Unlike manual sharding, dynamic sharding does not require shards and instances to be distributed correctly over a known set of hosts. Query is resilient, with a configurable delay to instances coming and going. For manual sharding, all instances must be available on the expected host at the expected URL. While dynamic shard registration allows different numbers of instances for any shard, manual sharding does not.
To enable dynamic sharding, set the following property in the alfresco-global.properties file:
solr.useDynamicShardRegistration=true
The following properties govern which instances are chosen for a query:
search.solrShardRegistry.purgeOnInit=true
search.solrShardRegistry.shardInstanceTimeoutInSeconds=300
search.solrShardRegistry.maxAllowedReplicaTxCountDifference=1000
| Property | Description | Example |
|---|---|---|
| search.solrShardRegistry.purgeOnInit | If true, this property removes persisted shard state from the database when the subsystem starts. | true |
| search.solrShardRegistry.shardInstanceTimeoutInSeconds | Specifies that if a shard has not made a tracking request within this time, it will not be used for query. > Note: When tracking large change sets or rebuilding your indexes, increase the shard timeout. For example, change the value of this property to 3200 or 7200 seconds. |
| 300 seconds | ||
| search.solrShardRegistry.maxAllowedReplicaTxCountDifference | Specifies that if any shard is more than this number of transactions behind the leading instance, it will not be used. | 1000 transactions |
If there is more than one index for a store, the most up to date index (the one that has indexed most transactions) will be used. For each shard, an instance is chosen at random from all the shards that are actively tracking and within 1000 transactions of the lead instance.
Shards are considered to be part of the same index if they:
- track the same store
- use the same template (and therefore, Solr schema)
- have the same number of shards
- use the same partitioning method with the same configuration, if any is required
- have the same setting to transform or ignore content
In dynamic sharding, shards can be created using the same API as manual sharding or you can list the required shards as a comma-separated list of shardIds.
http://localhost:8080/solr4/admin/cores?action=newCore&storeRef=workspace://SpacesStore&numShards=10&
numNodes=1&nodeInstance=1&property.data.dir.root=<ALFRESCO_HOME>/solr4/workspace-SpacesStore&shardIds=0,1,2,3,4
The status of all the available indexes, shards, and instances can be found using a JMX client. For more information, see Indexing information available in a JMX client.
Dynamic sharding will currently use partial indexes to answer queries. For example, there are two shards: Shard1 and Shard2. If there are no instances for Shard2, queries will only use Shard1.
- Installing and configuring Solr shards
Follow these steps to set up sharding of a non-sharded index or change the number of instances of an already sharded index. - Configuring Solr sharding using the Admin Console
Shard instances are registered dynamically with an Alfresco Content Services 5.2.7 repository or cluster. Use this information to know more about the Index Server Sharding page. - Indexing information available in a JMX client
You can use a JMX client, such as JConsole, for monitoring the status of all the available indexes, shards and its instances, and other related information. - Finding shards at query time
Use a JMX client to find shards at query time.
Installing and configuring Solr shards
Follow these steps to set up sharding of a non-sharded index or change the number of instances of an already sharded index.
Do not use SSL with sharding.
-
Create machines to host Solr shards.
-
These machines are basically application servers that hosts Solr webapp. If you install multiple Solr webapps on the same machine, each Solr instance must have a different configuration. In the solr4.xml file, edit the following parameters so that all Solr instances point to different root directories for each node:
- solr/home
- solr/model/dir
- solr/content/dir
Note: All the Solr instances hosting shards on a given host must have separate model and index contentstore locations.
-
-
Install and start Alfresco Content Services 5.1. For more information, see Installing using setup wizards.
-
Delete the existing Solr indexes from the installation.
Delete the alfresco and archive cores using the following commands:
https://localhost:8443/solr4/admin/cores?action=removeCore&storeRef=workspace://SpacesStore&coreName=alfresco https://localhost:8443/solr4/admin/cores?action=removeCore&storeRef=workspace://SpacesStore&coreName=archive -
Add any custom core templates. For more information, see Core templates.
-
Configure the
<SOLR_HOME>/conf/shared.propertiesfile. For more information, see About shared.properties file. -
Start the Solr server.
-
Create your new index shards and instances by configuring the properties on the URL.

http://localhost:8080/solr4/admin/cores?action=newCore&storeRef=workspace://SpacesStore& numShards=10&numNodes=1&nodeInstance=1&template=rerank&property.data.dir.root=<>This URL configures a sharded cluster that contains 10 shards, 1 node, and 1 instance of each shard. The following options must be used in the URL:
numShardsspecifies the number of logical shards.numNodesspecifies the total number of Solr nodes.nodeInstanceis the actual Solr instance corresponding to thathost:port.templatedefines the basic configuration for a new Solr core with some configuration properties. For more information, see Core templates.storeRefspecifies reference to a node store. When you install Alfresco Content Services 5.2.7 using the installer, the templates used to create shards do not use the port specified in the installer. Here’s an example to show how to set a non-SSL port manually when creating a shard.
Example: If you want a sharded Solr installation with a different Tomcat port (8090), set the
property.alfresco.portproperty on the URL used to create the shard. Theproperty.alfresco.portproperty specifies the port used to communicate with the repository (or repositories through a load balancer). This property can also be set if communicating through a different host or load balancer. In this example, we will setproperty.alfresco.port=8090, as shown below:http://localhost:8080/solr4/admin/cores?action=newCore&storeRef=workspace://SpacesStore& numShards=10&numNodes=1&nodeInstance=1&template=rerank&property.data.dir.root=<>&shardIds=0,1,2,3,4 &property.alfresco.port=8090 -
The Solr cores will register and start tracking the indexes.
If there are two indexes for the same store, the old index will be used until both the indexes are at the same state. Thereafter, both the indexes will be used.
-
Set the following properties in the
alfresco-global.propertiesfile.solr.secureComms=none solr.useDynamicShardRegistration=true -
Restart Alfresco Content Services.
-
You can turn off any old indexes from tracking. To do so, wait for the instances to time out and let the new index to be up-to-date. Alternatively, navigate to the JMX sharding operations and clear out all the registered shards, and start again.
You have a new live index.
####### High availability configuration
Sharding a Solr index is a highly scalable approach for improving the throughput and overall performance of large repositories. It provides high availability in case a shard/node fails.
Here are a few examples of a high availability configuration in a sharded Solr setup.
Example 1
In this example, you will setup a sharded cluster that contains:
- 3 hosts/machines
- 3 shards
- 2 copies
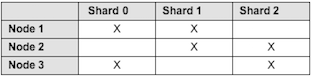
These are the steps to follow:
- Create machines to host Solr shards.
- Install and start Alfresco Content Services 5.1.
- Delete the alfresco and archive cores.
- Configure the
<SOLR_HOME>/conf/shared.propertiesfile. - Start the Solr server.
-
Create your new index shards and instances by configuring the properties on the URL.
http://localhost:8090/solr4/admin/cores?action=newCore&storeRef=workspace://SpacesStore&numShards=3&numNodes=3&nodeInstance=1 &template=rerank&property.data.dir.root=<>&shardIds=0,1&property.alfresco.port=8080http://localhost:8070/solr4/admin/cores?action=newCore&storeRef=workspace://SpacesStore&numShards=3&numNodes=3&nodeInstance=2 &template=rerank&property.data.dir.root=<>&shardIds=1,2&property.alfresco.port=8080http://localhost:8070/solr4/admin/cores?action=newCore&storeRef=workspace://SpacesStore&numShards=3&numNodes=3&nodeInstance=3 &template=rerank&property.data.dir.root=<>&shardIds=0,2&property.alfresco.port=8080 -
Set the following properties in the
alfresco-global.propertiesfile.solr.secureComms=none solr.useDynamicShardRegistration=true - Restart Alfresco Content Services.
Example 2
Another example to setup a sharded cluster that contains:
- 5 hosts/machines
- 5 shards
- 3 copies
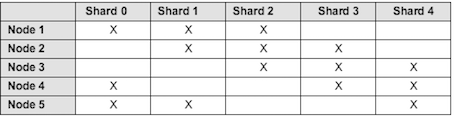
These are the steps to follow:
- Create machines to host Solr shards.
- Install and start Alfresco Content Services 5.1.
- Delete the alfresco and archive cores.
- Configure the
<SOLR_HOME>/conf/shared.propertiesfile. - Start the Solr server.
-
Create your new index shards and instances by configuring the properties on the URL.
http://localhost:8090/solr4/admin/cores?action=newCore&storeRef=workspace://SpacesStore&numShards=5&numNodes=5&nodeInstance=1 &template=rerank&property.data.dir.root=<>&shardIds=0,1,2&property.alfresco.port=8080http://localhost:8070/solr4/admin/cores?action=newCore&storeRef=workspace://SpacesStore&numShards=5&numNodes=5&nodeInstance=2 &template=rerank&property.data.dir.root=<>&shardIds=1,2,3&property.alfresco.port=8080http://localhost:8070/solr4/admin/cores?action=newCore&storeRef=workspace://SpacesStore&numShards=5&numNodes=5&nodeInstance=3 &template=rerank&property.data.dir.root=<>&shardIds=2,3,4&property.alfresco.port=8080http://localhost:8070/solr4/admin/cores?action=newCore&storeRef=workspace://SpacesStore&numShards=5&numNodes=5&nodeInstance=4 &template=rerank&property.data.dir.root=<>&shardIds=0,3,4&property.alfresco.port=8080http://localhost:8070/solr4/admin/cores?action=newCore&storeRef=workspace://SpacesStore&numShards=5&numNodes=5&nodeInstance=5 &template=rerank&property.data.dir.root=<>&shardIds=0,1,4&property.alfresco.port=8080 -
Set the following properties in the
alfresco-global.propertiesfile.solr.secureComms=none solr.useDynamicShardRegistration=true - Restart Alfresco Content Services.
For more information, see Installing and configuring Solr shards.
Configuring Solr 6 sharding using the Admin Console
Solr 6 supports sharded indexes with SSL. Use the Search Server Sharding page to set up and configure a Solr 6 sharded search index.
Prerequisites for viewing the Search Server Sharding page:
- Check that you have installed Alfresco Content Services 5.2.7 and have a valid license.
- Support for shard groups requires a clustered license. Make sure that you enable clustering on your ACS license. For more information, see Repository server clustering and Uploading a new license.
-
Open the Admin Console. For more information, see Launching the Admin Console.
-
In Repository Services, click Search Server Sharding.
You see the Search Server Sharding page. It displays information about dynamic shard index registration, shard groups, and shard instances.
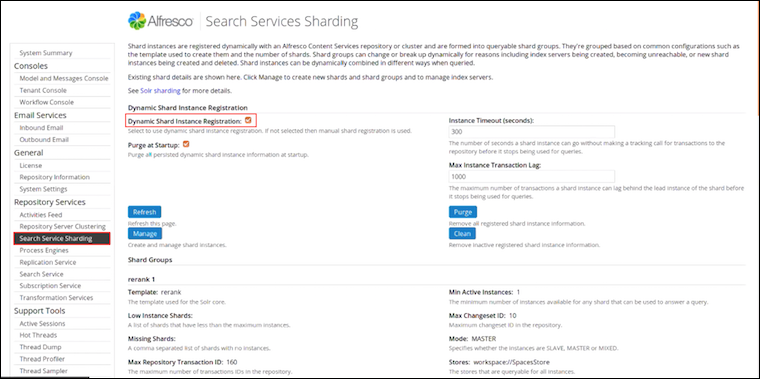
-
Under Dynamic Shard Instance Registration, select Dynamic Shard Instance Registration and set the other shard instance properties.
Shard registration property Example setting What is it? Dynamic Shard Instance Registration Enabled Yes Select this property to enable dynamic shard instance registration. If disabled, manual shard registration is used. Purge at Startup No This property purges all persisted dynamic shard instance information at startup. Instance Timeout (seconds) 100 This specifies the number of seconds a shard instance can go without making a tracking call for transactions to the repository before it stops being used for queries.
Note: When tracking large change sets or rebuilding your indexes, increase the shard timeout. For example, change the value of this property to 3200 or 7200 seconds.
| Max Instance Transaction Lag | 1000 | This specifies the maximum number of transactions a instance can lag behind the lead instance of the shard before it stops being used for queries. |
-
Click Refresh to refresh this page.
-
Click Purge to remove all registered shard instance information and start from clean.
-
Click Clean to remove inactive registered shard instance information.
-
Click Manage to create and manage shard instances.
You see the Index Server Shard Management window. Use this window to create individual shards or shard groups.
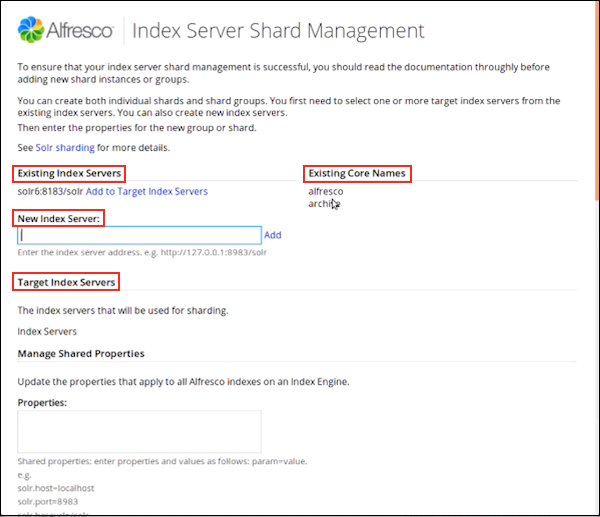
-
Use Existing Index Servers to view a list of existing index servers and to create new index servers.
To add a new index server, specify the server address in New Index Server and click Add.
You can view the newly created index server under Target Index Servers.
Click Add to Target Index Servers next to the server you want to add to the list of target index servers. Target Index Servers displays a list of index servers where you want to make the new shards.
-
Under Existing Core Names, you can view a list of the core names already in use.
-
Under Target Index Servers, you can view a list of index servers that will be used for sharding.
To remove an index server from the list of servers that will be used for sharding, click Remove.
-
Next, you need to create a core for the shard. There are two ways to do this. You can either:
- use the Manage Default Indexes and Manage Shared Properties sections to create default indexes - see Step 7 (e) and 7 (f); or
- use the New Shard Group and New Shard Instance sections to create a shard group and instance - see Step 7 (g) and 7 (i).
-
Use Manage Default Indexes to create default indexes on the servers listed in Target Index Servers.
The Manage Default Indexes section:
- appears only when you add a new index server.
- creates a core for a given shard, and therefore, can be used as an alternative to creating shards using the New Shard Group section (Step 7f).
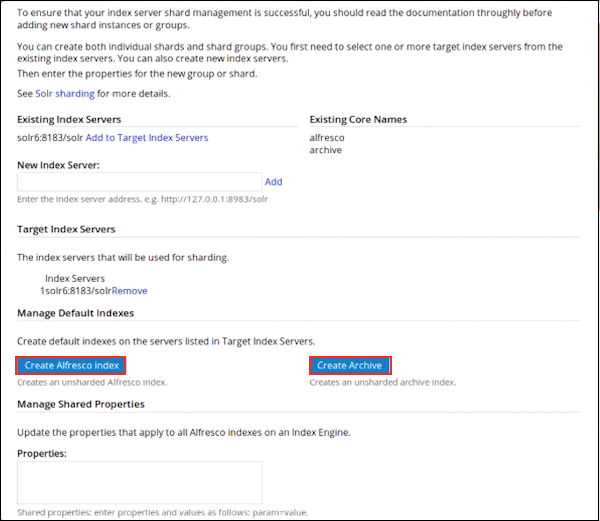
Important: The cores are visible in the Solr Admin web application only after you create them using the Index Server Sharding page.
- Click Create Alfresco Index to create an unsharded Alfresco index.
-
Click Create Archive to create an unsharded archive index.
Use the Report section at the end of this page to view the detailed core creation message.
Check the Solr Admin UI to ensure that both the indexes are correctly listed.
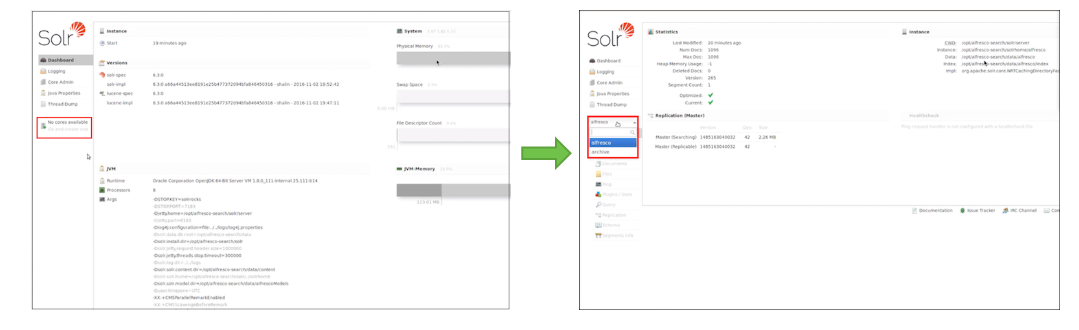
-
Use Manage Shared Properties to update the properties that apply to all Alfresco indexes on an Index Engine.

These properties are the same as in alfresco-search-services-1.2.x.zip/solrhome/conf/shared.properties. For example:
solr.host=localhost solr.port=8983 solr.baseurl=/solr -
Alternatively, to create a shard group, set the following properties under New Shard Group:
Shard group property Example setting What is it? Template rerank This specifies the template used for the shard group. Store workspace://SpacesStore This specifies the stores that are queryable for all shards. Core This specifies the name of the Solr core. Properties solr.suggester.enabledalfresco.secureComms=https
-
alfresco.port.ssl=8443
alfresco.commitInterval=20000
alfresco.newSearcherInterval=30000
| This specifies the properties to set on the Solr instances. These are the same properties that are set in the solrcore.properties file. | ||
| Shards | 1 | This specifies the total number of shards. |
| Instances | 1 | This specifies the total number of instances. |
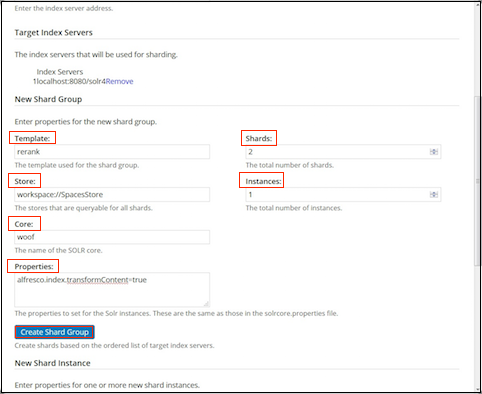
8. Click **Create Shards Group** to create new shards based on the ordered list of target index servers.
9. To create a single shard instance, set the following properties under New Shard Instance:
|Shard property|Example setting|What is it?|
|--------------|---------------|-----------|
|**Index Server URL**|localhost:8080/solr4|This specifies the URL to a single index server.|
|**Nodes**|1|This specifies the total number of Solr nodes that have been created.|
|**Target Index Server**|1|This specifies, out of all the solr nodes above, the number given to the target index server node for this new shard.|
|**Shards**| |This specifies the specific shards to create, on the node given above. You can also specify a comma-separated list of shards.|
See [Installing and configuring Solr shards](#installing-and-configuring-solr-shards) to view examples of creating shards when calling the REST URLs directly.
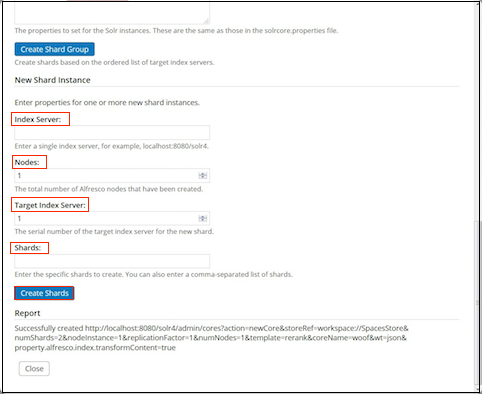
10. Click **Create Shards** to create the new shard based on the specified instance properties.
11. Use Report to get detailed information on shard creation and execution.
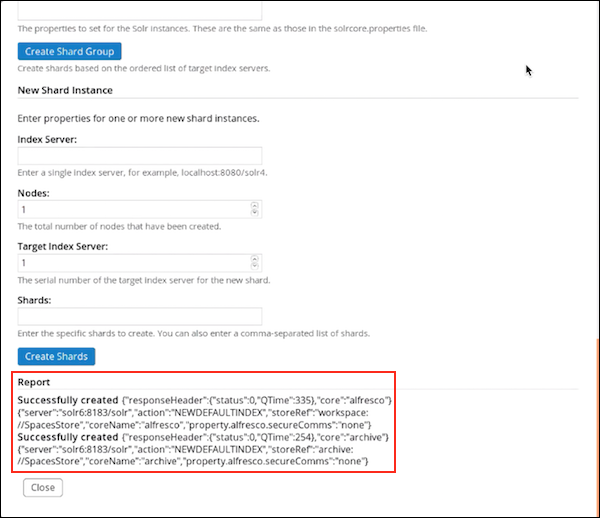
12. Click **Close** to close the Index Server Shard Management window.
You have successfully created an `alfresco` core and an `archive` core. To verify, in a browser, navigate to the Solr URL, [https://localhost:8983/solr](https://localhost:8443/solr4). In the Solr Admin UI, select the core selector drop-down list and verify that both the `alfresco` and `archive` cores are present in the list.
Validate that you can execute queries from the search public API to the archive core.
```
curl -X POST --header 'Content-Type: application/json' --header 'Accept: application/json' --header 'Authorization: Basic YWRtaW46YWRtaW4=' -d '{
"query":
{
"query": "foo"
},
"scope":
{
"stores": ["archive://SpacesStore"]
}
}' 'http://localhost:8080/alfresco/api/-default-/public/search/versions/1/search'
```
-
Under Shard Groups, you can view information about all the shards in the group.
Shard registration property Example setting What is it? Template rerank This specifies the template used for the Solr core. Low Instance Shards This specifies a list of shards that have less than the maximum number of instances. Missing Shards 100 This specifies a comma-separated list of shards with no instances. Max Repository Transaction ID 14,637 This specifies the maximum number of transaction IDs in the repository. Max Live Instances 1 This specifies the maximum number of instances available for any shard that can be used to answer a query. Remaining Transactions 2 This specifies the maximum number of transactions remaining for all the lead instances of all the active shards. Number of Shards 4 This specifies the total number of shards. Min Active Instances 1 This specifies the minimum number of instances available for any shard that can be used to answer a query. Max Changeset ID 104 This specifies the highest change set id in the repository. Mode MASTER This specifies whether the instances are SLAVE,MASTER, orMIXED. > Note: TheSLAVEandMIXEDinstances are not supported for a sharded installation.
| Stores | workspace://SpacesStore | This specifies the stores that are queryable for all instances. |
| Has Content | Enabled | This property is enabled if content is included for all instances. |
| Shard Method | DB_ID | This specifies the method used to define shards. The default shard method is DB_ID. You can specify your own shard method in Index Server Shard Management screen > New Shard Group > Properties. For example, shard.method=ACL_ID. |
You can also set this property in the alfresco-search-services-1.2.x.zip/solrhome/templates/rerank/conf/solrcore.properties file.
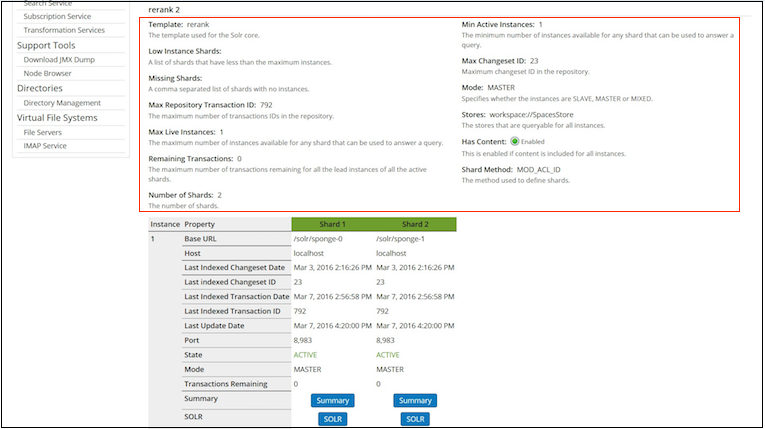
-
Use the instance property table to view detailed entity information for all the shards. This is the same information that is displayed in the JMX console, for example,
Base URL,Host,Last Indexed Changeset Date, and more.For more information, see Indexing information available in a JMX client.
-
Click Summary to go to the http://localhost:8080/solr4/admin/cores?action=SUMMARY page on Solr for the specific core.
For more information, see Unindexed Solr Transactions.
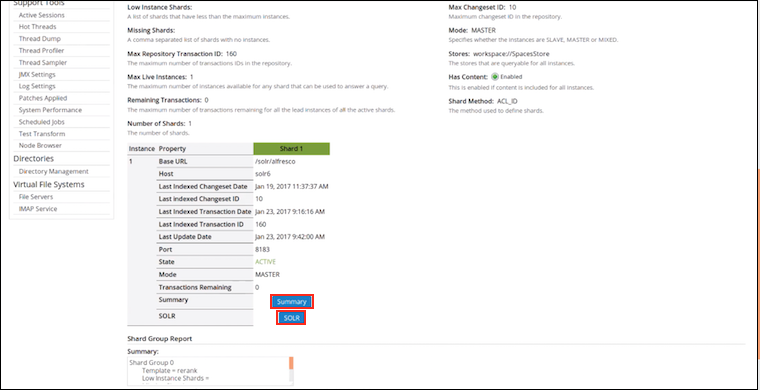
-
Click SOLR to go to the Solr Admin screen for the specific core.
For more information, see Connecting to the SSL-protected Solr web application.
-
-
The Shard Group Report section displays information about the shard groups and instances. A tabular view of this information is displayed in the shard table in Step 9. This information is read-only.
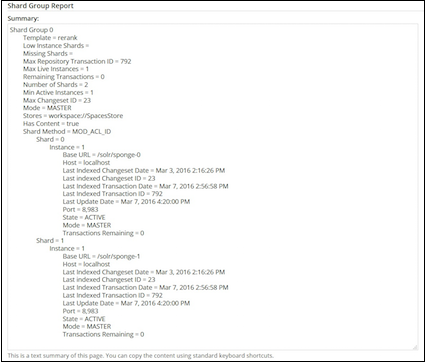
-
Click Save to apply the changes you have made to the index server shards.
If you do not want to save the changes, click Cancel.
Note: Alfresco recommends that you do not use the Solr Admin Console > Core Admin > Unload functionality to unload indexes (either whole indexes or shards that are part of an index). Unloading an index or a shard in this way will delete it and make it unavailable for query.
If you unload or delete a shard from the Solr Admin Console, make sure you restart the Solr server and restore your indexes so that Alfresco can work properly.
Indexing information available in a JMX client
You can use a JMX client, such as JConsole, for monitoring the status of all the available indexes, shards and its instances, and other related information.
The JMX view of all the instancess, shards, and indexes that stick together is displayed at the MBeans > Alfresco > FlocAdmin > Attributes > Flocs node. The Flocs node displays a tabular view of all the indexes formed by shard instances by registering with any member of the Alfresco Content Services cluster.
-
Open a command console.
-
Enter the following command:
jconsole
The JConsole: New Connection window displays.
-
Double-click on the Java process.
For Tomcat, this the Java process is usually labelled as
org.apache.catalina.startup.Bootstrap start.The Java Monitoring & Management window displays.
-
Select the MBeans tab.
The available managed beans display in JConsole.
-
Navigate to Alfresco > FlocAdmin.
The Attributes and Operations display below it in the tree.
-
Select Attributes.
-
Floc/Index level information
All instances that stick together to form an index have the same value for the following settings:
Attribute name Description Is configurable or displays state Example value activeTrackingMode Specifies if the instances for the index are all SLAVE,MASTER, orMIXED.
Note: TheSLAVEandMIXEDinstances are not supported for a sharded installation.
-
| State | MASTER |
||
| hasContent | If the index contains content, the value of this attribute is true, otherwise false. |
Configurable | true |
| lowReplicaShards | Specifies a comma separated list of shards that have less that maxReplicas. |
State | |
| maxReplicas | Specifies the number of instances for the shard which has the maximum number of instances. | State | 1 |
| maxRepoChangeSetId | Specifies the maximum changeset id in the repository. | State | 5029 |
| maxRepoTxId | Specifies the maximum transaction id in the repository. | State | 16903 |
| maxTransactions | Specifies the maximum number of transactions in any instance. | State | |
| minReplicas | Specifies the number of instances for the shard which has the minimum number of instances. | State | 1 |
| missingShards | Specifies a comma separated list of shards with no instances. | State | |
| numberOfShards | Specifies the total number of shards. | Configurable | 2 |
| shardMethod | Specifies how the nodes and ACLs are split into shards. | Configurable | MOD_ACL_ID |
| shards | Click to displays tabular data for each shard. | Displays details | Shards |
| stores | Specifies the stores that are indexed. | Configurable | workspace://SpacesStore |
| template | Specifies the name of the template used to create each core with common configuration. | Configurable | rerank |
- **Shard level information**
You can navigate through each shard using the tabular navigation.
|Attribute name|Description|Is configurable or displays state?|Example value|
|--------------|-----------|----------------------------------|-------------|
|#|Specifies the shard number.|Configurable|`0`|
|activeCount|Specifies the number of instances that are currently able to answer queries.|State|`1`|
|activeTrackingMode|Specifies if the instances for the shard are all `SLAVE`, `MASTER`, or `MIXED`.<br><br>**Note:** The `SLAVE` and `MIXED` instances are not supported for a sharded installation.
| State | MASTER |
||
| laggingCount | Specifies the number of instances that are currently unable to answer queries because they are too far behind. | State | 0 |
| maxTransactionsRemaining | Specifies the maximum number of transactions left to index for any shard instance. | State | 0 |
| maxTxId | Specifies the maximum number of transaction id indexes by any instance. | State | 16903 |
| silentCount | Specifies the number of instances that are no longer tracking. | State | |
| replicas | Provide detail for each instance in the shard. | Displays details | Instances |
- **Instance level information**
|Attribute name|Description|Displays location or state?|Example value|
|--------------|-----------|---------------------------|-------------|
|baseUrl|Specifies the URL to access the instance.|Location|`/solr4/alfresco-0/`|
|host|Specifies the host where the instance is located.|Location|`172.31.42.83`|
|port|Specifies the port on the host where the instance is located.|Location| |
|lastIndexedChangeSetCommitTime|Specifies the date and time of the last indexed changeset.|State|`Wed Oct 28 12:09:41 GMT 2015`|
|lastIndexedChangeSetId|Specifies the last indexed changeset id in the repository.|State|5029|
|lastIndexedTxCommitTime|Specifies the date and time of the last indexed transaction.|State|`Wed Oct 28 12:30:33 GMT 2015`|
|lastIndexedTxId|Specifies the transaction id of the last indexed transaction.|State|`16903`|
|lastUpdated|Specifies when the instance was last updated.|State|`Wed Oct 28 13:31:30 GMT 2015`|
|state|Specifies if the instance state is `ACTIVE`, `SILENT`, or `LAGGING`.|State|`ACTIVE`|
|trackingMode|Specifies if the tracking is performed by the master.|State|`MASTER`|
|transactionsRemaining|Specifies the number of transactions remaining to be indexed.|State|`5`|
-
Select Operations.
removeAgedOutShardsremoves all the shards which are too far behind and no longer tracking or are unresponsive.removeAllremoves all the shards that have registered and starts from clean. -
If you are using a sharded installation, go to MBeans > Alfresco > Configuration > Search > managed > solr4 > Attributes and set the number of filters using the
solr.defaultShardedFacetLimitproperty.solr.defaultShardedFacetLimit=20 -
If you are using a non-sharded installation, go to MBeans > Alfresco > Configuration > Search > managed > solr4 > Attributes and set the number of filters using the
solr.defaultUnshardedFacetLimitproperty.solr.defaultUnshardedFacetLimit=100
Finding shards at query time
Use a JMX client to find shards at query time.
-
In JConsole, go to MBeans > Alfresco > Configuration > Search > managed > solr4 > Attributes.
All the Solr attributes are listed on this page.
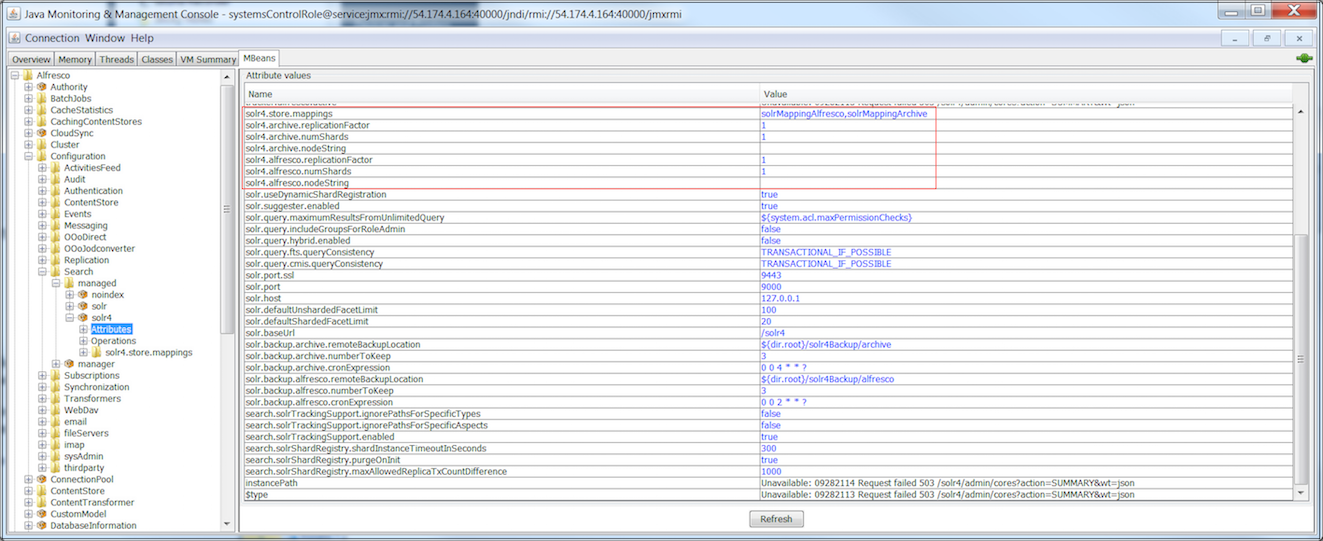
-
Set the following properties:
solr4.alfresco.numShards=10 solr4.archive.numShards=10 -
In JConsole, go to MBeans > Alfresco > Configuration > Search > managed > solr4 > solr4.store.mappings.
-
Set
numShardsforsolrMappingAlfrescoandsolrMappingArchive.-
Go to solrMappingAlfresco > Attributes > numShards and set the value of
numShards.numShards=10 -
Go to solrMappingArchive > Attributes > numShards and set the value of
numShards.numShards=10
-
Reindex documents by query
You can selectively reindex a small subset of the index based on a query. This enables a limited rebuild of the index.
Example 1: To reindex people after changing the first name and last name tokenisation, use the following single-threaded query:
http://localhost:8080/solr4/admin/cores?action=reindex&query=TYPE:person
Example 2: To reindex jobs that failed or threw an exception when indexing, use the following query:
http://localhost:8080/solr4/admin/cores?action=reindex&query=EXCEPTIONMESSAGE:*
You must first run the query to see how many nodes are affected. If the result is large, you can add paging as part of the query in order to reindex in smaller batches.
<query> AND created:"2015-08"
Query based reindexing is also useful when changing the property type, changing tokenisation, adding new properties to be treated as identifiers, or when reindexing synonyms.
In a sharded setup, the reindex query will have to be run on all the nodes. The query will run for all shards on any node.
Backing up Solr shards
To avoid any data loss, you can make backups of one or all the sharded Solr indexes.
Trigger a backup with an HTTP command which instructs the /replication handler to backup the Solr shards, for example:
curl http://solrshard20xbm.alfresco.com:9000/solr4/<CORE_NAME>/replication?command=backup
\&location=/mnt/solrContentStoreBackup\&numberToKeep=1
where:
<CORE_NAME> specifies the name of the core you are working with.
location specifies the path where the backup will be created. If the path is not absolute then the backup path will be relative to Solr’s instance directory.
numberToKeep specifies the number of backups to keep.
Backup status
The backup operation can be monitored to see if it has completed by sending the details command to the /replication handler, for example:
http://solrshard20xbm.alfresco.com:9000/solr4/<CORE_NAME>/replication?command=details
Best practices for setting up sharded Solr indexes
Use these best practices for setting up and using a sharded installation.

Do I need sharding?
If you plan to store 50 million + documents in your repository, you should consider sharding to maximize indexing performance and to enable horizontal scaling to massive content repositories.
Do I need dynamic shard registration?
You can set up sharding using either manual or dynamic shard registration. We recommend that you use dynamic shard registration because it is easier to implement than manual sharding.
How many shards should I have?
General rule of thumb is to divide the total number of documents by 50M (million). If you want to increase the query load or support more than 100 concurrent users, then check the memory specifications or the I/O specifications of the installation machine.
What are the reindexing recommendations for a sharded installation?
We recommend that existing customers should reindex using the rerank core. This has the following benefits:
- Smaller index
- Better query performance particularly for phrases and stop words
- Improved cross-language search
This should allow the user to store anywhere between 50 million - 80 million documents in a single shard. For more information, see the Alfresco Platform News and Alfresco 1 billion documents press release with Amazon Aurora.
Note that changing the number of shards requires a reindex.
Does sharding work with SSL enabled?
Since Alfresco Content Services 5.2 supports both Solr 4 and Alfresco Search Services (i.e. Solr 6 subsystem), there are fundamental differences in the SSL support for Solr 4 vs. Solr 6 sharding:
- If you’re using Solr 4, sharding only works if SSL is disabled.
- If you’re using Search Services (Solr 6), sharding is supported with both full SSL and non-SSL. Make sure you configure the Solr and SSL settings properly. For more information, see Solr certificate authentication.
Are there any considerations for query load and number of documents?
Before sharding your Solr index, it is important to consider your query load and the size of your repository. You need to create machines to host Solr. For more information, see Installing and configuring Solr 4. For example, if you need 5 shards, you need to setup those 5 machines, and have Solr instances running on all the 5 machines. Once your machines are ready, you are ready to set up or register shards.
For more information, see Dynamic shard registration.
After upgrading, can I use my current index while building a new sharded index?
Yes. After upgrading to Alfresco Content Services 5.2.7, continue to use the old search index server as before, setup a new sharded Solr server with the rerank template to reindex the data, and finally, switch over to the new sharded index once the indexing is done and the sharded Solr server is up-to-date.
Upgrading from 5.0 and earlier versions with Solr 4 to 5.2.7 (with zero downtime)
- Upgrade to 5.2.7 and continue to use the Solr 4 search service as before.
- Configure a separate sharded Solr 4 index with the
reranktemplate to track the repository. For details, see Installing and configuring Solr shards. - While the new sharded Solr 4 builds its indexes, you can monitor the progress using the Solr Admin Web interface. For details, see the next question.
- When the sharded Solr 4 index is updated, enable the sharded Solr 4 index by setting the
solr.hostproperty. For more information, see Activating Solr.
Upgrading from 4.x and earlier versions with Lucene to 5.2.7 (search service will be unavailable while the indexes are being built
-
Upgrade to 5.2.7 with a sharded Solr 4 installation to track the repository. Use the
reranktemplate when configuring the new Solr core. For details, see Installing and configuring Solr shards.Note: While the Solr 4 indexes are being built, you can continue to use Alfresco Content Services but the search service will not be available until the Solr 4 indexes are up-to-date.
- Enable the sharded Solr 4 index by setting the
solr.hostproperty. For more information, see Activating Solr. - While the new sharded Solr 4 builds its indexes, you can monitor the progress using the Solr Admin Web interface. For details, see the next question.
Upgrading from 5.0 and earlier versions with Solr 1 to 5.2.7 (with zero downtime)
- Upgrade to 5.2.7 and continue to use the Solr 1 search service as before.
- Configure a separate sharded Solr 4 index with the
reranktemplate to track the repository. For details, see Installing and configuring Solr shards. - While the new sharded Solr 4 builds its indexes, you can monitor the progress using the Solr Admin Web interface. For details, see the next question.
- When the sharded Solr 4 index is updated, enable the sharded Solr 4 index by setting the
solr.hostproperty. For more information, see Activating Solr.
How do i know the new sharded index is up-to-date?
Go to the Solr Admin Web interface at https://localhost:8443/solr4/#/alfresco and monitor the value of Approx transactions remaining. If the value is 0, it indicates that the index up-to-date.

Can different shards be inconsistent?
Yes. In a sharded setup, eventual consistency can introduce additional query inconsistencies.
A node can move between shards either by:
- Moving the node, or
- Adding a new access control list to a node that did not previously have any ACLs defined.
When this happens, the shards may index at different rates. It is possible to see:
- Two copies of the node if it is added to a new shard before it is deleted from the original shard.
- No node if it is deleted from the original shard before being added to a new shard.
Indexing is eventually consistent. When updates happen at the same time, no inconsistency is seen.
Full text search configuration properties for Solr index
The Solr index’s full text search properties influence the behaviour of Solr indexes.
The main index and deltas all use the same configuration. The data dictionary settings for properties determine how individual properties are indexed.
If you wish to change the default value of a property, add the relevant property to the alfresco-global.properties file and then make the changes.
Solr index properties
-
solr.host=localhost
The host name where the Solr instance is located.
-
solr.port=8080
The port number on which the Solr instance is running.
-
solr.port.ssl=8443
The port number on which the Solr SSL support is running.
-
solr.solrUser=solr
The Solr user name.
-
solr.solrPassword=solr
The Solr password.
-
solr.secureComms=https
The HTTPS connection.
-
solr.solrConnectTimeout=5000
The Solr connection timeouts in ms.
-
*solr.solrPingCronExpression=0 0/5 * * * ? **
The cron expression defining how often the Solr Admin client (used by JMX) pings Solr if it goes away.
Data dictionary options
The indexing behavior for each property can be set in the content model. By default the index is eventually consistent with the created content and properties are tokenized when indexed. For more information on how to configure indexing for properties in the content model see this page.
Indexing options
If you want archive or zip files to be unzipped and the files included in the index, set the following property:
transformer.Archive.includeContents=true
The default setting is false.
Using Filtered search
Use this information for an overview of the filtered search capability in Alfresco Share along with its configuration details. It also describes how to define your own custom filters.
Filtered search is a powerful search feature that allows users to filter and customize their results by applying multiple filters to their search results in a navigational way. Filtered search breaks up search results into multiple categories, typically showing counts for each, and allows the user to drill down or further restrict their search results based on those filters.
Important: Filtered search uses the Solr 4 search subsystem and is enabled by default from Alfresco Content Services 5.0 onwards. For more information on migrating from your existing search subsystem to Solr 4, see Upgrading search.
Configuring filtered search
You can configure filtered search either by using the configuration files or by using the Share Search Manager.
- Filtered search configuration file and default properties
There are a number of default filtered search configuration properties defined. The default filtered search properties are explained here. - Defining custom search filters using configuration file
You can define and create your own custom filters for being displayed on the search result page.
Filtered search configuration file and default properties
There are a number of default filtered search configuration properties defined. The default filtered search properties are explained here.
The following example shows how the default filters are defined:
#
# Alfresco default facets
# Note: If you have changed the filter's default value(s) via Share, then any
# subsequent changes of those default values won't be applied to the filter on
# server startup.
#
# Field-Facet-Qname => cm:content.mimetype
default.cm\:content.mimetype.filterID=filter_mimetype
default.cm\:content.mimetype.displayName=faceted-search.facet-menu.facet.formats
default.cm\:content.mimetype.displayControl=alfresco/search/FacetFilters
default.cm\:content.mimetype.maxFilters=5
default.cm\:content.mimetype.hitThreshold=1
default.cm\:content.mimetype.minFilterValueLength=4
default.cm\:content.mimetype.sortBy=DESCENDING
default.cm\:content.mimetype.scope=ALL
default.cm\:content.mimetype.scopedSites=
default.cm\:content.mimetype.isEnabled=true
# Field-Facet-Qname => cm:creator
default.cm\:creator.filterID=filter_creator
default.cm\:creator.displayName=faceted-search.facet-menu.facet.creator
default.cm\:creator.displayControl=alfresco/search/FacetFilters
default.cm\:creator.maxFilters=5
default.cm\:creator.hitThreshold=1
default.cm\:creator.minFilterValueLength=4
default.cm\:creator.sortBy=ALPHABETICALLY
default.cm\:creator.scope=ALL
default.cm\:creator.scopedSites=
default.cm\:creator.isEnabled=true
# Field-Facet-Qname => cm:modifier
default.cm\:modifier.filterID=filter_modifier
default.cm\:modifier.displayName=faceted-search.facet-menu.facet.modifier
default.cm\:modifier.displayControl=alfresco/search/FacetFilters
default.cm\:modifier.maxFilters=5
default.cm\:modifier.hitThreshold=1
default.cm\:modifier.minFilterValueLength=4
default.cm\:modifier.sortBy=ALPHABETICALLY
default.cm\:modifier.scope=ALL
default.cm\:modifier.scopedSites=
default.cm\:modifier.isEnabled=true
# Field-Facet-Qname => cm:created
default.cm\:created.filterID=filter_created
default.cm\:created.displayName=faceted-search.facet-menu.facet.created
default.cm\:created.displayControl=alfresco/search/FacetFilters
default.cm\:created.maxFilters=5
default.cm\:created.hitThreshold=1
default.cm\:created.minFilterValueLength=4
default.cm\:created.sortBy=INDEX
default.cm\:created.scope=ALL
default.cm\:created.scopedSites=
default.cm\:created.isEnabled=true
# Field-Facet-Qname => cm:modified
default.cm\:modified.filterID=filter_modified
default.cm\:modified.displayName=faceted-search.facet-menu.facet.modified
default.cm\:modified.displayControl=alfresco/search/FacetFilters
default.cm\:modified.maxFilters=5
default.cm\:modified.hitThreshold=1
default.cm\:modified.minFilterValueLength=4
default.cm\:modified.sortBy=INDEX
default.cm\:modified.scope=ALL
default.cm\:modified.scopedSites=
default.cm\:modified.isEnabled=true
# Field-Facet-Qname => cm:content.size
default.cm\:content.size.filterID=filter_content_size
default.cm\:content.size.displayName=faceted-search.facet-menu.facet.size
default.cm\:content.size.displayControl=alfresco/search/FacetFilters
default.cm\:content.size.maxFilters=5
default.cm\:content.size.hitThreshold=1
default.cm\:content.size.minFilterValueLength=4
default.cm\:content.size.sortBy=INDEX
default.cm\:content.size.scope=ALL
default.cm\:content.size.scopedSites=
default.cm\:content.size.isEnabled=true
Filter property description
An example of a filter is cm:modified. It specifies the name of the filter field. It is the field on which you want to do a filtered search.
-
filterID
Specifies a unique name to identify the filter. Before adding a new filter, check the existing filters (via Search Manager) to ensure that the
filterIDdoes not already exist. -
displayName
Specifies the display name of the filter.
-
displayControl
Enables the user to decide the user interface control or how the filter is displayed on the Search page. The default option is Check box.
displayControlis the full module name for an Aikau widget which is used for rendering the facet filters. By default, Alfresco Content Services providesalfresco/search/FacetFilterswhich is a basic rendering of the filters available for the facet. -
maxFilters
Enables the user to select the maximum number of filters shown for search results. You can select to show more than one filter.
-
hitThreshold
Enables the user to select the minimum number of matches a filter result must have to be shown on the Search page.
-
minFilterValueLength
Specifies the minimum length of characters that a filter value must have to be displayed. This can be useful in hiding common short words.
-
sortBy
Enables the user to select the order in which the filter results must be shown on the Search page. The
sortByoption is passed to theFacetFilterswidget and defines how the filters should be sorted. This property has the following options:Option Description ALPHABETICALLY Specifies the filter value A-Z. REVERSE_ALPHABETICALLY Specifies the filter value Z-A. ASCENDING Specifies the number of filter results (low to high). DESCENDING Specifies the number of filter results (high to low). INDEX This is a special value reserved for results rendered by filter queries. -
scope
Enables the user to select the sites where the filter will be available.
-
scopedSites
Displays a list of sites where the filter will be available.
-
isEnabled
Specifies if the filter is enabled for inclusion on the search results page. Disabled filters are not displayed. Only the filters you create via Share console can be deleted; default filters must be disabled to hide them.
Note: You cannot delete or modify any of the default filters, however you can disable them. To define your own custom filters, see Defining custom search filters.
Defining custom search filters using configuration file
You can define and create your own custom filters for being displayed on the search result page.
You can define custom filters in the solr-facets-config-custom.properties file. You can also use this file to override the default filter properties.
-
Navigate to the
/alfresco/extension directory. -
Create the solr-facets-config-custom.properties file.
-
Open the solr-facets-config-custom.properties file and specify your custom filter properties.
Here’s an example of custom filter configuration:
custom.cm\:description.filterID=filter_newFilter custom.cm\:description.displayName=faceted-search.facet-menu.facet.description custom.cm\:description.displayControl=alfresco/search/FacetFilters custom.cm\:description.maxFilters=3 custom.cm\:description.hitThreshold=1 custom.cm\:description.minFilterValueLength=2 custom.cm\:description.sortBy=DESCENDING custom.cm\:description.scope=SCOPED_SITES custom.cm\:description.scopedSites= custom.cm\:description.isEnabled=trueNote: The values specified in the custom filters will overwrite the default filter’s value. However, if you change the filter’s default value(s) via Share, then any subsequent changes made to the filter values via the configuration files, won’t be applied to the filter on server startup.
Setting Solr logging
You can set different debug logging levels for Solr components using the Solr log4j properties.
-
Locate the
/log4j-solr.properties file. -
Edit it to add your required logging setting. For example:
log4j.logger.org.alfresco.solr.tracker.MetadataTracker=DEBUG -
Changes to the log4j-solr.properties file will be re-read by Solr when it starts up. If you need to make changes to the logging level while the system is running, going to the following URL (either in a browser or for example, using curl) will cause Solr to re-load the properties file.
https://<solrHostName>:<solrPort>/solr4/admin/cores?action=LOG4J&resource=log4j-solr.properties
Transactional metadata query
Use this information for an overview on the transactional metadata query. It also describes the process of configuring the optional patch for upgrade.
- Overview of transactional metadata query
Alfresco Content Services supports the execution of a subset of the CMIS Query Language (CMIS QL) and Alfresco Full Text Search (AFTS) queries directly against the database. Also, the noindex subsystem supports queries only against the database. This feature is called transactional metadata query (TMDQ). - Features of transactional metadata query
Use this information to understand the features of the transactional metadata query. - Options supported by Query Languages
Use this information to know what options are supported by the Public API, CMIS Query Language (QL), and Alfresco Full Text Search Query Language (FTS QL). - Transactional metadata queries supported by database
Use this information to understand the queries supported by the database. - Configuring transactional metadata query
Configure the transaction metadata query using the subsystem properties. - Configuring an optional patch for upgrade
Transactional metadata query requires two optional patches to be applied for full support. If no patch is applied there is no database support. - Adding optional indexes to database
When you are upgrading the database, you can add optional indexes in order to support the metadata query feature. This information lets you know the likely duration of the upgrade and how to do it incrementally. - Configuring search in Alfresco Share
The following sections describe how to configure search in Alfresco Share.
Overview of transactional metadata query
Alfresco Content Services supports the execution of a subset of the CMIS Query Language (CMIS QL) and Alfresco Full Text Search (AFTS) queries directly against the database. Also, the noindex subsystem supports queries only against the database. This feature is called transactional metadata query (TMDQ).
TMDQ supports use cases where eventual consistency is not the preferred option.
Prior to Alfresco Content Services 4.2, the Solr search subsystem did not support transactional indexing. The Solr subsystem is eventually consistent. A change can take anytime to be reflected in the index, ranging from a few seconds to several minutes. Solr indexes the metadata and the content of each updated node, in the order in which the nodes were last changed. The rate at which the nodes are indexed is mainly determined by the time it takes to transform the content and the rate at which the nodes are being changed.
Some queries can be executed both transactionally against the database or with eventual consistency against the Index Engine. Only queries using the AFTS or CMIS query languages can be executed against the database. The Lucene query language cannot be used against the database whereas, selectNodes (XPATH) on the Java API always goes against the database, walking and fetching nodes as required.
Improvements to tracking in the Alfresco Solr 4/ Solr 6 integration results in less lag to metadata indexing. Metadata updates are impacted less by content indexing or the bulk updates to PATH for move, rename, link and, unlink operations.
The database can only be used for a subset of all the queries. These queries can be in the CMIS QL or AFTS QL. CMIS QL expressions are more likely to use TMDQ because of the default behaviour to do exact matches. AFTS QL defaults to full text search and uses constructs not supported by the database engine. For example, PATH queries.
In general, TMDQ does not support:
- Structural queries, full text search, and special fields: This includes SITE that are derived from structure and long strings (> 1024 characters). Text fields support exact and pattern-based matching subject to the database collation. Filter queries are rewritten along with the main query to create one large query. Ordering is fine, but again subject to database collation for text.
- Faceting
- Any aggregation: This includes counting the total number of matches for the query.
Fingerprint support is only on the Index Server.
AFTS and CMIS queries are parsed to an abstract form. This is then sent to an execution engine. There are two execution engines: the database and the Index Engine. The default is to try the database first and fall back to the Index Engine, if the query is not supported against the database. This is configurable for a search subsystem and per query using the Java API.
To support TMQD:
- Migrations from any version of Alfresco prior to Alfresco One 5.0 requires two optional patches to be applied.
- Migrations to Alfresco One 5.0 require one patch to be applied.
- Migration from Alfresco One 5.0 to Alfresco One 5.1 requires one patch to be applied.
- Alfresco Content Services supports TMDQ by default. The patches add supporting indexes that make the database approximately 25% larger.
Features of transactional metadata query
Use this information to understand the features of the transactional metadata query.
- Transactional metadata query is supported for both Solr 4 and noindex search subsystems.
- Transactional metadata query does not support facets.
- When you enable transactional metadata queries, a query is parsed to check if all of its parts are supported by the database-based query engine. If yes, the database is used automatically.
- Using the database gives transactional consistency as opposed to the eventual consistency provided by Solr 4.
- If you use the transactional metadata query with the noindex subsystem, the search functionality in Alfresco Share won’t work as it relies on full text search.
- Normally, a query will be executed against the database, if possible. Database execution of a query depends on the query itself. It also depends on the application of an optional patch to the database, which creates the required supporting database indexes. If the supporting indexes have been created, each index subsystem can be configured to:
- perform transactional execution of queries;
- execute queries transactionally, when possible, and fall back to eventual consistency; or
- always execute eventual consistency.
- When queries are executed against the database:
- Hidden nodes will be returned by the database, as they are in Alfresco Content Services 5.0.
- Large result sets are not supported because Alfresco Content Services does not evaluate permissions in query but as a post filter.
- Counts will not reflect the number of nodes that match the query.
- The
SearchParametersandQueryOptionsobjects can be used to override this behaviour per query.
Options supported by Query Languages
Use this information to know what options are supported by the Public API, CMIS Query Language (QL), and Alfresco Full Text Search Query Language (FTS QL).
Public API and TMDQ
From public API, anything that is not a simple query, a filter query, an option that affects these, or an option that affects what is returned for each node in the results, is not supported by TMDQ.
TMDQ supports:
querypagingincludeincludeRequestfieldssortdefaultsfilterQueriesscope(single)limitsfor permission evaluation
The default limits for permission evaluation will restrict the results returned from TMDQ based on both the number of results processed and time taken. These can be increased, if required.
The Public API does not support TMDQ for:
templateslocalisationandtimezonefacetQueriesfacetFieldsfacetIntervalspivotsstatsspellcheckhighlightranges facets- Solr
date math
Some of these will be ignored and produce transactional results; others will fail and be eventual.
The Public API ignores the SQL select part of a CMIS query and generate the results as it would do for AFTS.
CMIS QL & TMDQ
For CMIS QL, all expressions except for CONTAINS(), SCORE(), and IN_TREE() can now be executed against the database. Most data types are supported except for the CMIS uri and html types. Strings are supported but only if there are 1024 characters or less in length.
In Alfresco One 5.0, OR, decimal, and boolean types were not supported; it is only from Alfresco One 5.1 onwards that they are supported.
Primary and secondary types are supported and require inner joins to link them together. You can skip joins to secondary types from the fetch in CMIS using the public API. You would need an explicit SELECT list and supporting joins from a CMIS client. You still need joins to secondary types for predicates and ordering. As CMIS SQL supports ordering as part of the query language, you have to do it there and not via the Public API sort.
For multi-valued properties, CMIS QL supports ANY semantics from SQL 92. A query against a multi-lingual property, such as title or description, is treated as multi-valued and may match in any language. In the results, you will see the best value for your locale, which may not match the query. Also, ordering will consider any value.
UPPER() and LOWER()
UPPER() and LOWER() functions were in early drafts for the CMIS 1.0 specification, but were subsequently dropped. These are not part of the CMIS 1.0 or 1.1 specifications. They are not supported in TMDQ.
Alfresco FTS QL & TMDQ
It is more difficult to write AFTS queries that use TMDQ as the default behaviour is to use full text queries for text. These cannot go against the database. Also, special fields like SITE and TAG that are derived from the structure will not go to the database. TYPE, ASPECT and the related exact matches work fine with TMDQ. All property data types are fine but strings should be less than 1024 characters in length. Text queries have to be prefixed with = to avoid full text search. Additionally, PARENT is supported but OR is supported from Alfresco One 5.1 onwards.
Ranges, PATH, and ANCESTOR are not currently supported.
Database & TMDQ
Some differences between the database and TMDQ:
- The database has specific fixed collation as defined by the database schema. This affects all string comparisons, such as ordering or case sensitivity in equality. Solr uses Java localised collation and supports more advanced ordering and multi-lingual fields. The two engines can produce different results for lexical comparison, case sensitivity, ordering, or when using
mltextproperties. - The database results include hidden nodes. You can exclude them in the query. The Index Engine will never include hidden nodes and respects the index control aspect.
- The database post filters the results to apply permissions. As a result, no total count can be provided and large result sets are not well supported. This also affects paging behaviour. Permission evaluation is truncated by time or number of evaluations. TMDQ is not intended to scale to more than 10s of thousands of nodes. It will not perform well for users who can read one node in a million. It cannot and will not tell you how many results matched the query. To do this could require an inordinate number of permission checks. It does enough to give you the page requested. The Index Engine can apply permissions at query and facet time to billions of nodes. For the same reason, do not expect any aggregation support in TMDQ.
CONTAINS()support is complicated. The pure CMIS part of the query andCONTAINS()part are melded together into a single abstract query representation. By default, in CMIS theCONTAINS()expression implies full text search, so the queries will go to the Index Server.- The database does not score. It will return results in some order that depends on the query plan, unless you ask for specific ordering. A three part
ORquery, where some documents match more than one constraint, is treated as equal. In the Index Engine, the more parts of anORmatch, the higher is the score. The docs that match more optional parts of the query will come higher up. - Queries from Share will not use TMDQ as they will most likely have a full text part to the query and ask for facets.
Exact match and patterns
TMDQ can support exact match on all properties (subject to database collation) regardless of the property index configuration in the data model. All text properties can support pattern matching. The database index supports a fixed number of leading characters. The database store a maximum string size before it overflows to another form. Only short form strings can be used in database queries.
Solr supports exact match on all non-text properties. Text properties only support exact and pattern matches if set to tokenised both or false in the data model. Solr provides supports values up to approximately 32,700 UTF-8 bytes.
The following specific CMIS QL fields are supported:
cmis:parentIdcmis:objectcIdcmis:objectTypeIdcmis:baseTypeIdcmis:contentStreamMimeTypecmis:contentStreamLength
The following CMIS QL comparison operators are supported:
=,!=,<>,<,<=,>,>=IN,NOT IN,LIKE
The following AFTS exact matches and patterns are supported:
=<field>:term=<field>:ter*=<field>:*erm
Full text search for CMIS QL and AFTS
- CMIS QL
- IN_TREE()
- IN_FOLDER()
- AFTS
- PATH
Supported for special fields in TMDQ using AFTS
- PARENT
- TYPE
- ASPECT
- EXACTTYPE
- EXACTASPECT
Note: CMIS QL does not support any use of CONTAINS() using the database.
Transactional Metadata Query and the Index Engine are intended to support different use cases. They differ in queries and options that they support and in the results they generate with respect to collation and scoring.
Transactional metadata queries supported by database
Use this information to understand the queries supported by the database.
The Alfresco Full Text Search (FTS) query text can be used standalone or it can be embedded in CMIS-SQL using the contains() predicate function. The CMIS specification supports a subset of Alfresco FTS. For more information on search syntax, see Alfresco Full Text Search Reference.
CMIS QL
The following object types and their sub-types are supported:
-
cmis:documentFor example:
select * from cmis:document -
cmis:folderFor example:
select * from cmis:folder -
Aspects
For example:
select * from cm:dublincore
CMIS property data types
The WHERE and ORDER BY clauses support the following property data types and comparisons:
-
string- Supports all properties and comparisons, such as
=,<>,<,<=,>=,>,IN,NOT IN,LIKE - Supports ordering for single-valued properties For example:
select * from cmis:document where cmis:name <> 'fred' order by cmis:name - Supports all properties and comparisons, such as
integer- Supports all properties and comparisons, such as
=,<>,<,<=,>=,>,IN,NOT IN - Supports ordering for single-valued properties
- Supports all properties and comparisons, such as
double- Supports all properties and comparisons, such as
=,<>,<,<=,>=,>,IN,NOT IN - Supports ordering for single-valued properties
- Supports all properties and comparisons, such as
float- Supports all properties and comparisons, such as
=,<>,<,<=,>=,>,IN,NOT IN - Supports ordering for single-valued properties
- Supports all properties and comparisons, such as
boolean- Supports properties and comparisons, such as
=and<> - Supports ordering for single-valued properties
- Supports properties and comparisons, such as
id- Supports
cmis:objectId,cmis:baseTypeId,cmis:objectTypeId,cmis:parentId,=,<>,IN,NOT IN - Ordering using a property, which is a CMIS identifier, is not supported.
- Supports
-
datetime- Supports all properties and comparisons
=,<>,<,<=,>=,>,IN,NOT IN - Supports ordering for single-valued properties For example:
select * from cmis:document where cmis:lastModificationDate = '2010-04-01T12:15:00.000Z' order by cmis:creationDate ASC - Supports all properties and comparisons
Note: While the CMIS URI data type is not supported, multi-valued properties and multi-valued predicates as defined in the CMIS specification are supported. For example,
select * from ext:doc where 'test' = ANY ext:multiValuedStringProperty
Supported predicates
A predicate specifies a condition that is true or false about a given row or group. The following predicates are supported:
- Comparison predicates, such as
=,<>,<,<=,>=,>,<> INpredicate-
LIKEpredicateNote: Prefixed expressions perform better and should be used where possible.
NULLpredicate- Quantified comparison predicate (
= ANY) - Quantified IN predicate (
ANY .... IN (....)) IN_FOLDERpredicate function
Unsupported predicates
The following predicates are not supported:
- TEXT search predicate, such as
CONTAINS()andSCORE() IN_TREE()predicate
Supported logical operators
The following logical operators are supported:
ANDNOTOR
Other operators
In the following cases, the query will go to the database but the result might not be as expected. In all other unsupported cases, the database query will fail and fall back to be executed against the Solr 4 subsystem.
IS NOT NULLIS NULL: Currently, this operator will only find properties that are explicitly NULL as opposed to the property not existing.SORT: The multi-valued andmltextproperties will\ sort according to one of the values. Ordering is not localized and relies on the database collation. It uses anINNER JOIN, which will also filter NULL values from the result set.d:mltext: This data type ignores locale. However, if there is more than one locale, the localised values behave as a multi-valued string. Ordering onmltextwill be undefined as it is effectively multi-valued.UPPER()andLOWER(): Comparison predicates provide additional support for SQLUPPER()and LOWER() functions (that were dropped from a draft version of CMIS specification but are supported for backward compatibility).
Configuring transactional metadata query
Configure the transaction metadata query using the subsystem properties.
The common properties used to configure the transactional metadata query for the search subsystems are:
solr.query.cmis.queryConsistencysolr.query.fts.queryConsistency
These properties should be set in the alfresco-global.properties file.
The default value for these properties is TRANSACTIONAL_IF_POSSIBLE. However, you can override it with any of the following permitted values:
EVENTUALTRANSACTIONAL
The solr.query.cmis.queryConsistency and solr.query.fts.queryConsistency properties can also be set per query on the SearchParameters and QueryOptions objects.
Configuring an optional patch for upgrade
Transactional metadata query requires two optional patches to be applied for full support. If no patch is applied there is no database support.
The first patch does not support boolean, float or double properties, and disjunction (OR). It adds the database support for TMDQ equivalent to an out-of-the-box Alfresco One 5.0 install (where float, double, boolean, and disjunctions are not supported).
The second patch adds the database support for TMDQ equivalent to an out-of-the-box Alfresco One 5.1 install. Some CMIS QL use cases where OR would be used are supported by using IN. In Alfresco One 5.1 and later versions, these restrictions go away after applying all TMDQ optional patches. The database size will be approximately 25% larger with all indexes applied.
To use or run a query against the float, double, or boolean property data types, you need to run an optional patch that adds the required indexes to the database. To do so, set the following property in the alfresco-global.properties file:
system.metadata-query-indexes-more.ignored=false
When using all other data types (such as string, integer, id, or datetime), to enable the patch that adds the required indexes to the database, set the following property in the alfresco-global.properties file:
system.metadata-query-indexes.ignored=false
If these optional patches are not run, the metadata query will not be used, regardless of the configuration. This configuration is checked when the subsystem is reloaded.
For a new install, the default behavior is to use the TRANSACTIONAL_IF_POSSIBLE metadata queries. For an upgraded system, the TRANSACTIONAL_IF_POSSIBLE metadata queries will be used only if the upgrade patches have been run.
Adding optional indexes to database
When you are upgrading the database, you can add optional indexes in order to support the metadata query feature. This information lets you know the likely duration of the upgrade and how to do it incrementally.
For large repositories, creating the database indexes to support the transactional metadata query can take some time. To check how long it will take, you can add the first index to the database and note the time taken. The full upgrade is estimated to take less than 10 times this value. However, this can vary depending on the structure of the data, the database, and the size of the repository.
The SQL patch script can be run in parts, adding one index at a time. The patch is marked complete by the statement that inserts into alf_applied_patch. The patch can be marked as unapplied using the SQL delete statement.
Configuring search in Alfresco Share
The following sections describe how to configure search in Alfresco Share.
- Controlling permissions checking on search results
You can limit time that Alfresco Content Services spends on ensuring that the user executing the search has the necessary permissions to see each result. Setting this limit increases search speed and reduces the use of resources. - Controlling search results
Use this information to controlling the maximum number of items that an Alfresco Share search returns.
Controlling permissions checking on search results
You can limit time that Alfresco Content Services spends on ensuring that the user executing the search has the necessary permissions to see each result. Setting this limit increases search speed and reduces the use of resources.
You can limit both the time spent and the number of documents checked before Alfresco Content Services returns a search query using the system.acl.maxPermissionCheckTimeMillis and the system.acl.maxPermissionChecks properties. The default values are 10000 and 1000 respectively.
-
Open the
<classpathRoot>/alfresco-global.propertiesfile. -
Set the
system.acl.maxPermissionCheckTimeMillisproperty.For example,
system.acl.maxPermissionCheckTimeMillis=20000. -
Set the
system.acl.maxPermissionChecksproperty.For example,
system.acl.maxPermissionChecks=2000.Note:
- If you increase these values and have a query that returns a very large number of results, (a) the search results will take longer to be returned to the user, and (b) the system will spend longer to check permissions, leading to the possibility of performance degradation.
- If you set these values to a low number, you run the risk of inconsistent search results every time you run the same search.
- These settings are also applied when paging. So paging the results will only go up to the maximum returned results based on these settings.
Controlling search results
Use this information to controlling the maximum number of items that an Alfresco Share search returns.
By default, the Share search feature returns a maximum of 250 search results. You can extend this number of search results to return more than 250 entries.
-
Download the share-config.xml file.
-
Open the share-config.xml file and copy the
<config evaluator="string-compare" condition="Search" replace="true">section. -
Open the
\share-config-custom.xml file and then paste the copied section. -
Locate the
<max-search-results>250</max-search-results>property and then edit the value to your preferred number of search results. -
For the changes to take effect, refresh the Alfresco Content Services web scripts. To refresh the web scripts:
-
Navigate to the web scripts Home page.
For example, go to: http://
:8080/share/page/index. -
Click on Refresh Web Scripts.
You have now refreshed the web scripts and set a limit to the number of items a search in Share returns.
-
Note: Custom searches and searches from the node browser use the
solr.query.maximumResultsFromUnlimitedQueryproperty to control search results. For more information, see Solr core configuration properties.
Configuring OpenSearch
You can configure OpenSearch to use a search engine proxy.
OpenSearch is a collection of simple formats for sharing search string results, in order to extend existing schemas such as ATOM or RSS. The list of registered search engines is in /config/alfresco/web-scripts-config.xml. You can configure a search engine proxy so that the OpenSearch client indirectly submits a search request through the Alfresco Content Services Web Server (the proxy), rather than directly to the search engine.
-
Create a new file called /config/alfresco/extension/web-scripts-config-custom.xml.
This file will contain the search engine proxy information.
-
Create a new search engine proxy, using the
proxyattribute. For example:<engine label="Alfresco Open Source Talk" proxy="opentalk"> <url type="application/rss+xml">http://blogs.alfresco.com/opentalk/ os-query?s={searchTerms}&itemstart={startIndex?}&itempage={startPage?} &itemlimit={count?}</url> </engine>The value of the
proxyattribute must be a unique name that identifies the search engine. -
Save /config/alfresco/extension/web-scripts-config-custom.xml.
Configuring Alfresco Search Services with Solr 6
Alfresco Content Services 5.2.7 provides search capabilities for searching content within the repository using Solr 6.
In all previous Alfresco Content Services versions, Solr.war was bundled with the repository. With Alfresco Content Services 5.2.7, you no longer deploy a Solr.war to your application server. Solr 6 is an independently executable standalone application powered by a Jetty server.
Alfresco Content Services uses Solr 4 as the default search service index. For an improved and efficient search functionality, you can upgrade to Alfresco Search Services with Solr 6.
- Solr 6 features and enhancements
Alfresco Content Services 5.2.7 comes with new enhancements to Alfresco’s search capabilities. Use this information to know about the new features of the Alfresco Search Services 1.2. - Installing and configuring Solr 6
When you install Alfresco Content Services 5.2.7 using the setup wizard (installer), Solr 4 is installed by default. For additional search functionality, you can install Alfresco Search Services with Solr 6 which introduces additional features, including new sharding methods and sharding with SSL. It can optionally be configured with or without SSL. - Upgrading from Solr 4 to Solr 6 search
Use this information to upgrade from Alfresco One 5.1 with the Solr 4 search index server to Alfresco Content Services 5.2.7 with the Solr 6 search index server. - Upgrading from Alfresco Search Services 1.0 or 1.1 to Alfresco Search Services 1.2
Use this information to upgrade from Alfresco Search Services 1.0 or 1.1 to Alfresco Search Services 1.2 with the Solr 6 search index server. - Backing up Solr 6
There are a number of ways to back up Solr 6. You can set the Solr indexes backup properties either by using the Admin Console in Share, by editing thealfresco-global.propertiesfile, or by using a JMX client, such as JConsole. - Solr 6 sharding methods
When an index grows too large to be stored on a single search server, it can be distributed across multiple search servers. This is known as sharding. The distributed/sharded index can then be searched using Alfresco/Solr’s distributed search capabilities. - Document Fingerprints
Alfresco Content Services 5.2.7 provides support for Document Fingerprints to find related documents. Document Fingerprinting is performed by algorithms that map data, such as documents and files to shorter text strings, also known as fingerprints. This feature is exposed as a part of the Alfresco Full Text Search Query Language.
Solr 6 features and enhancements
Alfresco Content Services 5.2.7 comes with new enhancements to Alfresco’s search capabilities. Use this information to know about the new features of the Alfresco Search Services 1.2.
New features and enhancements of Solr 6
-
New sharding options
The new sharding approach randomly assigns nodes to shards by using the following methods:
- DBID (murmur hash): The most common and the default sharding method is to use the Alfresco node reference. It supports sharding of nodes based on the murmur hash of the DBID.
- ACLID (murmur hash): Use an ACLID approach if your repository makes extensive use of ACLs.
- DateMonth: Use the date-based sharding to group your data sequentially by DATE. It also allows any month grouping (sesquiannually, year, quarter, month)
- Use any string property, such as date, datetime, or text with a regular expression extraction and hashing as a sharding option. All documents with the same extracted key value will be in the same shard. For more information, see Solr 6 sharding methods.
-
Fingerprints
To enable you to find similar documents, Solr 6 generates a fingerprint of a document’s content using the MinHash technique.
-
Highlighting
Search term highlighting is now available in Share to help users identify the content they are looking for. The search term entered by the user is highlighted in the Search Results page if it is found in a file name, title, or description. The search results page also extracts and displays a snippet of relevant text from a document that contains the searched term.
-
Multi-select facets
Multi-select faceting allows you to see and select multiple facet values for different facets. Generally, facets only apply to the data that is being filtered. With multi-select faceting, it is now possible to show facets for all documents, including those documents that would be seen without facet filtering applied.
-
Category faceting
Solr 6 allows you to create facets based on categories in the public API for search.
-
Indexing Multiple Document Versions
A standard search usually looks at the most recent version of a document. With Solr 6, Alfresco can index all the versions of a document (across different stores - live, archive, and deleted) by indexing the version store. If version store indexing is enabled, all the previous versions of a document can be searched and all matching versions will be returned.
This feature is useful in cases where you need to search the entire history of a document. The archive store may be much larger than the index for live documents as there may be many more previous versions of a document than the single live version. So, use this feature with caution.
This feature is not exposed in Share; it is only available via the REST API.
-
Improved Solr Admin screen
Improvements have been made to the Admin screen to enable complete Solr configuration. For more information, see Configuring Solr 6 sharding using the Admin Console.
Installing and configuring Solr 6
When you install Alfresco Content Services 5.2.7 using the setup wizard (installer), Solr 4 is installed by default. For additional search functionality, you can install Alfresco Search Services with Solr 6 which introduces additional features, including new sharding methods and sharding with SSL. It can optionally be configured with or without SSL.
You may choose to secure Alfresco Search Services by installing Solr 6 with SSL enabled.
Note: When choosing to secure Solr 6 with SSL, be aware that there is a known issue when using Solr 6 where the SSL truststore and keystore passwords are visible as plain text in the Solr 6 process arguments. Alfresco recommends that you ensure the server running Solr 6 is security hardened and access is restricted to admin users only. For more information, see https://issues.apache.org/jira/browse/SOLR-8897.
Alfresco Search Services 1.2 supports all Alfresco Content Services 5.2.7 certified platforms and components. For more information, see Supported Platforms.
- Installing and configuring Solr 6 without SSL
Use this information to install Alfresco Search Services with Solr 6 on the same machine as Alfresco without SSL. - Installing and configuring Solr 6 with SSL enabled
Use this information to install Alfresco Search Services with Solr 6 with SSL enabled. - Configuring the Solr 6 using Admin Console
The topic describes the properties for configuring the Solr 6 search service. - Solr 6 subsystem
Search is contained in a subsystem and it has an implementation of Solr 6. - Solr 6 directory structure
After you have installed Solr 6, several directories and configuration files related to Solr will be available in the Solr 6 home directory. - Solr 6 externalized configuration
As a best practice, use the alfresco-search-services/solr.in.sh file (Linux-based platform) or alfresco-search-services/solr.in.cmd file (Windows-based platform) to set the external configuration that applies to all the Solr 6 cores.
Installing and configuring Solr 6 without SSL
Use this information to install Alfresco Search Services with Solr 6 on the same machine as Alfresco without SSL.
This task assumes that you have:
- Installed Alfresco Content Services 5.2.7. See Installing using setup wizards.
-
Set the following properties in the
alfresco-global.propertiesfile:index.subsystem.name=solr6 solr.secureComms=none solr.port=8983
-
Download and unzip the Solr 6 distribution,
alfresco-search-services-1.2.x.zipto a preferred location.By default, the contents of
alfresco-search-services-1.2.x.zipare decompressed in a root folder as/alfresco-search-services. -
Update the alfresco-search-services/solrhome/conf/shared.properties file.
-
If you use several languages across your organization, you must enable cross-language search support in all fields, by adding the following:
alfresco.cross.locale.datatype.0={http://www.alfresco.org/model/dictionary/1.0}text alfresco.cross.locale.datatype.1={http://www.alfresco.org/model/dictionary/1.0}content alfresco.cross.locale.datatype.2={http://www.alfresco.org/model/dictionary/1.0}mltext
-
-
(Optional) If you want to install Solr 6 on a separate machine, check the following before starting Solr 6:
-
Set the values of environment variables, such as
SOLR_SOLR_HOSTandSOLR_SOLR_PORT, in the alfresco-search-services/solr.in.sh file (Linux-based platform) or alfresco-search-services/solr.in.cmd file (Windows-based platform). -
Set the values of environment variables, such as
SOLR_ALFRESCO_HOSTandSOLR_ALFRESCO_PORT, in the alfresco-search-services/solr.in.sh file (Linux-based platform) or alfresco-search-services/solr.in.cmd file (Windows-based platform).
-
-
(Optional) Update the alfresco-search-services/solrhome/conf/shared.properties file.
-
Unlike Solr 4, suggestion is disabled by default for Solr 6. If you want to enable suggestion, add the following:
alfresco.suggestable.property.0={http://www.alfresco.org/model/content/1.0}name alfresco.suggestable.property.1={http://www.alfresco.org/model/content/1.0}title alfresco.suggestable.property.2={http://www.alfresco.org/model/content/1.0}description alfresco.suggestable.property.3={http://www.alfresco.org/model/content/1.0}content
Note: The spell check functionality does not work with Solr 6 as suggestion is disabled for scalability purpose.
-
-
To start Solr 6 with all the default settings, use the following command:
./solr/bin/solr start -a "-Dcreate.alfresco.defaults=alfresco,archive"This command automatically creates the
alfrescoand thearchivecores.The command line parameter,
-apasses additional JVM parameters, for example, system properties using-D.Note: The
-Dcreate.alfresco.defaults=alfresco,archivecommand automatically creates thealfrescoandarchivecores. Therefore, you should only start Solr 6 with-Dcreate.alfresco.defaults=alfresco,archivethe first time you are running Solr 6.Note: You should run this application as a dedicated user. For example, you can create a Solr user.
Note: To ensure that Solr 6 connects using IPv6 protocol instead of IPv4, add
-Djava.net.preferIPv6Addresses=trueto the Solr 6 startup parameters.Once your Solr 6 is up and running, you should see a message like:
Waiting up to 180 seconds to see Solr running on port 8983 [] Started Solr server on port 8983 (pid=24289). Happy searching!To stop the currently running Solr 6 instance, use:
./solr/bin/solr stopThe Solr 6 logs are stored in the alfresco-search-services/logs/solr.log file, by default. This can be configured in solr.in.sh.
You have successfully created an
alfrescocore and anarchivecore. To verify, in a browser, navigate to the Solr URL, http://localhost:8983/solr. In the Solr Admin UI, select the core selector drop-down list and verify that both thealfrescoandarchivecores are present in the list.Allow a few minutes for Solr 6 to start indexing.
-
Go to Admin Console > Repository Services > Search Service and verify that:
-
You see the Solr 6 option in the Search Service In Use list.
-
Under Main (Workspace) Store Tracking Status, the Approx Transactions to Index is 0.
-
-
Decommission Solr 4.
-
Disable Solr 4 tracking in the
alfresco/solr4/workspace-SpacesStore/conf/solrcore.propertiesfile.enable.alfresco.tracking=false -
To remove the Solr 4 web application and indexes, stop the Tomcat server which is running Solr 4.
-
Remove the
<ALFRESCO_HOME>/tomcat/webapps/solr4directory and the<ALFRESCO_HOME>/tomcat/webapps/solr4.warfile. -
Remove the
<ALFRESCO_HOME>/tomcat/conf/Catalina/localhost/solr4.xmlfile. -
Finally, remove the Solr 4 indexes.
-
Installing and configuring Solr 6 with SSL enabled
Use this information to install Alfresco Search Services with Solr 6 with SSL enabled.
This task assumes that you are using Alfresco Content Services 5.2.7 with clustering enabled.
-
Download and unzip the Solr 6 distribution,
alfresco-search-services-1.2.x.zipto a preferred location. -
To secure access to Alfresco Search Services, you must create a new set of keystores and keys.
-
Generate secure keys specific to your Alfresco installation. For more information, see Generating secure keys for Solr communication.
-
Create a new keystore directory at alfresco-search-services/solrhome.
-
In the production environment, copy your custom keystore and truststore to the
alfresco-search-services/solrhome/keystoredirectory. -
Update the SSL-related system properties.
If you are using a Windows-based platform, update the
alfresco-search-services/solr.in.cmdfile as:set SOLR_SSL_KEY_STORE=<solr>\keystore\ssl.repo.client.keystore set SOLR_SSL_KEY_STORE_PASSWORD=kT9X6oe68t set SOLR_SSL_TRUST_STORE=<solr>\keystore\ssl.repo.client.truststore set SOLR_SSL_TRUST_STORE_PASSWORD=kT9X6oe68t set SOLR_SSL_NEED_CLIENT_AUTH=true set SOLR_SSL_WANT_CLIENT_AUTH=falseIf you are using a Linux-based platform, update the
alfresco-search-services/solr.in.shfile as:SOLR_SSL_KEY_STORE=<solr>/keystore/ssl.repo.client.keystore SOLR_SSL_KEY_STORE_PASSWORD=kT9X6oe68t SOLR_SSL_TRUST_STORE=<solr>/keystore/ssl.repo.client.truststore SOLR_SSL_TRUST_STORE_PASSWORD=kT9X6oe68t SOLR_SSL_NEED_CLIENT_AUTH=true SOLR_SSL_WANT_CLIENT_AUTH=false
-
-
Update the
alfresco-search-services/solrhome/conf/shared.propertiesfile.-
If you use several languages across your organization, you must enable cross-language search support in all fields, by adding the following:
alfresco.cross.locale.datatype.0={http://www.alfresco.org/model/dictionary/1.0}text alfresco.cross.locale.datatype.1={http://www.alfresco.org/model/dictionary/1.0}content alfresco.cross.locale.datatype.2={http://www.alfresco.org/model/dictionary/1.0}mltext
-
-
(Optional) If you want to install Solr 6 on a separate machine, check the following before starting Solr 6:
-
Set the values of environment variables, such as
SOLR_SOLR_HOSTandSOLR_SOLR_PORT, in thealfresco-search-services/solr.in.shfile (Linux-based platform) oralfresco-search-services/solr.in.cmdfile (Windows-based platform). -
Set the values of environment variables, such as
SOLR_ALFRESCO_HOSTandSOLR_ALFRESCO_PORT, in thealfresco-search-services/solr.in.shfile (Linux-based platform) oralfresco-search-services/solr.in.cmdfile (Windows-based platform).
-
-
(Optional) Update the
alfresco-search-services/solrhome/conf/shared.propertiesfile.-
Unlike Solr 4, suggestion is disabled by default for Solr 6. If you want to enable suggestion, add the following:
alfresco.suggestable.property.0={http://www.alfresco.org/model/content/1.0}name alfresco.suggestable.property.1={http://www.alfresco.org/model/content/1.0}title alfresco.suggestable.property.2={http://www.alfresco.org/model/content/1.0}description alfresco.suggestable.property.3={http://www.alfresco.org/model/content/1.0}content
Note: The spell check functionality does not work with Solr 6 as suggestion is disabled for scalability purpose.
-
-
To configure the Solr 6 cores, set the following options:
- Before creating the alfresco and archive cores:
- Set
alfresco.secureComms=httpsinalfresco-search-services/solrhome/templates/rerank/conf/solrcore.properties. -
Copy the custom keystores to the
alfresco-search-services/solrhome/templates/rerank/confdirectory.ssl.repo.client.keystore ssl.repo.client.truststore ssl-keystore-passwords.properties ssl-truststore-passwords.properties
- Set
- If the alfresco and archive cores already exist, ensure that
alfresco.secureCommsis set tohttpsfor both the cores. For example:alfresco-search-services/solrhome/alfresco/conf/solrcore.propertiesalfresco-search-services/solrhome/archive/conf/solrcore.properties
- Before creating the alfresco and archive cores:
-
For running a single instance of Solr 6, use the following option:
./solr/bin/solr start -a "-Djavax.net.ssl.keyStoreType=JCEKS -Djavax.net.ssl.trustStoreType=JCEKS -Dsolr.ssl.checkPeerName=false -Dcreate.alfresco.defaults=alfresco,archive"Note: The
-Dcreate.alfresco.defaults=alfresco,archivecommand automatically creates thealfrescoandarchivecores. Therefore, you should only start Solr 6 with-Dcreate.alfresco.defaults=alfresco,archivethe first time you are running Solr 6.Note: To ensure that Solr 6 connects using IPv6 protocol instead of IPv4, add
-Djava.net.preferIPv6Addresses=trueto the Solr 6 startup parameters.Note: You should run this application as a dedicated user. For example, you can create a Solr user.
The default port used is 8983.
The command line parameter,
-apasses additional JVM parameters, for example, system properties using-D.Once your Solr 6 is up and running, you should see a message like:
Waiting up to 180 seconds to see Solr running on port 8983 [] Started Solr server on port 8983 (pid=24289). Happy searching!To stop all instances of Solr 6, use:
./solr/bin/solr stopThe Solr 6 logs are stored in the
alfresco-search-services/logs/solr.logfile, by default. This can be configured insolr.in.sh(for Linux) orsolr.in.cmd(for Windows) usingSOLR_LOGS_DIR.You have successfully created an
alfrescocore and anarchivecore. To verify, in a browser, navigate to the Solr URL, https://localhost:8983/solr. In the Solr Admin UI, select the core selector drop-down list and verify that both thealfrescoandarchivecores are present in the list.Allow a few minutes for Solr 6 to start indexing.
-
When the Solr 6 index is updated, you must enable the Solr 6 subsystem and disable the Solr 4 subsystem.
-
Go to Admin Console > Repository Services > Search Service and select Solr 6 from the Search Service In Use list.
-
Disable Solr 4 tracking in the
alfresco/solr4/workspace-SpacesStore/conf/solrcore.propertiesfile.enable.alfresco.tracking=false -
To remove the Solr 4 web application and indexes, stop the Tomcat server which is running Solr 4.
-
Remove the
<ALFRESCO_HOME>/tomcat/webapps/solr4directory and the<ALFRESCO_HOME>/tomcat/webapps/solr4.warfile. -
Remove the
<ALFRESCO_HOME>/tomcat/conf/Catalina/localhost/solr4.xmlfile. -
Finally, remove the Solr 4 indexes.
-
If you are not using sharded Solr 6, go to the Admin Console > Search Service Sharding page and:
- Deselect Dynamic Shard Instance Registration.
- Select Purge at Startup.
Configuring the Solr 6 using Admin Console
The topic describes the properties for configuring the Solr 6 search service.
-
Open the Admin Console. For more information, see Launching the Admin Console
-
In the Repository Services section, click Search Service.
You see the Search Service page.
-
In the Search Service section, select Solr 6 from the Search Service In Use list.
-
Set the Solr 6 search service properties:
Solr search property Example setting What is it? Content Tracking Enabled Yes This specifies that Solr 6 can still track with the No Index search enabled. This setting can be used to disable Solr 6 tracking by separate Solr instance(s) configured to track this server. Solr Port (Non-SSL) 8080 This specifies the application server’s http port (non-secure) on which Solr 6 is running. This is only used if Solr 6 is configured to run without secure communications. Solr base URL /solr6 This specifies the base URL for the Solr 6 web application. Solr Hostname localhost This specifies the hostname on which the Solr 6 server is running. Use localhost if running on the same machine. Solr SSL Port 8443 This specifies the application server’s https port on which Solr 6 is running. Auto Suggest Enabled 0 This specifies that the Solr 6 auto-suggest feature is enabled. This feature presents suggestions of popular queries as a user types their query into the search box or text box. Indexing in Progress No This specifies if Solr 6 is currently indexing outstanding transactions. Last Indexed Transaction 17 This specifies the transaction ID most recently indexed by Solr 6. Approx Index Time Remaining 0 Seconds This specifies the estimated time that Solr 6 will take to complete indexing the current outstanding transactions. Disk Usage (GB) 0.001748 This specifies the disk space used by the latest version of the Solr 6 index. Allow at least double this value for background indexing management. Index Lag 0 s This specifies the time that indexing is currently behind the repository updates. Approx Transactions to Index 0 This specifies the estimated number of outstanding transactions that require indexing. Memory Usage (GB) 0 This specifies the current memory usage. The value may vary due to transient memory used by background processing. Indexing in Progress No This specifies if Solr 6 is currently indexing outstanding transactions. Last Indexed Transaction 17 This specifies the transaction ID most recently indexed by Solr 6. Approx Index Time Remaining 0 Seconds This specifies the estimated time that Solr 6 will take to complete indexing the current outstanding transactions. Disk Usage (GB) 0.000034 This specifies the disk space used by the latest version of the Solr 6 index. Allow at least double this value for background indexing management. Index Lag 0 s This specifies the time that indexing is currently behind the repository updates. Approx Transactions to Index 0 This specifies the estimated number of outstanding transactions that require indexing. Memory Usage (GB) 0 This specifies the current memory usage. The value may vary due to transient memory used by background processing. The value does not include Lucene related caches. Backup Location (Main Store) ${dir.root}/solr6Backup/alfresco This specifies the location where the index backup for the main WorkspaceStore is stored on the Solr 6 server. Backup Cron Expression (Main Store) 0 0 2 * * ? This specifies a unix-like expression, using the same syntax as the cron command, that defines when backups occur. The default value is 0 0 2 * * ? meaning the backup is performed daily at 02.00. Backups To Keep (Main Store) 3 This specifies the number of backups to keep (including the latest backup). Backup Location (Archive Store properties) ${dir.root}/solr6Backup/archive This specifies the location where the index backup for ArchiveStore is stored on the Solr 6 server. Backup Cron Expression (Archive Store properties) 0 0 4 * * ? This specifies a unix-like expression, using the same syntax as the cron command, that defines when backups occur. The default value is 0 0 4 * * ? meaning the backup is performed daily at 04.00. Backups To Keep (Archive Store properties) 3 This specifies the number of backups to keep (including the latest ba CMIS Query Use database if possible This specifies the default mode which defines if and when the database should be used to support a subset of the CMIS Query Language. Alfresco Full Text Search Use database if possible This specifies the default mode which defines if and when the database should be used to support a subset of the Alfresco Full Text Search. -
Click Save to apply the changes you have made to the properties.
If you do not want to save the changes, click Cancel.
Solr 6 subsystem
Search is contained in a subsystem and it has an implementation of Solr 6.
Just like all previous versions of Solr, the activation and configuration of the Solr 6 subsystem can be done either by using the alfresco-global.properties file or the Admin Console.
Set the following Solr-related properties in the alfresco-global.properties file.
### Solr indexing ###
index.subsystem.name=solr6
solr.secureComms=none
solr.port=8983
solr.host=localhost
solr.baseUrl=/solr
These configuration properties are used by Alfresco to talk to Solr 6.
Solr 6 directory structure
After you have installed Solr 6, several directories and configuration files related to Solr will be available in the Solr 6 home directory.
The Solr 6 distribution (alfresco-search-services-1.2.x.zip) contains the following artifacts:
-
solrhome directory: This is the Solr configuration directory that is specific to Alfresco. It contains the following sub-folders are files:
Folder/File Description alfrescoModels When you install Solr 6, it creates an empty alfrescoModels directory. When Solr first talks to Alfresco, it pulls the model definitions into this directory. conf This directory contains the shared.properties file. See Solr 6 externalized configuration. templates This directory contains the core templates that define the base configuration for a new Solr core with some configuration properties. This directory also contains the /rerank/conf/solrcore.properties file. solr.xml This file defines the Solr web application context. -
logs directory: This directory contains the Solr 6-specific logging configuration file.
Folder/File Description log4j.properties This is the configuration file for Solr-specific logging. The Solr 6 log file can be found at /logs/solr.log. - solr directory: This directory contains the Solr 6 binaries and runtime Java library files.
- contentstore directory: This directory does not appear in the alfresco-search-services-1.2.x.zip file. It is automatically created after your Solr 6 cores are created and they start indexing. It stores the cache of all the content.
- solr.in.cmd: Use this file to specify additional Solr 6 configuration options for Windows.
- solr.in.sh: Use this file to specify additional Solr 6 configuration options for non-Windows platform, such a Linux and Mac OS X.
- README.MD: This file provides version information for the Alfresco Content Services, Alfresco Search Services, and Solr 6.
Solr 6 externalized configuration
As a best practice, use the alfresco-search-services/solr.in.sh file (Linux-based platform) or alfresco-search-services/solr.in.cmd file (Windows-based platform) to set the external configuration that applies to all the Solr 6 cores.
Note: For any property, only the environment variables should be specified in the solr.in.sh/ solr.in.cmd file. For example,
SOLR_SOLR_HOST,SOLR_SOLR_PORT, orSOLR_ALFRESCO_PORT.
The following configuration properties are used by an external client, such as Alfresco to talk to Solr. Besides the solr.in.sh/ solr.in.cmd file, you can also set these properties in the shared.properties file.
-
solr.host|**Description**|Specifies the host name that Alfresco uses to talk to Solr.| |**JNDI Property**|java:comp/env/solr/host| |**Java System Property**|solr.host or solr.solr.host| |**Environment Variable**|SOLR_SOLR_HOST| |**Default Value**|`localhost`| -
solr.port|**Description**|Specifies the port Solr will listen to.| |**JNDI Property**|java:comp/env/solr/port| |**Java System Property**|solr.port or solr.solr.port| |**Environment Variable**|SOLR_SOLR_PORT| |**Default Value**|`8983`| -
solr.baseUrl|**Description**|Specifies the base URL of the Solr server.| |**JNDI Property**|java:comp/env/solr/baseurl| |**Java System Property**|solr.baseurl or solr.solr.baseurl| |**Environment Variable**|SOLR_SOLR_BASEURL| |**Default Value**|`/solr`| -
solr.content.dir|**Description**|Specifies the location of the Solr content directory.| |**JNDI Property**|java:comp/env/solr/content/dir| |**Java System Property**|solr.content.dir or solr.solr.content.dir| |**Environment Variable**|SOLR_SOLR_CONTENT_DIR| |**Default Value**|<SOLR6_INSTALL_LOCATION>/contentstore| -
solr.model.dir|**Description**|Specifies the location of the Solr model directory.| |**JNDI Property**|java:comp/env/solr/model/dir| |**Java System Property**|solr.model.dir or solr.solr.model.dir| |**Environment Variable**|SOLR_SOLR_MODEL_DIR| |**Default Value**|<SOLR6_INSTALL_LOCATION>/solrhome/alfrescoModel|
Configurable per core values
These properties can also be set in the solrcore.properties file.
-
alfresco.host|**Description**|Specifies the externally resolvable host name of the Alfresco web application.| |**JNDI Property**|java:comp/env/alfresco/host| |**Java System Property**|alfresco.host or solr.alfresco.host| |**Environment Variable**|SOLR_ALFRESCO_HOST| |**Default Value**|`localhost`| -
alfresco.port|**Description**|Specifies the externally resolvable port number of the Alfresco web application.| |**JNDI Property**|java:comp/env/alfresco/port| |**Java System Property**|alfresco.port or solr.alfresco.port| |**Environment Variable**|SOLR_ALFRESCO_PORT| |**Default Value**|`8080`| -
alfresco.baseUrl|**Description**|Configures the base URL to Alfresco web project.| |**JNDI Property**|java:comp/env/alfresco/baseurl| |**Java System Property**|alfresco.baseurl or solr.alfresco.baseurl| |**Environment Variable**|SOLR_ALFRESCO_BASEURL| |**Default Value**|`/alfresco`| -
alfresco.port.ssl|**Description**|Specifies the HTTPS port for the Alfresco instance that Solr should track and index.| |**JNDI Property**|java:comp/env/alfresco/port/ssl| |**Java System Property**|alfresco.port.ssl or solr.alfresco.port.ssl| |**Environment Variable**|SOLR_ALFRESCO_PORT_SSL| |**Default Value**|`8443`| -
data.dir.root|**Description**|Specifies the top level directory path for the indexes managed by Solr.| |**JNDI Property**|java:comp/env/data/dir/root| |**Java System Property**|data.dir.root or solr.data.dir.root| |**Environment Variable**|SOLR_DATA_DIR_ROOT| |**Default Value**|`[solr_home]`|
These external values can be overridden by the JNDI attributes from java:comp/env, Java System properties, or OS environment variables.
Note that:
- JNDI properties are always lowercase
- Java System properties are always lowercase
- Environment variables are always uppercase
- Property names in the property files are case sensitive
Additional external configuration when using SSL
You need to set these properties only if you are configuring Solr 6 with SSL enabled. These properties can also be set in the solrcore.properties file.
-
alfresco.secureComms|**Description**|Instructs Solr if it should talk to Alfresco over HTTP or HTTPS. Set to none if a plain HTTP connection should be used.| |**JNDI Property**|java:comp/env/alfresco/securecomms| |**Java System Property**|alfresco.securecommssolr.securecomms
| Environment Variable | SOLR_ALFRESCO_SECURECOMMS |
| Default Value | none / https |
-
alfresco.encryption.ssl.keystore.passwordFileLocation|**Description**|Specifies the location of the file containing the password that is used to access the CLIENT keystore.| |**JNDI Property**|java:comp/env/alfresco/encryption/ssl/keystore/passwordfilelocation| |**Java System Property**|alfresco.encryption.ssl.keystore.passwordfilelocationsolr.encryption.ssl.keystore.passwordfilelocation
| Environment Variable | SOLR_ALFRESCO_ENCRYPTION_SSL_KEYSTORE_PASSWORDFILELOCATION |
-
alfresco.encryption.ssl.truststore.passwordFileLocation|**Description**|Specifies the location of the file containing the password that is used to access the CLIENT truststore.| |**JNDI Property**|java:comp/env/alfresco/encryption/ssl/truststore/passwordfilelocation| |**Java System Property**|alfresco.encryption.ssl.truststore.passwordfilelocation| |**Environment Variable**|`SOLR_ALFRESCO_ENCRYPTION_SSL_TRUSTSTORE_PASSWORDFILELOCATION`| -
alfresco.encryption.ssl.keystore.location|**Description**|Specifies the CLIENT keystore location reference. If the keystore is file-based, the location can reference any path in the file system of the node where the keystore is located.| |**JNDI Property**|java:comp/env/alfresco/encryption/ssl/keystore/location| |**Java System Property**|alfresco.encryption.ssl.keystore.location| |**Environment Variable**|`SOLR_ALFRESCO_ENCRYPTION_SSL_KEYSTORE_LOCATION`| -
alfresco.encryption.ssl.truststore.location|**Description**|Specifies the CLIENT truststore location reference. If the truststore is file-based, the location can reference any path in the file system of the node where the truststore is located.| |**JNDI Property**|java:comp/env/alfresco/encryption/ssl/truststore/location| |**Java System Property**|alfresco.encryption.ssl.truststore.location| |**Environment Variable**|`SOLR_ALFRESCO_ENCRYPTION_SSL_TRUSTSTORE_LOCATION`| -
alfresco.encryption.ssl.truststore.provider|**Description**|Specifies the Java provider that implements the type attribute (for example, JCEKS type). The provider can be left unspecified and the first provider that implements the truststore type specified is used.| |**JNDI Property**|java:comp/env/alfresco/encryption/ssl/truststore/provider| |**Java System Property**|alfresco.encryption.ssl.truststore.provider| |**Environment Variable**|`SOLR_ALFRESCO_ENCRYPTION_SSL_TRUSTSTORE_PROVIDER`| -
alfresco.encryption.ssl.keystore.type|**Description**|Specifies the CLIENT keystore type.| |**JNDI Property**|java:comp/env/alfresco/encryption/ssl/keystore/type| |**Java System Property**|alfresco.encryption.ssl.keystore.type| |**Environment Variable**|`SOLR_ALFRESCO_ENCRYPTION_SSL_KEYSTORE_TYPE`| |**Default Value**|`JCEKS`| -
alfresco.encryption.ssl.keystore.provider|**Description**|Specifies the Java provider that implements the type attribute (for example, JCEKS type). The provider can be left unspecified and the first provider that implements the keystore type specified is used.| |**JNDI Property**|java:comp/env/alfresco/encryption/ssl/keystore/provider| |**Java System Property**|alfresco.encryption.ssl.keystore.provider| |**Environment Variable**|`SOLR_ALFRESCO_ENCRYPTION_SSL_KEYSTORE_PROVIDER`| -
alfresco.encryption.ssl.truststore.type|**Description**|Specifies the CLIENT truststore type.| |**JNDI Property**|java:comp/env/alfresco/encryption/ssl/truststore/type| |**Java System Property**|alfresco.encryption.ssl.truststore.type| |**Environment Variable**|`SOLR_ALFRESCO_ENCRYPTION_SSL_TRUSTSTORE_TYPE`| |**Default Value**|`JCEKS`|
Upgrading from Solr 4 to Solr 6 search
Use this information to upgrade from Alfresco One 5.1 with the Solr 4 search index server to Alfresco Content Services 5.2.7 with the Solr 6 search index server.
To determine the current search server, navigate to the Search Manager page at Alfresco Share Admin Console > Repository Services > Search Service. Select the search subsystem from the Search Service In Use list.
Follow the steps to migrate from Alfresco One 5.x with Solr 4 search service to Alfresco Content Services 5.2.7 with Solr 6 search service.
-
Upgrade to Alfresco Content Services 5.2.7 and continue to use the Solr 4 search service as before.
-
Install and configure Solr 6 to track the repository. For more information, see Installing and Configuring Solr 6.
-
While Solr 6 builds its indexes, you can monitor progress using the
SUMMARYreport.[http://localhost:8080/solr6/admin/cores?action=SUMMARY&wt=xml](http://localhost:8080/solr4/admin/cores?action=SUMMARY&wt=xml)For details, see the Unindexed Solr Transactions topic.
-
Optionally, you can use the Solr Admin Web interface to view Solr configuration details, run queries, and analyze document fields.
-
Open the FireFox Certificate Manager by selecting Firefox > Preferences… > Advanced > Certificates > View Certificates > Your Certificates.
-
Import the browser keystore
browser.p12that is located in your<ALFRESCO_HOME>/alf_data/keystoredirectory. -
Enter the password
alfresco.A window displays showing that the keystore has been imported successfully. The Certificate Manager now contains the imported keystore with the Alfresco repository certificate under the Your Certificates tab.
-
Close the Certificate Manager by clicking OK.
-
In the browser, navigate to a Solr URL.
For example, use http://localhost:8080/solr4 for Solr 4 and http://localhost:8080/solr6 for Solr 6.
The browser displays an error message window to indicate that the connection is untrusted. This is due to the Alfresco certificate not being tied to the server IP address. In this case, view the certificate and confirm that it is signed by the Alfresco Certificate Authority.
-
Expand I understand the risks.
-
Select Add Exception.
-
Click View.
This displays the certificate.
-
Confirm that the certificate was issued by Alfresco Certificate Authority, and then confirm the Security Exception.
Access to Solr 6 is granted. The Solr Admin page is displayed. It is divided into two parts.
The left-side of the screen is a menu under the Solr logo that provides navigation through various screens. The first set of links are for system-level information and configuration and provide access to Logging, Core Admin and Java Properties. At the end of this information is a list of Solr cores configured for this instance of Alfresco.
The center of the screen shows the detail of the Solr core selected, such as statistics, summary report, and so on.
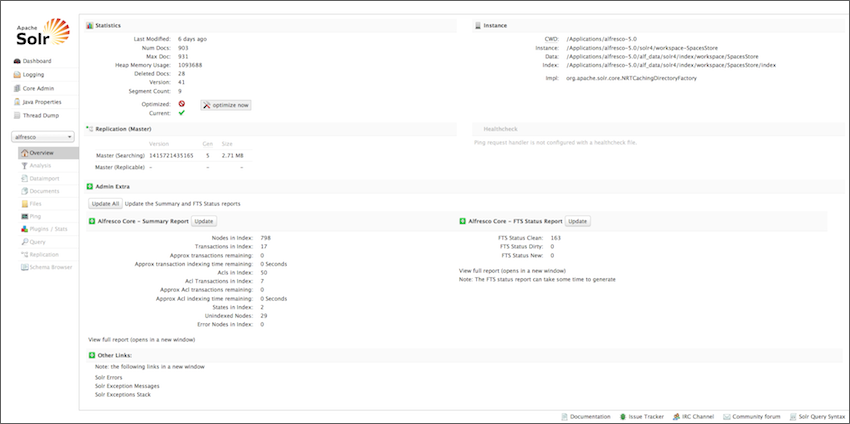
-
-
Monitor the progress of both the Solr 4 and Solr 6 subsystems via the JMX client or the
SUMMARYreport. -
When the index is updated as reported by the
SUMMARYreport, you can use theREPORToption and check the following:- In the
REPORToption, node count should match the number of live nodes in the repository (assuming nothing is changing and the index is updated). The index contains a document for failed nodes, so failures need to be considered separately. -
Any missing transactions; if there are issues, use the
FIXoption.[http://localhost:8080/solr6/admin/cores?action=FIX](http://localhost:8080/solr4/admin/cores?action=FIX)For more information, see the Troubleshooting Solr Index topic.
-
Find errors with specific nodes using
DOC_TYPE:ErrorNodeoption.[https://localhost:8446/solr6/alfresco/afts?q=DOC_TYPE:ErrorNode](https://localhost:8446/solr4/alfresco/afts?q=DOC_TYPE:ErrorNode) -
If there are any issues, use the
REINDEXoption with the relevant node id.[ http://localhost:8080/solr6/admin/cores?action=REINDEX&txid=1&acltxid=2&nodeid=3&aclid=4](http://localhost:8080/solr4/admin/cores?action=REINDEX&txid=1&acltxid=2&nodeid=3&aclid=4)For more information, see the Troubleshooting Solr Index topic.
- In the
-
When the Solr 6 index is updated, you must enable the Solr 6 subsystem and disable the Solr 4 subsystem.
-
Go to Admin Console > Repository Services > Search Service and select Solr 6 from the Search Service In Use list.
-
Disable Solr 4 tracking in the alfresco/solr4/workspace-SpacesStore/conf/solrcore.properties file.
enable.alfresco.tracking=false -
To remove the Solr 4 web application and indexes, stop the Tomcat server which is running Solr 4.
-
Remove the
<ALFRESCO_HOME>/tomcat/webapps/solr4directory and the<ALFRESCO_HOME>/tomcat/webapps/solr4.warfile. -
Remove the
<ALFRESCO_HOME>/tomcat/conf/Catalina/localhost/solr4.xmlfile. -
Finally, remove the Solr 4 indexes.
-
-
(Optional) To decommission (now redundant) Solr 4, follow the steps below:
-
Stop the Solr 4 search service.
-
Delete the solr directory from
<ALFRESCO_HOME>/tomcat/webapps. -
Delete the solr.xml file from
<ALFRESCO_HOME>tomcat/conf/Catalina/localhost. -
Delete the solr directory from
<ALFRESCO_HOME>/alf_data.
-
Upgrading from Alfresco Search Services 1.0 or 1.1 to Alfresco Search Services 1.2
Use this information to upgrade from Alfresco Search Services 1.0 or 1.1 to Alfresco Search Services 1.2 with the Solr 6 search index server.
-
Stop Alfresco Search Services 1.0 or 1.1.
./solr/bin/solr stop -
Backup or move the existing alfresco-search-services folder to a preferred location. For example, alfresco-search-services-1.0.
-
Download and unzip the Solr 6 distribution,
alfresco-search-services-1.2.x.zipto a preferred location.By default, the contents of
alfresco-search-services-1.2.x.zipare decompressed in a folder at./alfresco-search-services. So, the folder extracts into the same location as the zip. -
Copy archive and alfresco from the backup
alfresco-search-services-1.0/solrhome/toalfresco-search-services/solrhome/. -
Copy the contentstore from the backup to
alfresco-search-services. -
(Optional) If you have changed the
alfresco-search-services/solr.in.shoralfresco-search-services/solr.in.cmdfile, you must restore it from your backup. -
Start Alfresco Search Services 1.2.
./solr/bin/solr start
Backing up Solr 6
There are a number of ways to back up Solr 6. You can set the Solr indexes backup properties either by using the Admin Console in Share, by editing the alfresco-global.properties file, or by using a JMX client, such as JConsole.
Set up Solr backup properties using Share Admin Console
You can only see the Admin Console if you are an administrator user.
- Launch the Admin Console.
-
In the Repository Services section, click Search Service.
You see the Search Service page.
-
Scroll down to the Backup Settings section.
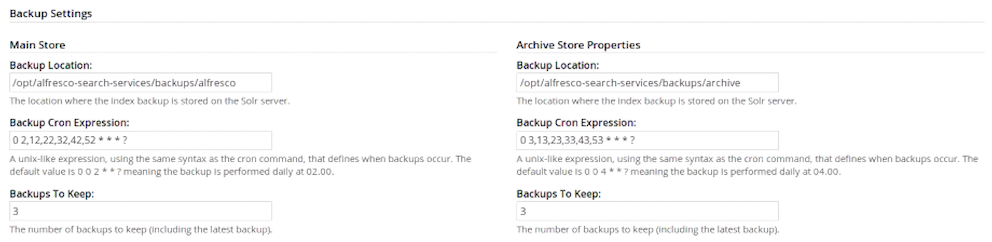
Here, you can specify the backup location and edit backup properties for each core of the Solr index: Main Store and Archive Store.
- Backup Location: Specifies the full-path location for the backup to be stored. This location must be on the machine on which Solr 6 is installed or it must be a location which is accessible from the Solr host. For example,
/opt/alfresco-search-services/backups/alfresco. - Backup Cron Expression: Specifies a Quartz cron expression that defines when backups occur. Solr creates a timestamped sub-directory for each index back up you make.
- Backups To Keep: Specifies the maximum number of index backups that Solr should store.
- Backup Location: Specifies the full-path location for the backup to be stored. This location must be on the machine on which Solr 6 is installed or it must be a location which is accessible from the Solr host. For example,
- Click Save.
Specifying Solr backup directory by using alfresco-global.properties file
This task shows how to specify the Solr backup directory by using alfresco-global.properties file.
To set the Solr backup directory using the alfresco-global.properties file, set the value of the following properties to the full path where the backups should be kept:
solr.backup.archive.remoteBackupLocation=
solr.backup.alfresco.remoteBackupLocation=
The values set on a subsystem will mean that the property values from configuration files may be ignored. Use the Share Admin Console or JMX client to set the backup location.
Back up Solr indexes using JMX client
If you have installed the Oracle Java SE Development Kit (JDK), you can use the JMX client, JConsole, to backup Solr indexes, edit Solr backup properties and setup the backup directory.
- You can set the backup of Solr indexes using the JMX client, such as JConsole on the JMX MBeans > Alfresco > Schedule > DEFAULT > MonitoredCronTrigger > search.alfrescoCoreBackupTrigger > Operations > executeNow tab. The default view is the Solr core summary. Alternatively, navigate to MBeans > Alfresco >SolrIndexes >coreName >Operations >backUpIndex tab. Type the directory name in the remoteLocation text box and click backUpIndex.
-
Solr backup properties can be edited using the JMX client on the JMX MBeans > Alfresco > Configuration > Search > managed > solr6 > Attributes tab. The default view is the Solr core summary.
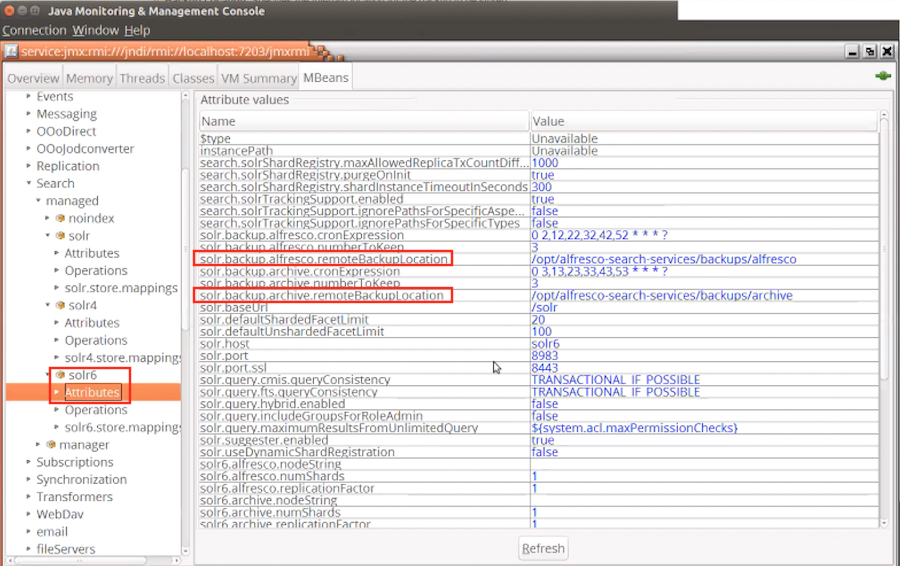
-
To use JMX client to setup Solr backup directory, navigate to MBeans tab > Alfresco > Configuration > Search > managed > solr > Attributes and change the values for solr.backup.alfresco.remoteBackupLocation and solr.backup.archive.remoteBackupLocation properties.
-
You may also trigger a backup with an HTTP command which instructs the
/replicationhandler to backup Solr, for example:http://localhost:8080/solr/alfresco/replication?command=backup&location=&numberToKeep=4&wt=xmlwhere:
locationspecifies the path where the backup will be created. If the path is not absolute then the backup path will be relative to Solr’s instance directory.numberToKeepspecifies the number of backups to keep.
-
Solr 6 sharding methods
When an index grows too large to be stored on a single search server, it can be distributed across multiple search servers. This is known as sharding. The distributed/sharded index can then be searched using Alfresco/Solr’s distributed search capabilities.
A specific configuration attribute, called shard.method defines the logic/strategy which controls how documents and ACLs are distributed across shards. Note this setting is configured in each Solr instance (i.e in each shard). So a shard will use that strategy for determining if the given incoming data belongs to it or not.
To use a specific sharding method, when creating a Solr node you must add the required configuration properties in solrcore.properties. The sharding method is set with the required property, shard_method. Additional properties may then be needed, depending on your chosen method. If an invalid shard_method is provided, then the system will fallback to DBID routing.
Solr 6 can use any of the following methods for routing documents and ACLs to shards.
-
ACL (MOD_ACL_ID) v1: This sharding method is available in Alfresco Search Services 1.0 and later versions.
Nodes and access control lists are grouped by their ACL ID. This places the nodes together with all the access control information required to determine the access to a node in the same shard. Both the nodes and access control information are sharded. The overall index size will be smaller than other methods. Also, the ACL count is usually much smaller than the node count.
This method is beneficial if you have lots of ACLs and the documents are evenly distributed over those ACLs. For example, if you have many Share sites, nodes and ACLs are assigned to shards randomly based on the ACL and the documents to which it applies.
The node distribution may be uneven as it depends how many nodes share ACLs.
To use this method when creating a shard, set the following configuration:
shard.method=MOD_ACL_ID shard.instance=<shard.instance> shard.count=<shard.count> -
ACL (ACL_ID) v2: This method is available in Alfresco Search Services 1.0 and later versions.
This sharding method is the same as
ACL IDv1 except that the murmur hash of the ACL ID is used in preference to its modulus. This gives better distribution of ACLs over shards. The distribution of documents over ACLs is not affected and so the shard sizes can still be skewed.shard.method=ACL_ID shard.instance=<shard.instance> shard.count=<shard.count> -
DBID (DB_ID): This method is available in all versions of Alfresco Search Services and is the default sharding option in Solr 6. Nodes are evenly distributed over the shards at random based on the murmur hash of the DBID. The access control information is duplicated in each shard. The distribution of nodes over each shard is very even and shards grow at the same rate. Also, this is the fall back method if any other sharding information is unavailable.
To use this method when creating a shard, set the following configuration:
shard.method=DB_ID shard.instance=<shard.instance> shard.count=<shard.count> -
DBID range (DB_ID_RANGE): This method is available in Alfresco Search Services 1.1 and later versions. This routes documents within specific DBID ranges to specific shards. It adds new shards to the cluster without requiring a reindex.
DBID range sharding is the only option to offer auto-scaling as opposed to defining your exact shard count at the start. All the other sharding methods require repartitioning in some way.
For each shard, you specify the range of DBIDs to be included. As your repository grows you can add shards.
Example 1: You may aim for shards of 20M nodes in size and expect it to get to 100M over five years. You could create the first shard for nodes 0-20M. As you approach node 20M, you can create the next shard for nodes 20M-40M, and so on.
To use this method when creating a shard, set the following configuration:
shard.method=DB_ID_RANGE shard.range=0-20000000 shard.instance=<shard.instance>Example 2: If there are 100M (million) nodes and you want to split them into 10 shards with 10M nodes each. So, at the start you can specify:
- 10 shards
- a shard to include 0-10M
- the second shard will have 10M - 20M nodes, third shard will have 20M - 30M nodes, and so on.
Date-based queries may produce results from only a subset of shards as DBID increases monotonically over time.
-
Date/Datetime (DATE): This method is available in all versions of Alfresco Search Services. The date-based sharding assigns dates sequentially through shards based on the month.
Example: If there are 12 shards, each month would be assigned sequentially to each shard, wrapping round and starting again for each year. The non-random assignment facilitates easier shard management - dropping shards or scaling out replication for some date range. Typical aging strategies could be based on the created date or destruction date.
If the property is not present on a node, sharding falls back to the DBID method to randomly distribute these nodes.
To use this method when creating a shard, set the following configuration:
shard.key=exif:dateTimeOriginal shard.method=DATE shard.instance=<shard.instance> shard.count=<shard.count>Months can be grouped together, for example, by quarter. Each quarter of data would be assigned sequentially through the available shards.
shard.date.grouping=3 -
Metadata (PROPERTY): This method is available in all versions of Alfresco Search Services. In this method, the value of some property is hashed and this hash is used to assign the node to a random shard. All nodes with the same property value will be assigned to the same shard.
Only properties of type
d:text,d:dateandd:datetimecan be used. For example, the recipient of an email, the creator of a node, some custom field set by a rule, or by the domain of an email recipient. The keys are randomly distributed over the shards using murmur hash.If the property is not present on a node, sharding falls back to the DBID method to randomly distribute these nodes.
To use this method when creating a shard, set the following configuration:
shard.key=cm:creator shard.method=PROPERTY shard.instance=<shard.instance> shard.count=<shard.count>It is possible to extract a part of the property value to use for sharding using a regular expression, for example, a year at the start of a string:
shard.regex=^\d{4}If the regular expression doesn’t match the property (e.g. the string doesn’t start with a four-digit year), then this causes a fallback to DBID sharding.
-
Explicit Sharding (EXPLICIT_ID): This method is available in Alfresco Search Services 1.2 and later versions. The node is assigned to a shard based on the value of a property (e.g.
cm:type), which should contain the “explicit” numeric shard ID.This method is similar to sharding by metadata. Rather than hashing the property value, it explicitly defines the shard where the node should go. If the property is absent or an invalid number, sharding will fall back to using the
DBIDsharding method. Only text fields are supported. Nodes are allowed to move shards. You can add, remove or change the property that defines the shard.To use this method when creating a shard, set the following configuration:
shard.method=EXPLICIT_ID shard.key=cm:targetShardInstance shard.instance=<shard.instance> shard.count=<shard.count>
Note: The ACL v1 (MOD_ACL_ID) sharding method was the only method available in Solr4.
Availability matrix
| Index Engine | ACL v1 | DB ID | Date/time | Metadata | ACL v2 | DBID range | Explicit |
|---|---|---|---|---|---|---|---|
| Alfresco Content Services 5.2.0+ Solr 4 |  |
 |
|
|
|
|
|
| Alfresco Content Services 5.2.0+ Alfresco Search Services 1.0 | |
|
|
|
|
|
|
| Alfresco Content Services 5.2.5+ Alfresco Search Services 1.1 | |
|
|
|
|
|
|
| Alfresco Content Services 5.2.5+ Alfresco Search Services 1.2+ | |
|
|
|
|
|
|
Comparison Overview
| Index Engine | ACL v1 | DB ID | Date/time | Metadata | ACL v2 | DBID range | Explicit |
|---|---|---|---|---|---|---|---|
| All shards required | |
|
|
|
|
|
|
| ACLs replicated on all shards | |
|
|
|
|
|
|
| Can add shards as the index grows | |
|
|
|
|
|
|
| Distribution of content over shards | Uneven | Very even | Quite even | Quite even | Quite even | Quite even | Quite even |
| Falls back to DBID sharding | |
|
|
|
|
|
|
| One shard gets new content | |
|
| Possible | Possible | |
|
|
| Nodes can move shard | |
|
|
|
|
|
|
- Configuring Solr 6 sharding using the Admin Console
Solr 6 supports sharded indexes with SSL. Use the Search Server Sharding page to set up and configure a Solr 6 sharded search index.
Configuring Solr 6 sharding using the Admin Console
Solr 6 supports sharded indexes with SSL. Use the Search Server Sharding page to set up and configure a Solr 6 sharded search index.
Prerequisites for viewing the Search Server Sharding page:
- Check that you have installed Alfresco Content Services 5.2.7 and have a valid license.
- Support for shard groups requires a clustered license. Make sure that you enable clustering on your ACS license. For more information, see Repository server clustering and Uploading a new license.
-
Open the Admin Console. For more information, see Launching the Admin Console.
-
In Repository Services, click Search Server Sharding.
You see the Search Server Sharding page. It displays information about dynamic shard index registration, shard groups, and shard instances.
-
Under Dynamic Shard Instance Registration, select Dynamic Shard Instance Registration and set the other shard instance properties.
Shard registration property Example setting What is it? Dynamic Shard Instance Registration Enabled Yes Select this property to enable dynamic shard instance registration. If disabled, manual shard registration is used. Purge at Startup No This property purges all persisted dynamic shard instance information at startup. Instance Timeout (seconds) 100 This specifies the number of seconds a shard instance can go without making a tracking call for transactions to the repository before it stops being used for queries.
Note: When tracking large change sets or rebuilding your indexes, increase the shard timeout. For example, change the value of this property to 3200 or 7200 seconds.
| Max Instance Transaction Lag | 1000 | This specifies the maximum number of transactions a instance can lag behind the lead instance of the shard before it stops being used for queries. |
-
Click Refresh to refresh this page.
-
Click Purge to remove all registered shard instance information and start from clean.
-
Click Clean to remove inactive registered shard instance information.
-
Click Manage to create and manage shard instances.
You see the Index Server Shard Management window. Use this window to create individual shards or shard groups.
-
Use Existing Index Servers to view a list of existing index servers and to create new index servers.
To add a new index server, specify the server address in New Index Server and click Add.
You can view the newly created index server under Target Index Servers.
Click Add to Target Index Servers next to the server you want to add to the list of target index servers. Target Index Servers displays a list of index servers where you want to make the new shards.
-
Under Existing Core Names, you can view a list of the core names already in use.
-
Under Target Index Servers, you can view a list of index servers that will be used for sharding.
To remove an index server from the list of servers that will be used for sharding, click Remove.
-
Next, you need to create a core for the shard. There are two ways to do this. You can either:
- use the Manage Default Indexes and Manage Shared Properties sections to create default indexes - see Step 7 (e) and 7 (f); or
- use the New Shard Group and New Shard Instance sections to create a shard group and instance - see Step 7 (g) and 7 (i).
-
Use Manage Default Indexes to create default indexes on the servers listed in Target Index Servers.
The Manage Default Indexes section:
- appears only when you add a new index server.
- creates a core for a given shard, and therefore, can be used as an alternative to creating shards using the New Shard Group section (Step 7f).
Important: The cores are visible in the Solr Admin web application only after you create them using the Index Server Sharding page.
- Click Create Alfresco Index to create an unsharded Alfresco index.
-
Click Create Archive to create an unsharded archive index.
Use the Report section at the end of this page to view the detailed core creation message.
Check the Solr Admin UI to ensure that both the indexes are correctly listed.
-
Use Manage Shared Properties to update the properties that apply to all Alfresco indexes on an Index Engine.
These properties are the same as in alfresco-search-services-1.2.x.zip/solrhome/conf/shared.properties. For example:
solr.host=localhost solr.port=8983 solr.baseurl=/solr -
Alternatively, to create a shard group, set the following properties under New Shard Group:
Shard group property Example setting What is it? Template rerank This specifies the template used for the shard group. Store workspace://SpacesStore This specifies the stores that are queryable for all shards. Core This specifies the name of the Solr core. Properties solr.suggester.enabledalfresco.secureComms=https
-
alfresco.port.ssl=8443
alfresco.commitInterval=20000
alfresco.newSearcherInterval=30000
| This specifies the properties to set on the Solr instances. These are the same properties that are set in the solrcore.properties file. | ||
| Shards | 1 | This specifies the total number of shards. |
| Instances | 1 | This specifies the total number of instances. |

8. Click **Create Shards Group** to create new shards based on the ordered list of target index servers.
9. To create a single shard instance, set the following properties under New Shard Instance:
|Shard property|Example setting|What is it?|
|--------------|---------------|-----------|
|**Index Server URL**|localhost:8080/solr4|This specifies the URL to a single index server.|
|**Nodes**|1|This specifies the total number of Solr nodes that have been created.|
|**Target Index Server**|1|This specifies, out of all the solr nodes above, the number given to the target index server node for this new shard.|
|**Shards**| |This specifies the specific shards to create, on the node given above. You can also specify a comma-separated list of shards.|
See [Installing and configuring Solr shards](#installing-and-configuring-solr-shards) to view examples of creating shards when calling the REST URLs directly.

10. Click **Create Shards** to create the new shard based on the specified instance properties.
11. Use Report to get detailed information on shard creation and execution.

12. Click **Close** to close the Index Server Shard Management window.
You have successfully created an `alfresco` core and an `archive` core. To verify, in a browser, navigate to the Solr URL, [https://localhost:8983/solr](https://localhost:8443/solr4). In the Solr Admin UI, select the core selector drop-down list and verify that both the `alfresco` and `archive` cores are present in the list.
Validate that you can execute queries from the search public API to the archive core.
```
curl -X POST --header 'Content-Type: application/json' --header 'Accept: application/json' --header 'Authorization: Basic YWRtaW46YWRtaW4=' -d '{
"query":
{
"query": "foo"
},
"scope":
{
"stores": ["archive://SpacesStore"]
}
}' 'http://localhost:8080/alfresco/api/-default-/public/search/versions/1/search'
```
-
Under Shard Groups, you can view information about all the shards in the group.
Shard registration property Example setting What is it? Template rerank This specifies the template used for the Solr core. Low Instance Shards This specifies a list of shards that have less than the maximum number of instances. Missing Shards 100 This specifies a comma-separated list of shards with no instances. Max Repository Transaction ID 14,637 This specifies the maximum number of transaction IDs in the repository. Max Live Instances 1 This specifies the maximum number of instances available for any shard that can be used to answer a query. Remaining Transactions 2 This specifies the maximum number of transactions remaining for all the lead instances of all the active shards. Number of Shards 4 This specifies the total number of shards. Min Active Instances 1 This specifies the minimum number of instances available for any shard that can be used to answer a query. Max Changeset ID 104 This specifies the highest change set id in the repository. Mode MASTER This specifies whether the instances are SLAVE,MASTER, orMIXED. > Note: TheSLAVEandMIXEDinstances are not supported for a sharded installation.
| Stores | workspace://SpacesStore | This specifies the stores that are queryable for all instances. |
| Has Content | Enabled | This property is enabled if content is included for all instances. |
| Shard Method | DB_ID | This specifies the method used to define shards. The default shard method is DB_ID. You can specify your own shard method in Index Server Shard Management screen > New Shard Group > Properties. For example, shard.method=ACL_ID. |
You can also set this property in the alfresco-search-services-1.2.x.zip/solrhome/templates/rerank/conf/solrcore.properties file.

-
Use the instance property table to view detailed entity information for all the shards. This is the same information that is displayed in the JMX console, for example,
Base URL,Host,Last Indexed Changeset Date, and more.For more information, see Indexing information available in a JMX client.
-
Click Summary to go to the http://localhost:8080/solr4/admin/cores?action=SUMMARY page on Solr for the specific core.
For more information, see Unindexed Solr Transactions.
-
Click SOLR to go to the Solr Admin screen for the specific core.
For more information, see Connecting to the SSL-protected Solr web application.
-
-
The Shard Group Report section displays information about the shard groups and instances. A tabular view of this information is displayed in the shard table in Step 9. This information is read-only.
-
Click Save to apply the changes you have made to the index server shards.
If you do not want to save the changes, click Cancel.
Note: Alfresco recommends that you do not use the Solr Admin Console > Core Admin > Unload functionality to unload indexes (either whole indexes or shards that are part of an index). Unloading an index or a shard in this way will delete it and make it unavailable for query.
If you unload or delete a shard from the Solr Admin Console, make sure you restart the Solr server and restore your indexes so that Alfresco can work properly.
Document Fingerprints
Alfresco Content Services 5.2.7 provides support for Document Fingerprints to find related documents. Document Fingerprinting is performed by algorithms that map data, such as documents and files to shorter text strings, also known as fingerprints. This feature is exposed as a part of the Alfresco Full Text Search Query Language.
Document Fingerprints can be used to find similar content in general or biased towards containment. The language adds a new FINGERPRINT keyword:
FINGERPRINT:<DBID | NODEREF | UUID>
By default, this will find documents that have any overlap with the source document. The UUID option is likely to be the most useful as UUID is present in the public API. To specify a minimum amount of overlap, use:
FINGERPRINT:<DBID | NODEREF | UUID>_<%overlap>
FINGERPRINT:<DBID | NODEREF | UUID>_<%overlap>_<%probability>
To find documents that have 20% overlap with the document 1234, use:
FINGERPRINT:1234_20
To execute a faster query that will be 80% confident anything brought back will overlap by 20%, use:
FINGERPRINT:1234_20_80
To support fingerprint queries, additional information is added to the Solr 4 or 6 indexes using the rerank template. This makes the indexes approximately 15% bigger. Document Fingerprint can only be disabled by changing the schema.
Similarity and Containment
Document similarity covers duplicate detection, near duplicate detection, and finding different renditions of the same content. This is important to find and reduce redundant information. Fingerprints can provide a distance measure to other documents, often based on Jaccard distance/ similarity coefficient, to support more like this and clustering. The distance can also be used as a basis for graph traversal.
The Jaccard similarity coefficient is a commonly used indicator of the similarity between two sets. For sets A and B it is defined to be the ratio of the amount of common content to the total content of two documents, as defined here:
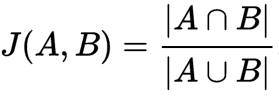
This distance can be used to compare the similarity of any two documents with any other pair of documents.
Containment is a related concept but is more about inclusion. For example, many email threads include parts or all of previous messages. Containment is not symmetrical like the measure of similarity above, and is defined as:

It represents how much of the content of a given document is common to another document. This distance can be used to compare a single document (A) to any other document.
Minhashing
Minhashing is a technique for quickly estimating how similar two sets of documents are. It is an example of a text processing pipeline.
First, the text is split into a stream of words. These words are then combined into five word sequences, known as shingles, to produce a stream of shingles. The 5-word shingles are then hashed, for example, in 512 different ways; keeping the lowest hash value for each hash. This results in 512 repeatably random samples of 5-word sequences from the text represented by the hash of the shingle. The same text will generate the same set of 512 minhashes. Similar text will generate many of the same hashes. It turns out that if 10% of all the min hashes from two documents overlap then it is a great estimator that J(A,B) = 0.1.
- Why 5 word sequences?: Word embedding suggests 5 or more words are enough to describe the context and meaning of a central word. Based on the distribution of words for 2 word shingles, 3 word shingles, 4 word shingles, and 5 word shingles found on the web, it was found that at 5 word shingles, the frequency distribution flattens and broadens compared with the trend seen for 1, 2, 3 and 4 word shingles.
- Why 512 hashes?: With a well distributed hash function this should give good hash coverage for 2,500 words and around 10% for 25,000, or something like 100 pages of text. We used a 128-bit hash to encode both the hash set position (see later) and hash value to minimise collision compared with a 64 bit encoding including bucket/set position.
Example 1
A document contains a single sentence of The quick brown fox jumps over the lazy dog, that would be broken down into the following 5-word long shingles:
- The quick brown fox jumps
- quick brown fox jumps over
- brown fox jumps over the
- fox jumps over the lazy
- jumps over the lazy dog
So, our document as a set looks like:
Set A = new Set(["The quick brown fox jumps", "quick brown fox jumps over", "brown fox jumps over the", "fox jumps over the lazy", "jumps over the lazy dog"]);
These sets of shingles can then be compared for similarity using the Jaccard Coefficient.
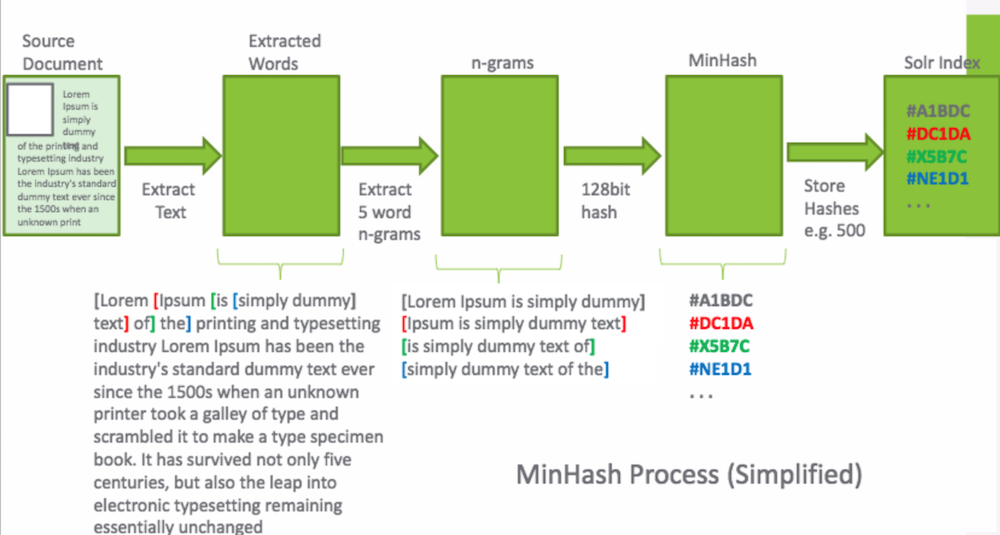
Example 2
Here are two summaries of the 1.0 and 1.1 CMIS specification. It demonstrates, amongst other things, how sensitive the measure is to small changes. Adding a single word affects 5 shingles.
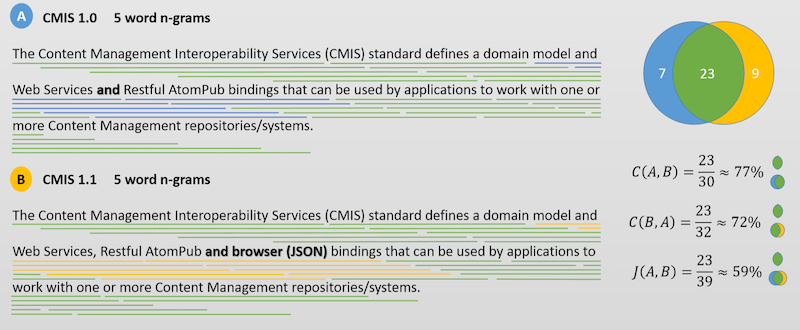
The content overlap of the full 1.0 CMIS specification found in the 1.1 CMIS specification, C(1.0, 1.1) is approximately 52%.
Alfresco Index Engine
You can host a separate instance of Alfresco Content Services 5.2.7 with Solr 6 for high scalability and for maximizing the throughput of your Alfresco services. This setup is termed as Alfresco Index Engine.
This setup shows a single repository database and content store. There are four nodes with Alfresco/Share and two nodes with Solr, all accessing the content simultaneously. This set up provides a higher level of availability, reliability, and scalability, thereby maximizing the throughput of various Alfresco services. Nodes in a cluster are positioned behind a load balancer that delegates requests to cluster members based on any one member’s ability/availability to handle the load.
Each Alfresco/Share instance is deployed into its own Tomcat servlet container. Alfresco services and CPU runtime footprint are optimized for high throughput under heavy concurrency with such a deployment. The load balancer fronts the cluster, and directs traffic to the member of the cluster most able to handle the current request.
Note: All the servers in a cluster should have static IP addresses assigned to them.

In this deployment scenario the following flows are present:
- Client flow:
- Client sends the request to the main load balancer to reach Share application.
- Main load balancer analyses the load and redirects the client to one of Share hosts.
- Main load balancer uses the JSESSIONID cookie to stick the client to one of Share nodes.
- Share sends the web scripts requests to the local repository instance, renders the page, and returns it to the user via the main load balancer.
- Alfresco internal flow:
- Repositories intercommunication is done via Hazelcast to replicate caches.
- Repositories share the same contentstore available via NFS/SAMBA share.
- Repositories share the same database schema.
- Alfresco Solr flow:
- Tracking tier: Two Solr instances periodically query repositories to detect new transactions, fetch new content, and build local indexes. Tracking is done through Solr load balancer, which analyses the load and distributes it across the repositories.
- Search tier: Four repository instances query two Solr instances on demand through the Solr load balancer.
To implement this setup, see Clustering for high throughput.