Here are some examples of how to deploy Content Services (ACS) with various configurations.
Deploy with AWS Services (S3, RDS and MQ)
This example describes how to deploy Content Services onto EKS and use S3 for content storage, RDS as an external database and Amazon MQ as an external message broker.
The diagram below shows the deployment produced by this example:

Prerequisites (AWS Services)
Follow the EKS deployment guide up to the Choose Content Services version section. Return to this page once the Docker registry secret is installed.
Set up AWS Services
The following sections describe how to setup the AWS services and highlights the information required to deploy Content Services.
S3
-
Create an S3 bucket in the same region as your cluster (replace
YOUR-BUCKET-NAMEwith a name of your choice):aws s3 mb s3://YOUR-BUCKET-NAME -
Enable versioning (replace
YOUR-BUCKET-NAMEwith the name you chose in the previous step):aws s3api put-bucket-versioning --bucket YOUR-BUCKET-NAME --versioning-configuration Status=Enabled -
Find the name of the role used by the nodes (replace
YOUR-CLUSTER-NAMEwith the name you gave your cluster):aws eks describe-nodegroup --cluster-name YOUR-CLUSTER-NAME --nodegroup-name linux-nodes --query "nodegroup.nodeRole" --output text -
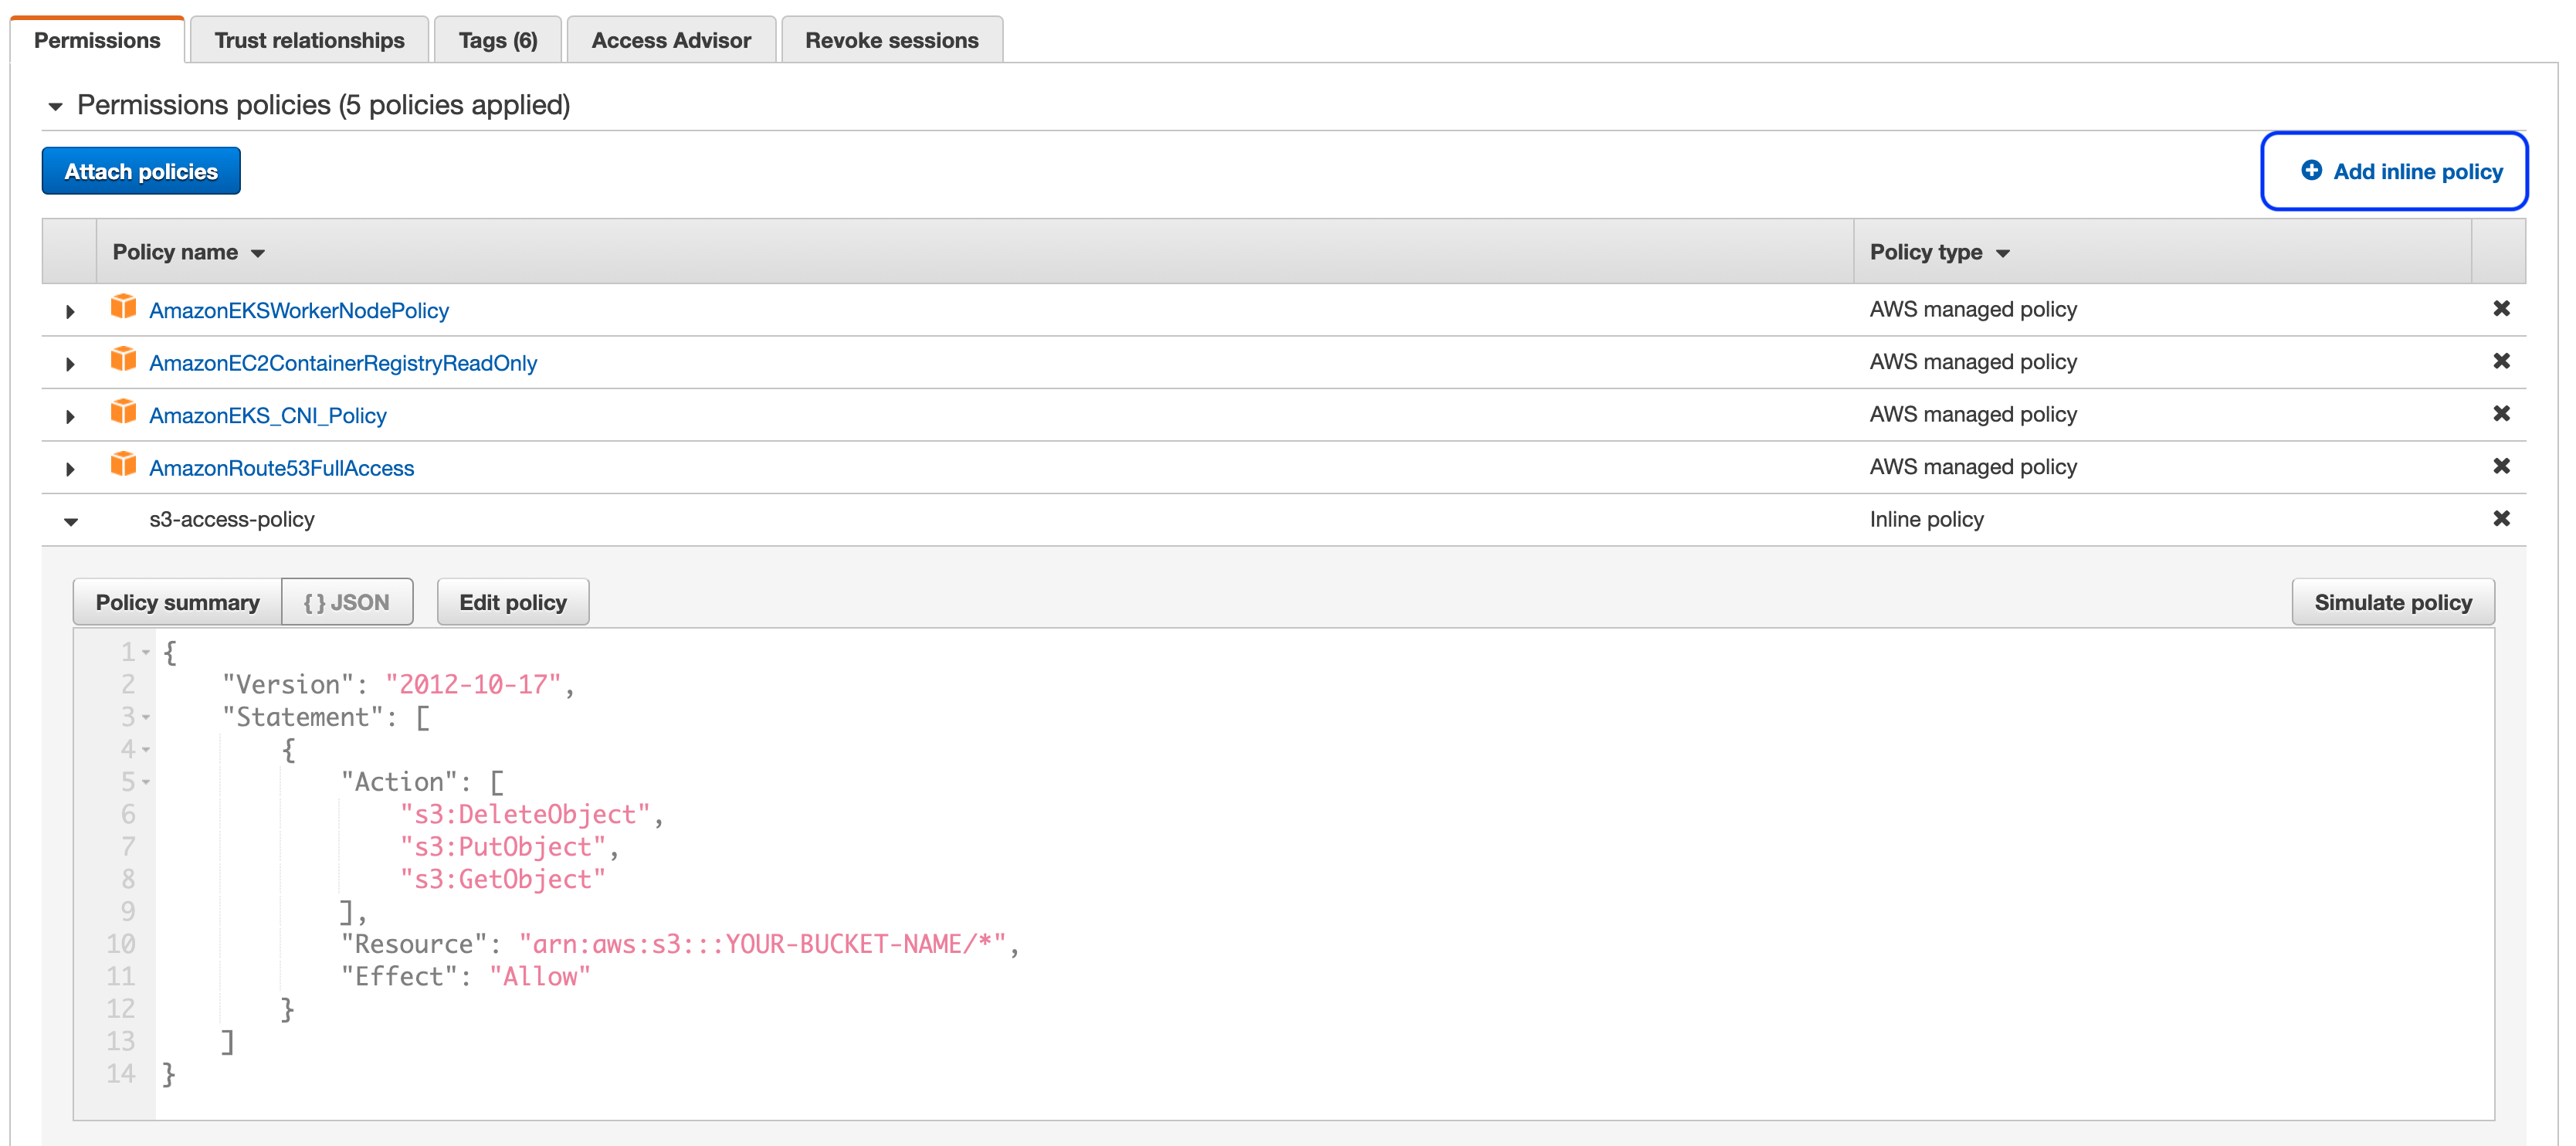
In the IAM console find the role discovered in the previous step. Create a new inline policy (highlighted in the screenshot below) using the JSON content below (replace
YOUR-BUCKET-NAMEwith the name you chose in the step 1):{ "Version": "2012-10-17", "Statement": [ { "Action": [ "s3:DeleteObject", "s3:PutObject", "s3:GetObject" ], "Resource": "arn:aws:s3:::YOUR-BUCKET-NAME/*", "Effect": "Allow" } ] }The end result should resemble something similar to the screenshot below:
RDS
-
Create an Aurora cluster using the Create database wizard in the RDS Console.
- Select the Standard Create option so you can choose the VPC later.
- Select the Amazon Aurora with PostgreSQL compatibility Edition.
- Select 11.7 for the Version.
- Provide a DB cluster identifier of your choosing.
- Change the Master username to
alfresco. - In the Connectivity section, select the VPC created by
eksctlthat contains your EKS cluster. - Expand the Additional configuration section and provide an Initial database name of
alfresco. - Leave all other options set to the default.
- Press the orange Create database button.
- Once the cluster has been created (it can take a few minutes) make a note of the generated master password using the View credentials details button in the header banner.
-
Select the database with the Writer role and click on the default security group link:
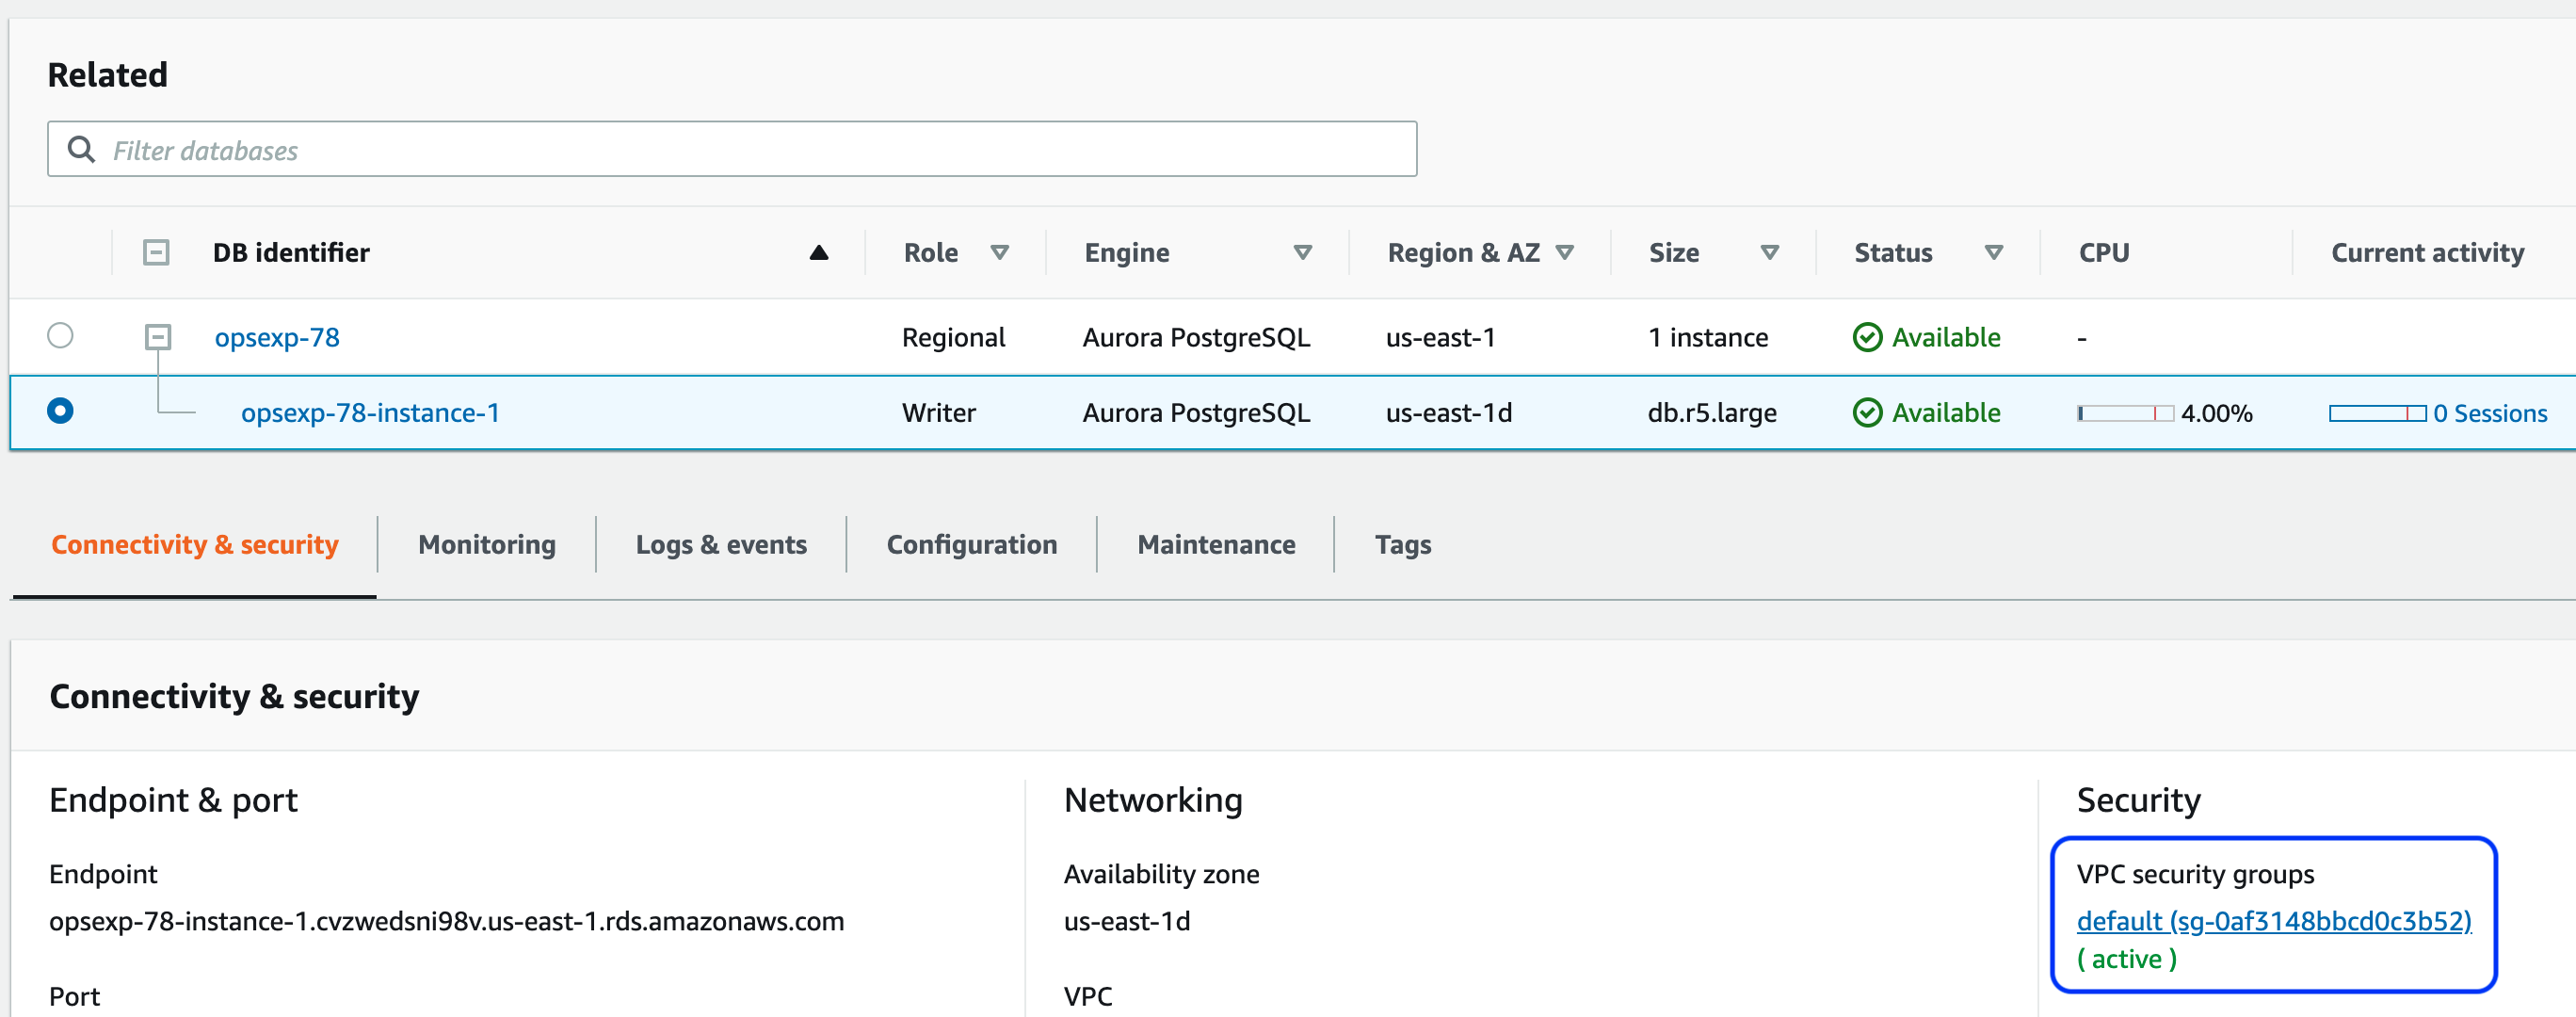
-
Add an inbound rule for PostgreSQL traffic from the VPC CIDR range (it will be the same as the NFS rule setup earlier):
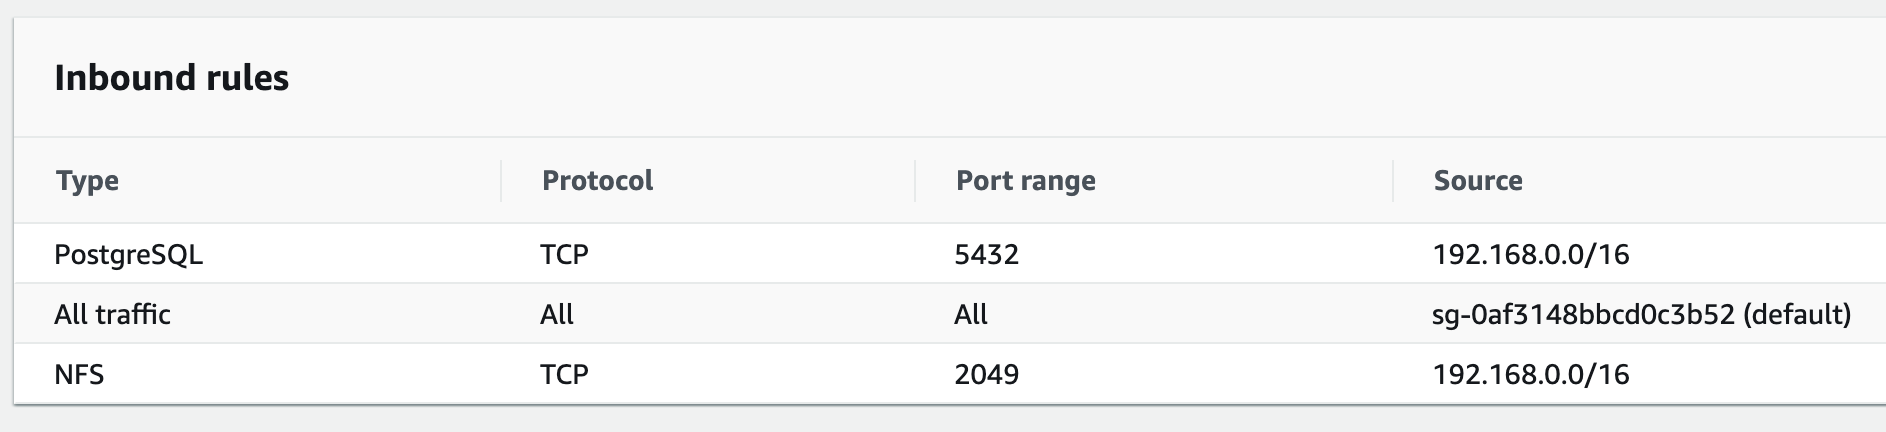
- Finally, take a note of the database Endpoint (shown in the screenshot in step 3).
Amazon MQ
-
Create an Amazon MQ broker using the Create brokers wizard in the MQ Console.
- Select Single-instance broker option and press Next.
- Provide a Broker name of your choosing.
- In the ActiveMQ Access section, specify
alfrescoas the Username and a Password of your choice. - In the Additional settings section, choose the Select existing VPC and subnet(s) option.
- Select the VPC created by
eksctlthat contains your EKS cluster. - Choose the Select existing security groups option and select the VPC’s default security group from the list.
- Leave all other options set to the default.
- Press the orange Create broker button.
- Once the broker has been created (it can take a few minutes), view the broker details, and click on the link to the security group.
-
Add an inbound rule for ActiveMQ traffic (TCP port 61617) from the VPC CIDR range (it will be the same as the NFS rule setup earlier):
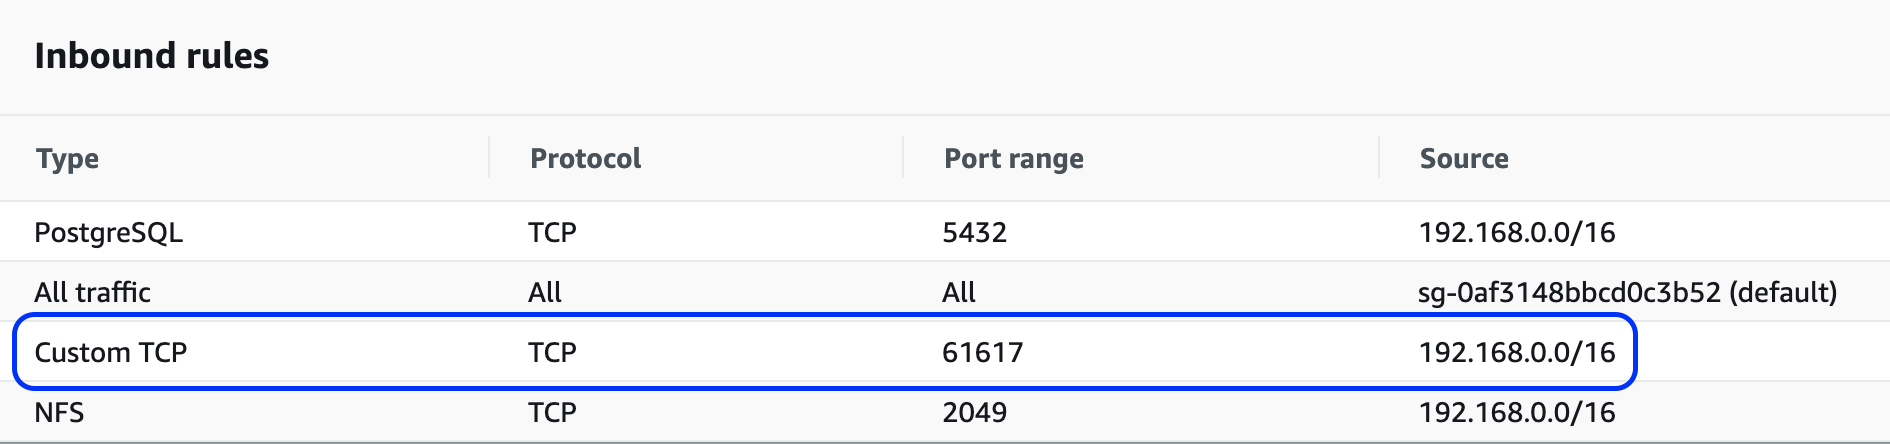
- Finally, take a note of the OpenWire Endpoint displayed in the Connections section.
Deploy (AWS Services)
In order to use the S3 Connector and external database options, the S3 Connector AMP and database drivers are required, respectively. Fortunately, a Docker image has been pre-packaged with the artifacts and can be used as-is for our deployment. To use the image, you can override the repository.image.repository property.
To use the S3 Connector, RDS, and Amazon MQ, we have to disable the internal default components via the Helm set command. You also need to provide the service endpoints and credentials we made a note of in the previous sections.
When we bring all this together, you can deploy Content Services using the command below (replace all the YOUR-XZY properties with the values gathered during the setup of the services):
helm install acs alfresco/alfresco-content-services \
--set externalPort="443" \
--set externalProtocol="https" \
--set externalHost="acs.YOUR-DOMAIN-NAME" \
--set persistence.enabled=true \
--set persistence.storageClass.enabled=true \
--set persistence.storageClass.name="nfs-client" \
--set global.alfrescoRegistryPullSecrets=quay-registry-secret \
--set repository.image.repository="quay.io/alfresco/alfresco-content-repository-aws" \
--set s3connector.enabled=true \
--set s3connector.config.bucketName="YOUR-BUCKET-NAME" \
--set s3connector.config.bucketLocation="YOUR-AWS-REGION" \
--set postgresql.enabled=false \
--set database.external=true \
--set database.driver="org.postgresql.Driver" \
--set database.url="jdbc:postgresql://YOUR-DATABASE-ENDPOINT:5432/" \
--set database.user="alfresco" \
--set database.password="YOUR-DATABASE-PASSWORD" \
--set activemq.enabled=false \
--set messageBroker.url="YOUR-MQ-ENDPOINT" \
--set messageBroker.user="alfresco" \
--set messageBroker.password="YOUR-MQ-PASSWORD" \
--atomic \
--timeout 10m0s \
--namespace=alfresco
Note: Alternatively, you can use Aurora MySQL instead of PostgreSQL. In the create database wizard:
- Select the Amazon Aurora with MySQL compatibility option and version
5.7.12- Change the
database.drivervalue toorg.mariadb.jdbc.Driver- Change the
database.urltojdbc:mariadb:aurora//YOUR-DATABASE-ENDPOINT:3306/alfresco?useUnicode=yes&characterEncoding=UTF-8
Deploy with Alfresco Intelligence Services
By default, the Alfresco Intelligence Services feature is disabled. This example describes how to deploy Content Services onto EKS with Intelligence Services enabled.
The diagram below shows the deployment produced by this example:

Prerequisites (Intelligence)
Follow the AWS Services example up to the Deploy section and return to this page.
Set up S3 bucket
Follow the steps to set up an IAM user and an S3 bucket for use by Alfresco Intelligence Services.
Deploy (Intelligence)
When we bring all this together, you can deploy Content Services using the command below (replace all the YOUR-XZY properties with the values gathered during the setup of the services):
helm install acs alfresco/alfresco-content-services \
--set externalPort="443" \
--set externalProtocol="https" \
--set externalHost="acs.YOUR-DOMAIN-NAME" \
--set persistence.enabled=true \
--set persistence.storageClass.enabled=true \
--set persistence.storageClass.name="nfs-client" \
--set global.alfrescoRegistryPullSecrets=quay-registry-secret \
--set repository.image.repository="quay.io/alfresco/alfresco-content-repository-aws" \
--set share.image.repository="quay.io/alfresco/alfresco-share-aws" \
--set s3connector.enabled=true \
--set s3connector.config.bucketName="YOUR-BUCKET-NAME" \
--set s3connector.config.bucketLocation="YOUR-AWS-REGION" \
--set postgresql.enabled=false \
--set database.external=true \
--set database.driver="org.postgresql.Driver" \
--set database.url="jdbc:postgresql://YOUR-DATABASE-ENDPOINT:5432/" \
--set database.user="alfresco" \
--set database.password="YOUR-DATABASE-PASSWORD" \
--set activemq.enabled=false \
--set messageBroker.url="YOUR-MQ-ENDPOINT" \
--set messageBroker.user="alfresco" \
--set messageBroker.password="YOUR-MQ-PASSWORD" \
--set ai.enabled=true \
--set ai.aws.accessKey="YOUR-AI-AWS-ACCESS-KEY-ID" \
--set ai.aws.secretAccessKey="YOUR-AI-AWS-SECRET-KEY" \
--set ai.aws.region="YOUR-AWS-REGION" \
--set ai.aws.s3Bucket="YOUR-AI-BUCKET-NAME" \
--set ai.aws.comprehendRoleARN="YOUR-AI-AWS-COMPREHEND-ROLE-ARN" \
--atomic \
--timeout 10m0s \
--namespace=alfresco
Enable access to Alfresco Search Services
This example demonstrates how to enable Alfresco Search Services (/solr) for external access which is disabled by default.
Prepare data
- Obtain the list of IP addresses you want to allow access to
/solr. - Format the IP addresses as a comma separated list of CIDR blocks, i.e.
192.168.0.0/16,10.0.0.0/16. To allow access to everyone use0.0.0.0/0. -
Generate a
base64encodedhtpasswdformatted string using the following command, wheresolradminis the username andsomepasswordis the password:echo -n "$(htpasswd -nbm solradmin somepassword)" | base64
Deploy (Search)
Follow the EKS deployment guide up to the Choose Content Services version section. Return to this page once the Docker registry secret is installed.
Deploy the latest version of Content Services (Enterprise) by running the command below. You’ll need to replace YOUR-DOMAIN-NAME with the hosted zone you created previously, and replace YOUR-BASIC-AUTH and YOUR-IPS with the encoded basic authentication string and list of whitelisted IP addresses you prepared in the previous section.
helm install acs alfresco/alfresco-content-services \
--set externalPort="443" \
--set externalProtocol="https" \
--set externalHost="acs.YOUR-DOMAIN-NAME" \
--set persistence.enabled=true \
--set persistence.storageClass.enabled=true \
--set persistence.storageClass.name="nfs-client" \
--set global.alfrescoRegistryPullSecrets=quay-registry-secret \
--set alfresco-search.ingress.enabled=true \
--set alfresco-search.ingress.basicAuth="YOUR-BASIC-AUTH" \
--set alfresco-search.ingress.whitelist_ips="YOUR_IPS" \
--atomic \
--timeout 10m0s \
--namespace=alfresco
Upgrade (Search)
If you’ve previously deployed Content Services where external Search access was disabled (the default), you can run the following helm upgrade command to enable external access for /solr (replace YOUR-BASIC-AUTH and YOUR-IPS with the encoded basic authentication string, and list of whitelisted IP addresses you prepared earlier:
helm upgrade acs alfresco/alfresco-content-services \
--set alfresco-search.ingress.enabled=true \
--set alfresco-search.ingress.basicAuth="YOUR-BASIC-AUTH" \
--set alfresco-search.ingress.whitelist_ips="YOUR_IPS" \
Note: There are known issues when upgrading a Helm chart relating to Helm cache.
If your helm upgrade fails due to any of these example errors:
Error: UPGRADE FAILED: no Secret with the name "nosy-tapir-alfresco-search-solr" found
Error: UPGRADE FAILED: no Ingress with the name "nosy-tapir-alfresco-search-solr" found
Then, simply delete that resource using one of the following examples:
kubectl delete secret nosy-tapir-alfresco-search-solr --namespace=alfresco
kubectl delete ingress nosy-tapir-alfresco-search-solr --namespace=alfresco
Next, re-try the steps to upgrade Search, which also re-creates the deleted resource.
Enable email services
This example demonstrates how to enable Inbound and Outbound email when installing the Content Services Helm chart.
Prerequisites (email)
Follow the EKS deployment guide up to the Choose Content Services version section. Return to this page once the Docker registry secret is installed.
Deploy (email)
Currently, the ingress-nginx doesn’t support TCP/UDP services due to Kubernetes limitations. The required workaround is to expose the TCP (for example SMTP(S), IMAP(S)) to be accessible from outside over internet, a Kubernetes Service LoadBalancer. This means inbound email need to be sent using this Service LoadBalancer address which is serving tcp traffic. This may means there is an overhead of an extra L4 LoadBalancer cost. This is purely due to current limitations on Kubernetes for TCP/UDP services and not related to Content Services helm setup.
So, for example if your Content Services Helm chart is enabled with Inbound/Outbound email in domain *.example.com, then the service endpoints would be:
myacs.example.com- for general Alfresco, Digital Workspace, and Share endpointssmtps-myacs.example.com- for sending emails to Content Services smtp(s) server (for example port: 1125 (smtps), 1144(imaps))
It is recommended to enable TLS while configuring SMTP(s) and IMAP(s) configuration. If TLS is enabled for inbound email, then the helm chart expects the TLS certificate as a Secret before installing the chart. This secret name is passed on as a parameter with helm chart installation to be used for inbound email with TLS and repository will create keystore and truststore accordingly from the provided SSL certificates.
For example, if your Content Services email server name is smtps-myacs.example.com and your SSL certificates (self signed or signed) are cert.pem, fullchain.pem and privkey.pem run the following command to create a Kubernetes TLS secret:
kubectl create secret tls your-cert-secret --key privkey.pem --cert fullchain.pem --namespace=alfresco
Deploy the latest version of Content Services Enterprise by running the command below (replace YOUR-DOMAIN-NAME with the hosted zone you created, and replace the email values accordingly). See the table of configuration options for the full list of available options.
helm install acs alfresco/alfresco-content-services \
--set externalPort="443" \
--set externalProtocol="https" \
--set externalHost="acs.YOUR-DOMAIN-NAME" \
--set persistence.enabled=true \
--set persistence.storageClass.enabled=true \
--set persistence.storageClass.name="nfs-client" \
--set global.alfrescoRegistryPullSecrets=quay-registry-secret \
--set mail.host="smtp.gmail.com" \
--set mail.from.default="some.user@gmail.com" \
--set mail.username="some.user@gmail.com" \
--set mail.password="somepassword" \
--set mail.protocol=smtps \
--set mail.smtp.auth=true \
--set mail.smtps.auth=true \
--set email.server.enabled=true \
--set email.server.auth.enabled=true \
--set email.server.enableTLS=true \
--set email.server.domain=smtps-myacs.example.com \
--set email.inbound.unknownUser="some.user@gmail.com" \
--set email.ssl.secretName=your-cert-secret \
--set imap.server.enabled=true \
--set imap.server.imap.enabled=true \
--set imap.server.imaps.enabled=true \
--atomic \
--timeout 10m0s \
--namespace=alfresco
Note: If you’re using GMail or Yahoo as the outbound email server, your application’s attempts to send outgoing emails may be blocked by email providers due to their security policies, as it considers the authentication attempts to be suspicious. When this happens, you will receive a security alert at the corresponding email address. To proceed, you will need to manually confirm the validity of the authentication attempt before the email provider will permit the application to send outbound emails. See Less secure apps & your Google Account for more information.
Exposing email service
Ingress-nginx currently does not support TCP or UDP services. The Helm chart will expose SMTP service as a LoadBalancer (it creates a new AWS ELB). You can get the LoadBalancer/ELB information by running the following command:
kubectl get services `kubectl get services --namespace=alfresco | grep email | awk '{print $1}'` --namespace=alfresco
This produces an output similar to the one below - the ELB DNS name is shown in the EXTERNAL-IP column.
NAME                          TYPE           CLUSTER-IP      EXTERNAL-IP                                                               PORT(S)          AGE
alert-fly-alfresco-cs-email   LoadBalancer   100.XX.33.188   a1dXXXXXab11eaac6702XXXf87b-XXXXXXXXXX.eu-west-1.elb.amazonaws.com   1125:30554/TCP   2d
Test email service
-
Use Route53 to register a more friendly name for the ELB DNS name retrieved in the previous section, for example
smtps-myacs.example.com. -
Test the communication using Telnet:
 $ telnet smtps-myacs.example.com 1125
 Trying 34.249.150.165...
 Connected to smtps-myacs.example.com.
 Escape character is '^]'.
 220 smtps-myacs.example.com ESMTP SubEthaSMTP 3.1.7
For more information, see:
Using a custom metadata keystore
The Alfresco content repository Docker image comes with a pre-created default keystore that contains a secret key. For more information, see Managing Alfresco keystores and Dockerfile.
It is recommended to generate a new keystore in production systems. You can mount it to the content-repository docker image to location /usr/local/tomcat/shared/classes/alfresco/keystore/. If the standard names of the keystore and the key are used, you only need to change the password values in values.yaml:
metadataKeystore:
  keystorePassword: ""
  keyPassword: ""
Otherwise, refer to the full list of configuration options in Keystore configuration.