Use the following to develop and customize Process Automation.
External systems communication
Communication with an external system should use the REST connector or the Lambda connector.
Important: The REST service and the AWS Lambda account and function need to be hosted outside of the Alfresco hosted environment.
Both connectors can send and return JSON payloads from a process. The REST connector can also be configured as a trigger for webhooks.
Extend the Digital Workspace
The default end user interface provided with Process Automation is the Alfresco Digital Workspace. Starting with Process Automation version 7.12, large parts of the Digital Workspace can be easily customized by editing the provided UI, see creating a custom user interface. If you’re using a version older than 7.12, use the instructions below to extend your Digital Workspace.
Setup
To start developing Digital Workspace customizations:
-
Request the source code from Support.
-
Unzip the source code into your development environment and create a
.envfile in the root folder. -
Insert the following contents in the
.envfile:# GENERAL AUTH_TYPE="OAUTH" PROVIDER="ALL" LOG_LEVEL="TRACE" ACA_BRANCH="develop" # ADW + APA API_HOST="https://..." API_CONTENT_HOST="https://..." API_PROCESS_HOST="https://..." OAUTH_HOST="https://..." IDENTITY_HOST="https://..." PLUGIN_PROCESS_SERVICE=true APP_CONFIG_APPS_DEPLOYED="[{"name": "..."}]" -
Update the contents of the
.envfile with the following:Property Description API_HOST The API host for the environment in the format https://alfresco.com.API_CONTENT_HOST The API host for the content services in the format https://alfresco.com.API_PROCESS_HOST The API host for the process services in the format https://alfresco.com.OAUTH_HOST The authentication host in the format https://alfresco.com/auth/realms/alfresco.IDENTITY_HOST The identity service host in the format https://alfresco.com/auth/realms/alfresco.APP_CONFIG_APPS_DEPLOYED The name of the deployed application to extend the Digital Workspace against. The name is set when the application is deployed, for example [{"name": "invoice-approval-application"}]. -
Run the following command from the root of your local Digital Workspace:
npm run start content-en-cloud. -
Your local Digital Workspace is now connected to your hosted Process Automation application and can be extended, tested and debugged.
Develop
The Digital Workspace is built using the Application Development Framework. There are a set of content components and a set of process components that can be extended.
Note: Process Automation uses the Process Services Cloud components.
Upload
Once the extended Digital Workspace has been fully customized and tested it can be deployed.
-
Remove the
.envfile from your source code. -
Upload your source code to your Alfresco S3 bucket.
Note: Please contact Support if you do not have the details of this bucket.
-
Raise a Support request with this information:
- A link to the source code in S3.
-
The name of the application to update.
Note: This should match what is configured in the
app.config.jsonfor the interface. - The environment the application is deployed in.
- When the application should be updated with the new interface.
Extend task list with custom columns
The Digital Workspace provides a default group of columns for your task list. The columns can be changed and configured in the process-services-cloud.extension.json file of the Process Services Cloud extension library.
Here is an example of a task list with default columns preset:
{
  "features": {
    "taskList": {
        "presets": {
            "default": [
                columns schema
            ]
        }
    }
  }
}
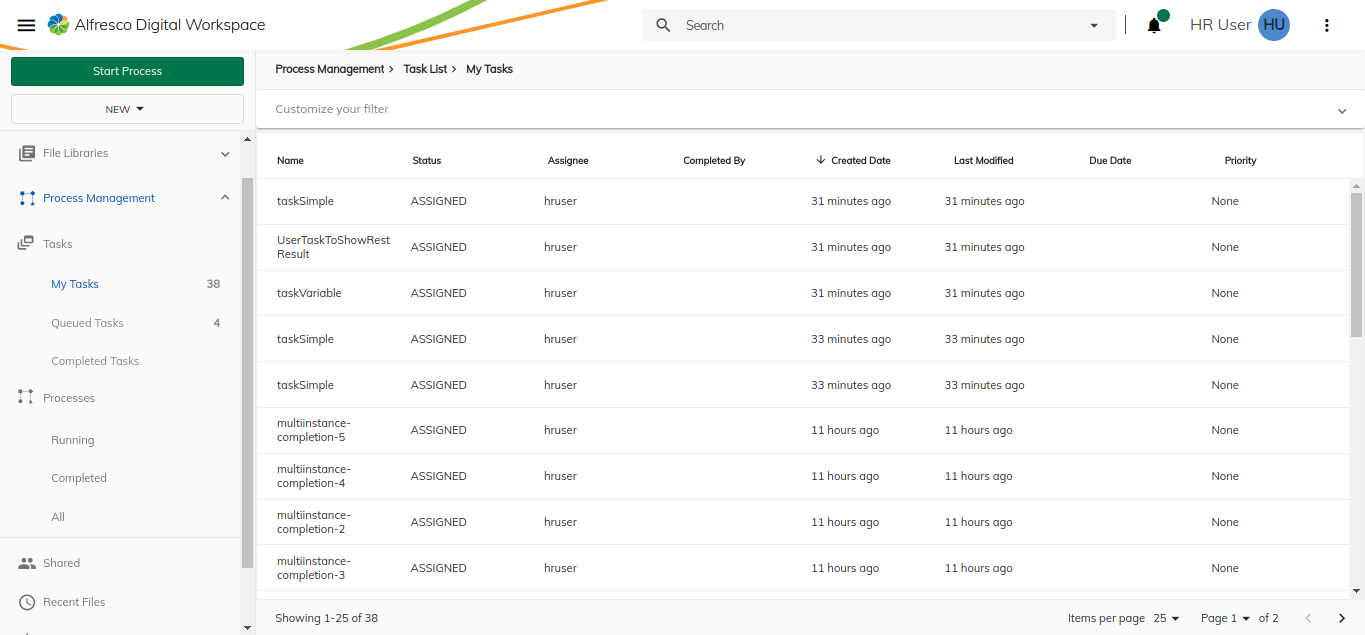
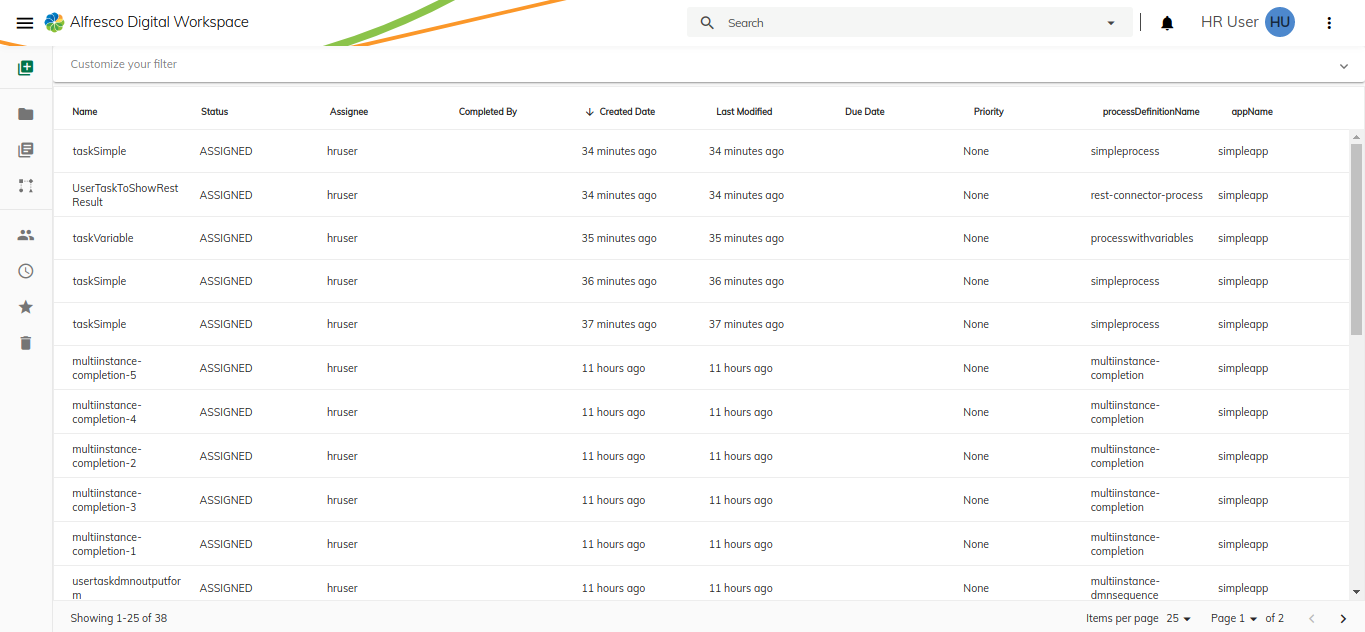
Add a column in the task list using a task property
To display the task list with new columns, edit the process-services-cloud.extension.json file, and insert an entry into the features.taskList.presets.default section.
{
  "features": {
    "taskList": {
        "presets": {
            "default": [
                { ...Default Columns schema },
                {
                    "id": "app.task.processDefinitionName",
                    "key": "processDefinitionName",
                    "type": "text",
                    "title": "processDefinitionName",
                    "sortable": true
                },
                {
                    "id": "app.task.appName",
                    "key": "appName",
                    "type": "text",
                    "title": "appName",
                    "sortable": true
                }
            ]
        }
    }
  }
}
When you restart the application you will see the new columns in the task list.

Replace a default preset in the task list
To display a task list with new columns already preset, edit the process-services-cloud.extension.json file to include the definition of your own set of columns, and insert an entry into the features.taskList.presets.my-task-presets section.
{
  "features": {
    "taskList": {
        "presets": {
            "default": [
                { Default Columns schema },
            ],
            "my-task-presets": [
                {
                    "id": "app.task.name",
                    "key": "name",
                    "type": "text",
                    "title": "Name",
                    "sortable": true
                },
                {
                    "id": "app.task.status",
                    "key": "status",
                    "type": "text",
                    "title": "Status",
                    "sortable": true
                },
                {
                    "id": "app.task.processDefinitionName",
                    "key": "processDefinitionName",
                    "type": "text",
                    "title": "processDefinitionName",
                    "sortable": true
                },
                {
                    "id": "app.task.appName",
                    "key": "appName",
                    "type": "text",
                    "title": "appName",
                    "sortable": true
                }
            ]
        }
    }
  }
}
To activate the new columns edit the task-list-cloud-ext.component file and change the this.columns = this.extensions.getTaskListPreset property from default to my-task-presets.
this.columns = this.extensions.getTaskListPreset('my-task-presets');
Add a column in the Task list using a custom template
To display a task list with a custom column template you first need to create a custom component.
For example, to create custom templates for the task name, due date, and priority properties edit the process-services-cloud.extension.json file in the following way.
import { ChangeDetectionStrategy, Component, Input, OnInit, ViewEncapsulation } from '@angular/core';
import { TaskDetailsCloudModel } from '@alfresco/adf-process-services-cloud';

@Component({
  selector: 'custom-template-name-column',
  template: `
    <mat-list>
        <mat-list-item>
            <div mat-line></div>
            <div mat-line [ngStyle]="{ 'padding-top': '5px' }">
                <span [ngStyle]="{ 'font-weight': 'bold' }">Assignee :</span>
                <span> </span>
            </div>
        </mat-list-item>
    </mat-list>
    `,
  host: { class: 'adf-datatable-content-cell adf-name-column' },
})
export class TaskNameComponent implements OnInit {

  @Input()
  context: any;

  displayValue: TaskDetailsCloudModel;

  constructor() {}

  ngOnInit() {
    this.displayValue = this.context?.row?.obj;
  }
}
import { Component, Input, OnInit } from '@angular/core';
import { TaskDetailsCloudModel } from '@alfresco/adf-process-services-cloud';

@Component({
  selector: 'custom-template-priority-column',
  template: `
    <mat-form-field>
      <mat-label>Change Priority</mat-label>
      <mat-select [(ngModel)]="selectedValue" name="priority">
        <mat-option *ngFor="let priority of priorities" [value]="priority">

        </mat-option>
      </mat-select>
    </mat-form-field>
    `,
  host: { class: 'adf-datatable-content-cell adf-name-column' },
})
export class TaskPriorityComponent implements OnInit {

  @Input()
  context: any;

  displayValue: TaskDetailsCloudModel;

  priorities: string[] = ['None', 'High', 'Low', 'Normal'];
  selectedValue: string;

  constructor() {}

  ngOnInit() {
    this.displayValue = this.context?.row?.obj;
    this.selectedValue = this.displayValue.priority;
  }
}
import { Component, Input, OnInit } from '@angular/core';
import { ProcessInstanceCloud } from '@alfresco/adf-process-services-cloud';

@Component({
  selector: 'custom-template-duedate-column',
  template: `
    <mat-form-field>
        <input matInput [matDatepicker]="picker" placeholder="Change due date" />
        <mat-datepicker-toggle matSuffix [for]="picker"></mat-datepicker-toggle>
        <mat-datepicker #picker></mat-datepicker>
    </mat-form-field>
    `,
  host: { class: 'adf-datatable-content-cell adf-name-column' },
})
export class TaskDueDateComponent implements OnInit {

  @Input()
  context: any;

  displayValue: TaskDetailsCloudModel;

  constructor() {}

  ngOnInit() {
    this.displayValue = this.context?.row?.obj;
  }
}
Register the custom components in the task-list.module.ts file. For more on how to register a custom component see Registration.
@NgModule({
    declarations: [TaskNameComponent, TaskPriorityComponent, TaskDueDateComponent ]
})

export class TasksListCloudModule {
    constructor(extensions: ExtensionService) {
        extensions.setComponents({
            'app.taskList.columns.name': TaskNameComponent,
            'app.taskList.columns.priority': TaskPriorityComponent,
            'app.taskList.columns.dueDate': TaskDueDateComponent
        });
    }
}
Once you have registered your components, you need to register your new template component. To do this you need to add your new column to the your-app.extensions.json file:
{
  "features": {
    "taskList": {
        "presets": {
            "default": [
                {
                  "id": "app.task.name",
                  "key": "name",
                  "title": "Name",
                  "type": "text",
                  "template": "app.taskList.columns.name",
                  "sortable": true
                },
                {
                  "id": "app.task.dueDate",
                  "key": "status",
                  "title": "Due Date",
                  "type": "text",
                  "template": "app.taskList.columns.dueDate",
                  "sortable": true
                },
                {
                  "id": "app.task.priority",
                  "key": "priority",
                  "title": "Priority",
                  "type": "text",
                  "template": "app.taskList.columns.priority",
                  "sortable": true
                }
            ]
        }
    }
  }
}
Restart the application and you will see the custom columns in the task list based on the new custom template.

Extend process list with custom columns
The Digital Workspace provides a default group of columns for your process list. The columns can be changed and configured in the process-services-cloud.extension.json file of the Process Services Cloud extension library.
Process list with default columns preset.
{
  "features": {
    "processList": {
        "presets": {
            "default": [
                columns schema
            ]
        }
    }
  }
}

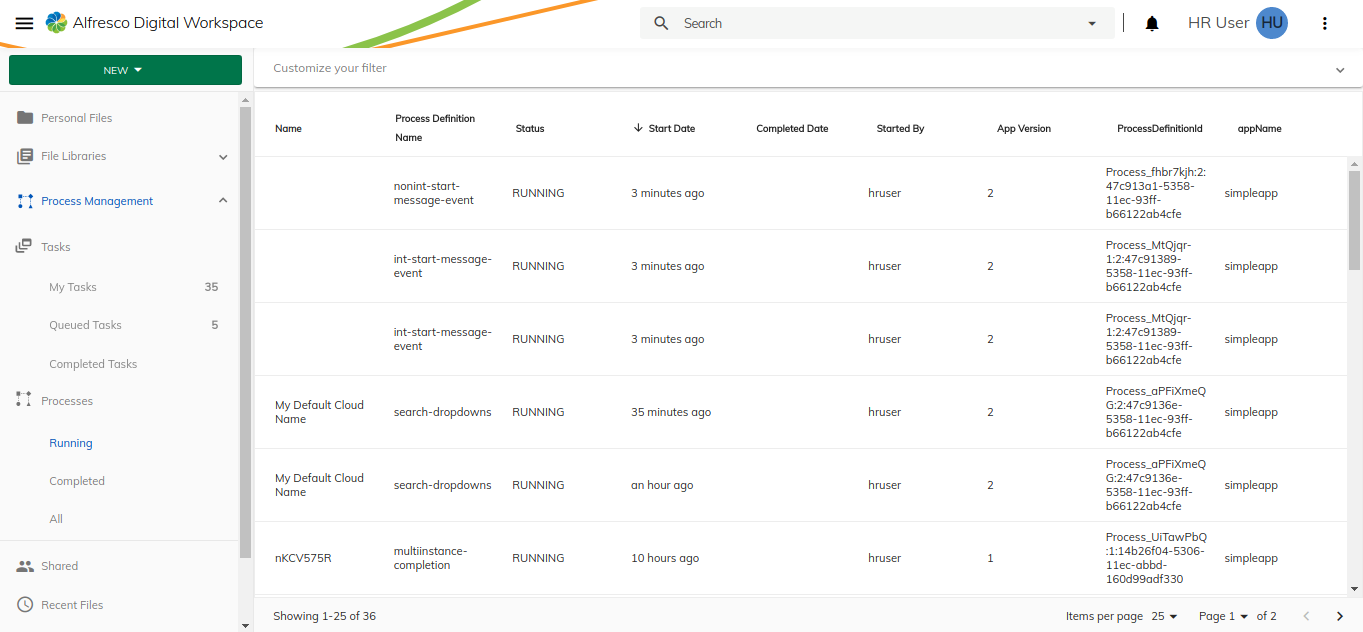
Add a column in the process list using a process instance property
To display the process list with new columns, edit the process-services-cloud.extension.json file, and insert an entry into the features.processList.presets.default section.
{
  "features": {
    "processList": {
        "presets": {
            "default": [
                { Default Columns schema },
                {
                    "id": "app.process.processDefinitionId",
                    "key": "processDefinitionId",
                    "type": "text",
                    "title": "ProcessDefinitionId",
                    "sortable": true
                },
                {
                    "id": "app.process.appName",
                    "key": "appName",
                    "type": "text",
                    "title": "appName",
                    "sortable": true
                }
            ]
        }
    }
  }
}
When you restart the application you will see the new columns in the process list.

Replace a default preset in the process list
To display a process list with new columns already preset, edit the process-services-cloud.extension.json file to include the definition of your own set of columns, and insert an entry into the features.processList.presets.my-process-presets section.
{
  "features": {
    "processList": {
        "presets": {
            "default": [
                { Default Columns schema },
            ],
            "my-process-presets": [
                {
                    "id": "app.process.id",
                    "key": "id",
                    "type": "text",
                    "title": "Process Id",
                    "sortable": true
                },
                                {
                    "id": "app.process.name",
                    "key": "name",
                    "type": "text",
                    "title": "appName",
                    "sortable": true
                },
                {
                    "id": "app.process.appName",
                    "key": "appName",
                    "type": "text",
                    "title": "appName",
                    "sortable": true
                }
            ]
        }
    }
  }
}
To activate the new columns edit the process-list-cloud-ext.component file and change the this.columns = this.extensions.getProcessListPreset property from default to my-process-presets.
this.columns = this.extensions.getProcessListPreset('my-process-presets');
Add a column in the process list using a custom template
To display a process list with a custom column template you first need to create a custom component.
For example, to create custom templates for the process name, and status properties, edit the process-services-cloud.extension.json file in the following way.
import { ChangeDetectionStrategy, Component, Input, OnInit, ViewEncapsulation } from '@angular/core';
import { ProcessInstanceCloud } from '@alfresco/adf-process-services-cloud';

@Component({
  selector: 'custom-template-name-column',
  template: `
      <mat-list>
        <mat-list-item>
            <div mat-line></div>
            <div mat-line [ngStyle]="{ 'padding-top': '5px' }">
                <span [ngStyle]="{ 'font-weight': 'bold' }">ADF_CLOUD_PROCESS_LIST.PROPERTIES.STARTED_BY :</span>
                <span> </span>
            </div>
        </mat-list-item>
      </mat-list>
    `,
  changeDetection: ChangeDetectionStrategy.OnPush,
  encapsulation: ViewEncapsulation.None,
  host: { class: 'adf-datatable-content-cell adf-name-column' },
})
export class ProcessNameComponent implements OnInit {

  @Input()
  context: any;

  displayValue: ProcessInstanceCloud;

  constructor() {}

  ngOnInit() {
    this.displayValue = this.context?.row?.obj;
  }
}
import { ChangeDetectionStrategy, Component, Input, OnInit, ViewEncapsulation } from '@angular/core';
import { ProcessInstanceCloud } from '@alfresco/adf-process-services-cloud';

@Component({
  selector: 'custom-template-status-column',
  template: `
    <mat-chip-list>
        <mat-chip>
            <div [ngStyle]="{ 'padding-right': '5px' }">
                <mat-icon *ngIf="displayValue.status === 'COMPLETED'" [ngStyle]="{ 'color': 'green' }">check_circle</mat-icon>
                <mat-icon *ngIf="displayValue.status === 'RUNNING'"   [ngStyle]="{ 'color': 'green' }">settings</mat-icon>
                <mat-icon *ngIf="displayValue.status === 'SUSPENDED'" [ngStyle]="{ 'color': 'red' }">block</mat-icon>
                <mat-icon *ngIf="displayValue.status === 'CANCELLED'" [ngStyle]="{ 'color': 'red' }">highlight_off</mat-icon>
            </div>
            <span></span>
        </mat-chip>
    </mat-chip-list>
    `,
  changeDetection: ChangeDetectionStrategy.OnPush,
  encapsulation: ViewEncapsulation.None,
  host: { class: 'adf-datatable-content-cell adf-name-column' },
})
export class ProcessStatusComponent implements OnInit {

  @Input()
  context: any;

  displayValue: ProcessInstanceCloud;

  constructor() {}

  ngOnInit() {
    this.displayValue = this.context?.row?.obj;
  }
}
Register the custom components in the process-list.module.ts file. For more on how to register a custom component see Registration.
@NgModule({
    declarations: [ ProcessNameComponent, ProcessStatusComponent ]
})

export class ProcessListCloudModule {
    constructor(extensions: ExtensionService) {
        extensions.setComponents({
            'app.processList.columns.name': ProcessNameComponent,
            'app.processList.columns.status': ProcessStatusComponent
        });
    }
}
Once you have registered your components, you need to register your new template component. To do this you need to add your new column to the your-app.extensions.json file:
{
  "features": {
    "processList": {
        "presets": {
            "default": [
                {
                  "id": "app.process.name",
                  "key": "name",
                  "title": "ADF_CLOUD_PROCESS_LIST.PROPERTIES.NAME",
                  "type": "text",
                  "template": "app.processList.columns.name",
                  "sortable": true
                },
                {
                  "id": "app.process.status",
                  "key": "status",
                  "title": "ADF_CLOUD_PROCESS_LIST.PROPERTIES.STATUS",
                  "type": "text",
                  "template": "app.processList.columns.status",
                  "sortable": true
                }
            ]
        }
    }
  }
}
Restart the application and you will see the custom columns in the process list based on the new custom template.

Create a custom user interface
Starting with Process Automation version 7.12, custom user interfaces can be modified, starting from the default interface. If you’re using older Process Automation version and wish to modify the user interface, see extending digital workspace instead.
To create a custom user interface:
-
Sign in to the Modeling Application and open a project.
-
Click the three dots next to UI and then select Create Custom UI.
-
Enter the name of the custom UI.
If you want to develop the custom UI basing on the existing default UI of the application, select Generate from template and click download source code link. Once your custom UI is ready to be deployed select Upload (you need to build your application and create a zip from the build).
Develop a custom user interface
Custom UIs can be developed using hyland nx generators.
The downloaded zip includes instructions how to customize application. To see the instructions, refer to plugins-generators.md file within the downloaded ZIP package.
Upload
Once the custom interface has been fully developed and tested it can be deployed.
-
Sign in to the Modeling Application and open a project.
-
Select the created custom UI under the UI drop-down list.
-
Click Upload.
-
Upload the custom UI as a ZIP file.
Custom form fields
To include custom form fields within a form, the form field customizations must be included in the customization of Digital Workspace or the development of a custom user interface.
Note: The custom field can be included in a form before the custom interface has been deployed.
REST API
The REST APIs are accessed differently depending on whether a service is an application or platform-specific. For application endpoints, the application name will form part of the endpoint.
The OpenAPI specifications for application endpoints require the {application-name} element in the URL:
- Application runtime bundle:
{domain-name}/{application-name}/rb/swagger-ui/index.html. - Application query service:
{domain-name}//{application-name}/query/swagger-ui/index.html.
The query service can also use GraphQL to expand the querying and can be accessed at: {domain-name}/{application-name}/notifications/graphiql.
Clean up historical data
You can use the REST API or the Create cleanup job process from within the Admin App to clean up your historical data.
Clean up using REST API
You can clean up historical data using the REST API by using specific keys as input paramaters.
| Property | Description |
|---|---|
historicRetentionDays |
Required. The number of days to retain any completed or cancelled processes. |
processDefinitionKeys |
Optional. A list of process definition keys to clean up. If omitted, all current process definitions are queried from the database and applied to delete the criteria. The default is null. |
limitSize |
Optional. A parameter that specifies the delete query size limit for performance. The default is 1000 rows. |
schemaPrefix |
Optional. A parameter that specifies the schema prefix, i.e. public. The default is an empty string. |
async |
Optional. A parameter that specifies the job execution strategy via the task executor. The default is true. |
For example:
POST /v1/admin/batch/jobs/executions/cleanup-query-process-instance-history-job
{
  "historicRetentionDays": 10,
  "processDefinitionKeys": ["ConnectorProcess", "HeadersConnectorProcess"],
  "limitSize": 100,
  "schemaPrefix": "public",
  "async": true
}
Replay service task using REST API
If a service task does not complete due to a Cloud connector failure it’s possible to replay the task and send a new integration request. To do this you must provide the execution id and the definition id of the service task:
POST /v1/executions/{executionId}/replay/service-task
{
   "flowNodeId": "flowNodeId"
}