A data model allows you to represent complex objects your application is handling. It allows you to define the standard data structure you will use in your application using JSON schema. A data model is useful when you want to query an internal or external service that has a specific structure. The data model editor allows you to visually create the JSON schema and the JSON editor allows you to see the JSON code of the schema. When you use a data model it provides auto-completion in your scripts and expressions. You can also map a data model with your variables and connector properties. You can use the Upload button to upload a previously defined JSON schema that you have downloaded from Process Automation.
These instructions describe how to make a data model for a specific process but you can create a data model for use at a global level where the same data model properties can be used across multiple processes. To create a global data model Click New > Data model from the home screen. Alternatively you can transform your data model into a global one by selecting the three dots on the right hand side of your open data model and selecting Turn global.
Note: If you transform your data model into a global one you are unable to revert it.
Properties
The properties of a data model are:
| Property | Description |
|---|---|
| Data model name | Required. The name of the data model. Must be in lowercase and between 1 and 26 characters in length. Alphanumeric characters and hyphens are allowed, however the name must begin with a letter and end alphanumerically, for example ‘person’. |
| Type | Required. Use the Type field to select the JSON schema type you want to use, for example object. You can select more than one JSON schema type from the dropdown list, except you cannot select more than one type from the Modelling app section. |
| Upload | Optional. You can upload a predefined data model. It must be in JSON schema format, for more see JSON schema. |
| Data model description | Optional. A free text description of what the data model is, for example ‘This data model represents a person in an organization’. |
Create a data model
The following example creates a data model that represents a person, including their name, date of birth, and gender.
Note: Data models are specific to your installation and configuration. The example described here creates a data model called Person. The model ensures that any service that uses the Person object understands its structure. This example is simple but it allows you to see how the process works but your data models could be more involved.
Create a data model for a specific process
To create a data model:
-
Sign into the Modeling Application and open a Project, and then click the + icon next to Data Models.
Note: You are able to upload already defined data models by using the Upload button next to Data models. Any data model you upload must be written in the JSON format.
-
Enter a name for the data model, for example ‘person’.
-
Enter a description for the data model, for example ‘This model provides the data structure for the object Person’.
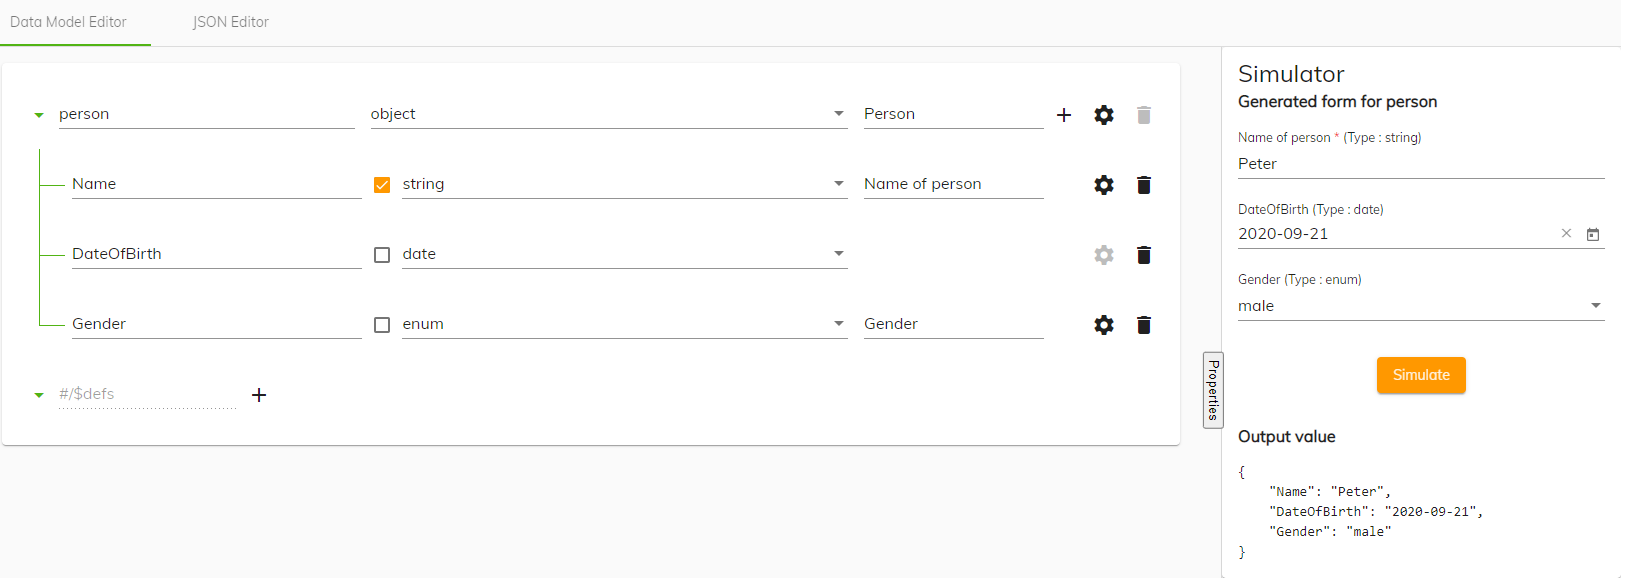
You are presented with the Data Model Editor.
-
From the Type dropdown list select object from the JSON schema types section.
You select object because the person data model will contain different fields.
You can click the cog icon to access the advanced settings which are standard JSON schema configuration settings, for more see JSON schema.
-
In the title field enter a meaningful title.
The title entered will be seen by a user when using a form with this data model.
-
Click the + icon to add a property to the Person object.
A new row is created.
-
Enter
Namefor the new row and then select the Required check box.Selecting the required check box ensures when a new person is added, the entry must include a Name.
-
From the Type dropdown list select string.
-
In the title field enter a meaningful title.
-
Click the + icon to add another property to the Person object.
-
Enter
DateOfBirthfor the new row. -
From the Type dropdown list select date from the Modelling app section.
-
Click the + icon to add another property to the Person object.
-
Enter
Genderfor the new row and then select the Required check box. -
From the Type dropdown list select enum from the Enumeration section and then enter a meaningful title in the title field.
-
Select the cog icon to access the Advanced settings and enter the gender definitions you would like to include in the Enumerated values box. Click Save.
You can see the JSON definition of the enumerated values in the preview section.
-
Click the Save icon to save the data model and then to see the JSON file created of the data model, click the JSON Editor button .
Note: You can also use references in your data model, for more see Using Ref in a data model.
{
    "description": "This model provides the data structure for the object Person.",
    "type": "object",
    "properties": {
        "Name": {
            "type": "string",
            "title": "Name of person"
        },
        "DateOfBirth": {
            "$ref": "#/$defs/primitive/date"
        },
        "Gender": {
            "enum": [
                "male",
                "female"
            ],
            "title": "Gender"
        }
    },
    "title": "Person",
    "required": [
        "Name"
    ]
}
You have created a data model called Person that can be used in Process Automation. Use the Simulator on the right to view how the information you have added to the data model appears on a form. You can test the rules you have created for each property and you can see the JSON output when a new person is added.
Using a data model in a process
To use the data model you created in a project:
-
In the Modelling Application click the + icon next to processes and create a new process called ‘person-process’.
-
Select Create REST connector from the Connectors menu.
-
Select Create new instance from the Connector Editor Settings window and enter ‘rest-connector-person’ for the connector name and then click Apply.
-
Use an arrow to connect to the Rest connector object.
-
Select the Rest connector object and then click the Append task icon.
-
Select the second object and click the Change type icon and then select User Task.
-
Ensure the User task is still selected and then click Assignment in the properties pane.
-
Select Identity and find the user you want to assign the task to and then click Assign.
-
Select the User task and click Append EndEvent.
-
Click anywhere in the whitespace to de-select the tasks and then click Edit Process Variables in the properties pane.
-
Click the + symbol and enter a name for the variable called ‘Person’.
-
Click the Type dropdown list and select Data Models and then select the person data model. Click Update.
You can see the properties of your data model in the Process variables window.
-
Select the REST connector object and then from the Action dropdown list select Get.
You are calling a service using the REST connector.
-
In the Output mapping section select the Process variable for the
restResultfield to beperson.This means your person variable will be populated with the result which means you can use the data within your person task.
-
Select the User task again and create a new form from the properties menu and call it ‘person’ and then add a textbox to it.
-
In the Field Editor of the textbox add a label called ‘Name’ and then click Save.
Note: You must add a text box for each of the fields you created when you made the data model and you must label them accordingly.
You now have a user task that is using a form called person and that form contains a checkbox called ‘Name’.
-
Go back to the process and select the user task and then edit the Process variable/Value field of the parameter called ‘Name’ that is under input mapping.
Note: You must do this for all the fields you want on your form.
-
On the Edit variable mapping window select Expression and add
${person.Name}and then click Update.You have added the value that the Name field will use on the form. You can use the auto-completion functionality to enter the expression.
Note: You must do this for all the fields you want on your form.
You now have a data model that is being used by a process that is processing complex objects.
Using Ref in a data model
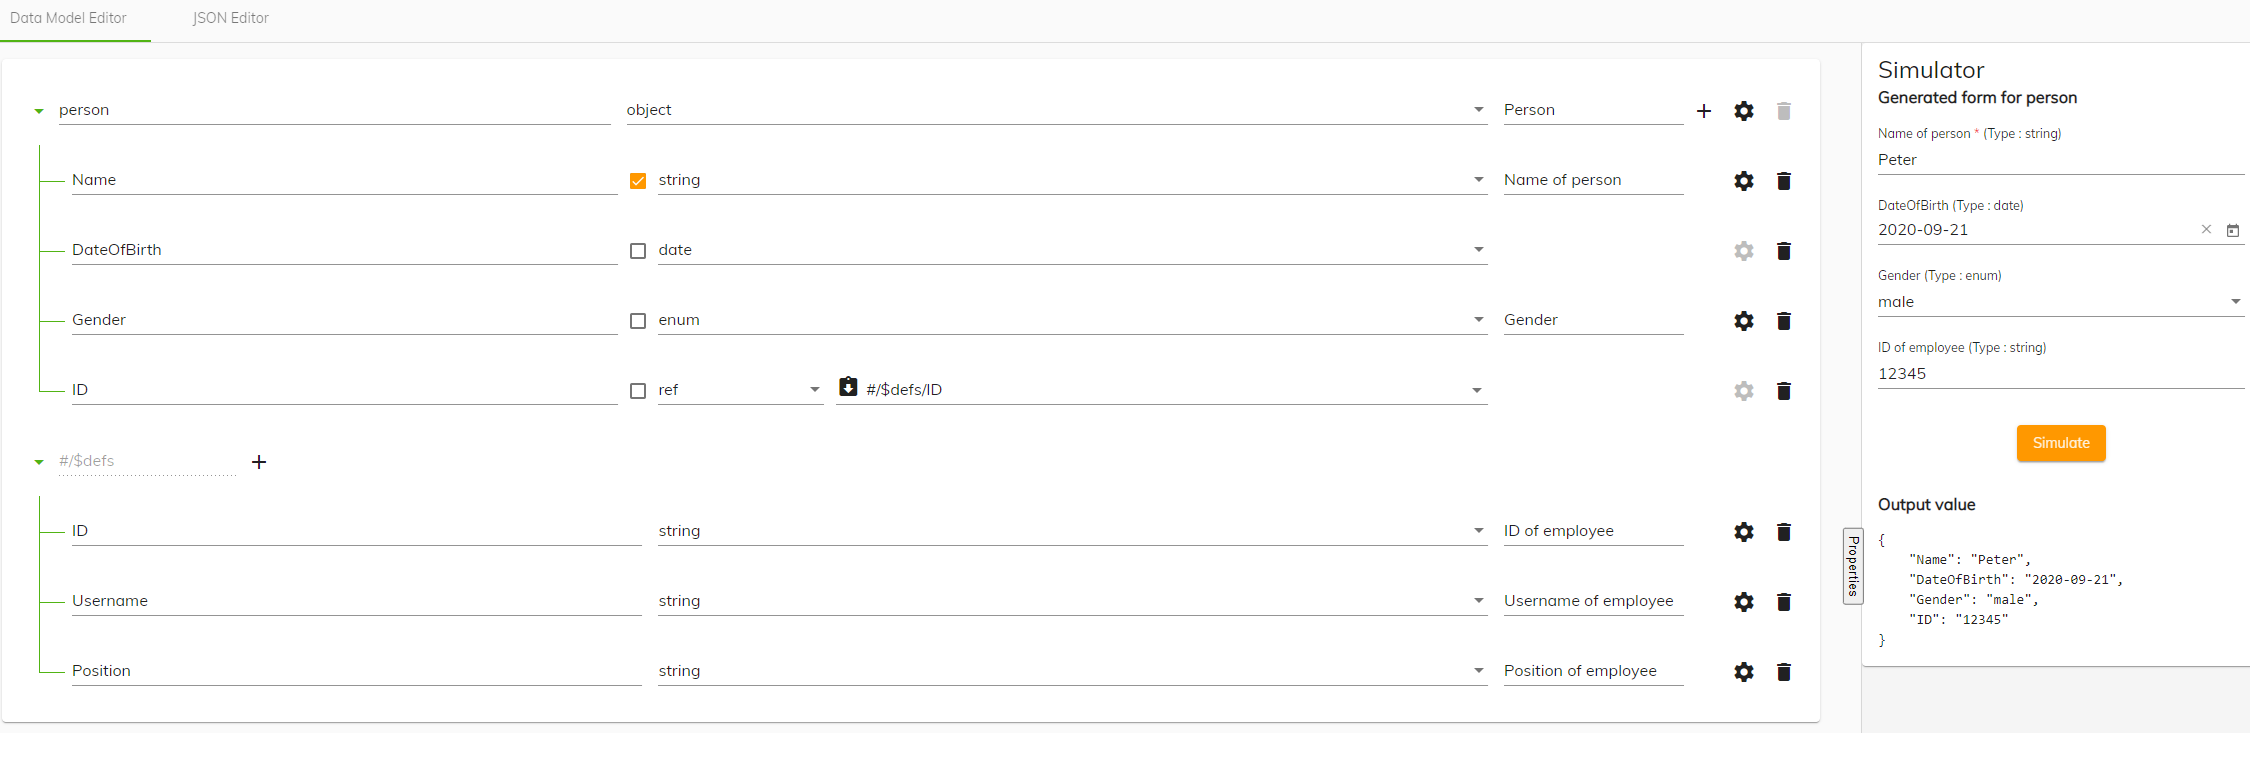
You can also use references when constructing your data model. Using the person data model you created earlier as an example, you can use reuse the defined reference in several properties of the data model. For example a reference called ID (which is used company wide as the ID of an employee), and might be constructed of a username, and position could be reused in numerous properties. A reference cannot be used in other data models.
To use references in a data model:
-
In the person data model click the + icon next to the references field to add a definition.
-
Enter ‘ID’ for the name of the reference and from the Type dropdown list select object.
-
In the title field enter a meaningful title.
-
Click the + icon again to add another row.
-
Enter ‘Username’ for the name of the row and From the Type dropdown list select object.
-
In the title field enter a meaningful title.
-
In the main section of the person data model click the + icon again to add another property row.
-
Enter a name for the new row and then select the Required check box.
-
From the Type dropdown list select ref under the composition heading.
-
From the second Type dropdown list that appears select the references block you want to use and then click Save.
You now have a reference being used within your person data model.