The default user interface for managing content, processes and tasks is the Alfresco Digital Workspace. An instance of the Digital Workspace is deployed with every application and used to manage the processes associated with that application.
Users need to have been given user access to an application in order to access and manage content and processes in the Digital Workspace.
Note: The Digital Workspace can be extended or replaced with a custom interface built using the Application Development Framework.
Processes
The Processes section is used for monitoring all the process instances in the application. The three default views are:
- Running which displays all in-flight process instances.
- Completed which displays all process instances that have been completed.
- All which displays all in-flight, completed, cancelled and suspended process instances.
Properties
The properties for each process instance are:
| Property | Description |
|---|---|
| Name | The name given to the process instance when it was started. |
| Process Definition Name | The process definition the instance is using. |
| Status | The current status of the process instance. See the table below for a list of possible statuses. |
| Start Date | The time since the process instance was started. |
| Completed Date | The time since the process instance was completed. It will be blank if the process instance has not yet been completed. |
| Started By | The name of the user that started the process instance. |
Note: Further details are available to view for each process instance by clicking on it. A properties panel will appear on the right-hand side of the screen.
The status of process instances are:
| Status | Description |
|---|---|
| RUNNING | The process instance is currently running. |
| COMPLETED | The process instance has been completed. |
| SUSPENDED | The process instance is currently suspended and cannot continue until it is reactivated. |
| CANCELLED | The process instance has been cancelled and cannot be completed. |
Start a process instance
To start a process instance:
-
Sign into the Digital Workspace.
-
Click Start Process.
-
Select the process you would like to start from the modal window.
If you defined categories when you created your processes, they will be organized within those categories.
-
Click START PROCESS.
Note: Once you have selected the process you would like to work with from the modal window you can copy and share the URL with another user, so they can start the process. This user must have credentials to sign into the Digital Workspace.
All Alfresco Digital Workspace users who have initiated a process or participated in one can see all the tasks from the process, including the tasks assigned to other users. To see the list of tasks navigate to Process Management > Processes > Running > Process details.
Start a process instance from a file
Process instances can also be started from a file in the repository. If the process definition contains a start event that contains a form with an attach file field then the content will be attached to the process as it is started.
-
Sign into the Digital Workspace.
-
Navigate to, or search for the file to start the process with.
-
Right click on the file and select Start Process.
-
Select the process definition to use from the dropdown. If the definition does not contain an upload field then a notice is displayed.
-
Give the process instance a name and click Start Process.
Filter process instances
The default process instance views can be updated by changing the filters. New views can also be created by editing the filters for a view and selecting saving a new one.
The properties for filters are:
| Property | Description |
|---|---|
| Process Name | The name of the process instances to display. |
| Process Definition | The process definition to filter by. |
| Status | The statuses of process instances to display. |
| Sort by | The column to sort by, for example Process Name, Status or Initiator. |
| Order by | Whether the ordering is ascending or descending. |
| Completed Date | The date range for when the process instances were completed. |
| Started Date | The date range for when the process instances were started. |
Once you have customized a filter, there are two options:
- Save filter: Selecting this will save the filter over the current view.
- Save filter as: Selecting this will give you the option to provide a name for a new view for your filter and add it under the Processes section.
You can use the Delete filter option at any time to remove a view.
Tasks
The Tasks section is used for monitoring all the tasks in the application. The three default views are:
- My Tasks which displays all tasks assigned to the user.
- Queued Tasks which displays all unclaimed tasks the user is eligible to claim.
- Completed Tasks which displays all tasks completed by the user.
In the Digital Workspace you are notified of new tasks assigned to you next to My Tasks and Queued Tasks. The number within the indicator displays how many tasks of that type you have been assigned. If at least one task has not been seen yet the indicator will be orange. The number within the task counter will continue to display until the tasks are completed.
Properties
The properties for each process instance are:
| Property | Description |
|---|---|
| Name | The name of the task. |
| Status | The current status of the task. See the table below for a list of possible statuses. |
| Assignee | The user assigned to the task. It will be blank if the task is unclaimed. |
| Status | The current status of the task. See the table below for a list of possible statuses. |
| Created Date | The time since the task was started. |
| Last Modified | The time since the task was last updated. |
| Due Date | The date and time the task is due to be completed by. |
| Priority | The relative priority of the task. |
Note: Further details are available to view for each task by clicking on it. A properties panel will appear on the right-hand side of the screen.
The status of tasks are:
| Status | Description |
|---|---|
| CREATED | The task has been created but not yet assigned. |
| ASSIGNED | The task has assigned but not yet completed. |
| COMPLETED | The task has been completed. |
| SUSPENDED | The task is suspended because the process instance it belongs to has been suspended. It cannot be completed until the process instance is activated. |
| CANCELLED | The task has been cancelled and cannot be completed. |
Claim and release tasks
Tasks that are assigned to a candidate group can be claimed by an individual user to work on the task. Claiming a task will remove it from other candidates Queued Tasks list.
To claim a task:
-
Sign into the Digital Workspace.
-
Click on the Queued Tasks view under Tasks.
-
Click on the task to claim and select Claim. The task status will update to
ASSIGNED.
Tasks that have been claimed from a candidate group can also be released. This will remove it from your My Tasks list and put it back in Queued Tasks.
To release a task:
-
Sign into the Digital Workspace.
-
Click on the My Tasks view under Tasks.
-
Click on the task to release and select Release. The task status will update to
CREATED.
Filter tasks
The default task views can be updated by changing the filters. New views can also be created by editing the filters for a view and selecting saving a new one.
The properties for filters are:
| Property | Description |
|---|---|
| Status | The statuses of tasks to display. |
| Assignee | The tasks assigned to which user to display. |
| Process Definition | The process definition to filter by. |
| Task Name | The name of the tasks to display. |
| Priority | The relative priority level of tasks to display. |
| Sort by | The column to sort by, for example Created Date, Status or Priority. |
| Order by | Whether the ordering is ascending or descending. |
| Due Date | The date range for when the tasks are due by. |
| Completed Date | The date range for when the tasks were completed. |
Once you have customized a filter, there are two options:
- Save filter: Selecting this will save the filter over the current view.
- Save filter as: Selecting this will give you the option to provide a name for a new view for your filter and add it under the Tasks section.
You can use the Delete filter option at any time to remove a view.
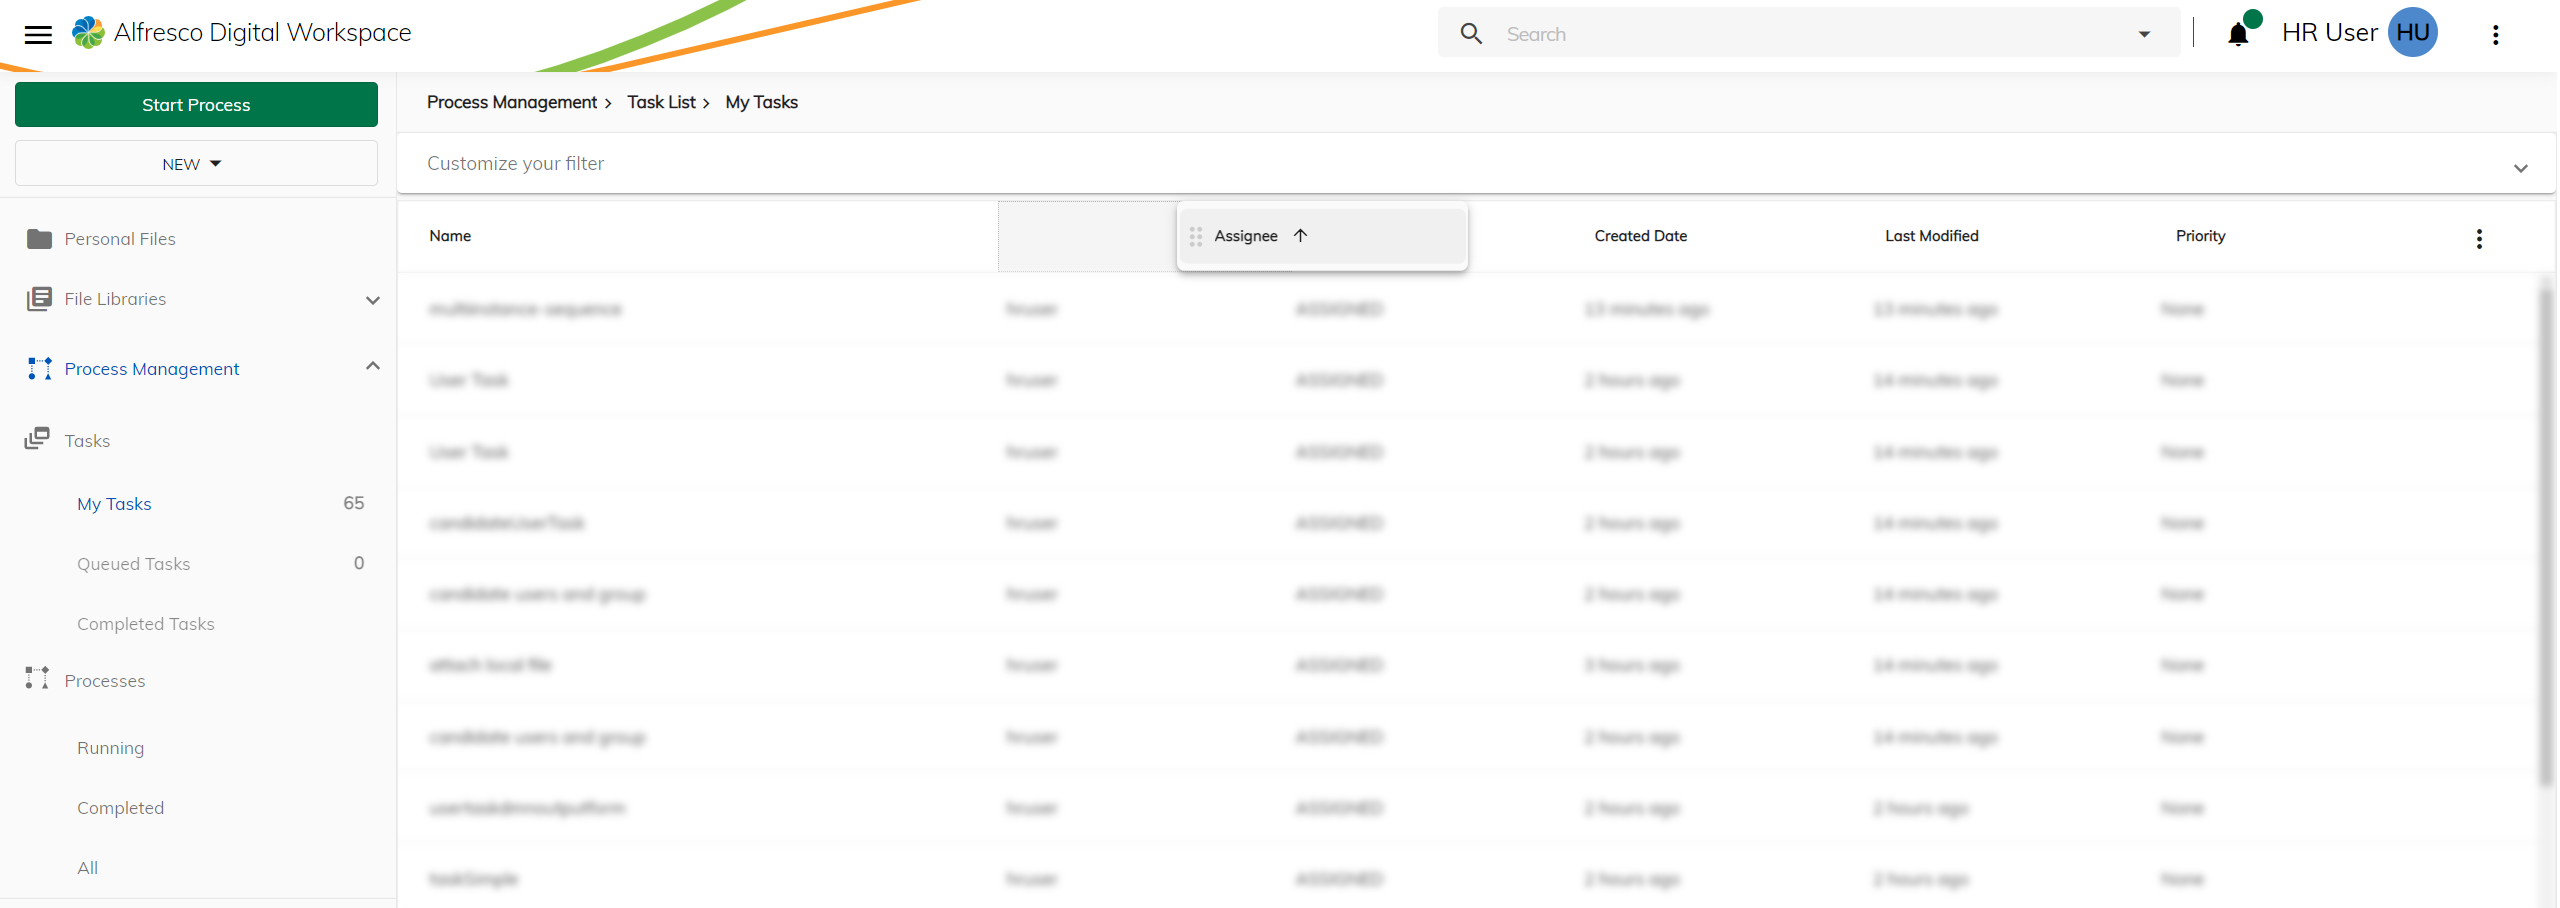
Configure Process and Task lists
You can configure the columns of the Process and Task lists in the Digital Workspace.
The order of the columns can be adjusted.
-
Navigate to Process Management on the left and then select any Process or Task list.
-
Access the six dots on the top right of a column by hovering your mouse over the name of the column.
-
Click and hold the six dots and then move the column on top of another column.
This moves the columns to the left one position and the column you are moving takes the place of the one underneath.
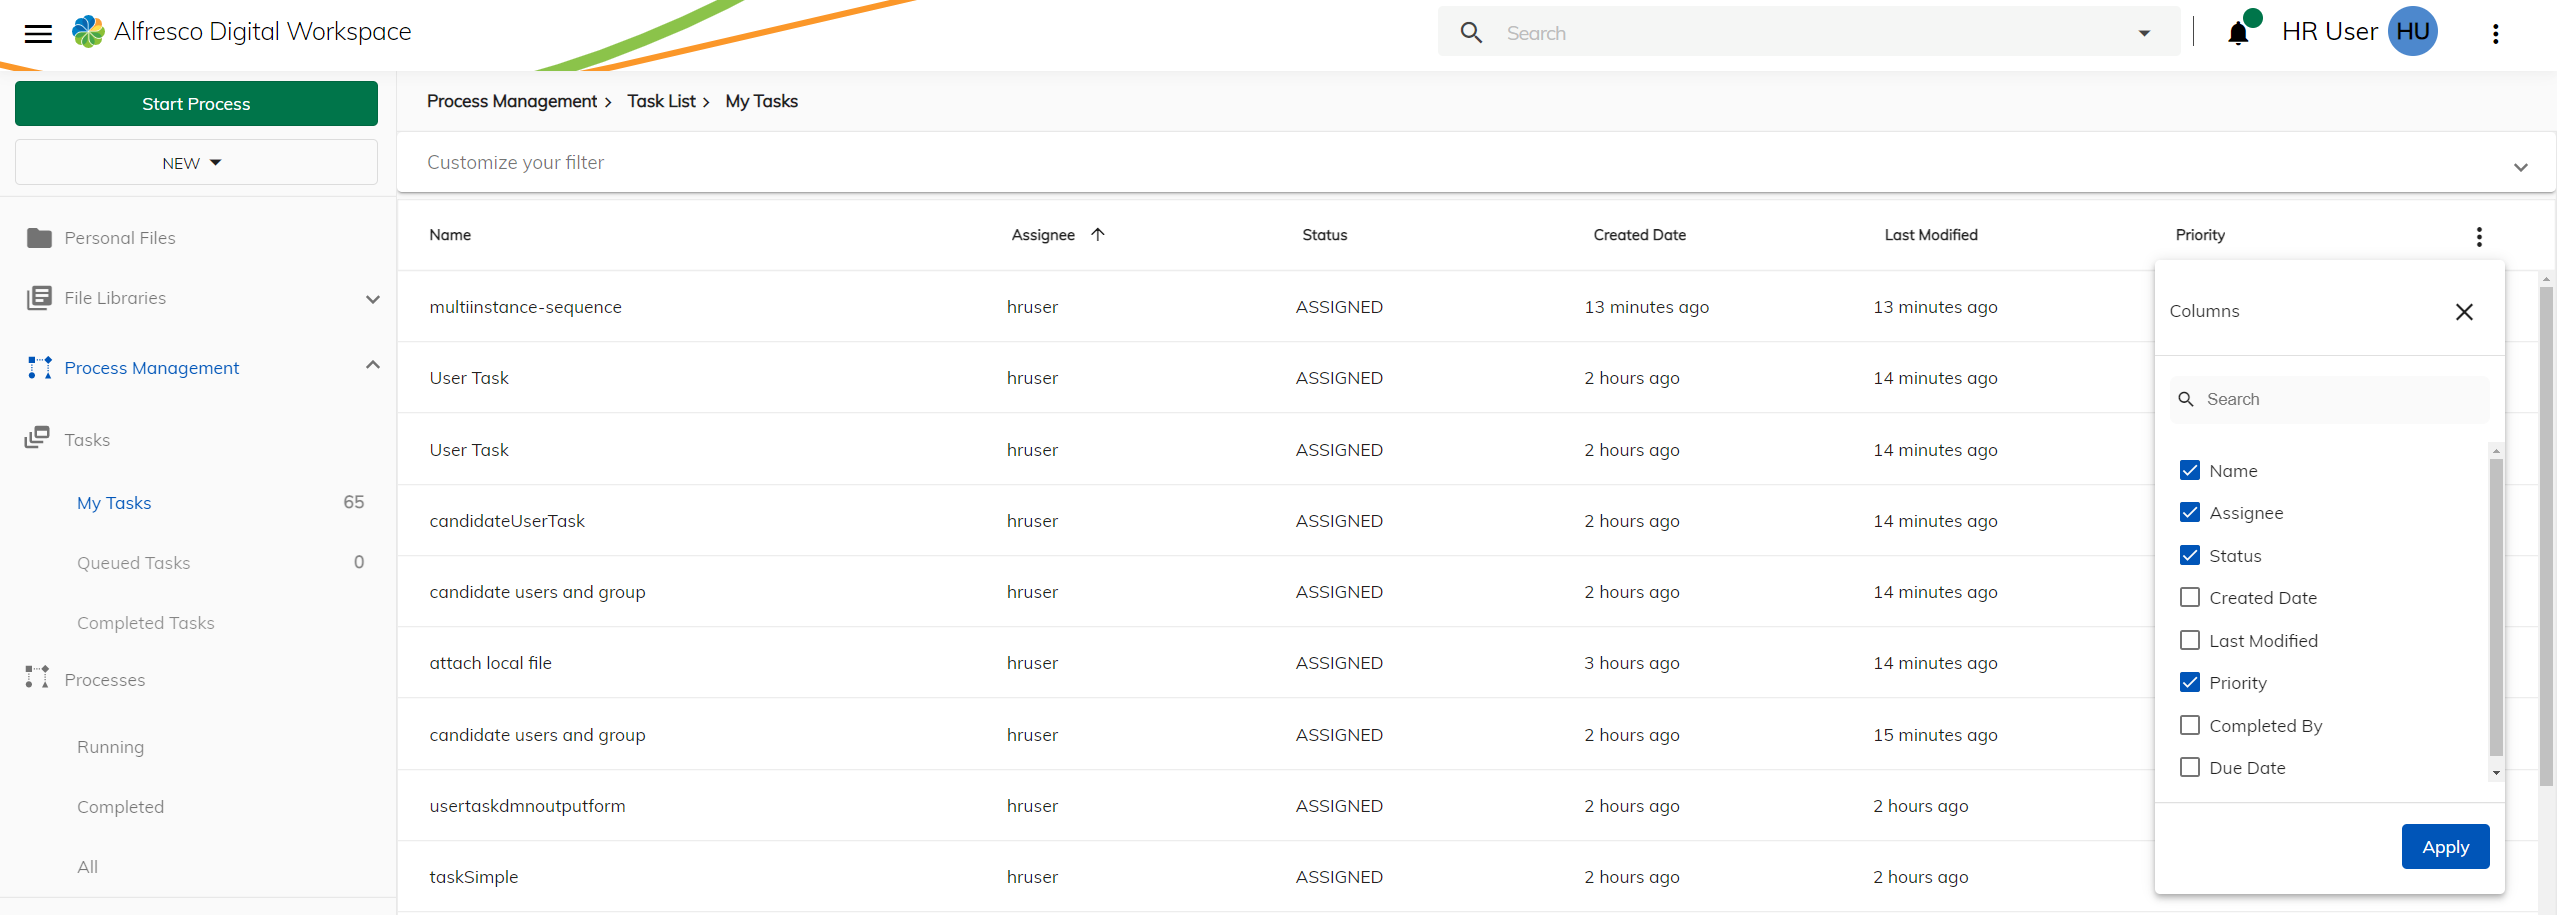
The columns that are visible can be adjusted.
-
Navigate to Process Management on the left and then select any Process or Task list.
-
Click the three dots on the right of the last column.
-
Select which columns you want show and then click Apply.
Column width
You can adjust the width of the columns of the Process Management section. To do this select the edge of the columns and adjust them to the desired width. Once you change one column, all the columns with the same name are also adjusted. If you log out and then log back in again, the new column widths is preserved.
This feature is enabled by default for the Process Management section. If you want to adjust the column widths in the same way for the Personal Files or File Libraries sections of the Digital Workspace, you must turn it on by editing the libs/content-ee/process-services-cloud-extension/assets/process-services-cloud.extension.json file and adding the following:
"column-resizing": [
                    {
                        "id": "column-resizing",
                        "enabled": true
                    }
                ]
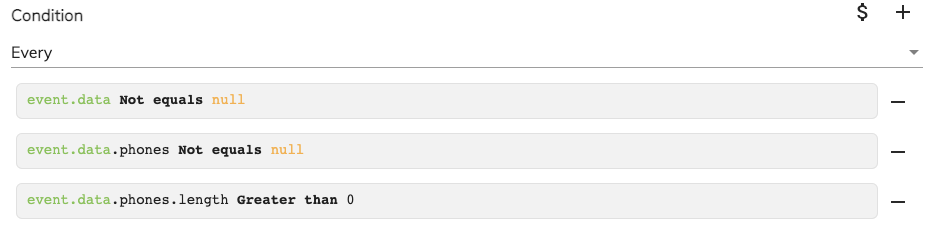
Condition builder
The condition builder is a tool that helps you build a JUEL expression for a condition. The condition is composed of a set of boolean statement(s) that are linked by an operator. This means the condition to be created is a statement evaluated as a boolean value. The following is an example.
-
Click the $ button to switch the condition builder to an expression editor where you can display and edit the JUEL expression.
-
Click the + button to add a new statement editor.
- The available operators are:
- Every: All statements must be true for the condition to be evaluated as true.
- At least one: The condition will be evaluated to be true when one or more of the statements are true.
- None: If all the statements are false, then the condition will be evaluated to be true.
Note: The operator between statements is the same for all the statements.
- Click the - button to remove the statement.
Statement editor
The statement editor manages boolean statements. A boolean statement normally consists of two statements and an operator between them, for example <left-statement> <operator> <right-statement>.
The statement editor reproduces the structure, the following is an example.
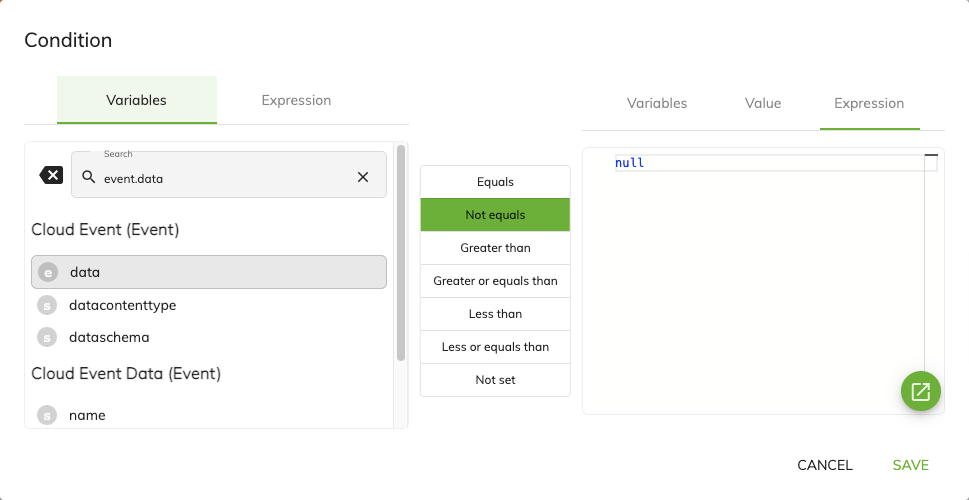
Left statement
The left-statement can be one of the available variables or a JUEL expression. Switching between variable and JUEL expression can be done using the tabs at the top of the left side. The available operators between statements are:
- Equals
- Not equals
- Greater than
- Greater or equals than
- Less than
- Less or equals than
- Not set
Note: The
Not setoperator means that the expression is a single statement expression which means no right-statement is needed.
Right statement
The right-statement can be one of the available variables, a JUEL expression, or a value if the left-statement is a variable value.
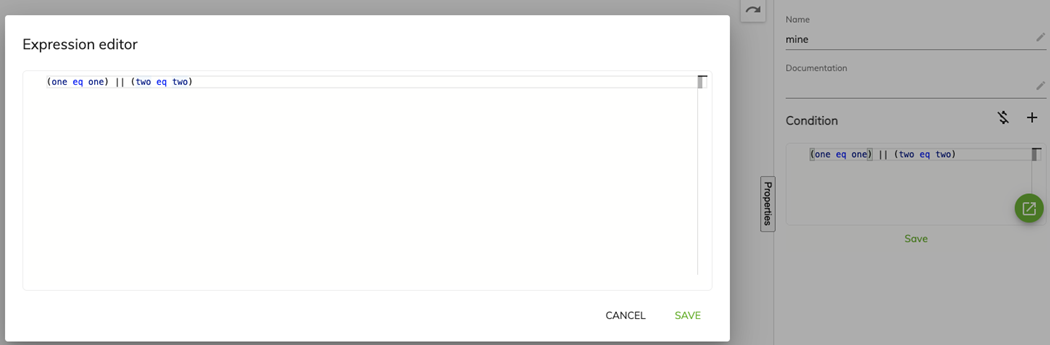
Expression editor
The expression editor is a code editor that provides autocompletion and hints when writing an expression that may contain a JUEL expression. In the expression editor you can test JUEL expressions by first setting the values of variables and then once the expression has been created it can be tested by clicking the Test button. The result is displayed in the gray area above the variables. The expression editor appears in the following places:
- Task mapping dialog: when selecting an expression as a variable value
- Variable dropdown selector: when using the dollar button
- User task assignment dialog
- Called element dialog: when using an expression to resolve the called element
- In the email template dialog: when setting the template for the email used in user tasks
- In the condition builder
- When setting the value of a JSON variable
Click the green button to expand the modal dialog to be full size, the following is an example.
Note: The green button only displays if the expression editor has been configured for it to show.
Autocompletion
The autocompletion function is based on the context of the project and depends on where the expression is going to be used. It lets the user know which variables in that context are available. The autocompletion is displayed as the user types but can also be triggered by using the following keyboard shortcuts:
- In Windows or Linux:
Ctrl + Space - In MacOS:
Ctrl + SpaceorFn + Ctrl + Space
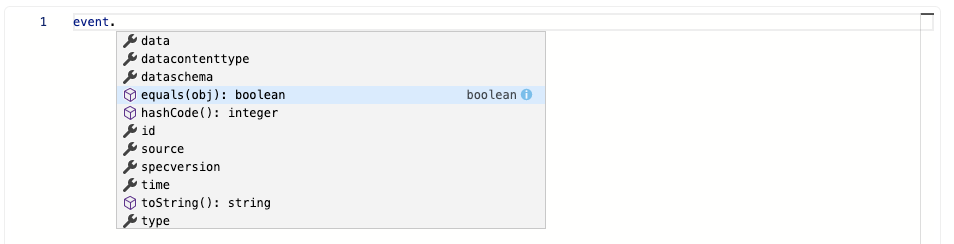
The following is an example.

Autocompletion displays suggestions for operators, in the example empty and eq, and for variables event in the screenshot.
Autocompletion can also show method suggestions and attributes when using the ‘dot’ accessor, in the example below equals and hashcode are methods while data and datacontenttype are attributes of the event object.
Hints
The expression editor provides helpful information when you place the cursor over an element of it. For example, in the image the cursor has been placed over the word event and a hint is displayed that provides a description of the event variable.

Process Analytics
Important: Process Analytics is only applicable for use by Alfresco Activiti Enterprise customers who are self managed. It is not compatible for use with Process Automation.
Process Analytics exposes a set of APIs that can be used to query business metrics about process instances and user tasks. The query language it uses is GraphQL.
Note: You must have the
ACTIVITI_ANALYTICSrole in the Identity Service to be able to execute queries.
Information available for process instances
- Process instance duration in seconds (minimum, maximum, or average)
- Total number of process instances (count)
Data can be filtered by:
- date range
- application name
- process definition name
- process status
Grouped by:
- process definition name
- process instance name
Aggregated by:
- time intervals (minute, hour, day, week, month, quarter, year)
- process status
Information available for user tasks
- User task duration in seconds (minimum, maximum or average)
- Total number of user tasks (count)
Data can be filtered by:
- date range
- application name
- process definition name
- user task status
Grouped by:
- process definition name
- user task name
- user task assignee
Aggregated by:
- time intervals (minute, hour, day, week, month, quarter, year)
- process status
To use the process analytics APIs
Before you use the process analytics APIs you must use the Admin app and change the password of the person who will be using them. When using the process analytics playground use incognito mode for your browser. You access the playground by navigating to https://{domain-name}/analytics/playground/. Use your new credentials to log into the system and you will see a similar screen to below.
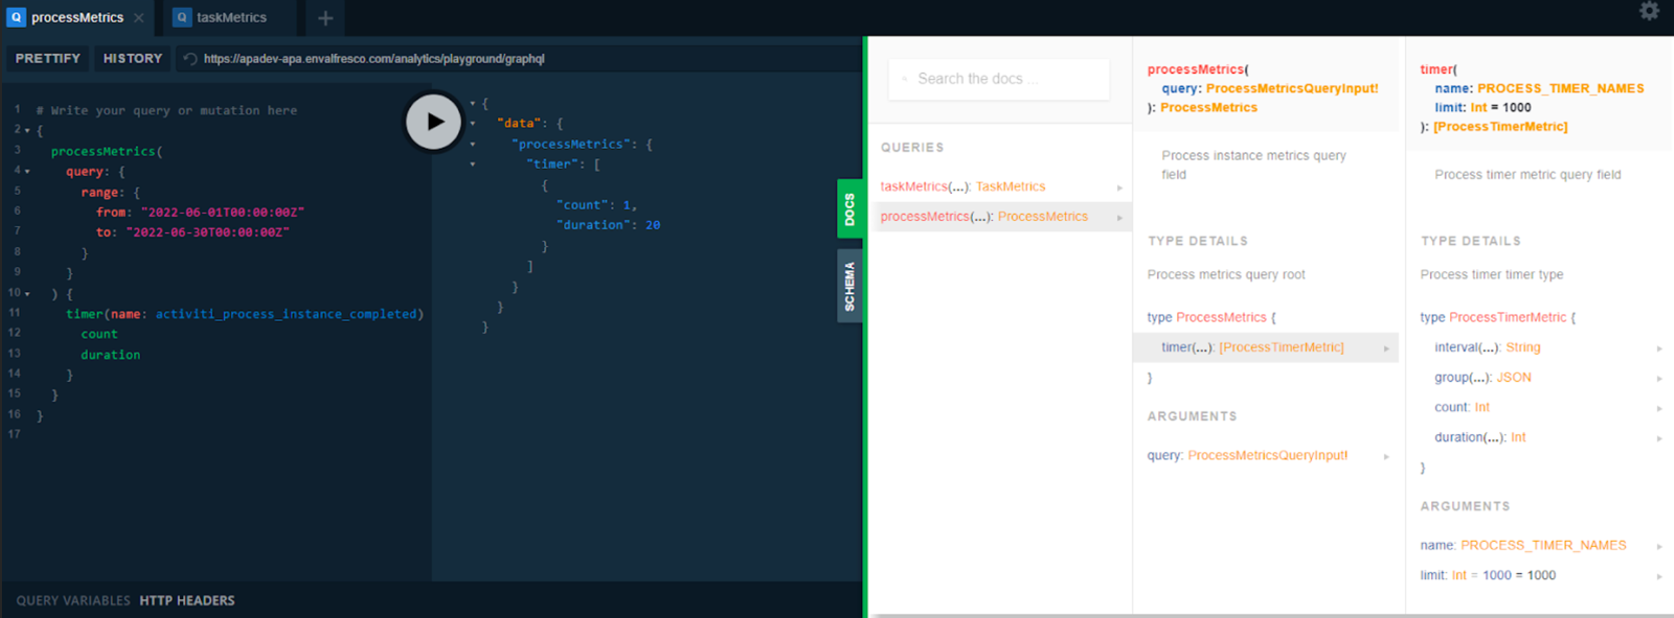
There are two tabs on the right side of the Playground: Docs and Schema. You can use them to learn about the structure of the APIs.
Example queries
Here are some examples of GraphQL queries that can be used in the Playground.
Example 1: Number of user tasks completed in 2022 aggregated by month
{
  taskMetrics(
    query: {
      range: {
        from: "2022-01-01T00:00:00Z"
        to: "2022-12-31T00:00:00Z"
      }
    }
  )
  {
    timer(name: activiti_user_task_completed) {
      count
      interval(by: task_completed_date, period: month, format: "yyyy-mm")
    }
  }
}
Example 2: Average process duration of the processes completed in June 2022 aggregated by day and grouped by process definition name
{
  processMetrics(
    query: {
      range: {
        from: "2022-06-01T00:00:00Z"
        to: "2022-06-30T00:00:00Z"
      }
    }
  )
  {
    timer(name: activiti_process_instance_completed) {
      duration (stat: avg)
      interval(by: process_completed_date, period: day, format: "yyyy-mm-dd")
      group (by: process_definition_name)
    }
  }
}